Attention: Here be dragons
This is the latest
(unstable) version of this documentation, which may document features
not available in or compatible with released stable versions of Godot.
Checking the stable version of the documentation...
部署到 Android
設定
多數獨立式頭戴式裝置(HMD)運行於 Android,OpenXR 支援正逐步進入這些平台。
在開始本頁有關 OpenXR 的專屬說明前,請先完成一般 Android 匯出相關系統設定,包括:
安裝 OpenJDK 17
安裝 Android Studio
在 Godot 中設定 Android SDK 的位置
詳情請參閱 為 Android 匯出,完成上述步驟後請回到本頁繼續。
警告
雖然 Mobile Vulkan 算繪器針對行動裝置做了多項優化,但目前尚有部分問題待解決。建議暫時針對 Android XR 裝置使用相容性算繪器(OpenGL)。
Gradle Android 建置
備註
OpenXR 規範起初未正式支援 Android 平台,導致各家廠商自行實作專屬載入器以讓 OpenXR 可於其頭顯運作。長期來看,預期所有廠商都會改用官方 OpenXR 載入器,但目前仍需將這些載入器加入專案中。
若要將廠商專屬的 OpenXR 載入器加入專案,必須設定 Gradle Android 建置。
在 專案 選單中選擇 安裝 Android 建置範本...:
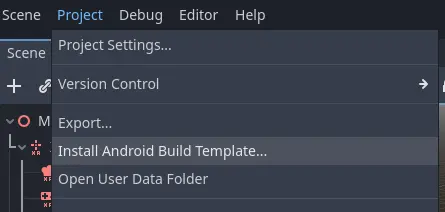
這會在你的專案資料夾內建立一個名為 android 的資料夾,裡面包含 Android 所需的所有執行檔案。你可以自訂這份安裝內容。Godot 編輯器不會顯示這個資料夾,但可用檔案總管找到。
你可以於 適用於 Android 的 Gradle 建置 了解更多有關 Gradle 建置的資訊。
安裝廠商外掛
The vendors plugin can be downloaded from the Asset Store, search for "OpenXR vendors".
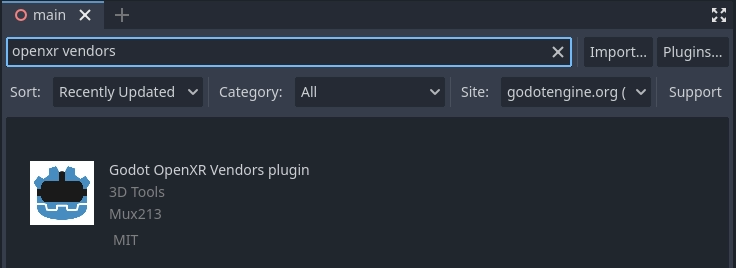
安裝完成後,檔案會位於專案的 addons 資料夾。或者,你也可以手動安裝 vendors 外掛:自 此發布頁 下載。接著將壓縮檔中的 assets/addons/godotopenxrvendors 資料夾複製到你專案的 addons 資料夾中。
你可以在 這裡 找到廠商外掛的原始碼倉庫。
備註
From Godot 4.6 onwards, the vendor plugin is now an optional but recommended plugin. Godot can export directly to most Android-compatible devices. This can be useful for demonstration and tutorial projects where a single APK can be deployed to multiple devices. The vendor plugin unlocks vendor specific implementations and settings, and may be required to release on app stores.
建立匯出預設
每個裝置都需建立各自的匯出預設,因為每台裝置都需要納入對應的載入器。
Open Project and select Export... Click on Add.. and select Android. Next change the name of the export preset for the device you're setting this up for, say Meta Quest. And enable Use Gradle Build. Next change the XR Mode to OpenXR. If you want to use one-click deploy (described below), ensure that Runnable is enabled.
If you've installed the vendor plugin you will also find entries for the different headsets under XR Features. Select the entry for your headset, if you see one. Otherwise, enable the Khronos plugin.
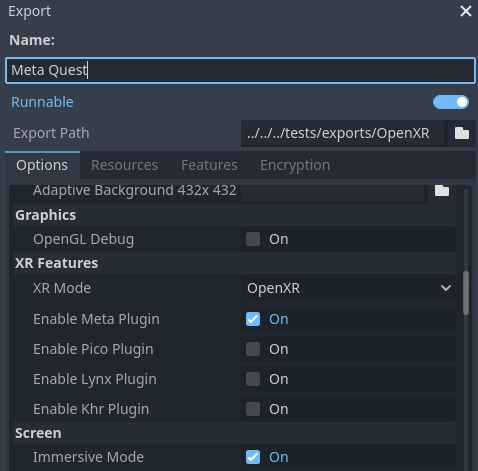
捲動到清單底部可以看到其他 XR 功能區段,目前提供 Meta XR Features、Pico XR Features、Magicleap XR Features 與 HTC 的 Khronos XR Features。若要使用這些功能,請選擇相應的設定。
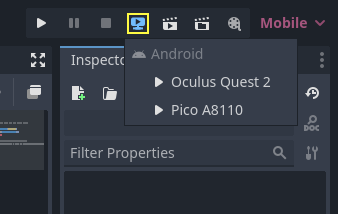
從 Godot 編輯器在裝置上執行
若你已依前述設定好匯出選項,並將頭顯正確連接至電腦且設備已被正確辨識,即可從 Godot 編輯器直接利用 單鍵部署 啟動:
某些平台或裝置可能需額外步驟才能被正確識別,請參考各廠商的開發者文件。
例如,Meta Quest 2 需先在頭顯上啟用開發者模式;若使用 Windows,還要安裝專用的 ADB 驅動程式。詳情請參考 Meta Quest 官方開發者文件。
若遇到一鍵部署相關問題,請參考 故障排除。