Attention: Here be dragons
This is the latest
(unstable) version of this documentation, which may document features
not available in or compatible with released stable versions of Godot.
Checking the stable version of the documentation...
播放影片
Godot 支援影片播放,可使用 VideoStreamPlayer 節點。
支援的播放格式
核心僅支援 Ogg Theora (不要與 Ogg Vorbis 音訊混淆) ,可選配 Ogg Vorbis 音軌。其他格式則可由擴充功能提供支援。
Godot 核心無法支援 H.264 和 H.265,因為它們都被軟體專利所限。AV1 不需要授權,但 CPU 解碼仍然很慢,也不是所有 GPU 都已支援硬體解碼。
Godot 3.x 核心中支援 WebM,但是會在 4.0 中移除支援,因為 bug 很多難以維護。因此**不推薦使用 WebM**。
備註
你可能會看到副檔名為 .ogg 或 .ogx 的影片,這是 Ogg 容器中資料的通用副檔名。
將這些檔副檔名修改為 .ogv``*可能*可以讓影片在 Godot 中匯入。不過,並不是所有 ``.ogg 或 .ogx 副檔名的檔都是影片——有些可能只包含音訊。
設定 VideoStreamPlayer
請使用「建立新節點」對話框新增一個 VideoStreamPlayer 節點。
在場景樹中選取 VideoStreamPlayer 節點,前往屬性檢視器,於 Stream 屬性載入
.ogv檔案。如果你還沒有把你的影片轉為 Ogg Theora 格式,請跳轉到 推薦 Theora 編碼設定。
如果你希望在場景載入時立即播放影片,請在屬性檢視器中勾選 Autoplay。否則,請保持 Autoplay 關閉,並在需要時在腳本中呼叫 VideoPlayer 節點的
play()開始播放。
處理大小變化及不同的縱橫比
By default, the VideoStreamPlayer will automatically be resized to match the video's resolution. You can make it follow usual Control sizing by enabling Expand on the VideoStreamPlayer node.
要調整 VideoPlayer 節點的大小隨視窗大小改變的方式,請通過 2D 編輯器視口頂部的**佈局**按鈕調整錨點。不過,這種設定可能不足以處理所有可能的情況,例如全屏播放影片但不造成形變(需要在邊界處留白)。要進行精確的控制,你可以使用專為處理這種情況設計的 AspectRatioContainer 節點:
新增一個 AspectRatioContainer 節點。請確保它不是任何其他容器節點的子節點。選中該 AspectRatioContainer 節點,然後在 2D 編輯器的頂部將 佈局 設定為 整個矩形 。將 AspectRatioContainer 節點的 Ratio(比例) 設定為與你的影片的長寬比配對的比例。你可以在屬性檢視器裡直接輸入數學公式。請記住要將其中的一個運算元寫成浮點形式,否則會得到整數的商。
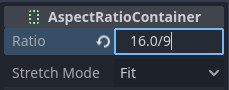
求值會得到(大約)1.777778
配置好 AspectRatioContainer 之後,請將你的 VideoPlayer 節點調整為該 AspectRatioContainer 節點的子節點。請確保禁用了該 VideoPlayer 的 Expand。你的影片現在應該就會自動適應到全屏的大小,不產生變形。
也參考
更多在專案中支援不同的長寬比的技巧,請參閱 多重解析度。
在 3D 表面上顯示影片
使用 VideoPlayer 節點作為 SubViewport 節點的子節點,就可以在 3D 表面上顯示任何 2D 節點。例如,可以用於顯示動態的廣告板,影格動畫可能花費太多的記憶體。
填寫下列設定:
建立一個 SubViewport 節點。 將其設定為與你的影片大小相配對的像素大小。
建立一個 VideoPlayer 節點*作為該 Viewport 節點的子節點*,並為其指定一個影片的路徑。請確保禁用了 Expand,需要時啟用 Autoplay。
建立一個 MeshInstance 節點,將其 Mesh 屬性設為 PlaneMesh 或 QuadMesh。將該網格的大小調整到與影片的長寬比一致(否則看上去就會變形)。
在 GeometryInstance 部分的 Material Override 屬性中新建一個 SpatialMaterial 資源。
在該 SpatialMaterial(底部)的 Resource 部分啟用 Local To Scene。這是在 Albedo Texture 屬性中使用 ViewportTexture 所*必須的*。
在該 SpatialMaterial 中,將 Albedo > Texture 屬性設定為**新建 ViewportTexture**。點擊編輯這個新的資源,在 Viewport Path 屬性中指定指向 Viewport 節點的路徑。
在該 SpatialMaterial 中啟用 Albedo Tex Force sRGB,防止顏色變化。
如果廣告板應該自發光,請啟用 Flags > Unshaded 提升算繪性能。
請參閱 使用視口 以及 3D 中的 GUI 範例,以了解更多關於此設定的資訊。
循環播放影片
如需讓影片循環播放,可啟用 Loop(循環) 屬性。啟用後,影片播放到結尾時會自動無縫重新開始播放。
請注意,若將專案設定中的 Video Delay Compensation(影片延遲補償) 設為非 0 值,可能會導致循環播放時出現不連續(卡頓),因為每次循環時音訊與影像會重新同步,偶爾會漏掉影格。建議將專案設定的 Video Delay Compensation 設為 0,以避免掉幀問題。
影片解碼條件及推薦解析度
由於 GPU 在解碼 Theora 影片時沒有硬體加速,所以影片解碼是在 CPU 上執行的。現代的桌面 CPU 可以以 1440p @ 60 FPS 或更高的速度解碼 Ogg Theora 格式的影片,但低端移動 CPU 處理高解析度影片可能會比較吃力。
為了確保影片在各種硬體上都能夠順利解碼:
為桌面平臺開發遊戲時,建議最多編碼為 1080p(最好是 30 FPS)。大多數人還在使用 1080p 或者更低解析度的顯示器,所以編碼為更高解析度的影片可能不值那些增大的檔大小和 CPU 需求。
為移動和 Web 平臺開發遊戲時,建議最多編碼為 720p(最好是 30 FPS 或更低)。移動裝置上 720p 和 1080p 的影片通常很難看出區別。
限制
Godot 目前的影片播放實作有以下限制:
不支援從 URL 播放影片流。
僅支援單聲道與立體聲輸出。具有 4、5.1、7.1 聲道的影片可播放,但會被向下混音為立體聲。
推薦 Theora 編碼設定
建議是(在大多數情況下)**避免依賴內建的 Ogg Theora 匯出器**。你可能想要優先使用外部程式編碼影片的原因有 2 個:
Blender 等程式可以算繪 Ogg Theora。然而,預設的品質預設就如今的標準而言通常是非常低的。你可能可以在軟體裡提高品質選項,但輸出的品質可能仍然不理想(提升了檔大小)。這通常意味著那個軟體只支援按照固定位元速率(CBR)去進行編碼,不支援變數位元速率(VBR)。大多數場合應該都優先使用 VBR 編碼,因為在相同的檔大小下能夠提供更好的品質。
有些其他的程式根本無法算繪 Ogg Theora。
在這種情況下,你可以**將影片使用高品質格式算繪作為仲介**(例如高位元速率 H.264 影片),然後再重新編碼成 Ogg Theora。理想情況下,你應該使用無損或者未壓縮格式作為仲介格式,最大化輸出 Ogg Theora 影片的品質,不過這樣做會需要大量的磁碟空間。
FFmpeg (命令列) 是這方面很常用的開源工具。FFmpeg 的學習曲線較陡,但功能強大。
以下是一些 FFmpeg 指令範例,用於將 MP4 影片轉換為 Ogg Theora。由於 FFmpeg 支援許多輸入格式,您應該能夠使用以下指令搭配幾乎任何輸入影片格式 (AVI、MOV、WebM 等)。
備註
請確保你的 FFmpeg 副本是啟用 libtheora 和 libvorbis 編譯的。檢查方法是不帶任何參數執行 ffmpeg,然後查看命令輸出中的 configuration: 一行。
警告
目前官方的 FFmpeg 版本在 Ogg/Theora 多工器上有一些問題。強烈建議使用最新的靜態每日建置,或自行從 master 分支編譯以取得最新修正。
On Windows, make sure to use 32-bit builds of FFmpeg. Windows 64-bit builds have known issues with Theora encoding, which result in artifacts in the output file.
平衡品質與檔大小
影片品質 等級(-q:v)必須在 1 和 10 之間。將品質設為 6 是在品質和檔大小之間的一個不錯的妥協。如果要編碼較高的解析度(例如 1440p 或者 4K),你可能想要把 -q:v 降為 5 ,把檔大小控制在合理的範圍內。因為 1440p 和 4K 影片的像素密度更高,相較於低解析度的影片,較低的品質預設看上去的效果是一樣甚至更好的。
** 音訊品質**等級(-q:a)必須在 1 和 10 之間。將品質設為 6 是在品質和檔大小之間的一個不錯的妥協。與影片品質不同,提升音訊品質並不會顯著增加輸出檔的大小。因此,如果你想要盡可能清晰的音訊,可以將其設為 9,達到*感知上無損*的音訊。在你的輸入檔使用的已經是無損音訊壓縮時尤其有用。Ogg Vorbis 音訊品質預設及其對應的變數位元速率表見`這個頁面 <https://wiki.hydrogenaud.io/index.php?title=Recommended_Ogg_Vorbis#Recommended_Encoder_Settings>`__。
GOP (Group of Pictures) 大小 (-g:v) 是關鍵影格之間的最大間隔。提高此值通常能在幾乎不影響品質的情況下提升壓縮效率。預設值 (12) 對多數內容來說過低,建議先提高 GOP 再考慮降低視訊品質。不過隨著 GOP 變大,壓縮效益會逐漸遞減。通常 64 到 512 之間能得到較佳壓縮。
備註
較大的 GOP 會增加最長搜尋時間,且在超過自 64 起的 2 的次方邊界時會出現突增。以 GOP 65 為例,最長搜尋時間可能接近 GOP 64 的兩倍(視解碼速度而定)。
FFmpeg:轉換時保持原始影片解析度
以下命令會在保持原始解析度的前提下對影片進行轉換。影片和音訊的位元速率會被設為可變,在最大化品質的同時在不需要高位元速率影片/音訊的時候節省空間(例如靜態場景)。
ffmpeg -i input.mp4 -q:v 6 -q:a 6 -g:v 64 output.ogv
FFmpeg:調整影片大小並轉換
以下命令會在保持現有長寬比的前提下將影片調整到 720 像素高(720p)。如果原始檔解析度是大於 720p 的,就能夠顯著降低檔大小:
ffmpeg -i input.mp4 -vf "scale=-1:720" -q:v 6 -q:a 6 -g:v 64 output.ogv
去背(Chroma Key)影片
Chroma Key(去背),也就是常見的「綠幕」或「藍幕」效果,可以將畫面中指定顏色去除,並用其他背景取代。這種特效常用於影片製作中,讓不同元素能夠無縫合成。
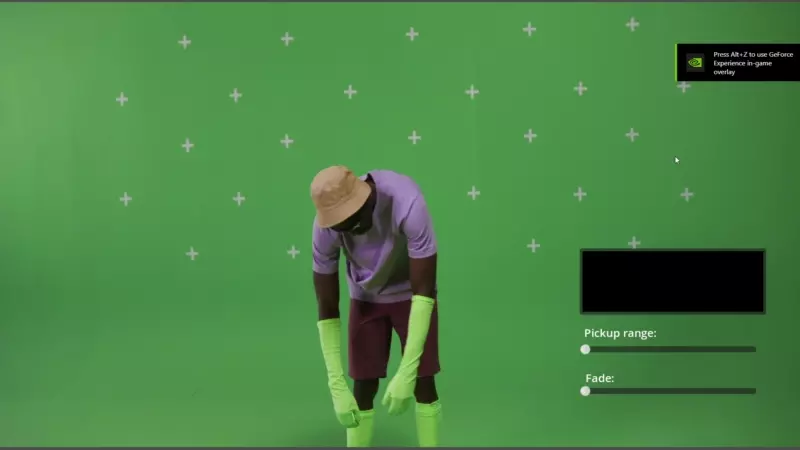
我們將透過自訂 GDScript 著色器(Shader)並搭配 VideoStreamPlayer 節點來實現去背效果,將影片內容顯示出來。
場景設定
請確認場景中包含一個 VideoStreamPlayer 節點(用於播放影片),以及一個 Control 節點(用來放置控制去背效果的 UI 元件)。

自訂著色器編寫
欲實作去背(Chroma Key)效果,請依下列步驟操作:
在場景中選取 VideoStreamPlayer 節點,於其屬性的 CanvasItem > Material 下,建立一個新的著色器(Shader),命名為 "ChromaKeyShader.gdshader"
在 "ChromaKeyShader.gdshader" 檔案中,請輸入如下自訂著色器程式碼:
shader_type canvas_item;

// Uniform variables for chroma key effect
uniform vec3 chroma_key_color : source_color = vec3(0.0, 1.0, 0.0);
uniform float pickup_range : hint_range(0.0, 1.0) = 0.1;
uniform float fade_amount : hint_range(0.0, 1.0) = 0.1;

void fragment() {
    // Get the color from the texture at the given UV coordinates
    vec4 color = texture(TEXTURE, UV);

    // Calculate the distance between the current color and the chroma key color
    float distance = length(color.rgb - chroma_key_color);

    // If the distance is within the pickup range, discard the pixel
    // the lesser the distance more likely the colors are
    if (distance <= pickup_range) {
        discard;
    }

    // Calculate the fade factor based on the pickup range and fade amount
    float fade_factor = smoothstep(pickup_range, pickup_range + fade_amount, distance);

    // Set the output color with the original RGB values and the calculated fade factor
    COLOR = vec4(color.rgb, fade_factor);
}
這個著色器會計算畫素與去背顏色的距離,將與指定色值足夠接近的畫素去除,達到去除目標顏色的效果。而距離稍遠的畫素則會根據 fade_factor 產生漸層透明,使邊緣過渡更自然。如此即可達到預期的去背(Chroma Key)效果,讓背景看起來像是被其他圖片或影片取代。
上述程式碼為 Chroma Key 著色器的簡單範例,你可以依照實際需求進一步調整與自訂。
UI 控制元件
為了讓使用者能即時調整去背效果,我們在 Control 節點中建立了滑桿(Slider)控制元件。Control 節點的程式腳本包含如下功能:
 extends Control

 func _on_color_picker_button_color_changed(color):
     # Update the "chroma_key_color" shader parameter of the VideoStreamPlayer's material.
     $VideoStreamPlayer.material.set("shader_parameter/chroma_key_color", color)

 func _on_h_slider_value_changed(value):
     # Update the "pickup_range" shader parameter of the VideoStreamPlayer's material.
     $VideoStreamPlayer.material.set("shader_parameter/pickup_range", value)

 func _on_h_slider_2_value_changed(value):
     # Update the "fade_amount" shader parameter of the VideoStreamPlayer's material.
     $VideoStreamPlayer.material.set("shader_parameter/fade_amount", value)

func _on_video_stream_player_finished():
     # Restart the video playback when it's finished.
     $VideoStreamPlayer.play()
using Godot;

public partial class MyControl : Control
{
    private VideoStreamPlayer _videoStreamPlayer;

    public override void _Ready()
    {
        _videoStreamPlayer = GetNode<VideoStreamPlayer>("VideoStreamPlayer");
    }

    private void OnColorPickerButtonColorChanged(Color color)
    {
        // Update the "chroma_key_color" shader parameter of the VideoStreamPlayer's material.
        _videoStreamPlayer.Material.Set("shader_parameter/chroma_key_color", color);
    }

    private void OnHSliderValueChanged(double value)
    {
        // Update the "pickup_range" shader parameter of the VideoStreamPlayer's material.
        _videoStreamPlayer.Material.Set("shader_parameter/pickup_range", value);
    }

    private void OnHSlider2ValueChanged(double value)
    {
        // Update the "fade_amount" shader parameter of the VideoStreamPlayer's material.
        _videoStreamPlayer.Material.Set("shader_parameter/fade_amount", value);
    }

    private void OnVideoStreamPlayerFinished()
    {
        // Restart the video playback when it's finished.
        _videoStreamPlayer.Play();
    }
}
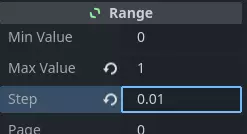
請確保滑桿的數值範圍設置合理。我們建議的設定如下:
訊號處理
請將 UI 元件的對應訊號(Signal)連接到 Control 節點的腳本,以便控制去背效果。這些訊號處理函式會根據使用者操作,即時更新著色器的 uniform 變數。
儲存並執行場景後,即可看到去背效果!透過 UI 控制元件,現在你可以即時調整去背顏色、容差範圍與漸層強度,讓影片內容達到理想的去背功能。