Attention: Here be dragons
This is the latest
(unstable) version of this documentation, which may document features
not available in or compatible with released stable versions of Godot.
Checking the stable version of the documentation...
使用 SceneTree
前言
在前面的教學中,一切都是圍繞「節點」這個概念。場景是由節點組成的集合,當它們進入 場景樹 時就會變為啟用狀態。
MainLoop
Godot 的內部運作方式如下:一開始只有 OS 這個類別的唯一實例在執行,之後才會載入所有驅動程式、伺服器、腳本語言、場景系統等。
當初始化完成後,OS 需要提供一個 MainLoop 來執行。這部分都是屬於內部細節(如果有興趣了解這些內部運作,可以參考原始碼中的 main/main.cpp 檔案)。
使用者的程式或遊戲,會從 MainLoop 開始執行。這個類別有幾個方法,分別用於初始化、閒置(影格同步回呼)、固定(物理同步回呼)與輸入。這些屬於較低階的操作,在 Godot 裡開發遊戲時,通常不需要自己實作 MainLoop。
SceneTree
可以這麼理解 Godot 的運作:它是建立在低階中介層之上的高階遊戲引擎。
場景系統就是遊戲引擎本身,而 OS 與伺服器則屬於低階 API。
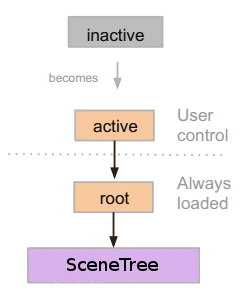
場景系統會提供自己的主迴圈給 OS,也就是 SceneTree。這個類別會在執行場景時自動實體化並設定,無需額外處理。
必須注意這個類別的存在,因為它有幾個重要用途:
它包含了根 Viewport,當場景第一次開啟時會被加為這個根 Viewport 的子節點,成為 場景樹 的一部分(詳見下文)。
它包含有關群組的資訊,並可用來呼叫群組內所有節點或取得其清單。
它也包含一些全域狀態的功能,例如設定暫停模式或結束處理程序。
當節點成為場景樹的一部分時,可以透過呼叫 Node.get_tree() 來取得 SceneTree 單例。
根 Viewport
根 Viewport 永遠位於場景最頂層。你可以在節點中用兩種方式取得它:
get_tree().root # Access via scene main loop.
get_node("/root") # Access via absolute path.
GetTree().Root // Access via scene main loop.
GetNode("/root"); // Access via absolute path.
這個節點就是主 Viewport。所有作為 Viewport 子節點的物件都會預設繪製於其內,因此所有節點的最頂層一定是這種類型,否則將無法顯示。
雖然可以在場景中建立其他 Viewport(例如分割畫面等效果),但這個根 Viewport 永遠不是由使用者建立,而是在 SceneTree 內自動產生。
場景樹
當節點直接或間接連接到根 Viewport 時,就成為 場景樹 的一部分。
這表示,如同前面教學所述,該節點會收到 _enter_tree() 和 _ready() 回呼(還有 _exit_tree())。
當節點進入 場景樹 後,就會變成啟用狀態。它們可以存取所有處理流程所需的內容,包含取得輸入、顯示 2D/3D 畫面、接收和發送通知、播放音效等。當節點從 場景樹 移除時,這些能力也會隨之失效。
樹狀順序
Godot 中大多數的節點操作,例如 2D 繪製、處理流程或接收通知,都是依照 樹狀順序 來進行,也就是在編輯器中由上而下的順序(又稱為前序遍歷):
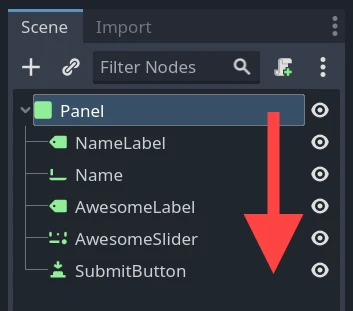
舉例來說,場景中最上層的節點會最先呼叫其 _process() 方法,然後依序呼叫下一個節點的 _process(),以此類推。
有個重要的例外是 _ready() 方法:每個父節點的 _ready() 只會在所有子節點的 _ready() 都被呼叫後才會執行,確保父節點可以安全存取所有子節點。這稱為後序遍歷。在上方的例子中,會先通知 NameLabel`(但僅在它的子節點都已通知後),然後依序是 `Name 等,Panel 會最後收到通知。
你也可以透過節點的 process_priority 屬性來覆寫這個執行順序。數值較小的節點會優先被呼叫。例如,優先序為「0、1、2、3」的節點會依序(由左到右)被呼叫。
藉由進入 場景樹 來「啟用」
場景可以從硬碟載入,也可以透過腳本建立。
該場景的根節點(僅有一個,記得嗎?)會被加到 SceneTree 的「root」 Viewport 或其後代任一節點下。
新加入場景的每個節點都會依照由上到下(前序遍歷)的順序收到「enter_tree」通知(GDScript 中為
_enter_tree()回呼)。每個節點會在其所有子節點收到「ready」通知後,再收到自己的「ready」通知(GDScript 中為
_ready()回呼),這是為了方便管理(也就是後序遍歷)。當一個場景(或其部分)被移除時,節點會依照自下而上的順序收到「exit scene」通知(GDScript 中為
_exit_tree()回呼),順序與加入時正好相反。
切換目前場景
當場景載入後,你可能希望切換成另一個場景。可以使用 SceneTree.change_scene_to_file() 函式來達成:
func _my_level_was_completed():
    get_tree().change_scene_to_file("res://levels/level2.tscn")
public void _MyLevelWasCompleted()
{
    GetTree().ChangeSceneToFile("res://levels/level2.tscn");
}
除了直接用檔案路徑,也可以傳入已載入的 PackedScene 資源,使用對應的 SceneTree.change_scene_to_packed(PackedScene scene) 函式:
var next_scene = preload("res://levels/level2.tscn")

func _my_level_was_completed():
    get_tree().change_scene_to_packed(next_scene)
public void _MyLevelWasCompleted()
{
    var nextScene = (PackedScene)ResourceLoader.Load("res://levels/level2.tscn");
    GetTree().ChangeSceneToPacked(nextScene);
}
這些方法讓你能快速切換場景,但缺點是遊戲會在新場景載入並啟動前暫停。當你的遊戲開發到一定階段,建議製作一個合適的載入畫面,配上進度條、動畫指示器,或用多執行緒(背景)載入。這些需要手動實作,相關做法請參考 單例(自動載入) 與 後臺載入。