Attention: Here be dragons
This is the latest
(unstable) version of this documentation, which may document features
not available in or compatible with released stable versions of Godot.
Checking the stable version of the documentation...
著色語言
前言
Godot 使用類似 GLSL ES 3.0 的著色語言。大多數資料型別與函式皆已支援,剩餘未支援的型別和函式也有可能隨時間加入。
如果你已熟悉 GLSL,可以參考 Godot 著色器遷移指南,協助你從標準 GLSL 轉換到 Godot 的著色語言。
資料型別
支援大多數 GLSL ES 3.0 資料型別:
型別 |
說明 |
|---|---|
void |
Void 資料型別,僅用於不回傳任何值的函式。 |
bool |
布林資料型別,只能包含 |
bvec2 |
布林值的雙分量向量。 |
bvec3 |
布林值的三分量向量。 |
bvec4 |
布林值的四分量向量。 |
int |
32 位元有符號標量整數。 |
ivec2 |
有符號整數的雙分量向量。 |
ivec3 |
有符號整數的三分量向量。 |
ivec4 |
有符號整數的四分量向量。 |
uint |
無符號標量整數,不能包含負數。 |
uvec2 |
無符號整數的雙分量向量。 |
uvec3 |
無符號整數的三分量向量。 |
uvec4 |
無符號整數的四分量向量。 |
float |
32 位元浮點標量。 |
vec2 |
浮點值的雙分量向量。 |
vec3 |
浮點值的三分量向量。 |
vec4 |
浮點值的四分量向量。 |
mat2 |
2x2 矩陣,以 column-major(欄主序)排列。 |
mat3 |
3x3 矩陣,以 column-major(欄主序)排列。 |
mat4 |
4x4 矩陣,以 column-major(欄主序)排列。 |
sampler2D |
用於綁定 2D 紋理的取樣器型別,以 float 讀取。 |
isampler2D |
用於綁定 2D 紋理的取樣器型別,以有符號整數讀取。 |
usampler2D |
用於綁定 2D 紋理的取樣器型別,以無符號整數讀取。 |
sampler2DArray |
用於綁定 2D 紋理陣列的取樣器型別,以 float 讀取。 |
isampler2DArray |
用於綁定 2D 紋理陣列的取樣器型別,以有符號整數讀取。 |
usampler2DArray |
用於綁定 2D 紋理陣列的取樣器型別,以無符號整數讀取。 |
sampler3D |
用於綁定 3D 紋理的取樣器型別,以 float 讀取。 |
isampler3D |
用於綁定 3D 紋理的取樣器型別,以有符號整數讀取。 |
usampler3D |
用於綁定 3D 紋理的取樣器型別,以無符號整數讀取。 |
samplerCube |
用於綁定立方體貼圖的取樣器型別,以 float 讀取。 |
samplerCubeArray |
用於綁定立方體貼圖陣列的取樣器型別,以 float 讀取。僅 Forward+ 與 Mobile 支援,不相容於 Compatibility。 |
samplerExternalOES |
外部取樣器型別。僅支援於 Compatibility/Android 平台。 |
These types can also be put inside arrays or structs, which are also usable as function parameters or return values. Arrays can be used as uniforms, but structs cannot.
警告
區域變數不會自動初始化為像是 0.0 這種預設值。如果你在賦值前就使用變數,它將包含記憶體中原本的隨機值,這會導致不可預期的視覺異常。然而,uniform 與 varying 會自動初始化為預設值。
型別轉換
就像 GLSL ES 3.0 一樣,不允許在相同大小但不同型別的標量與向量間進行隱式轉型,也不允許不同大小的型別之間轉型。必須透過建構子明確進行型別轉換。
範例:
float a = 2; // invalid
float a = 2.0; // valid
float a = float(2); // valid
預設的整數常數為有符號,因此轉換成無符號時必須進行型別轉換:
int a = 2; // valid
uint a = 2; // invalid
uint a = uint(2); // valid
成員
向量型別的每個標量成員可以透過 "x"、"y"、"z" 和 "w" 存取。也可以用 "r"、"g"、"b"、"a",效果相同。請依需求選用。
對於矩陣,請使用 m[欄][列] 索引語法來存取每個標量,或用 m[欄] 來取得對應欄的向量。例如,要取得 mat4 轉換矩陣的平移 y 分量(第 4 欄,第 2 行),可以寫 m[3][1] 或 m[3].y。
建構
建構向量型別時必須傳入:
// The required amount of scalars
vec4 a = vec4(0.0, 1.0, 2.0, 3.0);
// Complementary vectors and/or scalars
vec4 a = vec4(vec2(0.0, 1.0), vec2(2.0, 3.0));
vec4 a = vec4(vec3(0.0, 1.0, 2.0), 3.0);
// A single scalar for the whole vector
vec4 a = vec4(0.0);
建構矩陣型別時,必須傳入與矩陣維度相同的向量(視為欄)。也可用 matx(float) 語法建立對角矩陣。例如 mat4(1.0) 就是單位矩陣(identity matrix)。
mat2 m2 = mat2(vec2(1.0, 0.0), vec2(0.0, 1.0));
mat3 m3 = mat3(vec3(1.0, 0.0, 0.0), vec3(0.0, 1.0, 0.0), vec3(0.0, 0.0, 1.0));
mat4 identity = mat4(1.0);
矩陣也可以由其他維度的矩陣建構。有兩個規則:
1. If a larger matrix is constructed from a smaller matrix, the additional rows and columns are set to the values they would have in an identity matrix. 1. If a smaller matrix is constructed from a larger matrix, the top, left submatrix of the larger matrix is used.
mat3 basis = mat3(MODEL_MATRIX);
mat4 m4 = mat4(basis);
mat2 m2 = mat2(m4);
分量混寫(Swizzling)
你可以用任何順序組合向量的分量,只要結果也是向量型別(或標量)即可。範例如下:
vec4 a = vec4(0.0, 1.0, 2.0, 3.0);
vec3 b = a.rgb; // Creates a vec3 with vec4 components.
vec3 b = a.ggg; // Also valid; creates a vec3 and fills it with a single vec4 component.
vec3 b = a.bgr; // "b" will be vec3(2.0, 1.0, 0.0).
vec3 b = a.xyz; // Also rgba, xyzw are equivalent.
vec3 b = a.stp; // And stpq (for texture coordinates).
float c = b.w; // Invalid, because "w" is not present in vec3 b.
vec3 c = b.xrt; // Invalid, mixing different styles is forbidden.
b.rrr = a.rgb; // Invalid, assignment with duplication.
b.bgr = a.rgb; // Valid assignment. "b"'s "blue" component will be "a"'s "red" and vice versa.
精度
可以為資料型別加上精度修飾詞,適用於 uniform、變數、參數和 varying:
lowp vec4 a = vec4(0.0, 1.0, 2.0, 3.0); // low precision, usually 8 bits per component mapped to 0-1
mediump vec4 a = vec4(0.0, 1.0, 2.0, 3.0); // medium precision, usually 16 bits or half float
highp vec4 a = vec4(0.0, 1.0, 2.0, 3.0); // high precision, uses full float or integer range (32 bit default)
部分運算若使用較低精度,能提升效能(但精度會下降)。頂點處理器通常需高精度,比較少用低精度,但片段處理器則經常可以這樣做。
某些架構(主要是行動平台)這樣做能有明顯效益,但不同精度之間轉換會有額外負擔。請參閱目標平台的文件以獲取詳情。許多行動平台驅動可能會導致不一致或不可預期的行為,除非有必要,否則建議避免額外指定精度。
陣列
陣列是用於儲存多個相同型別變數的容器。
區域陣列
區域陣列需在函式內宣告。可使用所有允許的資料型別(取樣器除外)。陣列宣告語法類似 C 語言:[const] + [precision] + typename + identifier + [array size]。
void fragment() {
    float arr[3];
}
可以在宣告時直接初始化,例如:
float float_arr[3] = float[3] (1.0, 0.5, 0.0); // first constructor

int int_arr[3] = int[] (2, 1, 0); // second constructor

vec2 vec2_arr[3] = { vec2(1.0, 1.0), vec2(0.5, 0.5), vec2(0.0, 0.0) }; // third constructor

bool bool_arr[] = { true, true, false }; // fourth constructor - size is defined automatically from the element count
也可以在一行宣告多個(不同大小也可以):
float a[3] = float[3] (1.0, 0.5, 0.0),
b[2] = { 1.0, 0.5 },
c[] = { 0.7 },
d = 0.0,
e[5];
要存取陣列元素,請使用索引語法:
float arr[3];

arr[0] = 1.0; // setter

COLOR.r = arr[0]; // getter
陣列有一個內建函式 .length()``(請勿與全域 ``length() 函式混淆)。它不接受參數,會回傳陣列大小。
float arr[] = { 0.0, 1.0, 0.5, -1.0 };
for (int i = 0; i < arr.length(); i++) {
    // ...
}
備註
如果你使用小於 0 或超過陣列大小的索引,著色器將當機並導致渲染失敗。請使用 length()、if 或 clamp() 來保證索引合法。務必仔細測試和檢查你的程式碼。若索引是常數,編輯器會自動檢查界限避免當機。
全域陣列
你可以在全域範圍宣告陣列為 const 或 uniform:
shader_type spatial;

const lowp vec3 v[1] = lowp vec3[1] ( vec3(0, 0, 1) );
uniform lowp vec3 w[1];

void fragment() {
  ALBEDO = v[0] + w[0];
}
備註
全域陣列語法與區域陣列相同,只是在前面加上 const 或 uniform。注意 uniform 陣列不能有預設值。
常數
在變數宣告前加上 const 關鍵字,該變數就會成為不可變(immutable),也就是無法被修改。所有基本型別(取樣器除外)都可以宣告為常數。存取常數比 uniform 略快。常數必須在宣告時初始化。
const vec2 a = vec2(0.0, 1.0);
vec2 b;

a = b; // invalid
b = a; // valid
常數不可修改,也不能加提示,但相同型別的多個常數可以在同一行宣告,例如:
const vec2 V1 = vec2(1, 1), V2 = vec2(2, 2);
陣列也可以像變數一樣用 const 宣告為常數。
const float arr[] = { 1.0, 0.5, 0.0 };

arr[0] = 1.0; // invalid

COLOR.r = arr[0]; // valid
常數既可在全域(任何函式外)也可在區域(函式內)宣告。當你需要在整個著色器中使用且不需更動的值時,全域常數很實用。與 uniform 類似,全域常數會在所有著色器階段共用,但無法在著色器外部存取。
shader_type spatial;

const float GOLDEN_RATIO = 1.618033988749894;
float 型別的常數必須以小數點(如 1.0)或科學記號初始化,也支援可選的 f 後綴。
float a = 1.0;
float b = 1.0f; // same, using suffix for clarity
float c = 1e-1; // gives 0.1 by using the scientific notation
uint``(無符號整數)型別的常數必須加上 ``u 後綴以區分有符號整數。也可以用 uint(x) 內建轉換函式。
uint a = 1u;
uint b = uint(1);
結構(Structs)
結構(struct)是一種複合型別,可用來讓著色器程式碼更具抽象性。你可以在全域範圍宣告結構:
struct PointLight {
    vec3 position;
    vec3 color;
    float intensity;
};
宣告後,你可以這樣初始化實體:
void fragment()
{
    PointLight light;
    light.position = vec3(0.0);
    light.color = vec3(1.0, 0.0, 0.0);
    light.intensity = 0.5;
}
也可以直接用結構建構子來初始化:
PointLight light = PointLight(vec3(0.0), vec3(1.0, 0.0, 0.0), 0.5);
結構可以包含其他結構或陣列,也可以宣告為全域常數:
shader_type spatial;

...

struct Scene {
    PointLight lights[2];
};

const Scene scene = Scene(PointLight[2](PointLight(vec3(0.0, 0.0, 0.0), vec3(1.0, 0.0, 0.0), 1.0), PointLight(vec3(0.0, 0.0, 0.0), vec3(1.0, 0.0, 0.0), 1.0)));

void fragment()
{
    ALBEDO = scene.lights[0].color;
}
也可以將結構作為參數傳入函式:
shader_type canvas_item;

...

Scene construct_scene(PointLight light1, PointLight light2) {
    return Scene({light1, light2});
}

void fragment()
{
    COLOR.rgb = construct_scene(PointLight(vec3(0.0, 0.0, 0.0), vec3(1.0, 0.0, 0.0), 1.0), PointLight(vec3(0.0, 0.0, 0.0), vec3(1.0, 0.0, 1.0), 1.0)).lights[0].color;
}
運算子
Godot 著色語言支援與 GLSL ES 3.0 相同的運算子。以下為運算子優先順序列表:
優先順序 |
類別 |
運算子 |
1(最高) |
括號分組 |
() |
2 |
單元運算 |
+, -, !, ~ |
3 |
乘除法 |
/, *, % |
4 |
加減法 |
+, - |
5 |
位元移位 |
<<, >> |
6 |
關係運算 |
<, >, <=, >= |
7 |
等值比較 |
==, != |
8 |
位元 AND |
& |
9 |
位元 XOR(異或) |
^ |
10 |
位元 OR(或) |
| |
11 |
邏輯 AND |
&& |
12(最低) |
邏輯 OR |
|| |
備註
大多數接受向量或矩陣的運算子(如乘法、除法等)都會對各分量分別運算,即對每個分量獨立執行該運算。舉例如下:
運算 |
等價標量運算 |
|---|---|
|
|
|
|
|
|
依據 GLSL 語言規範 第 5.10 節(向量與矩陣運算)說明:
除少數例外,運算皆以分量為單位執行。通常,當運算子用於向量或矩陣時,會對每個分量分別運算。[...] 例外情況為:矩陣乘以向量、向量乘以矩陣、及矩陣乘以矩陣。這些情況不按分量運算,而是進行正確的線性代數乘法。
流程控制
Godot 著色語言支援常用的流程控制語句:
// `if`, `else if` and `else`.
if (cond) {

} else if (other_cond) {

} else {

}

// Ternary operator.
// This is an expression that behaves like `if`/`else` and returns the value.
// If `cond` evaluates to `true`, `result` will be `9`.
// Otherwise, `result` will be `5`.
int result = cond ? 9 : 5;

// `switch`.
switch (i) { // `i` should be a signed integer expression.
    case -1:
        break;
    case 0:
        return; // `break` or `return` to avoid running the next `case`.
    case 1: // Fallthrough (no `break` or `return`): will run the next `case`.
    case 2:
        break;
    //...
    default: // Only run if no `case` above matches. Optional.
        break;
}

// `for` loop. Best used when the number of elements to iterate on
// is known in advance.
for (int i = 0; i < 10; i++) {

}

// `while` loop. Best used when the number of elements to iterate on
// is not known in advance.
while (cond) {

}

// `do while`. Like `while`, but always runs at least once even if `cond`
// never evaluates to `true`.
do {

} while (cond);
請注意,在現代 GPU 上,無窮迴圈可能導致應用程式(包含編輯器)當機。Godot 無法保護你不受此影響,請務必避免這種錯誤!
此外,比較浮點數時,請務必與「範圍」做比較,而非直接比對精確數值。
像 if (value == 0.3) 這樣的比較可能不會等於 true。浮點運算常有誤差,結果可能不如你預期,不同硬體上的表現也可能不同。
切勿 這樣寫。
float value = 0.1 + 0.2;

// May not evaluate to `true`!
if (value == 0.3) {
    // ...
}
請改用 epsilon(誤差容許值)進行範圍比較。數字越大,或浮點精度越低,epsilon 應設得越大。
const float EPSILON = 0.0001;
if (value >= 0.3 - EPSILON && value <= 0.3 + EPSILON) {
    // ...
}
如需更多資訊,請參考:floating-point-gui.de 。
丟棄(Discard)
片段(fragment)、光源(light)以及由 fragment 或 light 呼叫的自訂函式中,可以使用 discard 關鍵字。使用時,該片段會被丟棄,不會寫入任何資料。
請注意,使用 discard 會有效能損耗,因為這會讓使用此著色器的表面無法執行深度預處理。被丟棄的像素頂點仍需經過頂點著色器運算,因此如果所有像素都用 discard,其渲染成本仍然高於完全不渲染。
函式
你可以在 Godot 著色器中自訂函式。語法如下:
ret_type func_name(args) {
    return ret_type; // if returning a value
}

// a more specific example:

int sum2(int a, int b) {
    return a + b;
}
只能呼叫已在前面(編輯器中較上方)定義過的函式。若重複定義同名函式(或與內建函式同名),將會發生錯誤。
函式參數可以有特殊修飾詞:
in:參數僅供讀取(預設)。
out:參數僅供寫入。
inout:參數以參考(reference)方式傳遞,可讀可寫。
const:參數為常數,無法修改,可與 in 一起使用。
範例如下:
void sum2(int a, int b, inout int result) {
    result = a + b;
}
支援函式多載(overloading)。你可以定義多個同名但參數不同的函式。注意,多載呼叫時不支援 隱式型別轉換 ,例如 int 轉 float ( 1 不能自動變成 1.0 )。
vec3 get_color(int t) {
    return vec3(1, 0, 0); // Red color.
}
vec3 get_color(float t) {
    return vec3(0, 1, 0); // Green color.
}
void fragment() {
    vec3 red = get_color(1);
    vec3 green = get_color(1.0);
}
Varying(變量)
若要將資料從頂點處理器傳遞到片段(或光源)處理器,請使用 varying。在頂點處理器中,每個基本頂點都設定了 varying,然後在片段處理器中針對每個像素進行插值。
shader_type spatial;

varying vec3 some_color;

void vertex() {
    some_color = NORMAL; // Make the normal the color.
}

void fragment() {
    ALBEDO = some_color;
}

void light() {
    DIFFUSE_LIGHT = some_color * 100; // optionally
}
Varying 也可以宣告為陣列:
shader_type spatial;

varying float var_arr[3];

void vertex() {
    var_arr[0] = 1.0;
    var_arr[1] = 0.0;
}

void fragment() {
    ALBEDO = vec3(var_arr[0], var_arr[1], var_arr[2]); // red color
}
你也可以用 varying 關鍵字,將資料從 fragment 傳到 light 處理器。在 fragment 中賦值,之後在 light 函式中使用即可。
shader_type spatial;

varying vec3 some_light;

void fragment() {
    some_light = ALBEDO * 100.0; // Make a shining light.
}

void light() {
    DIFFUSE_LIGHT = some_light;
}
注意,varying 不能在自訂函式或 light 處理器中直接賦值,例如:
shader_type spatial;

varying float test;

void foo() {
    test = 0.0; // Error.
}

void vertex() {
    test = 0.0;
}

void light() {
    test = 0.0; // Error too.
}
這項限制是為了避免初始化前的不正確用法。
插值修飾詞
著色管線中某些值會被插值。你可以用 插值修飾詞 來調整插值方式。
shader_type spatial;

varying flat vec3 our_color;

void vertex() {
    our_color = COLOR.rgb;
}

void fragment() {
    ALBEDO = our_color;
}
目前有兩種插值修飾詞:
修飾詞 |
說明 |
|---|---|
flat |
該值不進行插值。 |
smooth |
該值以透視修正的方式進行插值(預設)。 |
Uniform(統一變數)
你可以用 uniform (統一變量)將資料傳入著色器,uniform 必須在著色器全域範圍(函式外)宣告。當著色器指派給材質時,uniform 會出現在材質屬性視窗中,可供編輯。uniform 不能在著色器內部寫入。除了 void 以外,任何 資料型別 都可宣告為 uniform。
shader_type spatial;

uniform float some_value;

uniform vec3 colors[3];
你可以在編輯器的材質屬性檢視器中設定 uniform,或是 透過程式碼 設定。
Uniform 提示
Godot 提供可選的 uniform 提示,有助於編譯器了解 uniform 的用途,並讓編輯器決定如何讓使用者調整其值。
shader_type spatial;

uniform vec4 color : source_color;
uniform float amount : hint_range(0, 1);
uniform vec4 other_color : source_color = vec4(1.0); // Default values go after the hint.
uniform sampler2D image : source_color;
Uniform 也可以設定預設值:
shader_type spatial;

uniform vec4 some_vector = vec4(0.0);
uniform vec4 some_color : source_color = vec4(1.0);
注意:當同時有預設值與提示時,預設值必須寫在提示之後。
完整的 uniform 提示如下:
型別 |
提示 |
說明 |
|---|---|---|
vec3, vec4 |
source_color |
作為顏色使用。 |
int |
hint_enum("String1", "String2") |
將 int 輸入顯示為下拉選單。 |
int, float |
hint_range(min, max[, step]) |
限制為指定範圍內的值(最小/最大/步進)。 |
sampler2D |
source_color |
作為反照率顏色使用。 |
sampler2D |
hint_normal |
作為法線貼圖使用。 |
sampler2D |
hint_default_white |
作為數值或反照率顏色時,預設為不透明白色。 |
sampler2D |
hint_default_black |
作為數值或反照率顏色時,預設為不透明黑色。 |
sampler2D |
hint_default_transparent |
作為數值或反照率顏色時,預設為透明黑色。 |
sampler2D |
hint_anisotropy |
作為 flowmap 使用,預設朝右。 |
sampler2D |
hint_roughness[_r, _g, _b, _a, _normal, _gray] |
用於匯入時的粗糙度限制器(用於減少高光鋸齒)。 |
sampler2D |
filter[_nearest, _linear][_mipmap][_anisotropic] |
啟用指定的紋理過濾模式。 |
sampler2D |
repeat[_enable, _disable] |
啟用紋理重複。 |
sampler2D |
hint_screen_texture |
這個紋理為螢幕紋理。 |
sampler2D |
hint_depth_texture |
這個紋理為深度紋理。 |
sampler2D |
hint_normal_roughness_texture |
這個紋理為 normal roughness 紋理(僅 Forward+ 支援)。 |
使用 hint_enum
你可以利用 hint_enum 讓 int 變數在編輯器中以可讀的下拉選單顯示:
uniform int noise_type : hint_enum("OpenSimplex2", "Cellular", "Perlin", "Value") = 0;
你也可以用類似 GDScript 的冒號語法,為 hint_enum uniform 指定明確的數值:
uniform int character_speed: hint_enum("Slow:30", "Average:60", "Very Fast:200") = 60;
這個值會以整數形式儲存,對應到選項的索引(如 0、1、2)或用冒號語法指定的值(如 30、60、200)。用 set_shader_parameter() 設定時必須用整數值,不能用字串名稱。
使用 source_color
任何包含 sRGB 色彩資料 的紋理都必須加上 source_color 提示,才能正確取樣。因為 Godot 採用線性色彩空間算繪,但有些紋理本身為 sRGB 色彩資料。如果沒有這個提示,紋理顏色會看起來偏灰、失真。
albedo 與色彩紋理通常應加上 source_color 提示。法線、粗糙度、金屬度與高度紋理通常不需 source_color。
在 Forward+ 與 Mobile 渲染器下,以及 canvas_item 著色器啟用 HDR 2D 時,必須加上 source_color。如果是 Compatibility 渲染器,或 canvas_item 未啟用 HDR 2D 則為選擇性。但建議一律使用 source_color,即使未來切換渲染器或 HDR 2D 狀態都不會有色彩問題。
Uniform 分組
如果你想要在屬性檢視器將多個 uniform 分組顯示,可以用 group_uniform 關鍵字,例如:
group_uniforms MyGroup;
uniform sampler2D test;
你可以用如下語法結束該分組:
group_uniforms;
這個語法也支援子分組(不必先宣告父分組):
group_uniforms MyGroup.MySubgroup;
全域 uniform
有時你會想要一次修改多個著色器的參數。如果用一般 uniform,必須逐一設定所有著色器,非常麻煩。全域 uniform 可讓你建立可在所有著色器、所有型別(如 canvas_item、spatial、particles、sky、fog)共用的 uniform 變數。
全域 uniform 特別適合需要同時影響場景多個物件的環境特效,例如玩家靠近時所有樹葉彎曲,或物件隨風搖曳等。
備註
全域 uniform 與單一著色器的 全域範圍 不同。一般 uniform 只是在著色器內的全域範圍,而全域 uniform 則是整個專案所有著色器都能取得的全域變數。
要建立全域 uniform,請開啟 專案設定,切換到 Shader Globals 標籤。輸入 uniform 名稱(區分大小寫)及型別,然後點選對話框右上角的 新增。接著即可在 uniform 列表點擊並編輯其值:

在專案設定的 Shader Globals 標籤新增全域 uniform
建立全域 uniform 後,可以在著色器中這樣使用:
shader_type canvas_item;

global uniform vec4 my_color;

void fragment() {
    COLOR = my_color.rgb;
}
請注意,全域 uniform 必須 在儲存著色器時已存在於專案設定內,否則編譯會失敗。雖然你可以在著色器程式碼裡寫 global uniform vec4 my_color = ... 指定預設值,但這個值會被忽略,因為全域 uniform 必須始終於專案設定中定義。
若要在執行時更改全域 uniform 的值,請於腳本中使用 RenderingServer.global_shader_parameter_set 方法:
RenderingServer.global_shader_parameter_set("my_color", Color(0.3, 0.6, 1.0))
你可以不限次數地設定全域 uniform 值,而不會影響效能,因為這不需 CPU 與 GPU 的同步。
你也可以在執行時新增或移除全域 uniform:
RenderingServer.global_shader_parameter_add("my_color", RenderingServer.GLOBAL_VAR_TYPE_COLOR, Color(0.3, 0.6, 1.0))
RenderingServer.global_shader_parameter_remove("my_color")
於執行時新增或刪除全域 uniform 會有效能損耗,雖然比從腳本讀取全域 uniform 值小,但仍需注意(詳見下方警示)。
警告
雖然你 可以 在腳本中用 RenderingServer.global_shader_parameter_get("uniform_name") 於執行時查詢全域 uniform 的值,但這會嚴重拖慢效能,因為渲染執行緒需與呼叫執行緒同步。
因此,不建議在腳本中頻繁讀取全域 uniform 值。如果你需要在腳本設定後讀取該值,請考慮建立 autoload 來同步儲存並查詢這些值。
每個實例的 uniform
備註
per-instance uniforms 同時適用於 canvas_item (2D) 與 spatial (3D) 著色器。
有時你會想要讓每個節點使用材質時都能調整參數。舉例來說,如果你想讓森林裡每棵樹的顏色都可個別調整,若無 per-instance uniform,就必須為每棵樹建立一個專屬材質(色調略有不同)。這不僅讓材質管理變複雜,場景也會因為產生更多材質實體而拖慢效能。雖然也能用頂點色實現,但每種顏色都要複製一份網格,效能負擔同樣很重。
per-instance uniform 是設在每個 GeometryInstance3D(幾何實例)上,不是設在每個材質上。當你的網格有多個材質或採用 MultiMesh 時,請特別留意這點。
shader_type spatial;

// Provide a hint to edit as a color. Optionally, a default value can be provided.
// If no default value is provided, the type's default is used (e.g. opaque black for colors).
instance uniform vec4 my_color : source_color = vec4(1.0, 0.5, 0.0, 1.0);

void fragment() {
    ALBEDO = my_color.rgb;
}
儲存著色器後,可以在屬性檢視器中調整每個實例 uniform 的值:
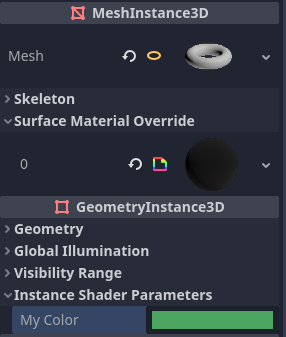
在屬性檢視器的 GeometryInstance3D 區塊設定 per-instance uniform 的值
你也可以於執行時,在繼承自 GeometryInstance3D 的節點上用 set_instance_shader_parameter 方法設定 per-instance uniform 的值:
$MeshInstance3D.set_instance_shader_parameter("my_color", Color(0.3, 0.6, 1.0))
使用 per-instance uniform 時,請注意以下限制:
Per-instance uniforms do not support textures or arrays, only regular scalar and vector types. As a workaround, you can pass a texture array as a regular uniform, then pass the index of the texture to be drawn using a per-instance uniform.
備註
In GLSL versions before 4.0 (i.e. GLSL 3.3 and lower), you cannot directly index a texture array using a per-instance uniform, as sampler arrays can only be indexed by compile-time constant expressions. This affects shaders compiled with the Compatibility renderer.
If you are affected, use the
switchstatement to select the texture:
uniform sampler2D texture_array[2];
instance uniform int texture_index;

void fragment() {
    vec4 color;
    switch (texture_index) {
        case 0:
            color = texture(texture_array[0], UV);
            break;
        case 1:
            color = texture(texture_array[1], UV);
            break;
    }

    COLOR = color;
}
每個著色器最多允許 16 個 per-instance uniform。
如果網格使用多個材質,找到的第一個材質的 per-instance uniform 會「覆蓋」後續材質,除非名稱、索引與型別都相同,此時所有參數才會正確套用。
若遇到上述情形,可以用
instance_index提示手動指定 per-instance uniform 的索引(0-15),以避免衝突:
instance uniform vec4 my_color : source_color, instance_index(5);
從程式碼設定 uniform
你可以在 GDScript 中用 set_shader_parameter() 設定 uniform:
material.set_shader_parameter("some_value", some_value)

material.set_shader_parameter("colors", [Vector3(1, 0, 0), Vector3(0, 1, 0), Vector3(0, 0, 1)])
備註
set_shader_parameter() 第一個參數是著色器內 uniform 的名稱。這個名稱必須*完全*相符,否則將無法辨識。
GDScript 的變數型別與 GLSL 不同,因此從 GDScript 傳值給著色器時,Godot 會自動轉換型別。以下為型別對應表:
GLSL 型別 |
GDScript 型別 |
說明 |
|---|---|---|
bool |
bool |
|
bvec2 |
int |
位元封裝整數,其中第 0 位(最低位)對應 x 分量。 例如,(bx, by) 的 bvec2 可以這樣建立: bvec2_input: int = (int(bx)) | (int(by) << 1)
|
bvec3 |
int |
位元封裝整數,其中第 0 位(最低位)對應 x 分量。 |
bvec4 |
int |
位元封裝整數,其中第 0 位(最低位)對應 x 分量。 |
int |
int |
|
ivec2 |
Vector2i |
|
ivec3 |
Vector3i |
|
ivec4 |
Vector4i |
|
uint |
int |
|
uvec2 |
Vector2i |
|
uvec3 |
Vector3i |
|
uvec4 |
Vector4i |
|
float |
float |
|
vec2 |
Vector2 |
|
vec3 |
Vector3、Color |
若型別為 Color,將會被解讀為 (r, g, b)。 |
vec4 |
Vector4、Color、Rect2、Plane、Quaternion |
若型別為 Color,將會被解讀為 (r, g, b, a)。 若型別為 Rect2,將會被解讀為 (position.x, position.y, size.x, size.y)。 若型別為 Plane,將會被解讀為 (normal.x, normal.y, normal.z, d)。 |
mat2 |
Transform2D |
|
mat3 |
Basis |
|
mat4 |
Projection、Transform3D |
若型別為 Transform3D,w 向量會自動設為單位(identity)。 |
sampler2D |
Texture2D |
|
isampler2D |
Texture2D |
|
usampler2D |
Texture2D |
|
sampler2DArray |
Texture2DArray |
|
isampler2DArray |
Texture2DArray |
|
usampler2DArray |
Texture2DArray |
|
sampler3D |
Texture3D |
|
isampler3D |
Texture3D |
|
usampler3D |
Texture3D |
|
samplerCube |
Cubemap |
關於在 Godot 匯入 cubemap 貼圖的說明,請參閱 更改匯入資源型別。 |
samplerCubeArray |
CubemapArray |
僅 Forward+ 與 Mobile 渲染支援,Compatibility 模式不支援。 |
samplerExternalOES |
ExternalTexture |
僅支援於 Compatibility/Android 平台。 |
備註
從 GDScript 設定 shader uniform 時請特別小心,若型別不符並不會報錯,而是產生未定義行為。特別是將 GDScript 的 int/float(64 位元)設給 Godot shader 的 int/float(32 位元)時,若需高精度時可能導致不可預期的結果。
Uniform 限制
每個著色器的 uniform 數量有上限。在大部分桌面平台上,限制為 65536 位元組(4096 個 vec4);在行動裝置上則為 16384 位元組(1024 個 vec4)。比 vec4 小的向量 uniform(如 vec2、vec3)會自動補齊成 vec4 大小。標量 uniform(如 int、float)不做補齊,而 bool 會補齊為 int 大小。
陣列 uniform 會以內容總大小計算。如果你需要的 uniform 陣列超過此上限,建議將資料包進紋理貼圖,因為紋理內容不計入 uniform 限制,只計取樣器(sampler uniform)本身。
內建變數
有大量內建變數可用,如 UV、COLOR、VERTEX 等。可用的變數取決於著色器類型(spatial、canvas_item、particle 等)與所使用的函式(vertex、fragment、light、start、process、sky 或 fog)。各類型可用的內建變數清單請見相對應頁面:
內建函式
Godot 支援大量內建函式,遵循 GLSL ES 3.0 標準。詳情請見 內建函式 頁面。
注釋
著色語言支援與 C# 和 C++ 相同的註解語法,單行註解使用
//,多行註解則使用/* */:Additionally, you can use documentation comments that are displayed in the inspector when hovering a shader parameter. Documentation comments are currently only supported when placed immediately above a
uniformdeclaration. These documentation comments only support the multiline comment syntax (even if used on a single line) and must use two leading asterisks (/**) instead of just one (/*):根據 著色器風格指南,後續行的星號不是必要的,但建議加上。這些星號會自動被屬性檢視器去除,因此不會出現在提示中。