Attention: Here be dragons
This is the latest
(unstable) version of this documentation, which may document features
not available in or compatible with released stable versions of Godot.
Checking the stable version of the documentation...
製作外掛程式
關於外掛程式
外掛程式是一種擴充編輯器功能、加入實用工具的好方法。它可以完全以 GDScript 與標準場景製作,甚至無須重新載入編輯器。與模組不同,外掛程式不需要撰寫 C++ 程式碼或重新編譯引擎。雖然功能上不及模組強大,但你仍然可以用外掛程式做到許多事。請注意,外掛程式性質上就像你平常建立的場景,只是它是透過腳本強化編輯器功能。
本教學將帶你實作兩個外掛程式,幫助你理解其運作方式,並能自行開發。第一個是可加到任何場景中的自訂節點,第二個是加到編輯器內的自訂面板(Dock)。
建立外掛程式
在開始前,請先於任意位置建立一個空專案。這個專案將作為開發與測試外掛程式的基礎。
編輯器要識別新外掛程式,必須先建立兩個檔案:一個 plugin.cfg 設定檔,以及一個包含功能的工具腳本。外掛程式應放在專案資料夾下的標準路徑,如 addons/plugin_name。Godot 提供對話方塊來產生這些檔案,並自動放置到正確的位置。
於主工具列中,點擊 Project 下拉選單,接著點選 Project Settings...。切換到 Plugins 分頁,然後點擊右上角的 按鈕。
你會看到出現如下的對話方塊:
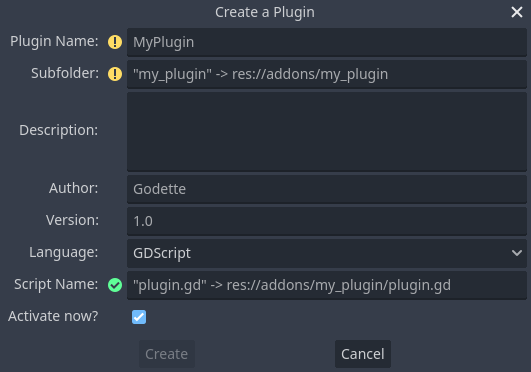
每個欄位的預設提示文字會說明它如何影響外掛程式檔案的產生與設定值。
請依下列範例值繼續操作:
Plugin Name: My Custom Node
Subfolder: my_custom_node
Description: A custom node made to extend the Godot Engine.
Author: Your Name Here
Version: 1.0.0
Language: GDScript
Script Name: custom_node.gd
Plugin Name: My Custom Node
Subfolder: MyCustomNode
Description: A custom node made to extend the Godot Engine.
Author: Your Name Here
Version: 1.0.0
Language: C#
Script Name: CustomNode.cs
警告
In C#, the EditorPlugin script needs to be compiled, which
requires building the project. After building the project the plugin can be
enabled in the Plugins tab of Project Settings.
你最後應該會看到類似如下的目錄結構:
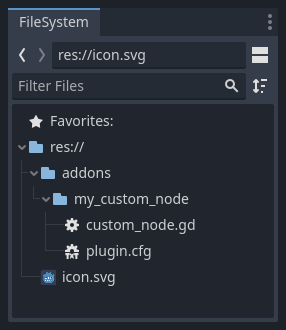
plugin.cfg 是一個 INI 格式檔,存放外掛程式的中繼資料。名稱與描述讓其他人明白它的用途,作者欄則確保你獲得正確署名。版本號可讓他人分辨是否為舊版本;若不知如何編寫版本號,請參考 Semantic Versioning。主腳本檔則會在外掛程式啟用時告訴 Godot 如何運作你的外掛程式。
腳本檔案
建立外掛程式後,對話方塊會自動幫你打開 EditorPlugin 腳本。此腳本有兩項必要條件:必須標記為 @tool,否則無法在編輯器正確載入;且必須繼承 EditorPlugin。
警告
除了 EditorPlugin 腳本外,你的外掛程式所用的其他 GDScript 也*必須*是工具腳本。若沒有 @tool 標記,該 GDScript 在編輯器中將形同空檔!
妥善處理資源的初始化與清理很重要。建議在 _enter_tree() 虛擬函式中初始化外掛程式,並於 _exit_tree() 負責清理。幸好 Godot 會自動為你產生這些回呼函式。你的腳本大致如下所示:
@tool
extends EditorPlugin


func _enter_tree():
    # Initialization of the plugin goes here.
    pass


func _exit_tree():
    # Clean-up of the plugin goes here.
    pass
#if TOOLS
using Godot;

[Tool]
public partial class CustomNode : EditorPlugin
{
    public override void _EnterTree()
    {
        // Initialization of the plugin goes here.
    }

    public override void _ExitTree()
    {
        // Clean-up of the plugin goes here.
    }
}
#endif
這是建立新外掛程式時的良好範本。
自訂節點
有時你會希望多個節點具有某種共通行為,例如可重用的自訂場景或控制元件。實體化(Instancing)很實用,但若在多個專案反覆使用會顯得繁複。一個好方法是製作一個能自動加入自訂行為節點的外掛程式。
本教學將製作一個按下時會顯示訊息的按鈕。你需要寫一支繼承自 Button 的腳本,或若偏好也可繼承 BaseButton:
# Optional, add to execute in the editor.
@tool

# Icons are optional.
# Alternatively, you may use the UID of the icon or the absolute path.
@icon("icon.svg")

# Automatically register the node in the Create New Node dialog
# and make it available for use with other scripts.
class_name MyButton
extends Button


func _enter_tree():
    pressed.connect(clicked)


func clicked():
    print("You clicked me!")
using Godot;

// Optional, add to execute in the editor.
[Tool]

// Icons are optional.
// Alternatively, you may use the UID of the icon or the absolute path.
[Icon("icon.svg")]

// Automatically register the node in the Create New Node dialog
// and make it available for use with other scripts.
[GlobalClass]
public partial class MyButton : Button
{
    public override void _EnterTree()
    {
        Pressed += Clicked;
    }

    public void Clicked()
    {
        GD.Print("You clicked me!");
    }
}
That's it for our basic button. You can save this as my_button.gd inside the
plugin folder. You may have a 16×16 icon to show in the scene tree. If you
don't have one, you can grab the default one from the engine and save it in your
addons/my_custom_node folder as icon.svg, or use the default Godot logo
(@icon("res://icon.svg")).
小訣竅
作為自訂節點圖示的 SVG 圖片,建議在 匯入選項 中啟用 Editor > Scale With Editor Scale**(編輯器縮放同步)及 **Editor > Convert Colors With Editor Theme (隨編輯器主題色彩轉換)。只要圖示顏色與 Godot 編輯器一致,這兩個選項就能讓圖示隨編輯器縮放與主題變換自動調整。
完成以上步驟後,外掛程式就會出現在 專案設定 的外掛程式清單中,可依 檢查結果 章節說明啟用它。
然後試著加入你剛剛創建的新節點:
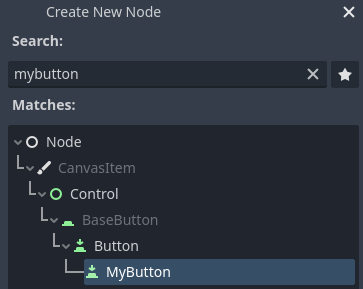
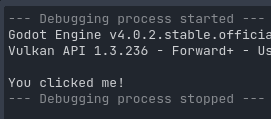
當你新增該節點時,會發現已自動掛上你寫的腳本。請為按鈕設定文字,然後儲存並執行場景。按下按鈕後,你會在終端機(Console)看到訊息:
自訂面板
有時你會想讓編輯器內隨時有特定工具。最簡單的方法就是做一個外掛程式,新增一個面板(Dock)。面板其實就是以 Control 為基礎的場景,建立方式和一般 GUI 場景相同。
建立自訂面板的步驟和自訂節點一樣。請在 addons/my_custom_dock 資料夾中建立新的 plugin.cfg,並加入以下內容:
[plugin]

name="My Custom Dock"
description="A custom dock made so I can learn how to make plugins."
author="Your Name Here"
version="1.0"
script="custom_dock.gd"
[plugin]

name="My Custom Dock"
description="A custom dock made so I can learn how to make plugins."
author="Your Name Here"
version="1.0"
script="CustomDock.cs"
接著在同一資料夾下建立 custom_dock.gd 腳本,內容可參考前述的 標準範本。
既然要新增自訂面板,就需要設計面板內容。這其實就是一個標準 Godot 場景:直接在編輯器裡新建場景再編輯即可。
For an editor dock, the root node must be a Control or one of its child classes. For this tutorial, you can create a single button. Don't forget to add some text to your button.
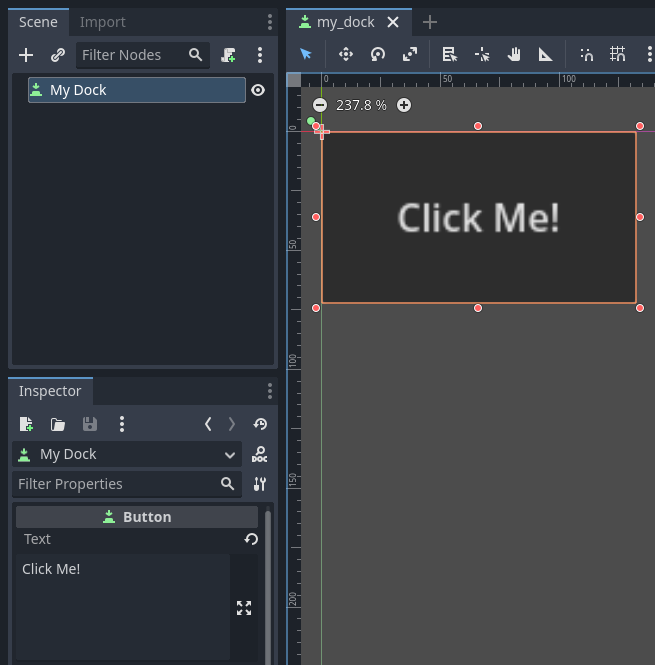
Save this scene as my_dock.tscn. Now, we need to grab the scene we created
then add it as a dock in the editor. For this, you can rely on the function
add_dock() from the
EditorPlugin class.
你需要選擇面板停靠的位置,並指定要加入的控制元件(就是你剛建立的場景)。外掛停用時,記得要**移除該面板**。腳本範例如下:
@tool
extends EditorPlugin


# A class member to hold the dock during the plugin life cycle.
var dock


func _enter_tree():
    # Initialization of the plugin goes here.
    # Load the dock scene and instantiate it.
    var dock_scene = preload("res://addons/my_custom_dock/my_dock.tscn").instantiate()

    # Create the dock and add the loaded scene to it.
    dock = EditorDock.new()
    dock.add_child(dock_scene)

    dock.title = "My Dock"

    # Note that LEFT_UL means the left of the editor, upper-left dock.
    dock.default_slot = DOCK_SLOT_LEFT_UL

    # Allow the dock to be on the left or right of the editor, and to be made floating.
    dock.available_layouts = EditorDock.DOCK_LAYOUT_VERTICAL | EditorDock.DOCK_LAYOUT_FLOATING

    add_dock(dock)


func _exit_tree():
    # Clean-up of the plugin goes here.
    # Remove the dock.
    remove_dock(dock)
    # Erase the control from the memory.
    dock.queue_free()
#if TOOLS
using Godot;

[Tool]
public partial class CustomDock : EditorPlugin
{
    private EditorDock _dock;

    public override void _EnterTree()
    {
        var _dock_scene = GD.Load<PackedScene>("res://addons/MyCustomDock/MyDock.tscn").Instantiate<Control>();

        // Create the dock and add the loaded scene to it.
        _dock = new EditorDock();
        _dock.AddChild(dock_scene);

        _dock.Title = "My Dock";

        // Note that LeftUl means the left of the editor, upper-left dock.
        _dock.DefaultSlot = DockSlot.LeftUl;

        // Allow the dock to be on the left or right of the editor, and to be made floating.
        _dock.AvailableLayouts = DockLayout.Horizontal | DockLayout.Floating;

        AddDock(_dock);
    }

    public override void _ExitTree()
    {
        // Clean-up of the plugin goes here.
        // Remove the dock.
        RemoveDock(_dock);
        // Erase the control from the memory.
        _dock.QueueFree();
    }
}
#endif
請注意,雖然面板初始會出現在指定位置,但使用者可隨意拖曳並儲存佈局。
檢查結果
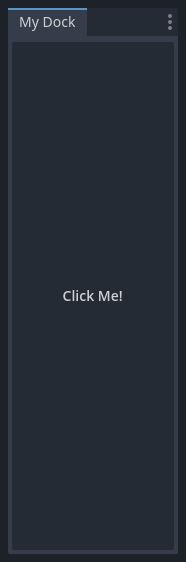
現在可以檢查你的成果了。打開 專案設定,切到 外掛程式 分頁。你的外掛程式應該會出現在清單中。

你會發現外掛程式預設為未啟用狀態。勾選 啟用 後,面板會立即出現在編輯器主畫面上,無需關閉設定視窗。現在你就擁有一個自訂面板了:
於外掛程式中註冊自動載入/單例
編輯器外掛程式可以在啟用時自動註冊 自動載入,且會在外掛程式停用時自動解除註冊。
這樣一來,若你的外掛程式需要用到自動載入,使用者就不必再手動於專案設定中新增,能更快完成外掛程式設定。
你可用以下程式碼於編輯器外掛程式註冊單例(Singleton):
@tool
extends EditorPlugin

# Replace this value with a PascalCase autoload name, as per the GDScript style guide.
const AUTOLOAD_NAME = "SomeAutoload"


func _enable_plugin():
    # The autoload can be a scene or script file.
    add_autoload_singleton(AUTOLOAD_NAME, "res://addons/my_addon/some_autoload.tscn")


func _disable_plugin():
    remove_autoload_singleton(AUTOLOAD_NAME)
#if TOOLS
using Godot;

[Tool]
public partial class MyEditorPlugin : EditorPlugin
{
    // Replace this value with a PascalCase autoload name.
    private const string AutoloadName = "SomeAutoload";

    public override void _EnablePlugin()
    {
        // The autoload can be a scene or script file.
        AddAutoloadSingleton(AutoloadName, "res://addons/MyAddon/SomeAutoload.tscn");
    }

    public override void _DisablePlugin()
    {
        RemoveAutoloadSingleton(AutoloadName);
    }
}
#endif
使用子外掛程式
有時一個外掛程式會新增多種功能,例如同時包含自訂節點與自訂面板。這時將各功能拆分成不同的外掛腳本會更有彈性。子外掛程式(sub-plugins)正是為此設計。
首先,先將主要外掛與子外掛都建立成一般外掛:

然後將子外掛(sub-plugins)移到主外掛資料夾下:

Godot 會自動將子外掛從外掛程式列表中隱藏起來,使用者無法直接啟用或停用。主外掛腳本需透過程式碼,像這樣啟用或停用子外掛:
@tool
extends EditorPlugin

# The main plugin is located at res://addons/my_plugin/
const PLUGIN_NAME = "my_plugin"

func _enable_plugin():
    EditorInterface.set_plugin_enabled(PLUGIN_NAME + "/node", true)
    EditorInterface.set_plugin_enabled(PLUGIN_NAME + "/panel", true)

func _disable_plugin():
    EditorInterface.set_plugin_enabled(PLUGIN_NAME + "/node", false)
    EditorInterface.set_plugin_enabled(PLUGIN_NAME + "/panel", false)
進階應用
現在你已學會製作基本外掛程式,便能用多種方式擴充編輯器功能。透過 GDScript 就能實現大量編輯器功能,這是打造專業化編輯器又無須深入 C++ 模組的強大方式。
你可以開發自用或分享用的外掛程式,並上傳到 素材庫,讓其他人也能受惠於你的成果。