Attention: Here be dragons
This is the latest
(unstable) version of this documentation, which may document features
not available in or compatible with released stable versions of Godot.
Checking the stable version of the documentation...
匯入外掛
備註
本教學假設你已經知道如何製作一般外掛。如果有疑問,請參閱 製作外掛程式 頁面。這也假設你已熟悉 Godot 的匯入系統。
前言
匯入外掛是一種特殊的編輯器工具,能讓 Godot 匯入自訂資源,並將其視為一等資源。編輯器內建許多匯入外掛,用來處理常見的資源類型,例如 PNG 圖片、Collada 與 glTF 模型、Ogg Vorbis 音效等等。
本教學將示範如何建立一個匯入外掛,把自訂文字檔載入作為材質資源。這個文字檔會包含三個以逗號分隔的數值,分別代表顏色的三個通道,產生的顏色會作為匯入材質的反照率(主色彩)。像是這個例子就是純藍色(紅色 0,綠色 0,藍色全滿):
0,0,255
配置
首先我們需要一個一般外掛,負責初始化和銷毀我們的匯入外掛。先新增 plugin.cfg 檔案:
[plugin]

name="Silly Material Importer"
description="Imports a 3D Material from an external text file."
author="Yours Truly"
version="1.0"
script="material_import.gd"
接著我們需要 material_import.gd 檔案,方便在需要時註冊和移除匯入外掛:
# material_import.gd
@tool
extends EditorPlugin


var import_plugin


func _enter_tree():
    import_plugin = preload("import_plugin.gd").new()
    add_import_plugin(import_plugin)


func _exit_tree():
    remove_import_plugin(import_plugin)
    import_plugin = null
當這個外掛被啟用時,會建立一個新的匯入外掛實例(我們很快就會製作),並利用 add_import_plugin() 方法註冊到編輯器。我們將它的參考存放在類別成員 import_plugin,方便移除時使用。當外掛被停用時,會呼叫 remove_import_plugin() 方法來清除記憶體,同時讓編輯器知道這個匯入外掛已經無效。
注意,匯入外掛是參考型別,因此不需要用 free() 函式手動釋放記憶體。超出作用範圍後,會由引擎自動回收。
EditorImportPlugin 類別
這個教學的主角是 EditorImportPlugin 類別。它負責實作 Godot 在處理檔案時所呼叫的相關方法。
讓我們開始實作外掛,逐步撰寫每個方法:
# import_plugin.gd
@tool
extends EditorImportPlugin


func _get_importer_name():
    return "demos.sillymaterial"
第一個方法是 _get_importer_name() 。這個名稱是你的外掛唯一識別,Godot 會用它判斷某個檔案是由哪個匯入外掛處理。當檔案需要重新匯入時,編輯器就知道該呼叫哪個外掛。
func _get_visible_name():
    return "Silly Material"
_get_visible_name() 方法負責回傳匯入類型的名稱,這個名稱會顯示在匯入面板中。
這個名稱會接在「匯入為」之後,例如 「匯入為 Silly Material」。你可以隨意命名,但建議採用具有描述性的名稱。
func _get_recognized_extensions():
    return ["mtxt"]
Godot 的匯入系統會根據副檔名判斷檔案型別。在 _get_recognized_extensions() 方法中,你要回傳一個字串陣列,列出這個外掛支援的所有副檔名。如果有多個外掛都支援同一副檔名,使用者可以在匯入時自行選擇。
小訣竅
像 .json、.txt 這類常見副檔名可能會有多個外掛都支援。此外,專案內也有可能有純粹遊戲用的資料檔案,不應該被匯入。你在匯入時必須小心驗證資料內容,千萬不要假設檔案一定格式正確。
func _get_save_extension():
    return "material"
匯入後的檔案會儲存在專案根目錄的 .import 資料夾。其副檔名應該對應你匯入的資源型別,但因為 Godot 可能無法事先知道你要用哪個(同一資源型別可能有多個有效副檔名),所以你必須在匯入過程中自行宣告。
由於我們要匯入的是材質,就會用專屬於該類型資源的副檔名。如果你要匯入場景,可以用 scn。一般資源則可用 res 副檔名。這些規範僅是慣例,Godot 引擎本身並不強制。
func _get_resource_type():
    return "StandardMaterial3D"
匯入的資源有明確的型別,這樣編輯器就知道它可以套用到哪些屬性欄位。如此一來,你就能直接從檔案系統面板拖曳到屬性檢查器(Inspector)內的屬性欄位。
本例中,我們匯入的是 StandardMaterial3D,可以套用到 3D 物件。
備註
如果你需要從同一副檔名匯入不同型別的資源,必須建立多個匯入外掛。建議把共用的匯入程式碼抽出到其他檔案,以減少重複。
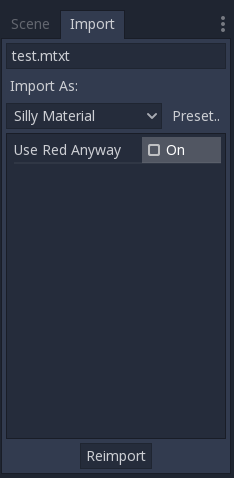
選項與預設組合
你的外掛可以提供不同的選項,讓使用者決定資源要如何被匯入。如果有一組常用組合,你也可以做成預設組合(Preset),讓使用者方便套用。下圖顯示這些選項在編輯器中的呈現方式:
由於預設組合可能很多,而且都是用數字標識,建議用列舉(enum)來定義,方便後續用名稱引用。
@tool
extends EditorImportPlugin


enum Presets { DEFAULT }


...
現在列舉已經定義好,讓我們繼續介紹匯入外掛的其他方法:
func _get_preset_count():
    return Presets.size()
_get_preset_count() 方法會回傳這個外掛定義了幾個預設組合。我們目前只有一個,但可以回傳 Presets 列舉的長度,確保日後擴充時無需改動此方法。
func _get_preset_name(preset_index):
    match preset_index:
        Presets.DEFAULT:
            return "Default"
        _:
            return "Unknown"
這裡介紹 _get_preset_name() 方法,它會把預設組合命名,這些名稱會呈現給使用者,所以一定要簡潔明瞭。
可以用 match 敘述讓程式碼更有架構,未來要新增預設組合也會更方便。也建議用 catch-all 模式回傳預設值,雖然 Godot 不會請你提供超出定義數量的預設名稱,保險起見還是這樣寫比較好。
如果只有一個預設組合,可以直接回傳名稱,但這樣日後新增時要特別注意。
func _get_import_options(path, preset_index):
    match preset_index:
        Presets.DEFAULT:
            return [{
                       "name": "use_red_anyway",
                       "default_value": false
                    }]
        _:
            return []
這個方法用來定義可用的選項。_get_import_options() 會回傳一個字典陣列,每個字典包含一些鍵,編輯器會依此客製化該選項的顯示方式。下表列出可能的鍵:
鍵名 |
型別 |
說明 |
|---|---|---|
|
字串 |
選項名稱。顯示時底線會轉成空格,首字母會自動大寫。 |
|
任意型別 |
此預設組合下的選項預設值。 |
|
列舉值 |
使用 PropertyHint 其中一個值作為提示。 |
|
字串 |
屬性的提示字串,和 GDScript 的 |
|
列舉值 |
用 PropertyUsageFlags 的其中一個值定義用途。 |
name 和 default_value 這兩個鍵是 必要 的,其餘可選。
請注意,get_import_options 方法會收到預設組合的編號,因此你可以針對不同預設組合調整選項(尤其是預設值)。這個範例用了 match 敘述,但如果選項很多、不同預設只差預設值,你可以先建立選項陣列,再根據預設組合調整。
警告
即使你沒有定義任何預設組合(讓 get_preset_count 回傳 0),也還是會呼叫 get_import_options。你必須回傳一個陣列(即使是空的),否則會發生錯誤。
func _get_option_visibility(path, option_name, options):
    return true
對於 _get_option_visibility() 方法,我們直接回傳 true ,因為目前所有選項(其實就一個)都是恆常可見。
如果你想讓某個選項只在另一選項被設為特定值時顯示,可以在這個方法裡加入條件判斷。
import 方法
將檔案轉換成資源的主要流程,是透過 _import() 方法來處理。我們的範例程式碼稍微長一點,以下會拆解說明:
func _import(source_file, save_path, options, r_platform_variants, r_gen_files):
    var file = FileAccess.open(source_file, FileAccess.READ)
    if file == null:
        return FileAccess.get_open_error()

    var line = file.get_line()
我們匯入方法的第一步是開啟並讀取來源檔案。我們用 FileAccess 類別來達成,編輯器會提供 source_file 參數。
如果開檔失敗,就回傳錯誤代碼,讓編輯器知道匯入失敗。
var channels = line.split(",")
if channels.size() != 3:
    return ERR_PARSE_ERROR

var color
if options.use_red_anyway:
    color = Color.from_rgba8(255, 0, 0)
else:
    color = Color.from_rgba8(int(channels[0]), int(channels[1]), int(channels[2]))
這段程式會將剛才讀到的檔案內容依逗號分割。如果不剛好三個數值,視為格式錯誤並回報錯誤。
接著建立一個新的 Color 變數,根據輸入檔案的數值設置。如果有啟用 use_red_anyway 選項,則強制設為純紅色。
var material = StandardMaterial3D.new()
material.albedo_color = color
這部分會建立一個新的 StandardMaterial3D 物件,也就是我們要匯入的資源,然後把顏色設為前面取得的值。
return ResourceSaver.save(material, "%s.%s" % [save_path, _get_save_extension()])
這是最後也是很重要的一步,因為這裡要把資源存到硬碟上。存檔路徑會由編輯器透過 save_path 參數傳入,注意這裡 沒有 副檔名,所以我們要用 string formatting 加上去。這邊呼叫我們前面定義的 _get_save_extension 方法,可以確保副檔名和前面定義的同步。
我們也會回傳 ResourceSaver.save() 的結果,這樣如果這一步出錯,編輯器就能收到錯誤訊息。
平臺變體與產生檔案
你可能已經注意到,我們的外掛忽略了 import 方法的兩個參數。這些是*回傳參數*(名稱開頭有 r),編輯器在呼叫你的 import 方法後會讀取這些內容。它們都是陣列,可以由你填入資訊。
如果你需要根據不同目標平臺匯入不同的資源,就要用到 r_platform_variants 參數。雖然名稱是*平臺*變體,其實是根據 feature tags 來判斷,所以同一平臺根據設定也可能有多種變體。
要匯入平臺變體時,你要在副檔名之前加上 feature tag 來儲存檔案,然後把這個 tag 推進 r_platform_variants 陣列,讓編輯器知道你有處理這個變體。
舉例來說,假設我們要為行動裝置平臺產生不同的材質,可以這樣處理:
r_platform_variants.push_back("mobile")
return ResourceSaver.save(mobile_material, "%s.%s.%s" % [save_path, "mobile", _get_save_extension()])
r_gen_files 參數則是給你在匯入過程中產生、需要保留的額外檔案。編輯器會根據這個陣列管理依賴,確保這些檔案不會被誤刪。
這也是一個陣列,你要把所有你儲存的檔案完整路徑填進去。舉例來說,如果我們為下一個 pass 產生另一個材質並存成不同檔案,可以這樣做:
var next_pass = StandardMaterial3D.new()
next_pass.albedo_color = color.inverted()
var next_pass_path = "%s.next_pass.%s" % [save_path, _get_save_extension()]

err = ResourceSaver.save(next_pass, next_pass_path)
if err != OK:
    return err
r_gen_files.push_back(next_pass_path)
測試這個外掛
以上都是理論,現在匯入外掛已經完成,來實際測試一下。請先建立一個範例檔(內容如前言所述),存成 test.mtxt。然後到「專案設定」啟用這個外掛。
如果一切順利,匯入外掛會被加入編輯器,並掃描檔案系統,讓自訂資源出現在「檔案系統」面板。點選該檔案並切換到「匯入」面板,就能看到唯一的選項。
在場景中建立一個 MeshInstance3D 節點,並為其 Mesh 屬性設定一個新的 SphereMesh。展開 Inspector 內的 Material 屬性,然後把檔案從檔案系統面板拖曳到該屬性上。此物件會在視窗中以匯入材質的藍色顯示。
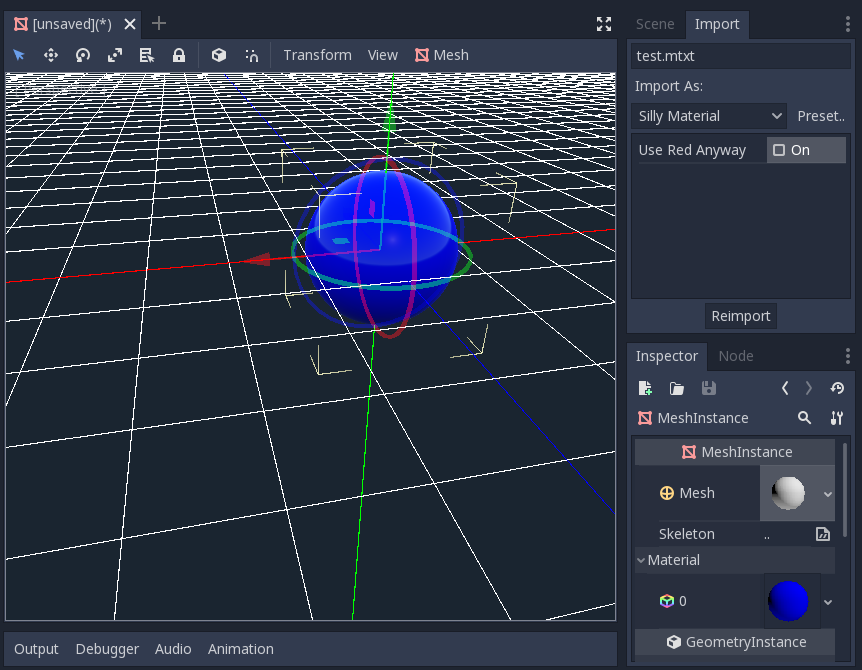
切換到「匯入」面板,勾選「強制使用紅色」選項,並點選「重新匯入」。這會更新已匯入的材質,物件顏色也會自動變成紅色。
這樣就完成了!你的第一個匯入外掛已經搞定!現在可以發揮創意,為自己喜歡的格式寫外掛。這種方式可以讓你用自訂格式管理資料,但在 Godot 裡就像用原生資源一樣方便。這也顯現出 Godot 匯入系統的強大與可擴充性。