Attention: Here be dragons
This is the latest
(unstable) version of this documentation, which may document features
not available in or compatible with released stable versions of Godot.
Checking the stable version of the documentation...
3D 灯光和阴影
介绍
光源发出灯光,灯光会与材质相混合,产生可见的结果。场景可以有很多不同类型的光源:
来自材质本身的自发光颜色(但是无法影响附近的对象,除非进行了烘焙,或者启用了屏幕空间间接光照)。
灯光节点:DirectionalLight3D、OmniLight3D、SpotLight3D。
Environment 或 反射探针 中的环境光。
全局光照(LightmapGI、VoxelGI、SDFGI)。
自发光是材质的属性。更多相关内容见 标准 3D 材质与 ORM 3D 材质 教程。
参见
可以使用 3D 光影演示项目动态比较不同类型的灯光。
灯光节点
灯光节点有三种:DirectionalLight3D、OmniLight3D、SpotLight3D。让我们来看看灯光的通用参数:
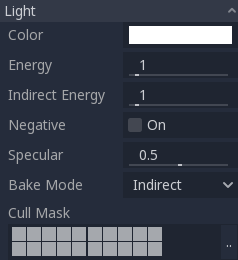
每个属性都有特定的功能:
Color:发光的基础颜色。
Energy:能量乘数。这对于使灯光饱和或使用高动态范围光照非常有用。
Indirect Energy:间接能量。用于间接光(反弹的光)的次级乘数。适用于使用光照贴图全局照明、VoxelGI 和 SDFGI。
Volumetric Fog Energy:体积雾能量。用于体积雾的次级乘数。仅在启用体积雾时有效。
Negative:(减色)光变为减色而不是添加。对于手动补偿一些黑暗角落有时很有用。
Specular:镜面反射。影响受此光影响的物体中镜面反射斑点的强度。值为零时,该光变为纯漫反射光。
Bake Mode:设置灯光的烘焙模式。见使用光照贴图全局照明。
Cull Mask:(剔除遮罩)在下面选定的图层中的物体将受到此光的影响。请注意,通过这个剔除遮罩禁用的对象仍然会投射阴影。如果你不希望被禁用的物体投射阴影,请将 GeometryInstance3D 上的 Cast Shadow 属性调整为所需的值。
参见
如果你希望使用真实世界的单位来配置灯光的强度和色温,请参阅物理灯光和相机单位。
灯光数量限制
使用 Forward+ 渲染器时,Godot 使用集群方法进行实时光照。可以添加任意数量的灯光(只要性能允许)。但是,当前相机视图中可以存在的集群元素的默认上限仍为 512 个。集群元素是指全向灯、聚光灯、贴花或反射探针。可以通过调整项目设置 > 渲染 > 限制 > 集群构建器的最大集群元素数来增加该上限。
使用 Mobile 渲染器时,每个网格资源有 8 个 OmniLight 加 8 个 SpotLight 的限制。此外,在当前相机视图中可渲染的 OmniLight 和 SpotLight 数量限制为 256 个。这些限制目前无法更改。
使用兼容渲染器时,每个网格资源最多可渲染 8 个 OmniLight 加 8 个 SpotLight。此限制可以在 渲染 > 限制 > OpenGL 的高级项目设置里调整 最大可渲染元素数 和/或 单对象最大光源数 来提升,但会牺牲性能和延长着色器编译时间。可以通过减少此限制来减少着色器编译时间并略微提升性能。
在所有的渲染方法中,最多可以同时显示 8 个 DirectionalLight。但是,每增加一个启用阴影的 DirectionalLight,都会降低每个 DirectionalLight 的有效阴影分辨率。这是因为所有灯光共享方向阴影图集。
如果超过了渲染限制,灯光就会在摄像机移动过程中跳进跳出,这可能会分散注意力。在灯光节点上启用 Distance Fade 有助于减少这一问题,同时还能提高性能。将网格分割成更小的部分也会有所帮助,尤其是关卡几何体(这也能提高剔除效率)。
如果你需要渲染的灯光数量超过了给定渲染器所能提供的数量,请考虑使用烘焙光照贴图,并将灯光的烘焙模式设置为静态。这样就可以完全烘焙光照,从而加快渲染速度。你也可以使用任何全局光照技术的自发光材质来替代在大范围内发光的灯光节点。
阴影贴图
灯光可以可选地投射阴影。这使它们具有更好的真实感(光线不会照到被遮挡的区域),但它会带来更大的性能开销。有一个通用阴影参数列表,每个参数也有一个特定的功能:
Enabled:选中以启用此灯光下的阴影贴图。
Opacity:(不透明度)被遮挡的区域会因该不透明度系数而变暗。默认情况下,阴影是完全不透明的,但是可以更改此设置,以使阴影对于给定的光线来说是半透明的。
Bias:(偏置)当此参数太小时,阴影会打在物体自己身上。当太大时,阴影会与物体本体分开。请调整到最适合你的状态。
Normal Bias:当此参数太小时,阴影会打在物体自己身上。当太大时,阴影会与物体本体分开。请调整到最适合你的状态。
Transmittance Bias:(透射率偏置)当此参数太低时,启用透射率的材质上,阴影会打在物体自己身上。如果太高,阴影将不会影响始终启用透射率的材质。请调整到最适合你的状态。
Reverse Cull Face:反转表面剔除,当阴影贴图使用反转表面剔除渲染时,在某些场景表现更好。
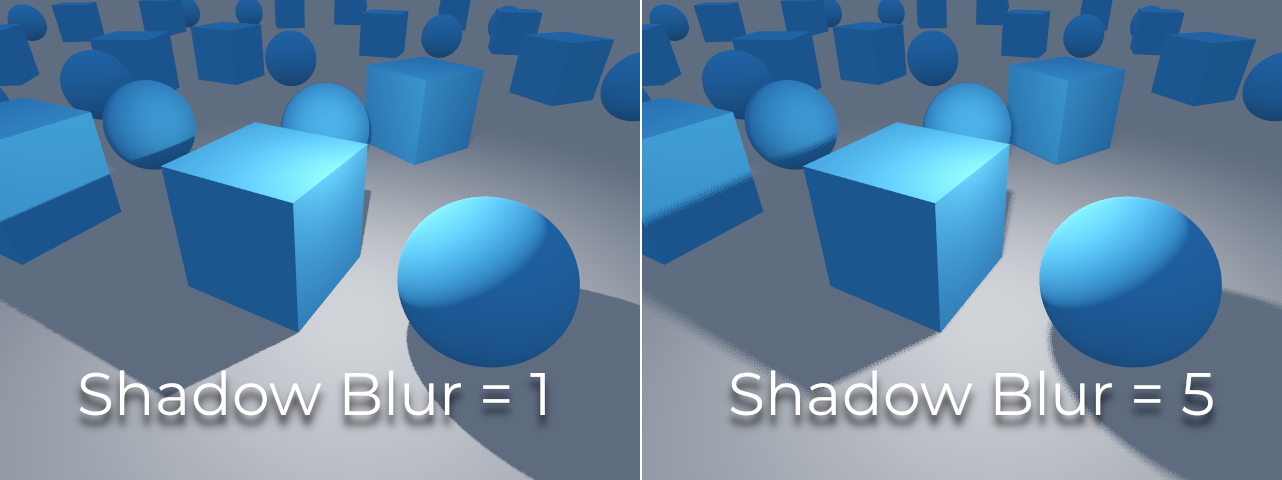
模糊(Blur):倍增该灯光的阴影模糊半径。这适用于传统阴影贴图和接触硬化阴影(角度距离(Angular Distance)或大小(Size)大于
0.0的灯光)。数值越大,阴影越柔和,对于移动的物体来说,阴影在时间上也会显得更加稳定。增加阴影模糊的缺点是,它会让用于滤波的颗粒图案更加明显。另请参阅 阴影过滤模式。Caster Mask(投射遮罩):只有在这些图层中的对象才能投射阴影。注意,这个遮罩不会影响阴影投射到哪些对象上。
调整阴影偏置
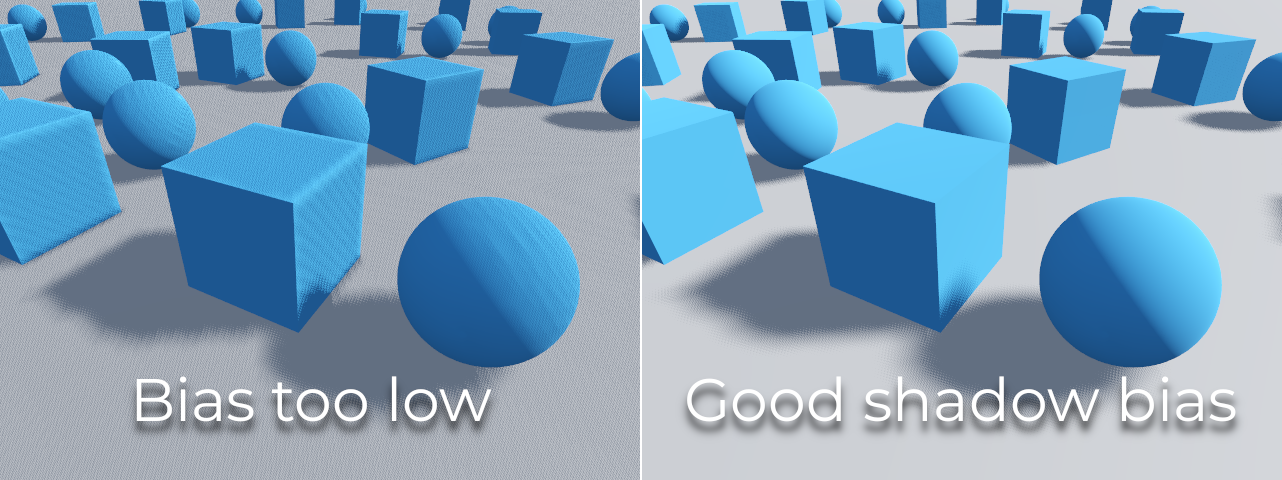
下图是调整偏置的图像。默认值适用于大多数情况,但通常来说,它取决于几何的大小和复杂程度。
如果给定灯光的 Shadow Bias 或 Shadow Normal Bias 设置得太低,阴影就会“涂抹”到物体上。这将导致光线的预期外观变暗,称为阴影失真(shadow acne):
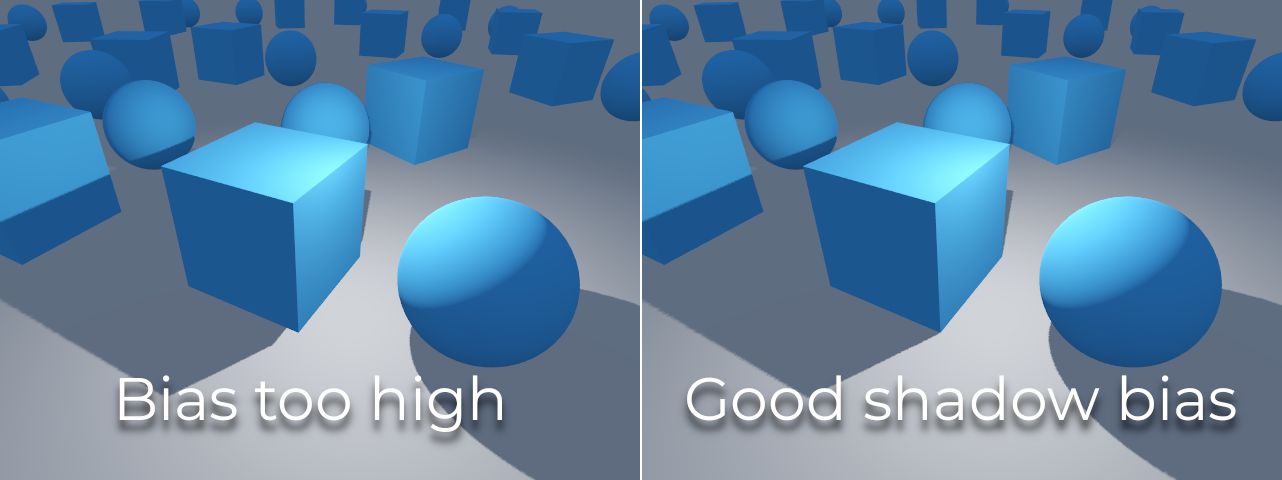
另一方面,如果给定光线的 Shadow Bias 或 Shadow Normal Bias 设置得太高,阴影可能看起来与物体脱节。这被称为阴影悬浮(peter-panning):
一般来说,增加 Shadow Normal Bias 比增加 Shadow Bias 更可取。增大 Shadow Normal Bias 不会像增大 Shadow Bias 那样导致更多的阴影悬浮,但仍能有效解决大多数阴影失真问题。增加 Shadow Normal Bias 的缺点是会使某些物体的阴影看起来更薄。
任何偏置问题都可以通过提高阴影贴图分辨率来解决,尽管这可能会导致性能下降。
备注
调整阴影贴图设置是一门艺术,没有“放之四海而皆准”的设置。为了获得最佳的视觉效果,你可能需要针对每个灯光使用不同的阴影偏置值。
关于外观变化的注意事项:为光源启用阴影时需注意,与兼容性渲染器中关闭阴影渲染时的情况相比,光源的外观可能发生变化。由于较旧移动设备的限制,阴影是通过多通道渲染方式实现的,因此启用阴影的光源在 sRGB 色彩空间而非线性空间中进行渲染。这种渲染空间的变化有时会显著影响光源的外观。若需获得与未启用阴影的光源相似的外观,你可能需要调整光源的能量设置。
平行光
这是最常见的光线类型,代表了很远的光源(如太阳)。它也是计算中最便宜的光,应该尽可能使用(虽然它不是计算起来最便宜的阴影贴图,但这点稍后再说)。
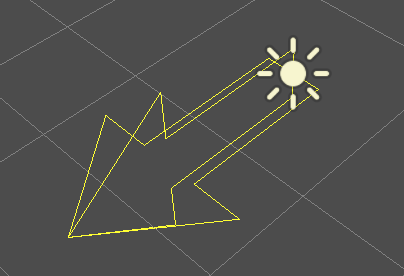
平行光模拟覆盖整个场景的无限数量的平行光线。平行光节点由指示光线方向的大箭头表示。但是,节点的位置根本不会影响照明,它可以在任何地方。
每个表面的正面被光线照射,而其他部分则保持黑暗。与大多数其他类型的光不同,平行光没有特定的参数。
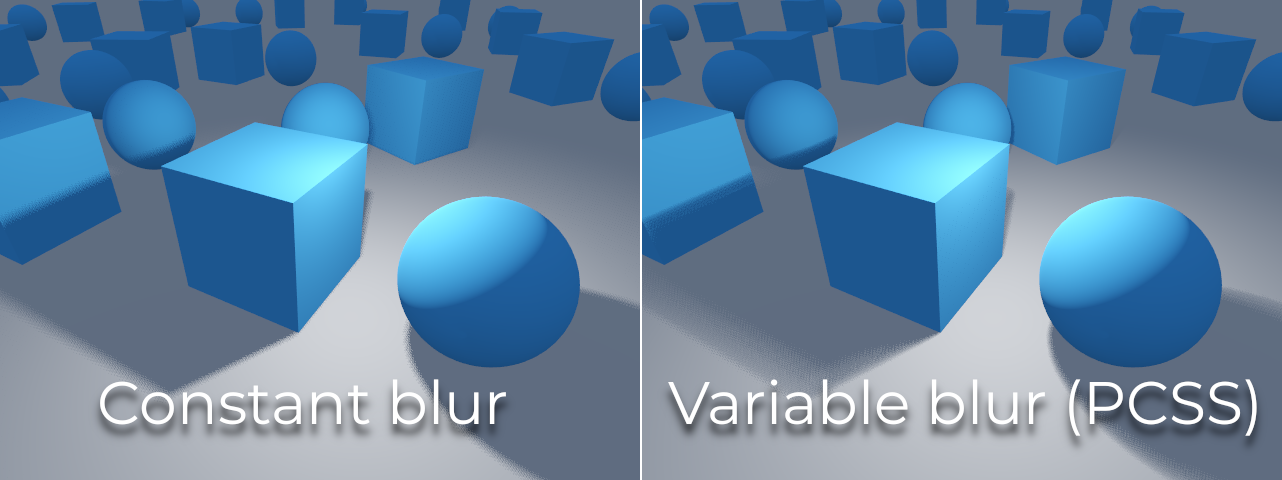
平行光还提供了一个 Angular Distance 属性,用于确定光源的角大小(以度为单位)。将此值增加到 0.0 以上,会使远离投射体的阴影变得更加柔和,同时也会影响程序化天空材质中太阳的外观。这被称为接触硬化阴影(也称为 PCSS)。
作为参考,从地球看太阳的角距离约为 0.5。这种阴影的性能消耗资源较高,因此如果在启用阴影的灯光上将此值设置为高于 0.0,请查看 PCSS 建议 中的建议。
方向光阴影贴图
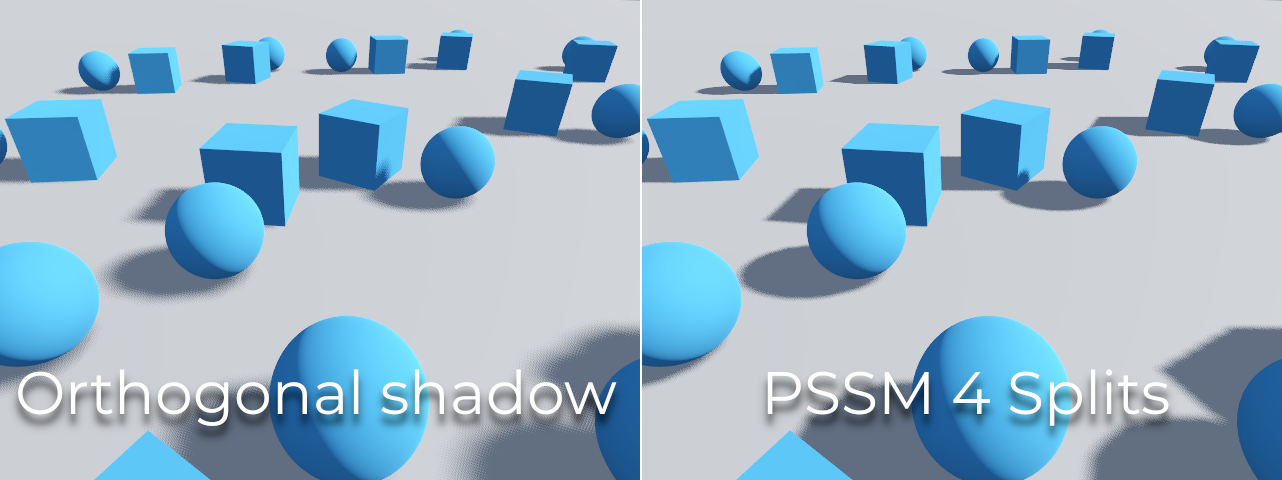
为了计算阴影贴图,从覆盖整个场景(或最大距离)的正交角度渲染场景(仅深度)。但是,这种方法存在一个问题,因为靠近相机的物体接收到的低分辨率阴影可能看起来是块状的。
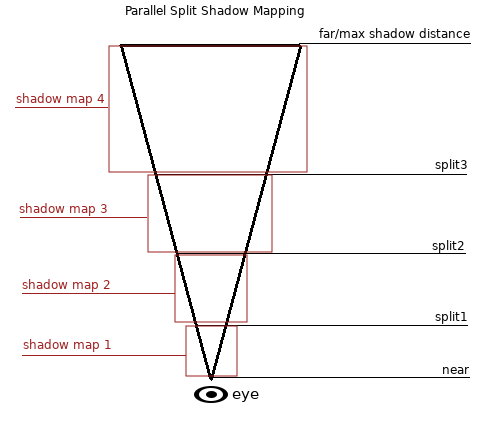
为了解决这个问题,我们使用了一种名为平行分割阴影贴图(PSSM,Parallel Split Shadow Maps)的技术。这将视锥体分割成 2 个或 4 个区域。每个区域都有自己的阴影贴图。这使得靠近观察者的小区域可以具有与远处巨大区域相同的阴影分辨率。当为 DirectionalLight3D 启用阴影时,默认阴影模式为具有 4 个分割的 PSSM。在对象大到足以出现在所有四个分割区域的情况下,它会导致绘制调用增加。具体来说,这样的对象将被总共渲染五次:四个阴影分割各渲染一次,最终场景渲染一次。这可能会影响性能,理解该行为对于优化场景和管理性能预期非常重要。
有了它,阴影变得更加详细:
为了控制PSSM,暴露了许多参数:
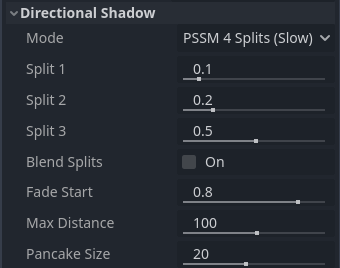
每个分割距离都是相对于相机最远处进行控制的(如果大于 0,则为阴影 Max Distance(最大距离))。0.0 是眼睛位置,1.0 是阴影在一定距离处结束的位置。分割介于两者之间。默认值通常效果很好,但一般会调整第一个分割数值,以便为近处对象提供更多细节(比如第三人称游戏中的角色)。
请务必根据场景需要设置阴影的 Max Distance 。最大距离越小,阴影效果越好,性能也越高,因为阴影渲染中需要包含的物体越少。你还可以调整 Fade Start 来控制远处阴影淡出距离的强度。对于 Max Distance 完全覆盖任何给定摄像机位置的场景,可以将 Fade Start 增加到 1.0 ,以防止阴影在远处渐变。在 Max Distance 没有完全覆盖场景的场景中,不应该这样做,因为阴影会在远处突然消失。
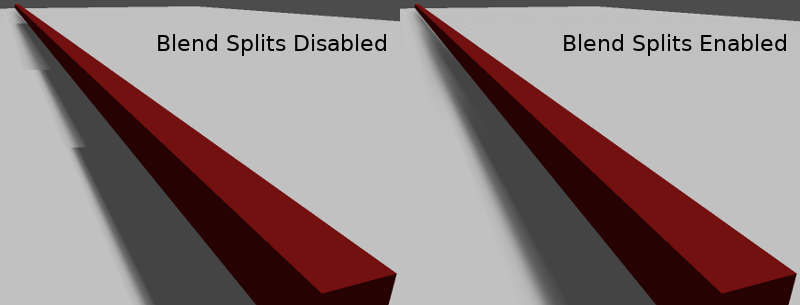
有时,一个分割与下一个之间的过渡看起来很糟糕。要解决此问题,可以打开 Blend Splits (混合分割)选项,牺牲细节和性能以换取更平滑的过渡:
Shadow > Normal Bias 参数可用于修复当对象垂直于光线时自阴影的特殊情况。唯一的缺点是它会使阴影变得更薄。在大多数情况下,在增加 Shadow > Bias 之前,请考虑增加 Shadow > Normal Bias 。
最后,如果未细分网格的大型对象出现了阴影缺失的情况,可以调整 Pancake Size(压平区大小)属性来修复。只有在发现阴影缺失与阴影偏置问题无关时,才可以更改此值。
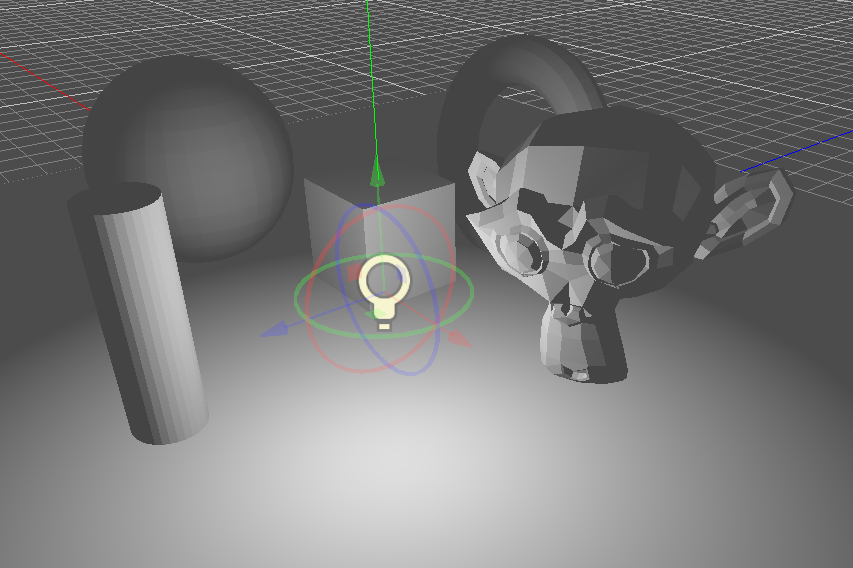
全向光
全向光是一种点光源,可在所有方向上发射光,直至给定的半径。
在现实生活中,光衰减是个和距离成反比的函数,这意味着全向光没有半径。这是一个问题,因为这意味着计算几个全向光会变得很困难。
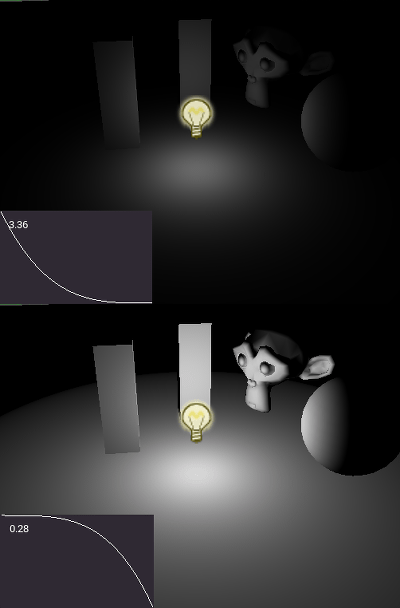
为了解决这个问题,引入了 Range(范围)参数和衰减函数。
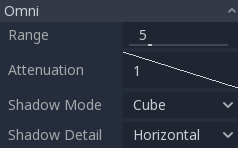
这两个参数允许调整其在视觉上的工作方式,以便找到美学上令人愉悦的结果。
OmniLight3D 还提供了一个 Size(尺寸) 参数。调大这个数值,会让光线随着距离衰减得更慢,并且当物体离产生阴影的投射者较远时,阴影会显得更模糊。这在一定程度上可以用来模拟面光源的效果。这种效果被称为 接触硬化 阴影(也称为 PCSS)。这种阴影的计算成本很高,因此,如果你要在开启了阴影的灯光上将这个值设置为大于 0.0 ,请务必查阅 PCSS 建议 中的相关建议。
全向光阴影贴图
全向光的阴影贴图相对简单。需要考虑的主要问题是用于渲染它的算法。
全向光阴影可以渲染为 Dual Paraboloid(双抛物面)或 Cube(方形)映射。Dual Paraboloid 的渲染速度很快,但可能会导致变形,而 Cube 更正确但速度较慢。默认值为 Cube,但可以考虑将其改为 Dual Paraboloid,以让光线不会产生太大的视觉差异。
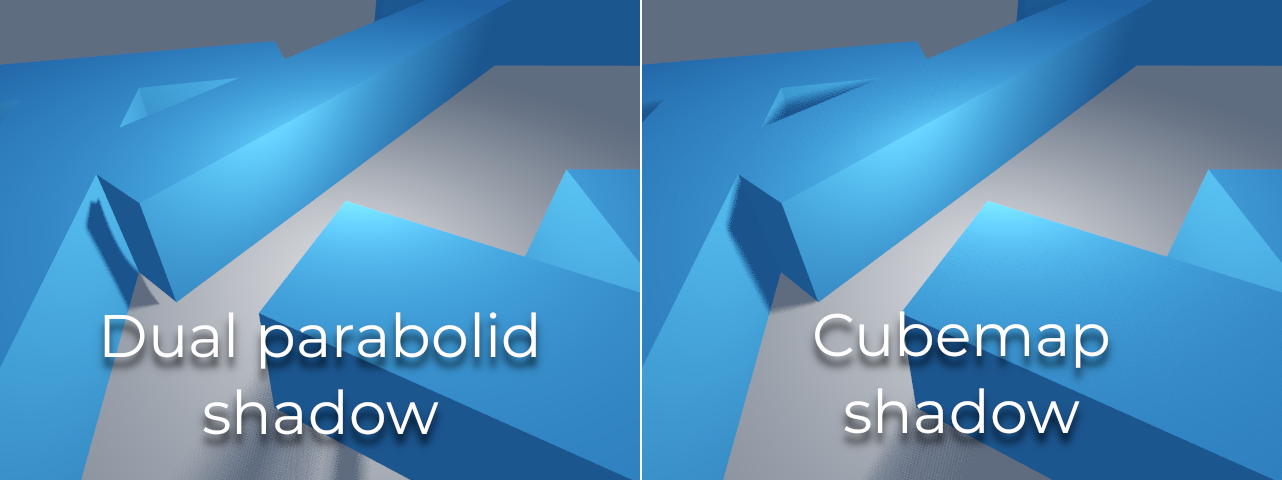
如果渲染的对象大部分是不规则且细分的,那么 Dual Paraboloid (双抛物线)通常就足够了。无论怎么说,由于这些阴影被缓存在阴影图集中(后面会详细介绍),对于大多数场景而言,它可能不会对性能产生影响。
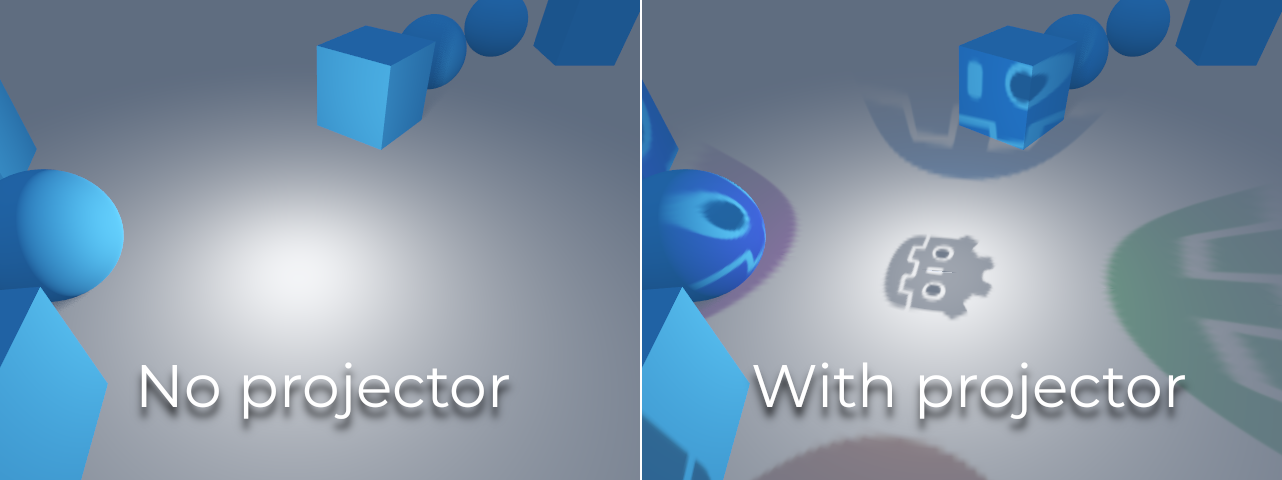
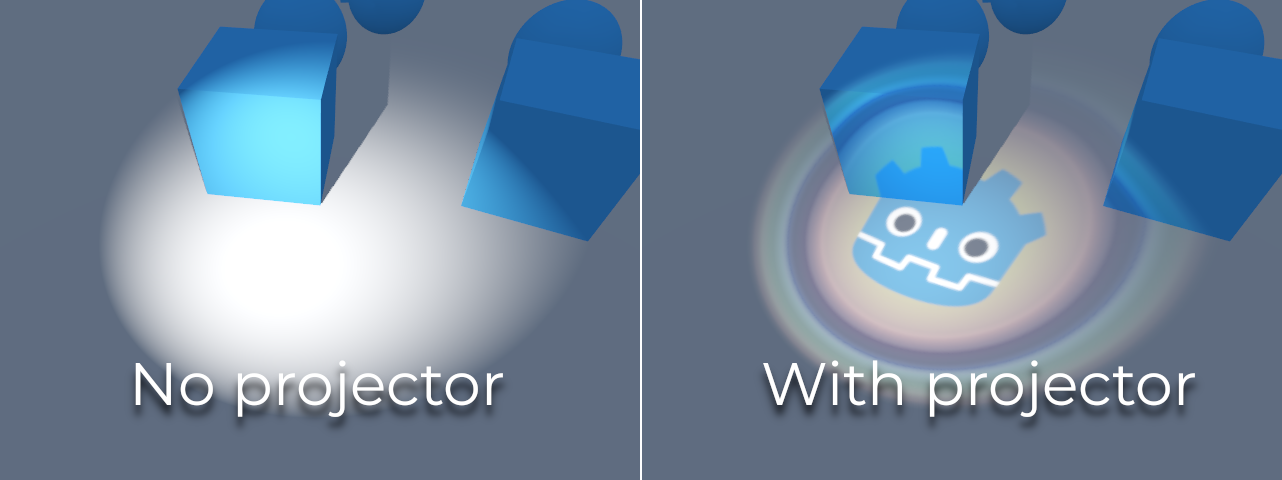
启用阴影功能的全向灯光可以使用投影。投影纹理会将灯光的颜色乘以纹理上给定点的颜色。因此,一旦分配了投影纹理,灯光通常会显得更暗;你可以增加 Energy 来弥补这一点。
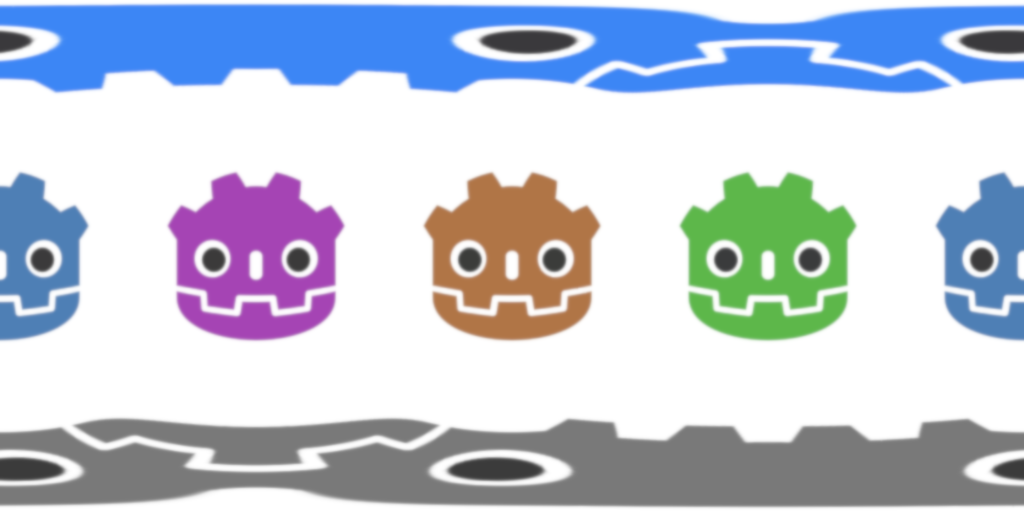
全方位光投影纹理需要特殊的 360° 全景贴图,类似于 PanoramaSkyMaterial 纹理。
通过下面的投影纹理,可以得到以下结果:
小技巧
如果你已获得立方体贴图形式的全方位投影图像,你可以使用 这个基于网络的转换工具 将它们转换为单一的全景图像。
聚光
聚光与全向光类似,但是它们只发光到锥形(或“截断”)中。它们可用于模拟手电筒、车灯、反射器、聚光灯等。这种类型的光也会向其指向的相反方向衰减。
聚光和 OmniLight3D 共用相同的 Range(范围)、Attenuation(衰减)和 Size(大小),并添加了两个额外参数:
Angle:(角度)光线的光圈角度。
Angle Attenuation:(角度衰减)锥形衰减,有助于柔化锥形边界。
聚光灯阴影贴图
聚光灯的阴影贴图参数与全方位光源相同。由于只需渲染一个阴影纹理(而不是渲染 6 个面,或在双 Parabolid 模式下渲染 2 个面),渲染聚光灯阴影贴图的速度明显快于全方位光源。
启用阴影功能的光线可以使用投影。投影纹理会将灯光的颜色乘以纹理上给定点的颜色。因此,一旦分配了投影纹理,灯光通常会显得更暗;你可以增加 Energy 来弥补这一点。
与全向光投影不同,聚光灯投影纹理不需要遵循特殊格式就能看起来正确无误。它的映射方式类似于贴花。
通过下面的投影纹理,可以得到以下结果:

备注
广角聚光灯的阴影质量会低于窄角聚光,因为阴影贴图会分布在更大的表面上。角度大于 89 度时,聚光阴影将完全停止工作。如果你需要更宽的灯光阴影,请使用全向光。
Area light
Sometimes, you want lighting to come from a large area instead of a single point. Area lights are useful for simulating soft, diffuse lighting, such as light coming from a window or a lit billboard.
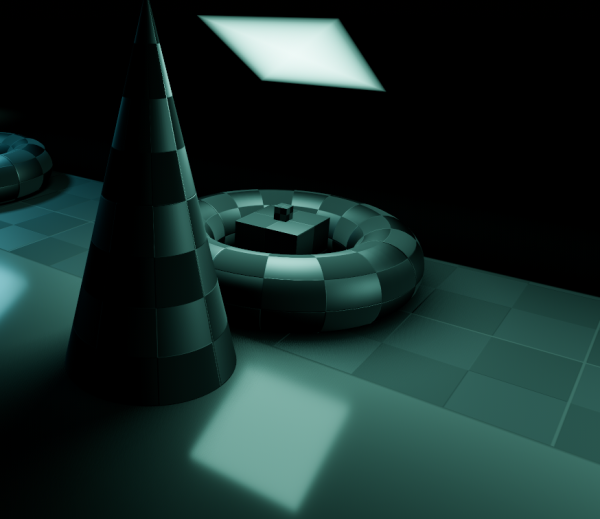
Godot 专门提供了 AreaLight3D 节点来实现这个目的,它会从一个矩形的区域向外发射光线。这个节点本身只负责发光,在场景里是没有任何其他视觉显示的(也就是说你看不见它本体)。下面这些截图为了演示方便,特意在面光源下面加了一个 Sprite3D 节点作为子节点,这样就能在画面里直观地看到这个光源的位置和大小了。
警告
This type of light is the most expensive to render in real-time. It should be used sparingly, especially when shadows are enabled. Consider using them only for cinematics or when targeting high-end devices.
In Forward+, as soon as one area light is visible in the view frustum, it incurs an additional performance cost on all rendered objects in the scene, even those that are not reached by an area light. This tradeoff allows for a greater number of area lights to be rendered (clustered lighting).
In Mobile and Compatibility, only objects that are reached by an area light incur an additional performance cost.
面光源同样可以投射阴影,并且默认会使用 PCSS 技术来模拟出富有变化的半影(也就是阴影边缘那种柔和、模糊的过渡效果)。你可以通过 Light3D 的 Size(尺寸) 属性来控制这个半影的大小。不过,这种效果对性能的消耗相当大,所以如果你不需要这种柔和的阴影,可以把 Size 属性设为 0.0 来直接关闭它。
备注
如果投射阴影的物体自身细分度不够(也就是模型的网格面数太少),而且它又离面光源非常近的话,面光源投出的阴影看起来可能会有点不对劲。这个限制和全向光(Omni Light)使用双抛物面(Dual Paraboloid)阴影模式时遇到的问题是一样的。
备注
由于面光源在实时光栅化渲染器中非常难以模拟,所以它们伴随着不少局限性。
对于体积较小的光源,如果你使用点光源(point lights),效果通常会更好。面光源投射的阴影其实只是一种粗略的近似模拟,因为它们的阴影在计算时本质上还是被当作点光源来处理的,所以阴影边缘可能会出现扭曲或变形的情况。如果想要得到更好的效果,请务必确保处于光源照射范围内的模型拥有足够的细分度(也就是网格面数要够多)。
面光源在光线以极小的掠射角(也就是几乎平行地擦过表面)照射时,很容易在正对着光源的物体背面发生漏光现象,所以在摆放它们的位置时一定要多加小心。
最后,并不是所有的材质特性都能得到完全支持。面光源在实际应用中,基本只能完美支持兰伯特(Lambertian)漫反射和 GGX 镜面高光着色。而且,各向异性材质(Anisotropic Materials)在面光源下会失去其特性,看起来就像普通的各向同性材质一样。此外,面光源目前也没有实现顶点着色(Vertex Shading)。
面光源会在一个由 Area > Size(区域 > 尺寸) 属性定义的矩形区域内向外发射光线(注意不要把它和通用的 Light3D Size 属性搞混了哦)。为了得到符合物理规律的真实效果,你应该把这个区域的大小调整得和你想要模拟的现实生活中的光源尺寸一致。举个例子,如果你要模拟一根长 1 米、宽 10 厘米的霓虹灯管,那就把面光源的区域尺寸设为 (1, 0.1) ,然后根据实际情况相应地调整一下能量(Energy)大小就好啦。
默认情况下,光源的能量是自动归一化的:也就是说,发光区域越大,光线就会变得越弱。这样做的好处是,当你调整区域大小时,不需要手动去修改能量值来补偿亮度,这在制作动画时非常实用。如果你希望光源的能量不受区域大小的影响,可以取消勾选 Area > Normalize Energy(区域 > 归一化能量) 来关闭这个功能。
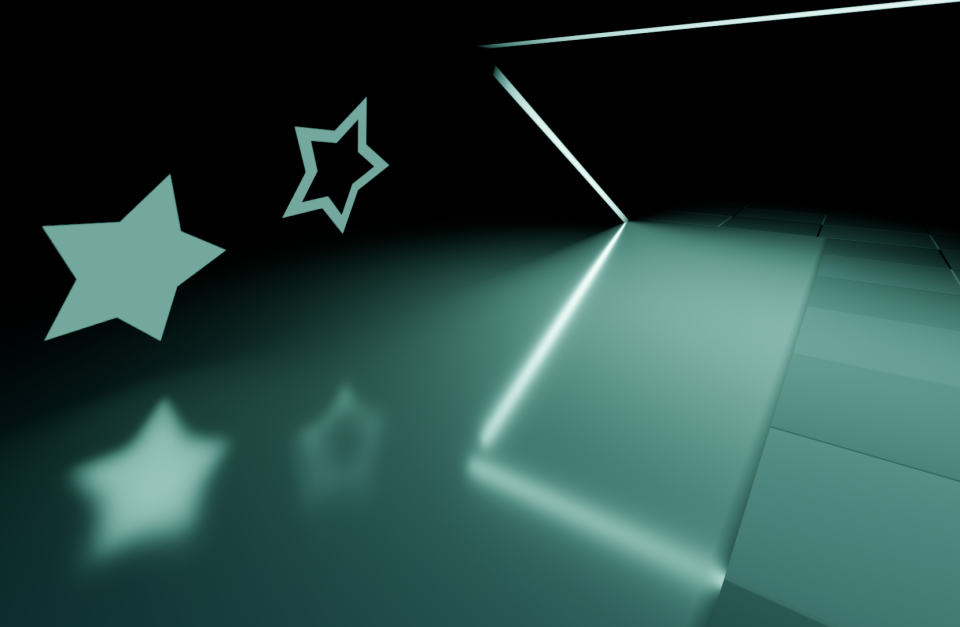
这个矩形区域可以选择性地添加贴图。你可以利用这一点,把光源的形状改成任意的 2D 形状,或者给它染上不同的颜色。贴图的透明通道(Alpha 通道)会被视作黑色(也就是完全不透光)。面光源的贴图会根据物体表面的粗糙度,清晰地反映在镜面反射中。这种表现方式与全向光或聚光灯的投影仪(Projector)模式不同,因为它并不会把贴图直接投射到所有的漫反射光照上。
如果你使用的贴图边缘是透明或者黑色的,建议最好在边缘处预留几个像素的空白间距(也就是留一点缝隙)。这样做可以确保贴图在渲染时,边缘能够被平滑地模糊过渡。
备注
在运行时(也就是游戏或程序跑起来的时候)动态更改面光源的贴图可能会非常消耗性能,特别是当这张贴图的分辨率很大时。
为了降低在运行时(游戏进行中)切换贴图带来的性能影响,请确保面光源贴图的每一条边长要么是 128 像素的倍数,要么是 2 的幂次方。这样做可以省去一个‘缩放处理’的步骤,从而加快贴图切换的速度。另外,贴图不一定要是正方形的才能达到最佳效果。比较理想的贴图尺寸例子包括 32×64、128×128 和 256×384。
在兼容性(Compatibility)渲染器中,不支持带纹理的面光源。
阴影图集
与具有自己的阴影纹理的平行光不同,全向光和聚光被分配了阴影图集的槽位。该图集可以在高级项目设置(渲染 > 灯光和阴影 > 位置阴影)中进行配置。
这个分辨率适用于整个阴影图集。该图集分为四个象限:
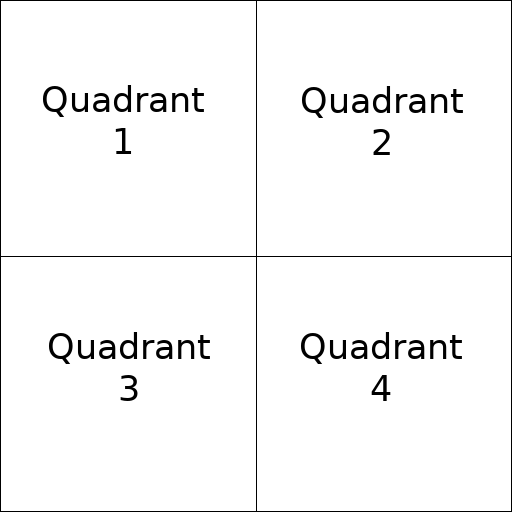
每个象限可以细分,分配任意数量的阴影贴图。以下是默认细分方式:
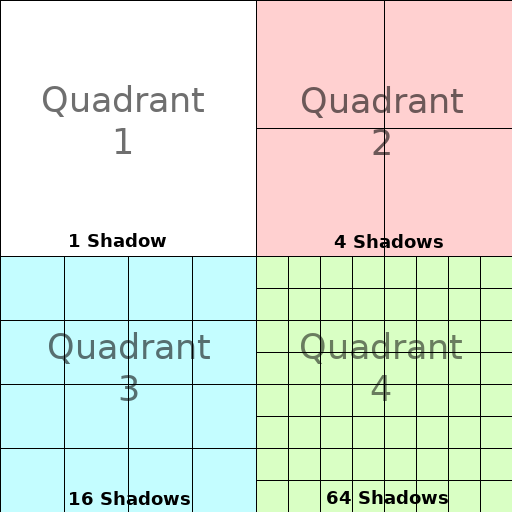
阴影图集分配空间如下:
最大阴影贴图尺寸(未使用细分时)代表屏幕尺寸(或更大)的灯光。
细分(较小的贴图)表示距离视图较远并且比例较小的灯光的阴影。
每一帧,以下过程被应用于所有光:
检查灯光是否在正确大小的插槽上。如果没有,重新渲染它并将其移动到更大/更小的插槽。
检查影响阴影贴图的任何对象是否已更改。如果是的话,重新渲染光线。
如果上述情况均未发生,则不执行任何操作,阴影保持不变。
如果一个象限中的槽位满了,光线会被推回到更小的槽位中,取决于大小和距离。如果所有象限中的所有槽位都已满,则某些灯光即使启用了阴影,也将无法渲染阴影。
默认的阴影分配策略最多可以渲染 88 盏灯,并在相机锥体中启用阴影(4 + 4 + 16 + 64):
第一象限也是最精细的象限,可以存储 4 个阴影。
第二象限可存储 4 个其他阴影。
第三象限可存储 16 个阴影,但细节较少。
第四象限也是细节最少的象限,可存储 64 个阴影,但细节更少。
每个象限使用较多的阴影数量可以支持启用阴影的更多灯光,同时还能提高性能(因为阴影将以较低的分辨率为每个灯光渲染)。不过,增加每个象限的阴影数量的代价是降低阴影质量。
在某些情况下,你可能想要使用不同的分配策略。例如,在自上而下看的游戏中,所有灯光的大小都大致相同,你可能希望将所有象限设置为具有相同的细分,以便所有灯光都具有相似质量级别的阴影。
平衡性能与质量
阴影渲染是 3D 渲染性能方面的重要议题。做出正确的选择非常重要,这样才能避免制造出瓶颈。
平行光的阴影质量设置可以在运行时通过调用合适的 RenderingServer 方法进行更改。
位置光(全向光/聚光)的阴影质量设置可以在运行时通过根 Viewport 进行更改。
阴影贴图大小
高阴影分辨率会带来更清晰的阴影,但性能会大幅下降。还应注意,更清晰的阴影并不总是更逼真。在大多数情况下,应将其保持为默认值 4096 或针对低端 GPU 降低至 2048。
如果在减小阴影贴图大小后,位置阴影变得过于模糊,可以通过调整阴影图集象限以包含较少的阴影来解决。这样就能以更高的分辨率渲染每个阴影。
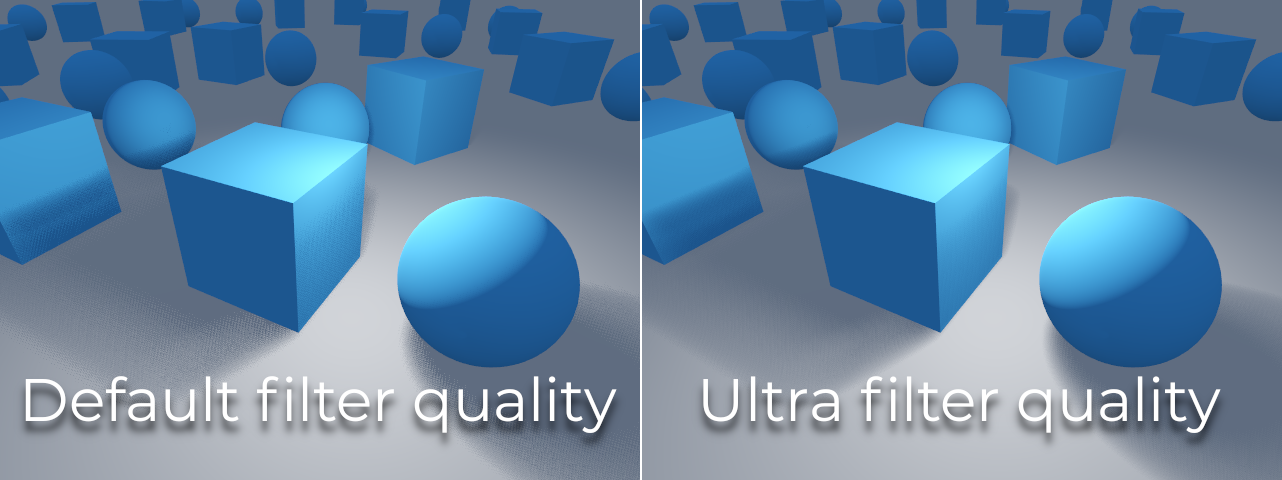
阴影过滤模式
这里可以选择多种阴影贴图质量设置。默认的 Soft Low 在性能和质量之间取得了很好的平衡,适用于有细节纹理的场景,因为纹理细节有助于使颜色抖动的纹路不那么明显。
不过,在纹理细节较少的项目中,颜色抖动的纹路可能会更加明显。要隐藏这种纹路,可以启用时间抗锯齿(TAA)、AMD FidelityFX Super Resolution 2.2(FSR2)、快速近似抗锯齿(FXAA) 或将阴影滤镜质量提高到 Soft Medium 或更高。
Soft Very Low 设置会自动减少阴影模糊,使低采样数产生的伪影不那么明显。相反,Soft High 和 Soft Ultra 设置会自动增加阴影模糊,以更好地利用增加的样本数。
16 位与 32 位
默认情况下,Godot 使用 16 位深度纹理进行阴影贴图渲染。在大多数情况下,我们都建议使用这种方式,因为它的性能更好,而且质量也不会有明显差异。
如果禁用 16 Bits,则将使用 32 位色深的纹理。这样做可以减少大型场景和启用阴影的大型灯光中的伪影。不过,这种差异通常几乎不明显,但却会带来显著的性能损失。
灯光/阴影的距离淡出
OmniLight3D 和 SpotLight3D 提供了一些能够隐藏远距离灯光的属性。如果是在大型场景中,并且存在几十盏灯,就能够显著提升性能。
Enabled:(启用)控制是否启用距离淡入淡出( LOD 的一种形式)。 光线将在 Begin + Length 内淡出,之后它将被剔除且根本不会发送到着色器。 使用它可以减少场景中活动灯光的数量,从而提高性能。
Begin:(开始)光线开始消失时距相机的距离(以 3D 单位表示)。
Shadow:(阴影)阴影开始消失时距相机的距离(以 3D 单位表示)。 与光线相比,这可用于更快地淡出阴影,从而进一步提高性能。 仅当为灯光启用阴影时才可用。
Length: (长度)光线和阴影淡出的距离(以 3D 单位表示)。 光线在这段距离内慢慢变得更加透明,最后完全不可见。 值越高,淡出过渡越平滑,这样的配置在相机快速移动时更合适。
PCSS 建议
百分比接近软阴影(PCSS)会提供更真实的阴影贴图外观,半影(penumbra)大小根据光源(caster)与接收阴影的表面之间的距离而变化。这会带来很高的性能成本,特别是对于平行光而言。
为了避免性能问题,建议:
仅在给定时间里使用少量启用了 PCSS 阴影的灯光。 这种效果通常在大而明亮的灯光下最为明显。 较微弱的辅助光源通常不会从使用 PCSS 阴影中获益。
为用户提供禁用 PCSS 阴影的设置。 在平行光上,这可以通过在脚本中将 DirectionalLight3D 的
light_angular_distance属性设置为0.0来完成。 对于位置光源,这可以通过在脚本中将 OmniLight3D 或 SpotLight3D 的light_size属性设置为0.0来完成。
投影器过滤模式
投影的渲染方式也会对性能产生影响。渲染> 纹理 > 光投影器 > 过滤 高级项目设置允许你控制投影纹理如何过滤。Nearest/Linear 不使用 mipmap,这使得渲染速度更快。然而,投影在远处看起来会有颗粒感。Nearest/Linear Mipmaps 在远处看起来会更平滑,但从倾斜角度观看时投影看起来会模糊。这可以通过使用 Nearest/Linear Mipmaps Anisotropic 来解决,这是最高质量的模式,但也是消耗最高的。
如果你的项目具有像素艺术风格,请考虑将过滤器设置为 Nearest 的值之一,以便投影使用最近邻过滤(nearest-neighbor filtering)。否则,请继续使用 Linear。