Up to date
This page is up to date for Godot 4.2.
If you still find outdated information, please open an issue.
使用 CharacterBody2D/3D
前言
Godot 提供了多种碰撞对象来提供碰撞检测和响应。试图决定在你的项目中使用哪一个可能会让你感到困惑。如果你了解它们中的每一个是如何工作的,以及它们的优点和缺点是什么,你就可以避免问题并简化开发。在本教程中,我们将查看 CharacterBody2D 节点,并展示一些如何使用它的例子.
备注
虽然本文档在其示例中使用 CharacterBody2D ,但相同的概念也适用于 3D。
什么是角色体?
CharacterBody2D 用于实现通过代码控制的物体。Character bodies 在移动时可以检测到与其他物体的碰撞,但不受引擎物理属性(如重力、摩擦力等)的影响。虽然这意味着你必须编写一些代码来创建它们的行为,但这也意味着你可以更精确地控制它们如何移动和反应。
备注
本文假设你熟悉 Godot 中的各种物理体。否则请先阅读 物理介绍 。
小技巧
CharacterBody2D 可以受到重力和其他力的影响,但你必须在代码中计算它的运动。物理引擎不会移动 CharacterBody2D 。
运动与碰撞
当移动一个 CharacterBody2D 时,你不应该直接设置它的 position 属性,而应该使用 move_and_collide() 或 move_and_slide() 方法。这些方法沿着给定的向量移动物体,并且检测碰撞。
警告
你应该在 _physics_process() 回调中处理物理体的运动。
这两种运动方法有不同的作用, 在后面的教程中, 你会看到它们如何工作的例子.
move_and_collide
这个方法需要一个 Vector2 参数以表示物体的相对运动。通常,这是速度向量乘以帧时间步长( delta )。如果引擎在沿着此向量方向的任何位置检测到碰撞,则物体将立即停止移动。如果发生这种情况,该方法将返回一个 KinematicCollision2D 对象。
KinematicCollision2D 是一个包含碰撞和碰撞对象数据的对象. 使用这些数据, 你可以计算出你的碰撞响应.
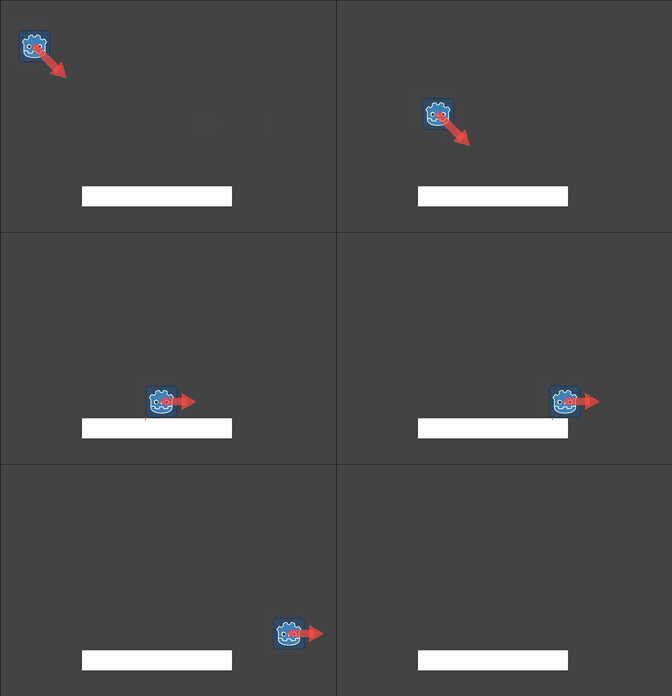
当你只想移动物体并检测碰撞,并且不需要任何自动碰撞响应时, move_and_collide 最有用。例如,如果你需要一颗从墙上弹开的子弹,你可以在检测到碰撞时直接更改速度角度。请参阅下面的示例。
move_and_slide
move_and_slide() 方法旨在简化常见情况下的碰撞响应, 即你希望一个物体沿着另一个物体滑动. 例如, 在平台游戏或自上而下的游戏中, 它特别有用.
当调用 move_and_slide() 时,该函数使用许多节点属性来计算其滑动行为。这些属性可以在检查器中找到,或在代码中设置。
velocity- default value:Vector2( 0, 0 )This property represents the body's velocity vector in pixels per second.
move_and_slide()will modify this value automatically when colliding.motion_mode- default value:MOTION_MODE_GROUNDEDThis property is typically used to distinguish between side-scrolling and top-down movement. When using the default value, you can use the
is_on_floor(),is_on_wall(), andis_on_ceiling()methods to detect what type of surface the body is in contact with, and the body will interact with slopes. When usingMOTION_MODE_FLOATING, all collisions will be considered "walls".up_direction- default value:Vector2( 0, -1 )This property allows you to define what surfaces the engine should consider being the floor. Its value lets you use the
is_on_floor(),is_on_wall(), andis_on_ceiling()methods to detect what type of surface the body is in contact with. The default value means that the top side of horizontal surfaces will be considered "ground".floor_stop_on_slope- default value:true该参数可以防止物体站立不动时从斜坡上滑落.
wall_min_slide_angle- default value:0.261799(in radians, equivalent to15degrees)This is the minimum angle where the body is allowed to slide when it hits a slope.
floor_max_angle- 默认值:0.785398(以弧度表示, 相当于45度)这是表面不再被视为 "地板" 之前的最大角度
There are many other properties that can be used to modify the body's behavior under specific circumstances. See the CharacterBody2D docs for full details.
检测碰撞
当使用 move_and_collide() 时, 函数直接返回一个 KinematicCollision2D , 你可以在代码中使用这个.
When using move_and_slide() it's possible to have multiple collisions occur,
as the slide response is calculated. To process these collisions, use get_slide_collision_count()
and get_slide_collision():
# Using move_and_collide.
var collision = move_and_collide(velocity * delta)
if collision:
    print("I collided with ", collision.get_collider().name)

# Using move_and_slide.
move_and_slide()
for i in get_slide_collision_count():
    var collision = get_slide_collision(i)
    print("I collided with ", collision.get_collider().name)
// Using MoveAndCollide.
var collision = MoveAndCollide(Velocity * (float)delta);
if (collision != null)
{
    GD.Print("I collided with ", ((Node)collision.GetCollider()).Name);
}

// Using MoveAndSlide.
MoveAndSlide();
for (int i = 0; i < GetSlideCollisionCount(); i++)
{
    var collision = GetSlideCollision(i);
    GD.Print("I collided with ", ((Node)collision.GetCollider()).Name);
}
备注
get_slide_collision_count() only counts times the body has collided and changed direction.
关于返回哪些碰撞数据, 请参见 KinematicCollision2D .
使用哪种运动方式?
A common question from new Godot users is: "How do you decide which movement
function to use?" Often, the response is to use move_and_slide() because
it seems simpler, but this is not necessarily the case. One way to think of it
is that move_and_slide() is a special case, and move_and_collide()
is more general. For example, the following two code snippets result in
the same collision response:

# using move_and_collide
var collision = move_and_collide(velocity * delta)
if collision:
    velocity = velocity.slide(collision.get_normal())

# using move_and_slide
move_and_slide()
// using MoveAndCollide
var collision = MoveAndCollide(Velocity * (float)delta);
if (collision != null)
{
    Velocity = Velocity.Slide(collision.GetNormal());
}

// using MoveAndSlide
MoveAndSlide();
你用 move_and_slide() 做的任何事情都可以用 move_and_collide() 来完成, 但它可能需要更多的代码. 但是, 正如我们在下面的示例中将看到的, 有些情况下 move_and_slide() 不能提供你想要的响应.
In the example above, move_and_slide() automatically alters the velocity
variable. This is because when the character collides with the environment,
the function recalculates the speed internally to reflect
the slowdown.
例如, 如果角色倒在地上, 不希望它因为重力的影响而积累垂直速度, 而希望它的垂直速度重置为零.
move_and_slide() may also recalculate the kinematic body's velocity several
times in a loop as, to produce a smooth motion, it moves the character and
collides up to five times by default. At the end of the process, the character's
new velocity is available for use on the next frame.
示例
To see these examples in action, download the sample project: character_body_2d_starter.zip
移动和墙壁
If you've downloaded the sample project, this example is in "basic_movement.tscn".
For this example, add a CharacterBody2D with two children: a Sprite2D and a
CollisionShape2D. Use the Godot "icon.svg" as the Sprite2D's texture (drag it
from the Filesystem dock to the Texture property of the Sprite2D). In the
CollisionShape2D's Shape property, select "New RectangleShape2D" and
size the rectangle to fit over the sprite image.
备注
有关实现2D移动方案的示例, 请参阅 2D 运动概述 .
Attach a script to the CharacterBody2D and add the following code:
extends CharacterBody2D

var speed = 300

func get_input():
    var input_dir = Input.get_vector("ui_left", "ui_right", "ui_up", "ui_down")
    velocity = input_dir * speed

func _physics_process(delta):
    get_input()
    move_and_collide(velocity * delta)
using Godot;

public partial class MyCharacterBody2D : CharacterBody2D
{
    private int _speed = 300;

    public void GetInput()
    {
        Vector2 inputDir = Input.GetVector("ui_left", "ui_right", "ui_up", "ui_down");
        Velocity = inputDir * _speed;
    }

    public override void _PhysicsProcess(double delta)
    {
        GetInput();
        MoveAndCollide(Velocity * (float)delta);
    }
}
Run this scene and you'll see that move_and_collide() works as expected, moving
the body along the velocity vector. Now let's see what happens when you add
some obstacles. Add a StaticBody2D with a
rectangular collision shape. For visibility, you can use a Sprite2D, a
Polygon2D, or turn on "Visible Collision Shapes" from the "Debug" menu.
Run the scene again and try moving into the obstacle. You'll see that the CharacterBody2D
can't penetrate the obstacle. However, try moving into the obstacle at an angle and
you'll find that the obstacle acts like glue - it feels like the body gets stuck.
发生这种情况是因为没有 碰撞响应 . move_and_collide() 在碰撞发生时停止物体的运动. 我们需要编写我们想要的碰撞响应.
Try changing the function to move_and_slide() and running again.
move_and_slide() 提供了一个沿碰撞对象滑动物体的默认碰撞响应. 这对于许多游戏类型都很有用, 并且可能是获得所需行为所需的全部内容.
弹跳/反射
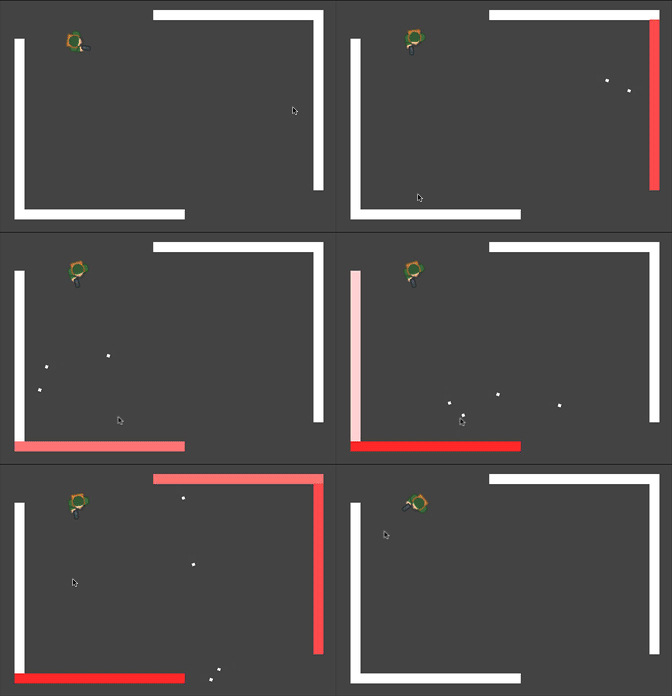
What if you don't want a sliding collision response? For this example ("bounce_and_collide.tscn" in the sample project), we have a character shooting bullets and we want the bullets to bounce off the walls.
此示例使用三个场景. 主场景包含游戏角色和墙壁. 子弹和墙是单独的场景, 以便它们可以实例化.
The Player is controlled by the w and s keys for forward and back. Aiming
uses the mouse pointer. Here is the code for the Player, using move_and_slide():
extends CharacterBody2D

var Bullet = preload("res://bullet.tscn")
var speed = 200

func get_input():
    # Add these actions in Project Settings -> Input Map.
    var input_dir = Input.get_axis("backward", "forward")
    velocity = transform.x * input_dir * speed
    if Input.is_action_just_pressed("shoot"):
        shoot()

func shoot():
    # "Muzzle" is a Marker2D placed at the barrel of the gun.
    var b = Bullet.instantiate()
    b.start($Muzzle.global_position, rotation)
    get_tree().root.add_child(b)

func _physics_process(delta):
    get_input()
    var dir = get_global_mouse_position() - global_position
    # Don't move if too close to the mouse pointer.
    if dir.length() > 5:
        rotation = dir.angle()
        move_and_slide()
using Godot;

public partial class MyCharacterBody2D : CharacterBody2D
{
    private PackedScene _bullet = GD.Load<PackedScene>("res://Bullet.tscn");
    private int _speed = 200;

    public void GetInput()
    {
        // Add these actions in Project Settings -> Input Map.
        float inputDir = Input.GetAxis("backward", "forward");
        Velocity = Transform.X * inputDir * _speed;
        if (Input.IsActionPressed("shoot"))
        {
            Shoot();
        }
    }

    public void Shoot()
    {
        // "Muzzle" is a Marker2D placed at the barrel of the gun.
        var b = (Bullet)_bullet.Instantiate();
        b.Start(GetNode<Node2D>("Muzzle").GlobalPosition, Rotation);
        GetTree().Root.AddChild(b);
    }

    public override void _PhysicsProcess(double delta)
    {
        GetInput();
        var dir = GetGlobalMousePosition() - GlobalPosition;
        // Don't move if too close to the mouse pointer.
        if (dir.Length() > 5)
        {
            Rotation = dir.Angle();
            MoveAndSlide();
        }
    }
}
子弹的代码:
extends CharacterBody2D

var speed = 750

func start(_position, _direction):
    rotation = _direction
    position = _position
    velocity = Vector2(speed, 0).rotated(rotation)

func _physics_process(delta):
    var collision = move_and_collide(velocity * delta)
    if collision:
        velocity = velocity.bounce(collision.get_normal())
        if collision.get_collider().has_method("hit"):
            collision.get_collider().hit()

func _on_VisibilityNotifier2D_screen_exited():
    # Deletes the bullet when it exits the screen.
    queue_free()
using Godot;

public partial class Bullet : CharacterBody2D
{
    public int _speed = 750;

    public void Start(Vector2 position, float direction)
    {
        Rotation = direction;
        Position = position;
        Velocity = new Vector2(speed, 0).Rotated(Rotation);
    }

    public override void _PhysicsProcess(double delta)
    {
        var collision = MoveAndCollide(Velocity * (float)delta);
        if (collision != null)
        {
            Velocity = Velocity.Bounce(collision.GetNormal());
            if (collision.GetCollider().HasMethod("Hit"))
            {
                collision.GetCollider().Call("Hit");
            }
        }
    }

    private void OnVisibilityNotifier2DScreenExited()
    {
        // Deletes the bullet when it exits the screen.
        QueueFree();
    }
}
The action happens in _physics_process(). After using move_and_collide(), if a
collision occurs, a KinematicCollision2D object is returned (otherwise, the return
is null).
如果有一个返回的碰撞, 我们使用碰撞的 normal 来反映子弹的 velocity 和 Vector2.bounce() 方法.
如果碰撞对象( collider )有一个 hit 方法, 我们也调用它. 在示例项目中, 我们为墙壁添加了一个颜色闪烁效果来演示这一点.

平台运动
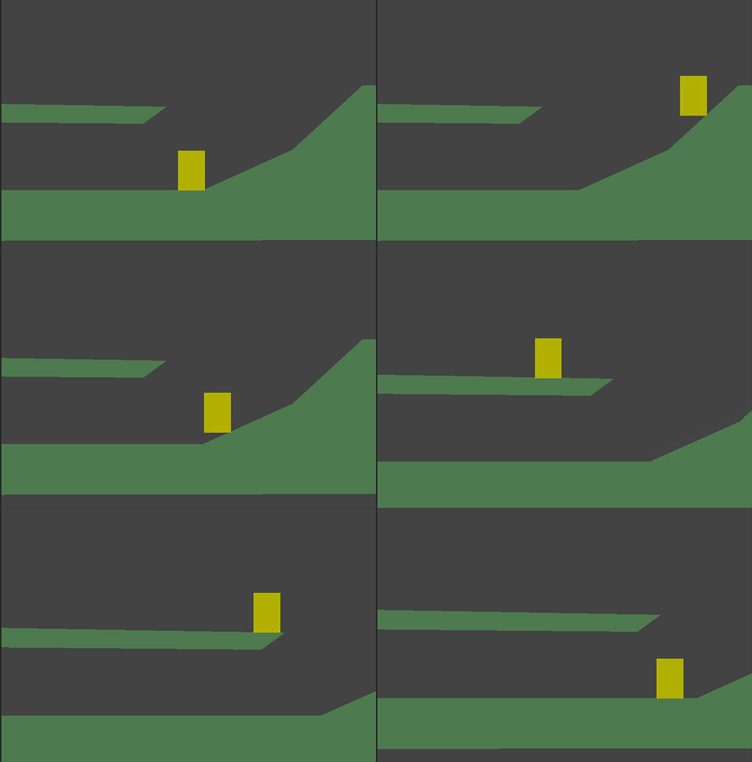
Let's try one more popular example: the 2D platformer. move_and_slide()
is ideal for quickly getting a functional character controller up and running.
If you've downloaded the sample project, you can find this in "platformer.tscn".
For this example, we'll assume you have a level made of one or more StaticBody2D
objects. They can be any shape and size. In the sample project, we're using
Polygon2D to create the platform shapes.
这是游戏角色物体的代码:
extends CharacterBody2D

var speed = 300.0
var jump_speed = -400.0

# Get the gravity from the project settings so you can sync with rigid body nodes.
var gravity = ProjectSettings.get_setting("physics/2d/default_gravity")


func _physics_process(delta):
    # Add the gravity.
    velocity.y += gravity * delta

    # Handle Jump.
    if Input.is_action_just_pressed("jump") and is_on_floor():
        velocity.y = jump_speed

    # Get the input direction.
    var direction = Input.get_axis("ui_left", "ui_right")
    velocity.x = direction * speed

    move_and_slide()
using Godot;

public partial class MyCharacterBody2D : CharacterBody2D
{
    private float _speed = 100.0f;
    private float _jumpSpeed = -400.0f;

    // Get the gravity from the project settings so you can sync with rigid body nodes.
    public float Gravity = ProjectSettings.GetSetting("physics/2d/default_gravity").AsSingle();

    public override void _PhysicsProcess(double delta)
    {
        Vector2 velocity = Velocity;

        // Add the gravity.
        velocity.Y += Gravity * (float)delta;

        // Handle jump.
        if (Input.IsActionJustPressed("jump") && IsOnFloor())
            velocity.Y = _jumpSpeed;

        // Get the input direction.
        float direction = Input.GetAxis("ui_left", "ui_right");
        velocity.X = direction * _speed;

        Velocity = velocity;
        MoveAndSlide();
    }
}

In this code we're using move_and_slide() as described above - to move the body
along its velocity vector, sliding along any collision surfaces such as the ground
or a platform. We're also using is_on_floor() to check if a jump should be
allowed. Without this, you'd be able to "jump" in midair; great if you're making
Flappy Bird, but not for a platformer game.
There is a lot more that goes into a complete platformer character: acceleration, double-jumps, coyote-time, and many more. The code above is just a starting point. You can use it as a base to expand into whatever movement behavior you need for your own projects.