Attention: Here be dragons
This is the latest
(unstable) version of this documentation, which may document features
not available in or compatible with released stable versions of Godot.
Checking the stable version of the documentation...
GDScript 导出属性
在 Godot 中,类成员是可以导出的。这些成员的值会与其所附加的资源(例如场景)一起保存,使用 RPC 时会一同传递,还可以在属性编辑器中编辑。导出使用 @export 注解来实现。
@export var number: int = 5
在上面这个例子中,数值 5 会保存起来,并在属性编辑器中显示。
导出变量必须使用常量表达式来进行初始化,部分导出注解具有特殊类型,对变量类型不作要求(请参见下面的示例部分)。
导出成员变量的基本好处之一,便是让这些变量在编辑器中可见可改,这样一来,美术师和游戏设计师就可以修改这些会影响程序运行方式的值。为此,Godot 提供了一种特殊的导出语法。此外,还可以使用 文档注释 来提供工具提示描述,悬停鼠标即可查看。
备注
导出属性也可以用 C# 等其他语言完成。语法因语言而异。有关 C# 导出的信息见 C# 导出属性。
基本用法
如果为导出变量赋予了常量值或常量表达式值,则可以对该变量的值进行类型推断,并使该变量在编辑器中可用。
@export var number = 5
如果导出变量没有默认值,那么你可以为该变量添加类型限定。
@export var number: int
可以导出资源和节点。
@export var resource: Resource
@export var node: Node
即便脚本不在编辑器中执行,导出属性仍然可以编辑。不过只有处于 工具模式 的脚本才会使用 getter 和 setter。
导出分组
可以使用 @export_group 注解来在检查器中对导出属性进行分组管理,在该注解后的每个导出变量均会被添加到该分组中。用一个新分组开头,或使用 @export_group("") 开头会结束之前的分组的作用范围。
@export_group("My Properties")
@export var number = 3
该注解的第二个参数仅囊括名称以该参数开头的导出变量。
导出项分组无法嵌套定义,需要用 @export_subgroup 来在一个大的导出项分组里定义一个小分组。
@export_subgroup("Extra Properties")
@export var string = ""
@export var flag = false
你还可以使用 @export_category 注解来更改主类别的名称,亦或在属性列表中创建其他类别。
@export_category("Main Category")
@export var number = 3
@export var string = ""

@export_category("Extra Category")
@export var flag = false
备注
属性列表是根据类的继承关系组织起来的,但新建导出项类别这个操作会破坏掉这种结构,故使用时需要格外小心,创建公共项目时更应如此。
字符串用作文件路径
字符串为文件路径。见 @export_file。
@export_file var f
字符串为目录路径。见 @export_dir。
@export_dir var f
字符串为文件路径,提示中提供自定义筛选器。见 @export_file。
@export_file("*.txt") var f
也可以使用全局文件系统中的路径,仅工具模式下的脚本可以如此使用。
字符串为全局文件系统中 PNG 文件的路径。见 @export_global_file。
@export_global_file("*.png") var tool_image
字符串为全局文件系统中目录的路径。见 @export_global_dir。
@export_global_dir var tool_dir
多行文本注释会让编辑器使用大文本输入框来编辑多行文本。请查看 @export_multiline 。
@export_multiline var text
将字符串作为输入动作
一个在项目的输入映射(Input Map)中定义好的、用作输入动作的字符串。
@export_custom(PROPERTY_HINT_INPUT_NAME) var my_input
一个字符串形式的输入动作名称,该名称需在项目的输入映射(input map)中定义,以及像 ui_accept 和 ui_cancel 这样的默认内置值。
@export_custom(PROPERTY_HINT_INPUT_NAME, "show_builtin") var my_input
一个字符串形式的输入动作名称(需在项目的输入映射中定义),或者是可以手动输入的任意值。
@export_custom(PROPERTY_HINT_INPUT_NAME, "loose_mode") var my_input
一个在项目输入映射(input map)中定义的字符串形式的输入动作名称,以及像 ui_accept 和 ui_cancel 这样的默认内置值,或者是可以手动输入的任意值。
@export_custom(PROPERTY_HINT_INPUT_NAME, "show_builtin,loose_mode") var my_input
编辑器内限制值的输入范围
下列示例见 @export_range。
允许 0 到 20 之间的整数。
@export_range(0, 20) var i
允许 -10 到 20 之间的整数。
@export_range(-10, 20) var j
允许 -10 到 20 之间的数,调整步长为 0.2 。
@export_range(-10, 20, 0.2) var k: float
可以通过添加提示 "or_less" 和/或 "or_greater",这些限制将仅影响滑块。如果使用了这些提示中的任意一个,用户在不使用滑块时将可以输入任意值或用鼠标拖动数值,即使超出指定范围也无妨。
@export_range(0, 100, 1, "or_less", "or_greater") var l: int
"exp" 提示可用于使数值使用指数滑块而非线性滑块。这意味着当你向右拖动滑块时,数值的变化会随着鼠标拖动而逐渐加快。这对于编辑可能非常小或非常大的数值很有帮助,但代价是直观性较差。
@export_range(0, 100000, 0.01, "exp") var exponential: float
对于表示缓动因子的值,请使用 带缓动提示的浮点数 代替。
可以使用 "hide_slider" 这个提示,来隐藏 float (浮点数)属性下方出现的横向滑动条,或者 int (整数)属性旁边出现的上下调节箭头:
@export_range(0, 1000, 0.01, "hide_slider") var no_slider: float
另一方面,可以使用 "prefer_slider" 提示,让 int (整数)属性下方显示一个横向滑动条,而不是上下调节箭头:
@export_range(0, 100, 1, "prefer_slider") var with_slider: int
添加后缀与角度/弧度处理
你还可以定义一个后缀,让这个数值在检查器(Inspector)中显示得更加不言自明。比如,要定义一个需要用户以“米”(m)为单位来配置的数值:
@export_range(0, 100, 1, "suffix:m") var m: int
对于那些在代码内部以弧度(radians)存储,但在编辑器里想让用户以角度(degrees)来查看和修改的属性,可以使用 "radians_as_degrees" 这个提示:
@export_range(0, 360, 0.1, "radians_as_degrees") var angle: float
当数值在检查器(Inspector)中被显示或修改时,它会自动进行换算,同时还会显示一个度数(°)后缀。Godot 引擎自带的 rotation (旋转)属性在整个编辑器中就是这么处理的。
如果角度本身就是以“度”(degrees)为单位存储的,那就请使用 "degrees" 这个提示。这样既能显示出度数符号(°),同时还能在从检查器(Inspector)修改数值时,禁用掉那种自动的“角度转弧度”换算。
将向量的值链接在一起
可以将向量的各个数值关联(链接)在一起。当用户调整向量的其中一个分量时,其他分量也会自动按比例进行调整。例如,在调整 2D 精灵(Sprite)的缩放比例时,这个功能对于保持其长宽比(宽高比)非常有用。用户可以通过点击属性右侧的链接图标来临时禁用此功能。
# Leave the hint string empty if you don't want to add a suffix.
@export_custom(PROPERTY_HINT_LINK, "suffix:px") var vector2_linked: Vector2 = Vector2(16, 16)
结果为:
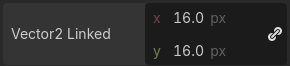
带有 "px"(像素)后缀的关联 Vector2i 属性
This hint 适用于 Vector2, Vector2i, Vector3, Vector3i, Vector4, and Vector4i. 它可以与属性后缀同时使用,正如上面的示例所示。
带缓动提示的浮点数
在编辑器里提供 ease() 函数的视觉呈现。请查看@export_exp_easing。
@export_exp_easing var transition_speed
颜色
使用红、绿、蓝、Alpha 值指定普通颜色。
@export var col: Color
颜色以红、绿、蓝值的形式给出(Alpha 值始终为 1)。见 @export_color_no_alpha。
@export_color_no_alpha var col: Color
节点
脚本中可以直接将节点作为属性导出,不必再使用 NodePath来辅助进行导出:
# Allows any node.
@export var node: Node

# Allows any node that inherits from BaseButton.
# Custom classes declared with `class_name` can also be used.
@export var some_button: BaseButton
如有需要,仍可以像 Godot 3.x 中那样导出 NodePath:
@export var node_path: NodePath
var node = get_node(node_path)
如果想要限制 NodePath 的类型,可以使用 @export_node_path 注解:
@export_node_path("Button", "TouchScreenButton") var some_button
资源
@export var resource: Resource
在检查器里,可以将资源文件从文件系统面板中拖放到导出变量所对应的槽位中。
不过,打开检查器的下拉列表可能会导致要创建的资源类列表非常之长。因此,如果在导出资源时指定了 Resource 的子类,例如:
@export var resource: AnimationNode
下拉列表就会限定到 AnimationNode 及其派生类。
备注
对 Resource 对象使用 @export 导出变量,会让这些资源变成该实例的依赖项。这意味着,只要加载包含该脚本的场景,所有被 @export 变量引用的资源都会被一并加载。如果你只是想引用一个 Resource 对象,但希望等到真正需要的时候再手动加载它(比如,在引用包含整个关卡的 PackedScenes 时,通常就需要这样做),那么请改用 @export_file 或 @export_file_path 来代替。
导出位标记
被用作位标志(bit flags)的整数,可以在一个属性里同时存储多个 true/false (布尔值)的状态。通过加上 @export_flags 这个注解,你就可以直接在编辑器里方便地勾选和设置它们:
# Set any of the given flags from the editor.
@export_flags("Fire", "Water", "Earth", "Wind") var spell_elements = 0
你必须为每个位标记提供一个字符串描述。在本例中,Fire 的值是 1,Water 的值是 2,Earth 的值是 4,Wind 的值是 8。通常情况下应相应地定义常量(例如 const ELEMENT_WIND = 8 等)。
你可以使用冒号添加显式的值:
@export_flags("Self:4", "Allies:8", "Foes:16") var spell_targets = 0
只有2的幂次方值才是有效的位标记选项。允许的最低值是1,因为0表示没有选中任何内容。你还可以添加一些其他标记的组合作为选项:
@export_flags("Self:4", "Allies:8", "Self and Allies:12", "Foes:16")
var spell_targets = 0
针对在项目设置(Project Settings)里定义好的物理层(physics)、渲染层(render)和导航层(navigation),Godot 也提供了专门的导出注解(Export annotations):
@export_flags_2d_physics var layers_2d_physics
@export_flags_2d_render var layers_2d_render
@export_flags_2d_navigation var layers_2d_navigation
@export_flags_3d_physics var layers_3d_physics
@export_flags_3d_render var layers_3d_render
@export_flags_3d_navigation var layers_3d_navigation
使用位标记需要对位操作有一定的了解,若对此有疑问,请使用布尔变量代替位标记使用。
导出枚举
见 @export_enum。
成员属性也可以通过将类型限定为一个枚举来导出,导出值为该枚举的枚举常量。编辑器会在相应位置创建一个列表,将枚举项按如“物体1”、“物体2”、“其他物体”的方式来进行排列显示。导出枚举的数值会按整数类型来存储。
enum NamedEnum {THING_1, THING_2, ANOTHER_THING = -1}
@export var x: NamedEnum
也可以使用 @export_enum 注解来将整数和字符串属性限制为特定的值列表。编辑器将在检查器中创建一个小工具,将以下枚举为:战士、魔术师、小偷。该值将被存储为整数,对应于所选选项的索引(即 0、1 或 2)。
@export_enum("Warrior", "Magician", "Thief") var character_class: int
你可以使用冒号添加显式的值:
@export_enum("Slow:30", "Average:60", "Very Fast:200") var character_speed: int
如果变量类型是字符串,则枚举字符串本身就是该变量的可选数值。
@export_enum("Rebecca", "Mary", "Leah") var character_name: String
如果你想设置初始值,你必须明确指定它:
@export_enum("Rebecca", "Mary", "Leah") var character_name: String = "Rebecca"
导出数组
导出的数组可以赋予初始值,但其初始值必须是常量表达式。
如果导出的数组指定了继承自 Resource 类型的对象,则可以从文件系统面板中一次性拖放多个文件来到检查器中来设置数组值。
默认值必须是常量表达式。
@export var a = [1, 2, 3]
导出数组也可以指定元素类型(使用之前提到的提示即可)。
@export var ints: Array[int] = [1, 2, 3]

# Nested typed arrays such as `Array[Array[float]]` are not supported yet.
@export var two_dimensional: Array[Array] = [[1.0, 2.0], [3.0, 4.0]]
也可以不声明初始值,这样的话,数组的初始值就默认为 null。
@export var b: Array
@export var scenes: Array[PackedScene]
如果导出的数组指定了从 Resource 继承的类型,则可以一次性从文件系统面板中拖放多个文件到检查器中来设置该数组的值。
@export var textures: Array[Texture] = []
@export var scenes: Array[PackedScene] = []
压缩数组也可以使用导出,但需要构造对应的空压缩数组去赋值:
@export var vector3s = PackedVector3Array()
@export var strings = PackedStringArray()
属性提示可以用来导出字符串作为路径:
@export_range(-360, 360, 0.001, "degrees") var laser_angles: Array[float] = []
@export_file("*.json") var skill_trees: Array[String] = []
@export_color_no_alpha var hair_colors = PackedColorArray()
@export_enum("Espresso", "Mocha", "Latte", "Capuccino") var barista_suggestions: Array[String] = []
@export_storage
导出属性在默认情况下会产生以下两种效果:
将属性存到场景/资源文件当中(即 PROPERTY_USAGE_STORAGE 位标志的作用);
将字段加到检查器当中(即 PROPERTY_USAGE_EDITOR 位标志的作用)。
然而有时你会想让某个属性能够序列化,不让它显示在编辑器当中,以防误修改其值,同时避免检查器窗口杂乱无章。
可以使用 @export_storage 注解来实现上述效果,该注解在 @tool 脚本中十分有用。而且,与非导出属性不同的是,如果调用 Resource.duplicate() 或 Node.duplicate() 方法,会复制该属性的值。
var a # Not stored in the file, not displayed in the editor.
@export_storage var b # Stored in the file, not displayed in the editor.
@export var c: int # Stored in the file, displayed in the editor.
@export_custom
如果你需要比内置的 @export 注解更多的控制,可以使用 @export_custom。它允许定义任何属性提示、提示字符串和使用标志,语法与编辑器用于内置节点的语法类似。
例如这么写就会暴露 altitude 属性,没有范围限制,但定义了 m(米)作为后缀:
@export_custom(PROPERTY_HINT_NONE, "suffix:m") var altitude: float
上述功能通常无法通过标准的 @export_range 语法实现,因为它需要定义范围。
参数列表及对应的值见类参考。
警告
使用 @export_custom 时,GDScript 不会对语法进行任何验证。无效的语法可能会导致检查器中出现意外行为。
从工具脚本中设置导出变量
当 工具模式 下的脚本中的一个导出变量的值改变时,该值在检查器中不会自动更新。更新的方法是在设置该导出变量的值之后调用 notify_property_list_changed()。
在初始化阶段过早获取导出变量的值
如果在 _init() 中读取导出变量的值,它将返回导出注释中指定的默认值,而不是在检查器中设置的值。这是因为从已保存的场景/资源文件中赋值是在对象初始化 之后 进行的;在此之前,将使用默认值。
要获取在检查器中设置的值(因此保存在场景/资源文件中),需要在对象构造 之后 再读取它,例如在 Node._ready() 中。也可以在导出属性上定义的 setter 中读取该值,对于自定义资源中非常有用,因为在这些资源中 _ready() 方法不可用。
# Set this property to 3 in the inspector.
@export var exported_variable = 2:
    set(value):
        exported_variable = value
        print("Inspector-set value: ", exported_variable)

func _init():
    print("Initial value: ", exported_variable)
结果为:
Initial value: 2
Inspector-set value: 3
高级导出
为了避免非必要的复杂设计,并非所有类型的导出都在语言层面上提供。下面将说明一些能用底层 API 实现的,且较为常见的导出方法。
在进一步阅读前,你需要熟悉属性的处理方式,以及如何通过 _set()、_get()、_get_property_list() 等方法定制这些属性。详见 从对象访问数据或逻辑。
参见
要在 C++ 中用上述方法绑定属性,请参阅 使用 _set/_get/_get_property_list 绑定属性。
警告
脚本必须在 @tool 注解的修饰下,才能使上述方法在编辑器内运行。