Attention: Here be dragons
This is the latest
(unstable) version of this documentation, which may document features
not available in or compatible with released stable versions of Godot.
Checking the stable version of the documentation...
部署到 Android
设置
多数独立头显运行在 Android 上,并且 OpenXR 支持正在逐步推广到这些平台。
在遵循此处的 OpenXR 特定说明之前,你需要首先设置你的系统以导出到 Android 平台,包括:
安装 OpenJDK 17
安装 Android Studio
在 Godot 中配置 Android SDK 的路径
详情请参见 为 Android 导出 ,完成所需配置后再返回此处。
警告
虽然 Vulkan 渲染器针对移动设备进行了优化,但目前我们仍在解决适配问题。就现在而言,强烈建议开发者在针对基于 Android 的 XR 设备时使用兼容性渲染器(OpenGL)。
Gradle Android 构建
备注
最初,官方对 Android 平台的支持并未添加到 OpenXR 规范中,这导致各大供应商都创建了自定义加载器以在其头戴设备上实现 OpenXR。尽管从长远角度来看,所有供应商都终将转移到官方的 OpenXR 加载器;但就当下来说,这些加载器需要添加到你的项目中。
为了将特定供应商的 OpenXR 加载器包含到你的项目中,你需要先设置一个 Gradle Android 构建。
在项目菜单中选择安装 Android 构建模板...:
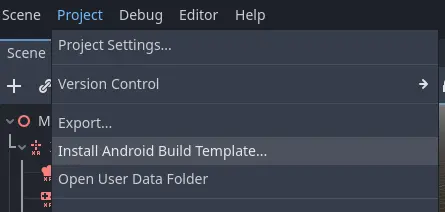
这将在你的项目中创建一个名为 android 的文件夹,包含在 Android 上运行所需的所有运行时文件。现在你可以自定义这个安装,Godot 不会在编辑器中显示这个文件夹,但你可以通过文件浏览器找到它。
你可以在这里阅读更多关于 Gradle 构建的信息:Android 的 Gradle 构建。
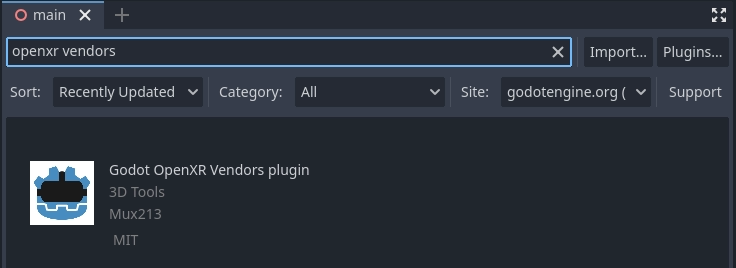
安装供应商插件
The vendors plugin can be downloaded from the Asset Store, search for "OpenXR vendors".
你可以在项目的 addons 文件夹里找到已经安装好的文件。另外,你也可以选择手动安装 vendors 插件,方法是从 from the release page here 下载它。你需要把 zip 压缩包里的 assets/addons/godotopenxrvendors 文件夹,直接复制到你项目的 addons 文件夹中。
你可以在 这里 找到 vendors 插件的主仓库。
备注
从 Godot 4.6 起, 供应商插件现在已经是一个可选但是推荐的插件。Godot 现在可以直接导出至绝大多数兼容安卓的设备。这会对样本演示和教学项目非常有用——单个 APK 可以被部署到多个设备上。供应商插件解锁了供应商特定的实现和设置,而且也可能发行在应用商店的时候所需要的。
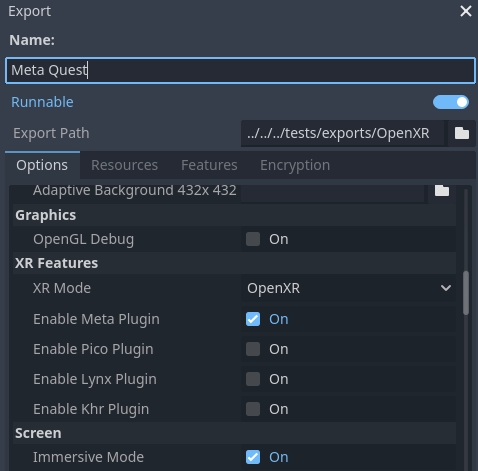
创建导出预设
不同的设备有不同的加载器,因此你需要为每个设备分别准备导出预设。
打开菜单栏的 Project(项目) ,然后选择 Export...(导出) 。点击 Add...(添加) 按钮,并选择 Android 。接着,为你正在设置的设备更改导出预设的名称,比如改成 Meta Quest 。然后,记得勾选启用 Use Gradle Build(使用 Gradle 构建) 。接下来,将 XR Mode(XR 模式) 切换为 OpenXR 。如果你想使用一键部署功能(稍后会介绍),请确保勾选启用 Runnable(可运行) 选项。
如果供应商插件安装正确,你应该会在 XR功能 下找到不同头戴设备的条目。如果你看到了你的头戴设备条目,请选择它。否则,请启用 Khronos 插件。
滚动到列表的最底部,你会发现一些额外的 XR 功能分区。目前这里只有 Meta XR 功能 、Pico XR 功能 、Magicleap XR 功能 以及适用于 HTC 的 Khronos XR 功能 。如果你想要使用这些功能,就需要在这里勾选相应的设置。
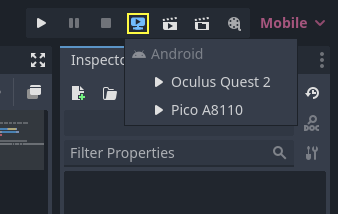
通过 Godot 编辑器在设备上运行
如果按照上述说明设置导出预设,且头戴设备已连接到电脑并被正确识别,你可以通过一键部署直接从 Godot 编辑器启动它:
正确识别某些平台上的某些设备,可能需要执行额外步骤,请务必查阅头显设备供应商的开发者文档。
例如,对于 Meta Quest 2,你需要在头戴设备上启用开发者模式,并且如果你在 Windows 上开发,还需安装特定 ADB 驱动程序。更多详细信息,请参阅官方 Meta Quest 开发者文档。
如果你在一键部署方面遇到了问题,可参考一键部署的故障排除。