Attention: Here be dragons
This is the latest
(unstable) version of this documentation, which may document features
not available in or compatible with released stable versions of Godot.
Checking the stable version of the documentation...
屏幕读取着色器
介绍
很多人想要让着色器在写屏幕的同时读取该屏幕的数据。因为内部硬件限制,OpenGL 和 DirectX 等 3D API 都很难实现这一功能。GPU 是极其并行的,所以同时进行读写会导致各种缓存和一致性问题。因此,即便是最新的硬件也对此进行无法正确的支持。
解决办法是将屏幕或屏幕的一部分复制到一个后台缓冲区,然后在绘图时从那里读取。Godot 提供了一些工具,可以使这一过程变得很容易。
屏幕纹理
Godot 的 着色语言 (着色器语言)提供了一种特殊的纹理,可以用来访问屏幕上已经渲染好的画面内容。要使用它,只需要在声明一个 sampler2D 统一变量(uniform)时,加上 hint_screen_texture 这个提示(hint)即可。此外,还有一个特殊的内置变化量(varying)叫做 SCREEN_UV ,可以用它来获取当前像素片段(fragment)相对于整个屏幕的 UV 坐标。因此,这段 canvas_item 片段着色器会让物体看起来完全‘隐形’,因为它只显示了物体背后原本就存在的东西。
shader_type canvas_item;

uniform sampler2D screen_texture : hint_screen_texture, repeat_disable, filter_nearest;

void fragment() {
    COLOR = textureLod(screen_texture, SCREEN_UV, 0.0);
}
这里使用 textureLod 是因为我们只想读取最底层(也就是最清晰的那层)的 mipmap。如果你想读取一张模糊版本的纹理,可以把 textureLod 的第三个参数调大,并且把纹理的过滤提示(hint)从 filter_nearest 改成 filter_nearest_mipmap (或者任意其他开启了 mipmap 的过滤模式)。只要使用了带有 mipmap 的过滤模式,Godot 就会自动为你计算出模糊的纹理效果。
警告
如果纹理的过滤模式(filter mode)没有改成名称里包含 mipmap (多级渐远纹理)的模式,那么当你调用 textureLod 并传入一个大于 0.0 的 LOD 参数时,它的显示效果会和传入 0.0 时完全一样(也就是 LOD 参数根本不起作用)。
屏幕纹理示例
屏幕纹理可以用来做很多事情。有一个针对屏幕空间着色器的特殊演示项目,你可以下载后查看学习。其中的一个例子就是用简单的着色器来调整亮度、对比度以及饱和度:
shader_type canvas_item;

uniform sampler2D screen_texture : hint_screen_texture, repeat_disable, filter_nearest;

uniform float brightness = 1.0;
uniform float contrast = 1.0;
uniform float saturation = 1.0;

void fragment() {
    vec3 c = textureLod(screen_texture, SCREEN_UV, 0.0).rgb;

    c.rgb = mix(vec3(0.0), c.rgb, brightness);
    c.rgb = mix(vec3(0.5), c.rgb, contrast);
    c.rgb = mix(vec3(dot(vec3(1.0), c.rgb) * 0.33333), c.rgb, saturation);

    COLOR.rgb = c;
}
幕后
虽然这看起来很神奇,但其实不然。在 2D 中,第一次在即将绘制的节点中发现 hint_screen_texture 时,Godot 就会将整个屏幕拷贝到后台缓冲之中。后续在着色器中使用它的节点将不会造成屏幕的复制,因为否则的话效率非常低。在 3D 中,进行屏幕拷贝的时机是在不透明几何体阶段之后、透明几何体阶段之前,所以透明的物体不会被捕捉到屏幕纹理之中。
因此,在 2D 中,如果使用 hint_screen_texture 的着色器存在覆盖,那么后一个着色器使用的就不是第一个着色器的结果,会导致意外的图像:
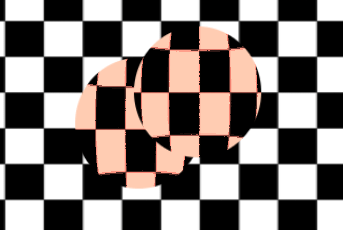
在上图中,第二个球体(右上)所使用的屏幕纹理和第一个球体所使用的屏幕纹理的来源是一致的,所以第一个球体会“消失”,或者说不可见。
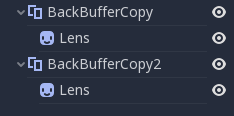
在 2D 中,这个问题可以通过 BackBufferCopy 节点修正,在这两个球体之间实例化即可。BackBufferCopy 可以指定屏幕上的某个区域进行复制,也可以复制整个屏幕:
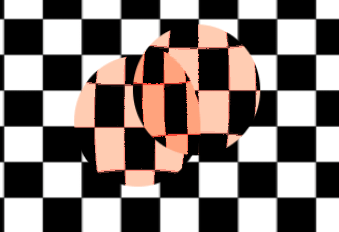
正确复制后台缓冲之后,这两个球体就能够正确混合了:
警告
在 3D 场景中,使用了 hint_screen_texture 提示的材质本身会被视为透明材质,因此它们不会出现在其他材质最终获取到的屏幕纹理画面中。如果你打算实例化一个使用了 hint_screen_texture 材质的场景,你将需要使用一个 BackBufferCopy(后台缓冲复制)节点来解决这个问题。
在 3D 中,这个问题解决起来就没有那么灵活,因为屏幕纹理只会捕捉一次。在 3D 中使用屏幕纹理时请多加小心,因为它并不会捕获到透明的对象,反而可能捕获到位于使用屏幕纹理的对象之前的不透明对象。
要在 3D 中重现后台缓冲的逻辑,可以创建一个 Viewport 并在对象的位置创建一个相机,然后就可以使用该 Viewport 的纹理来代替屏幕纹理。
后台缓冲逻辑
好的,想要对后台缓冲有更清晰的理解的话,Godot 在 2D 中后台缓冲复制的原理是这样的:
如果某个节点使用了
hint_screen_texture,那么绘制该节点之前就会将整个屏幕复制到后台缓冲之中。只有第一次才会这么做,后续的节点不会触发。如果上述情况发生前遇到过 BackBufferCopy 节点(即便尚未使用过
hint_screen_texture),那么也不会执行相关的行为。换句话说,自动复制整个屏幕的条件只有:某个节点中首次使用hint_screen_texture并且按照树顺序不存在更早的(未被禁用的)BackBufferCopy 节点。BackBufferCopy 可以选择复制整个屏幕或者只复制某个区域。如果设置为区域(非整个屏幕),但是着色器使用了复制区域之外的像素,那么读取到的结果就是未定义的(很可能是上一帧残留的垃圾数据)。换句话说,你确实能够使用 BackBufferCopy 复制屏幕上的某个区域,然后读取屏幕纹理上的其他区域。但请避免这样的行为!
深度纹理
3D 着色器也可以访问屏幕深度缓冲,使用 hint_depth_texture 提示即可。该纹理不是线性的;必须通过逆投影矩阵进行转换。
以下代码会获取正在绘制的像素所在的 3D 位置:
uniform sampler2D depth_texture : hint_depth_texture, repeat_disable, filter_nearest;

void fragment() {
    float depth = textureLod(depth_texture, SCREEN_UV, 0.0).r;
    vec4 upos = INV_PROJECTION_MATRIX * vec4(SCREEN_UV * 2.0 - 1.0, depth, 1.0);
    vec3 pixel_position = upos.xyz / upos.w;
}
法线-粗糙度纹理
备注
法线-粗糙度(Normal-roughness)纹理仅在 Forward+(正向+)渲染方法中受支持,而在 Mobile(移动端)或 Compatibility(兼容性)模式下不支持。
类似的,如果对象在深度预渲染中进行了渲染,就可以用法线-粗糙度纹理来读取该对象的法线和粗糙度。法线存储在 .xyz 通道中(映射到了 0-1 范围内),而粗糙度则存储在 .w 通道中。
uniform sampler2D normal_roughness_texture : hint_normal_roughness_texture, repeat_disable, filter_nearest;

void fragment() {
    float screen_roughness = texture(normal_roughness_texture, SCREEN_UV).w;
    vec3 screen_normal = texture(normal_roughness_texture, SCREEN_UV).xyz;
    screen_normal = screen_normal * 2.0 - 1.0;
重定义屏幕纹理
可以对多个 uniform 使用屏幕纹理提示(hint_screen_texture、hint_depth_texture、hint_normal_roughness_texture)。例如,你可能会想要使用不同的重复标志和过滤标志多次读取该纹理。
下面的例子中,着色器在读取屏幕空间法线时使用的就是线性过滤,而读取屏幕空间粗糙度时使用的就是最邻近过滤。
uniform sampler2D normal_roughness_texture : hint_normal_roughness_texture, repeat_disable, filter_nearest;
uniform sampler2D normal_roughness_texture2 : hint_normal_roughness_texture, repeat_enable, filter_linear;

void fragment() {
    float screen_roughness = texture(normal_roughness_texture, SCREEN_UV).w;
    vec3 screen_normal = texture(normal_roughness_texture2, SCREEN_UV).xyz;
    screen_normal = screen_normal * 2.0 - 1.0;