Attention: Here be dragons
This is the latest
(unstable) version of this documentation, which may document features
not available in or compatible with released stable versions of Godot.
Checking the stable version of the documentation...
Embedding Godot in Android projects
The Godot Engine can be embedded within Android applications or libraries, allowing developers to augment their projects with the full capabilities of the engine.
The component hosting the embedded engine is responsible for driving the engine lifecycle via its Android APIs. These APIs can also be used to provide bidirectional communication between the host and the embedded Godot instance allowing for greater control over the desired experience.
以下將以範例 Android App 說明如何將 Godot 引擎嵌入 Android 檢視元件並用於渲染 3D glTF 模型。
GLTF Viewer 範例 App 採用 Android 的 RecyclerView 元件,顯示來自 Kenney's Food Kit 資源包的 glTF 項目清單。當某項目被選取時,App 會呼叫嵌入的 Godot 引擎渲染該 3D 模型。
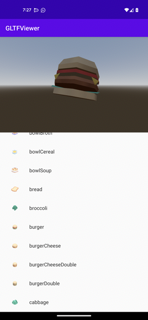
The sample app source code can be found on GitHub. Follow the instructions in its README to build and install it.
Below we break down the steps used to create the GLTF Viewer app.
警告
Only a single instance of the Godot Engine is supported per Android process. You can configure the process the Android Activity runs under using the android:process attribute.
警告
目前不支援自動調整大小/方向等設定事件,否則可能導致當機。你可停用相關事件:
可透過 android:screenOrientation 屬性 鎖定特定畫面方向。
或於 AndroidManifest.xml 宣告 Activity 將處理這些設定事件(使用 android:configChanges 屬性)。
1. Initial setup of the Android app
備註
本範例 App 是透過 Android Studio 製作,並使用 Gradle 當作建置系統。
The Android ecosystem provides multiple tools, IDEs, and build systems for creating Android apps so feel free to use what you're familiar with, and update the steps below accordingly.
建立一個 Android 專案,可為全新或既有專案
加入 Godot Android 函式庫的 Maven 相依性
若使用
gradle,請將以下內容加入 app gradle 設定檔的dependency區段,並將<version>換成 Godot Android 函式庫的最新版:
implementation("org.godotengine:godot:<version>")
若使用
gradle,請在 app gradle 設定檔的android > defaultConfig區段加入下列aaptOptions設定,可讓 gradle 在建置應用程式時包含 Godot 的隱藏目錄。If your build system does not support hidden directories, you can configure the Godot project to not use hidden directories by deselecting Application > Config > Use Hidden Project Data Directory in the Project Settings.
android {

  defaultConfig {
      // The default ignore pattern for the 'assets' directory includes hidden files and
      // directories which are used by Godot projects, so we override it with the following.
      aaptOptions {
          ignoreAssetsPattern "!.svn:!.git:!.gitignore:!.ds_store:!*.scc:<dir>_*:!CVS:!thumbs.db:!picasa.ini:!*~"
      }
    ...
建立或更新託管 Godot 引擎實例的 Activity。以範例 App 而言,對應檔案為 MainActivity
The host Activity should implement the GodotHost interface
The sample app uses Fragments to organize its UI, so it leverages GodotFragment, a fragment component provided by the Godot Android library, to automatically host and manage the Godot Engine instance.
private var godotFragment: GodotFragment? = null

override fun onCreate(savedInstanceState: Bundle?) {
    super.onCreate(savedInstanceState)

    setContentView(R.layout.activity_main)

    val currentGodotFragment = supportFragmentManager.findFragmentById(R.id.godot_fragment_container)
    if (currentGodotFragment is GodotFragment) {
        godotFragment = currentGodotFragment
    } else {
        godotFragment = GodotFragment()
        supportFragmentManager.beginTransaction()
            .replace(R.id.godot_fragment_container, godotFragment!!)
            .commitNowAllowingStateLoss()
    }

    ...
備註
The Godot Android library provides GodotActivity, an abstract Activity component that can be extended to automatically host and manage the Godot Engine instance.
And the embedded Godot project provides GodotApp,
an implementation of GodotActivity that can be used as a ready standalone Activity
to launch and manage the embedded Godot project in its own separate Activity.
Alternatively, applications can directly create a Godot instance, host, and manage it themselves.
Using GodotHost#getHostPlugins(...), the sample app creates a runtime GodotPlugin instance that's used to send signals to the embedded Godot project scripts.
The runtime
GodotPlugincan also be used by the embedded Godot project scripts to access methods from the host Android project. For more information, see Godot Android plugins.
新增應用程式所需的其他邏輯
以範例 App 為例,需加入 ItemsSelectionFragment 及相關類別,用來建立與顯示 glTF 項目清單
開啟
AndroidManifest.xml檔案,依需要使用 android:screenOrientation 屬性 設定畫面方向如需停用自動調整大小/方向等設定變更,請使用 android:configChanges 屬性
<activity android:name=".MainActivity"
    android:screenOrientation="fullUser"
    android:configChanges="orientation|screenSize|smallestScreenSize|screenLayout"
    android:exported="true">

    ...
</activity>
2. Create and set up the Godot project
In your Android project root directory, create a
godotdirectoryOpen the Godot Editor and create a Godot project in the
godotdirectory we just created aboveSee the sample app's Godot project for reference
Configure the project settings:
Update the Godot project's orientation to match the one set in the Android project's manifest
Set textures/vram_compression/import_etc2_astc to
true
Configure the project Android export preset:
Within the Godot Editor export window, create a new Android export preset
Enable
Gradle Build > Use Gradle Buildin the Android export presetSet the
Gradle Build > Export FormattoExport AARSet the
Export Pathfor the generatedAARto a location accessible by the Android project. The exported projectAARbinaries will be used as a build dependency for the Android project.Update the
Architecturesoptions to match the architectures supported by the Android projectFor this sample, we are not planning to use the
GodotAppAndroid Activity provided by the Godot project, so we disablePackage > Show in App LibraryConfigure any other export options that makes sense for your project, then close the export window
Update the Godot project script as needed
For the sample app, the script logic queries for the registered
GodotPlugininstance, and uses it to connect to signals fired by the app logicThe app logic emits a signal every time an item is selected in the list. The signal contains the filepath of the glTF model, which is used by the script logic to render the model.
extends Node3D

# Reference to the gltf model that's currently being shown.
var current_gltf_node: Node3D = null

func _ready():
    # Default asset to load when the app starts.
    _load_gltf("res://gltfs/food_kit/turkey.glb")

    var app_plugin = Engine.get_singleton("AppPlugin")
    if app_plugin:
        print("App plugin is available")

        # Signal fired from the app logic to update the gltf model being shown.
        app_plugin.connect(&"show_gltf", _load_gltf)
    else:
        print("App plugin is not available")


# Load the gltf model specified by the given path.
func _load_gltf(gltf_path: String):
    if current_gltf_node != null:
        remove_child(current_gltf_node)

    current_gltf_node = load(gltf_path).instantiate()

    add_child(current_gltf_node)
3. 建置並執行應用程式
Now that the Godot project is set up, the next step is complete the configuration of the Android project's dependencies.
We need to add dependencies to the AAR binaries generated by the Godot project export process:
Add the following to the
dependencysection of the app's gradle build file, where<godot_project_export_path>points to the Godot project's export directory:implementation fileTree(dir: "<godot_project_export_path>", include: ["**/*.jar", "*.aar"]) implementation fileTree(dir: "<godot_project_export_path>/aar_deps", include: ["**/*.jar", "*.aar"])
The export Godot project AAR binaries have dependencies on the androidx-fragment and androidx-core-splashscreen libraries, so they need to be included in the Android project dependencies as well.
Add the following to the
dependencysection of the app's gradle build file:implementation "androidx.core:core-splashscreen:1.2.0" implementation "androidx.fragment:fragment:1.9.1"
The final step is to configure the build flow, such that the Godot project is built and exported every time the sample app is built. To do so, add the following code snippet to the app's gradle build file:
def godotBinary = "<absolute_path_to_godot_binary>"

tasks.register("exportGodotProject", Exec) {
    doFirst {
        if (godotBinary.isEmpty()) {
            throw new GradleException("The path to the Godot editor binary was not specified.")
        }

        File godotBinaryFile = new File(godotBinary)
        if (!godotBinaryFile.exists()) {
            throw new GradleException("The path to the Godot editor binary is invalid: $godotBinary")
        }
    }

    description = "Export the embedded Godot project"
    workingDir file("<path_to_godot_project>")
    executable godotBinary
    args "--headless", "--export-release", "<android_export_preset_name>", "<export_path_relative_to_workingDir>"
}

afterEvaluate {
    tasks.named("preBuild").configure {
        dependsOn("exportGodotProject")
    }
}
說明:
<absolute_path_to_godot_binary>is the absolute path to the Godot editor binary<path_to_godot_project>is the path to the Godot project<android_export_preset_name>is the name of the Android export preset configured in the Godot project<export_path_relative_to_workingDir>is theExport Pathconfigured in the Godot project relative to the project path or absolute
Once this is completed, build and run the Android app. If set up correctly, the host Activity will initialize the Godot Engine on startup, and run the embedded Godot project.
App 執行期間,可透過 Android logcat 檢查錯誤或當機資訊。
可參考 GLTF Viewer 範例的 建置與安裝說明。