Up to date
This page is up to date for Godot 4.2.
If you still find outdated information, please open an issue.
為 Android 進行編譯
也參考
這個頁面描述的是如何從源碼編譯 Android 匯出範本二進位。如果你想要找的是匯出專案到 Android,請閱讀 為 Android 匯出。
請注意
在大多數情況下,使用內建的部署工具與匯出樣板就勾勒。手動編譯 Android APK 通常適用於自定建置或為部署工具自定套件的情況。
另外,在建置自定匯出樣板前,依然必須依照 為 Android 匯出 中所提到的步驟進行。
系統需求
要在 Windows, Linux 或 macOS 下進行編譯,則必須滿足下列條件:
SCons 3.0+ 建置系統。
Android SDK (命令行工具即可)。
所需的 SDK 元件會由 Gradle 自動安裝 (除了 NDK)。
- Linux
在 Linux 上,請勿使用發行版本倉庫提供的 Android SDK,因為它通常是過時的。
Gradle (若尚未安裝,會自動下載並安裝)。
JDK 17 (either OpenJDK or Oracle JDK).
You can download a build from ojdkbuild.
設定建置系統
Set the environment variable
ANDROID_HOMEto point to the Android SDK. If you downloaded the Android command-line tools, this would be the folder where you extracted the contents of the ZIP archive.在此資料夾中安裝必要的SDK元件:
通過運作以下命令接受SDK元件許可證, 其中
android_sdk_path是android SDK的路徑, 然後用y回答所有提示:
cmdline-tools/latest/bin/sdkmanager --sdk_root=<android_sdk_path> --licenses
運作以下命令完成安裝, 其中
android_sdk_path是Android SDK的路徑.
cmdline-tools/latest/bin/sdkmanager --sdk_root=<android_sdk_path> "platform-tools" "build-tools;30.0.3" "platforms;android-29" "cmdline-tools;latest" "cmake;3.10.2.4988404"
也參考
若要在 Windows 下設定環境變數,請點擊 Windows + R ,然後輸入「control system」,接著點擊左側面板的「進階系統設定」,然後在出現的視窗中點擊 環境變數 。
也參考
To set the environment variable on Linux or macOS, use
export ANDROID_HOME=/path/to/android-sdk where /path/to/android-sdk points to
the root of the SDK directories.
建置匯出樣板
Godot 會需要兩個 Android 匯出樣板:一個經過最佳化的「release」樣板 (android_release.apk) 以及除錯樣板 (android_debug.apk)。由於 Google 自 2019 年八月開始要求所有 APK 都必須包含 ARMv8 (64 位元) 函式庫,因此下方的指令會建置同時包含 ARMv7 與 ARMv8 函式庫的 APK。
可以通過在 Godot 根目錄以下列參數來呼叫 SCons 來編譯標準匯出樣板:
釋出樣板 (用於匯出時有勾選 Debugging Enabled 時)
scons platform=android target=template_release arch=arm32
scons platform=android target=template_release arch=arm64
cd platform/android/java
# On Windows
.\gradlew generateGodotTemplates
# On Linux and macOS
./gradlew generateGodotTemplates
產生的 APK 會放在 bin/android_release.apk。
除錯樣板 (用於匯出時有勾選 Debugging Enabled 時)
scons platform=android target=template_debug arch=arm32
scons platform=android target=template_debug arch=arm64
cd platform/android/java
# On Windows
.\gradlew generateGodotTemplates
# On Linux and macOS
./gradlew generateGodotTemplates
產生的 APK 會放在 bin/android_debug.apk。
也參考
如果您想要啟用 Vulkan 驗證層,請參閱 Android 上的 Vulkan 驗證層 <doc_vulkan_validation_layers_android>`。
加上對 x86 裝置的支援
若想包含對 x86 與 x86-64 裝置的支援,則請在使用 Gradle 建置 APK 前以 android_arch=x86 與 android_arch=x86_64 參數來執行第三次與第四次 SCons。舉例來說,對於釋出樣板:
scons platform=android target=template_release arch=arm32
scons platform=android target=template_release arch=arm64
scons platform=android target=template_release arch=x86_32
scons platform=android target=template_release arch=x86_64
cd platform/android/java
# On Windows
.\gradlew generateGodotTemplates
# On Linux and macOS
./gradlew generateGodotTemplates
這樣會產生一個很大的二進位檔案,可用於所有平台。最終用於匯出專案的 APK 大小會依據匯出時選擇要支援的平台而定。也就是說,未使用的平台會從 APK 中被移除。
清理產生的匯出樣板
可以使用下列指令來移除產生的匯出樣板:
cd platform/android/java
# On Windows
.\gradlew clean
# On Linux and macOS
./gradlew clean
使用匯出樣板
Godot 需要使用與編輯器相同版本/Commit 編譯的釋出與除錯 APK。若使用官方的編輯器執行檔,請確定與安裝的匯出樣板版本相同,或是自行以相同的版本建置。
匯出遊戲時,Godot 會開啟 APK,並在 APK 內部修改一些東西,然後加上專案檔案。
安裝樣板
必須將新編譯的樣板 (android_debug.apk and android_release.apk) 複製到 Godot 的樣板路徑中,並命名為對應的名稱。樣板資料夾位於:
Windows:
%APPDATA%\Godot\templates\<版本>\Linux:
$HOME/.local/share/godot/templates/<版本>/macOS:
$HOME/Library/Application Support/Godot/templates/<版本>/
<版本> 的格式是與 Godot 原始碼儲存庫中 version.py 相同的值,為 major.minor[.patch].status 這樣的格式 (如 3.0.5.stable 或 3.1.dev)。另外還必須在匯出樣板旁放置一個寫著相同版本的 version.txt 檔案。
但若你使用自定模組或自定 C++ 程式碼,可能需要在此處將自定匯出樣板設為自定 APK:
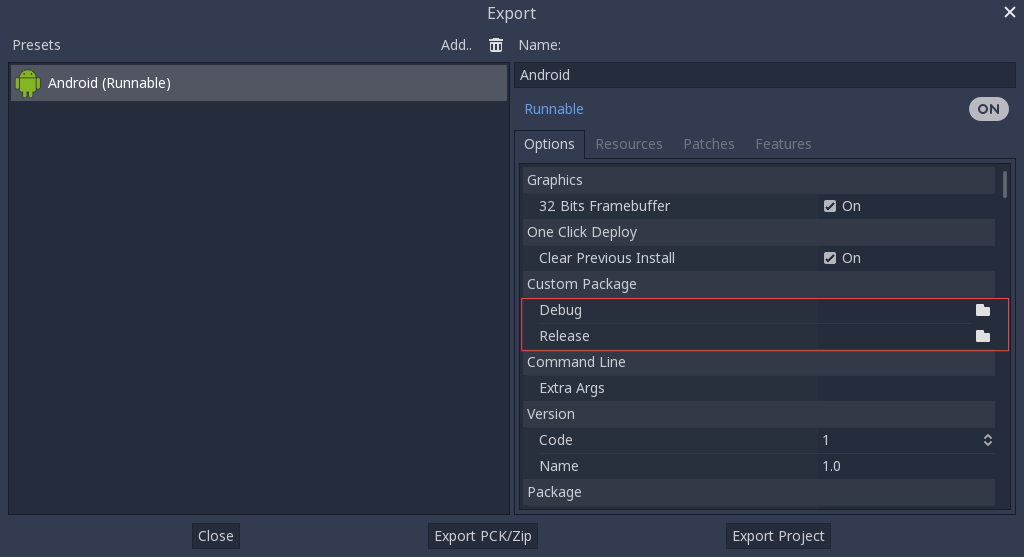
這種情況下甚至不需要複製這些檔案,只需要將這些檔案參照至 Godot 原始碼目錄中的 bin\ 資料夾即可。這樣一來下次建置時就會自動參照到自定樣板。
內建主題編輯器。
可以通過在 Godot 根目錄以下列參數來呼叫 SCons 來編譯標準匯出樣板:
scons platform=android arch=arm32 production=yes target=editor
scons platform=android arch=arm64 production=yes target=editor
scons platform=android arch=x86_32 production=yes target=editor
scons platform=android arch=x86_64 production=yes target=editor
cd platform/android/java
# On Windows
.\gradlew generateGodotEditor
# On Linux and macOS
./gradlew generateGodotEditor
The resulting APK will be located at bin/android_editor_builds/android_editor-release.apk.
使用匯出樣板
可以使用下列指令來移除產生的匯出樣板:
 cd platform/android/java
 # On Windows
.\gradlew clean
# On Linux and macOS
./gradlew clean
安裝樣板
在啟用了開發者選項的 Android 裝置上,透過 USB/USB-C 連接埠的充電線將 Android 裝置連接到您的電腦。開啟終端機/命令提示字元並使用以下參數從根目錄執行以下命令:
adb install ./bin/android_editor_builds/android_editor-release.apk
疑難排解
SCons 中未顯示平台
Double-check that you've set the ANDROID_HOME
environment variable. This is required for the platform to appear in SCons'
list of detected platforms.
See Setting up the buildsystem
for more information.
應用程式無法安裝
Android 可能會提示應用程式未正確安裝。這時:
請檢查除錯 (Debug) 金鑰儲存區是否有正確產生。
請檢查 jarsigner 執行檔是否為 JDK 8 中的。
若依然失敗,請開啟命令行並執行 logcat :
adb logcat
接著在應用程式安裝時檢查輸出。錯誤訊息應該會顯示在此處。若無法解決,請尋找支援。
應用程式馬上退出
若應用程式可執行,但會馬上退出的話,可能是由於下列原因導致:
請確保匯出樣板的版本符合編輯器版本。若使用較新的 Godot 版本,則 必須 一併更新樣板的版本。
libs/<android_arch>/中沒有libgodot_android.so。其中,<android_arch>是裝置的架構。專案的架構與匯出樣板的架構不同。請確定有使用裝置的架構來建置樣板,並確認匯出設定有包含對該架構的支援。
不論哪種情況,adb logcat 應該也會顯示錯誤的原因。