Empezar
Workflow overview
As a GDExtension, godot-cpp is more complicated to use than GDScript and C#. If you decide to work with it, here's what to expect your workflow to look like:
Create a new godot-cpp project (from the template, or from scratch, as explained below).
Develop your code with your favorite IDE locally.
Build and test your code with the earliest compatible Godot version.
Create builds for all platforms you want to support (e.g. using GitHub Actions).
Optional: Publish on the Godot Asset Library.
Proyecto ejemplo
For your first godot-cpp project, we recommend starting with this guide to understand the technology involved with
godot-cpp. After you're done, you can use the godot-cpp template,
which has better coverage of features, such as a GitHub action pipeline and useful SConstruct boilerplate code.
However, the template does not explain itself to a high level of detail, which is why we recommend going through this
guide first.
Configurando el proyecto
Hay algunos requisitos previos que necesitarás:
A Godot 4 executable.
A C++ compiler.
SCons como una herramienta de compilación.
A copy of the godot-cpp repository.
See also Configuring an IDE and Compiling as the build tools are identical to the ones you need to compile Godot from source.
You can download the godot-cpp repository from GitHub or let Git do the work for you. Note that this repository has different branches for different versions of Godot. GDExtensions will not work in older versions of Godot (only Godot 4 and up) and vice versa, so make sure you download the correct branch.
Nota
To use GDExtension
you need to use the godot-cpp branch that matches the version of Godot that you are
targeting. For example, if you're targeting Godot 4.1, use the 4.1 branch. Throughout
this tutorial we use 4.x, which will need to be replaced with the version of Godot you
are targeting.
The master branch is the development branch which is updated regularly
to work with Godot's master branch.
Advertencia
GDExtensions targeting an earlier version of Godot should work in later minor versions, but not vice-versa. For example, a GDExtension targeting Godot 4.2 should work just fine in Godot 4.3, but one targeting Godot 4.3 won't work in Godot 4.2.
There is one exception to this: extensions targeting Godot 4.0 will not work with Godot 4.1 and later (see Actualizando su GDExtension para la versión 4.1).
If you are versioning your project using Git, it is recommended to add it as a Git submodule:
mkdir gdextension_cpp_example
cd gdextension_cpp_example
git init
git submodule add -b 4.x https://github.com/godotengine/godot-cpp
cd godot-cpp
git submodule update --init
Alternatively, you can also clone it to the project folder:
mkdir gdextension_cpp_example
cd gdextension_cpp_example
git clone -b 4.x https://github.com/godotengine/godot-cpp
Nota
If you decide to download the repository or clone it into your folder, make sure to keep the folder layout the same as we've setup here. Much of the code we'll be showcasing here assumes the project has this layout.
Si clonaste el ejemplo del enlace especificado en la introducción, los submódulos no son inicializados automáticamente. Tendrás que ejecutar los siguientes comandos:
cd gdextension_cpp_example
git submodule update --init
This will initialize the repository in your project folder.
Compilar las ligaduras de C++
Ya que descargamos los prerequisitos, es hora de compilar las ligaduras de C++.
The repository contains a copy of the metadata for the current Godot release, but if you need to build these bindings for a newer version of Godot, call the Godot executable:
godot --dump-extension-api
The resulting extension_api.json file will be created in the executable's
directory. Copy it to the project folder and add custom_api_file=<PATH_TO_FILE>
to the scons command below.
To generate and compile the bindings, use this command (replacing <platform>
with windows, linux or macos depending on your OS):
The build process automatically detects the number of CPU threads to use for
parallel builds. To specify a number of CPU threads to use, add -jN at the
end of the SCons command line where N is the number of CPU threads to use.
cd godot-cpp
scons platform=<platform> custom_api_file=<PATH_TO_FILE>
cd ..
Este paso tomará tiempo en finalizar, una vez completo, deberías de tener unas bibliotecas estáticas que pueden ser compiladas dentro de tu proyecto guardado en godot-cpp/bin/.
Nota
Es posible que necesites agregar bits=64 al comando en Windows o Linux.
Creación de un plugin simple
Es hora de hacer un plugin real. Iniciaremos creando un proyecto de Godot vacío en el que colocaremos unos cuantos archivos.
Open Godot and create a new project. For this example, we will place it in a
folder called demo inside our GDExtension's folder structure.
En nuestro proyecto demo, crearemos una escena que contendrá un Nodo llamado "Main" y lo guardaremos como main.tscn. Volveremos a esto más tarde.
Back in the top-level GDExtension module folder, we're also going to create a
subfolder called src in which we'll place our source files.
You should now have demo, godot-cpp, and src
directories in your GDExtension module.
Your folder structure should now look like this:
gdextension_cpp_example/
|
+--demo/                  # game example/demo to test the extension
|
+--godot-cpp/             # C++ bindings
|
+--src/                   # source code of the extension we are building
In the src folder, we'll start with creating our header file for the
GDExtension node we'll be creating. We will name it gdexample.h:
#pragma once

#include <godot_cpp/classes/sprite2d.hpp>

namespace godot {

class GDExample : public Sprite2D {
    GDCLASS(GDExample, Sprite2D)

private:
    double time_passed;

protected:
    static void _bind_methods();

public:
    GDExample();
    ~GDExample();

    void _process(double delta) override;
};

} // namespace godot
There are a few things of note to the above. We include sprite2d.hpp which
contains bindings to the Sprite2D class. We'll be extending this class in our
module.
We're using the namespace godot, since everything in GDExtension is defined
within this namespace.
Then we have our class definition, which inherits from our Sprite2D through a
container class. We'll see a few side effects of this later on. The
GDCLASS macro sets up a few internal things for us.
Después de eso declaramos una sola variable de miembro llamada time_passed.
In the next block we're defining our methods, we have our constructor and destructor defined, but there are two other functions that will likely look familiar to some, and one new method.
The first is _bind_methods, which is a static function that Godot will
call to find out which methods can be called and which properties it exposes.
The second is our _process function, which will work exactly the same
as the _process function you're used to in GDScript.
Implementemos nuestras funciones creando nuestro archivo gdexample.cpp`:
#include "gdexample.h"
#include <godot_cpp/core/class_db.hpp>

using namespace godot;

void GDExample::_bind_methods() {
}

GDExample::GDExample() {
    // Initialize any variables here.
    time_passed = 0.0;
}

GDExample::~GDExample() {
    // Add your cleanup here.
}

void GDExample::_process(double delta) {
    time_passed += delta;

    Vector2 new_position = Vector2(10.0 + (10.0 * sin(time_passed * 2.0)), 10.0 + (10.0 * cos(time_passed * 1.5)));

    set_position(new_position);
}
This one should be straightforward. We're implementing each method of our class that we defined in our header file.
Note our _process function, which keeps track of how much time has passed
and calculates a new position for our sprite using a sine and cosine function.
There is one more C++ file we need; we'll name it register_types.cpp. Our
GDExtension plugin can contain multiple classes, each with their own header
and source file like we've implemented GDExample up above. What we need now
is a small bit of code that tells Godot about all the classes in our
GDExtension plugin.
#include "register_types.h"

#include "gdexample.h"

#include <gdextension_interface.h>
#include <godot_cpp/core/defs.hpp>
#include <godot_cpp/godot.hpp>

using namespace godot;

void initialize_example_module(ModuleInitializationLevel p_level) {
    if (p_level != MODULE_INITIALIZATION_LEVEL_SCENE) {
        return;
    }

    GDREGISTER_RUNTIME_CLASS(GDExample);
}

void uninitialize_example_module(ModuleInitializationLevel p_level) {
    if (p_level != MODULE_INITIALIZATION_LEVEL_SCENE) {
        return;
    }
}

extern "C" {
// Initialization.
GDExtensionBool GDE_EXPORT example_library_init(GDExtensionInterfaceGetProcAddress p_get_proc_address, const GDExtensionClassLibraryPtr p_library, GDExtensionInitialization *r_initialization) {
    godot::GDExtensionBinding::InitObject init_obj(p_get_proc_address, p_library, r_initialization);

    init_obj.register_initializer(initialize_example_module);
    init_obj.register_terminator(uninitialize_example_module);
    init_obj.set_minimum_library_initialization_level(MODULE_INITIALIZATION_LEVEL_SCENE);

    return init_obj.init();
}
}
The initialize_example_module and uninitialize_example_module functions get
called respectively when Godot loads our plugin and when it unloads it. All
we're doing here is parse through the functions in our bindings module to
initialize them, but you might have to set up more things depending on your
needs. We call the GDREGISTER_RUNTIME_CLASS macro for each of our classes
in our library. This will make them run only in game, like the default for GDScript.
The important function is the third function called example_library_init.
We first call a function in our bindings library that creates an initialization object.
This object registers the initialization and termination functions of the GDExtension.
Furthermore, it sets the level of initialization (core, servers, scene, editor, level).
At last, we need the header file for the register_types.cpp named
register_types.h.
#pragma once

#include <godot_cpp/core/class_db.hpp>

using namespace godot;

void initialize_example_module(ModuleInitializationLevel p_level);
void uninitialize_example_module(ModuleInitializationLevel p_level);
Compilar el plugin
To compile the project we need to define how SCons using should compile it
using an SConstruct file which references the one in godot-cpp.
Writing it from scratch is outside the scope of this tutorial, but you can
the SConstruct file we prepared.
We'll cover a more customizable, detailed example on how to use these
build files in a subsequent tutorial.
Nota
This SConstruct file was written to be used with the latest godot-cpp
master, you may need to make small changes using it with older versions or
refer to the SConstruct file in the Godot 4.x documentation.
Once you've downloaded the SConstruct file, place it in your GDExtension folder
structure alongside godot-cpp, src and demo, then run:
scons platform=<platform>
Ahora deberías poder encontrar el módulo en demo/bin/<platform>.
When building for iOS, package the module as a static .xcframework, you can use following commands to do so:
# compile simulator and device modules
scons arch=universal ios_simulator=yes platform=ios target=<target>
scons arch=arm64 ios_simulator=no platform=ios target=<target>

# assemble xcframeworks
xcodebuild -create-xcframework -library demo/bin/libgdexample.ios.<target>.a -library demo/bin/libgdexample.ios.<target>.simulator.a -output demo/bin/libgdexample.ios.<target>.xcframework
xcodebuild -create-xcframework -library godot-cpp/bin/libgodot-cpp.ios.<target>.arm64.a -library godot-cpp/bin/libgodot-cpp.ios.<target>.universal.simulator.a  -output demo/bin/libgodot-cpp.ios.<target>.xcframework
Nota
Here, we've compiled both godot-cpp and our gdexample library as debug
builds. For optimized builds, you should compile them using the
target=template_release switch.
Using the GDExtension module
Before we jump back into Godot, we need to create one more file in
demo/bin/.
This file lets Godot know what dynamic libraries should be
loaded for each platform and the entry function for the module. It is called gdexample.gdextension.
[configuration]

entry_symbol = "example_library_init"
compatibility_minimum = "4.1"
reloadable = true

[libraries]

macos.debug = "res://bin/libgdexample.macos.template_debug.framework"
macos.release = "res://bin/libgdexample.macos.template_release.framework"
ios.debug = "res://bin/libgdexample.ios.template_debug.xcframework"
ios.release = "res://bin/libgdexample.ios.template_release.xcframework"
windows.debug.x86_32 = "res://bin/libgdexample.windows.template_debug.x86_32.dll"
windows.release.x86_32 = "res://bin/libgdexample.windows.template_release.x86_32.dll"
windows.debug.x86_64 = "res://bin/libgdexample.windows.template_debug.x86_64.dll"
windows.release.x86_64 = "res://bin/libgdexample.windows.template_release.x86_64.dll"
linux.debug.x86_64 = "res://bin/libgdexample.linux.template_debug.x86_64.so"
linux.release.x86_64 = "res://bin/libgdexample.linux.template_release.x86_64.so"
linux.debug.arm64 = "res://bin/libgdexample.linux.template_debug.arm64.so"
linux.release.arm64 = "res://bin/libgdexample.linux.template_release.arm64.so"
linux.debug.rv64 = "res://bin/libgdexample.linux.template_debug.rv64.so"
linux.release.rv64 = "res://bin/libgdexample.linux.template_release.rv64.so"
android.debug.x86_64 = "res://bin/libgdexample.android.template_debug.x86_64.so"
android.release.x86_64 = "res://bin/libgdexample.android.template_release.x86_64.so"
android.debug.arm64 = "res://bin/libgdexample.android.template_debug.arm64.so"
android.release.arm64 = "res://bin/libgdexample.android.template_release.arm64.so"

[dependencies]
ios.debug = {
    "res://bin/libgodot-cpp.ios.template_debug.xcframework": ""
}
ios.release = {
    "res://bin/libgodot-cpp.ios.template_release.xcframework": ""
}
This file contains a configuration section that controls the entry function of the module.
You should also set the minimum compatible Godot version with compatibility_minimum,
which prevents older version of Godot from trying to load your extension.
The reloadable flag enables automatic reloading of your extension by the editor every time you recompile it,
without needing to restart the editor. This only works if you compile your extension in debug mode (default).
The libraries section is the important bit: it tells Godot the location of the
dynamic library in the project's filesystem for each supported platform. It will
also result in just that file being exported when you export the project,
which means the data pack won't contain libraries that are incompatible with the
target platform.
Finally, the dependencies section allows you to name additional dynamic
libraries that should be included as well. This is important when your GDExtension
plugin implements someone else's library and requires you to supply a
third-party dynamic library with your project.
Here is another overview to check the correct file structure:
gdextension_cpp_example/
|
+--demo/                  # game example/demo to test the extension
|   |
|   +--main.tscn
|   |
|   +--bin/
|       |
|       +--gdexample.gdextension
|
+--godot-cpp/             # C++ bindings
|
+--src/                   # source code of the extension we are building
|   |
|   +--register_types.cpp
|   +--register_types.h
|   +--gdexample.cpp
|   +--gdexample.h
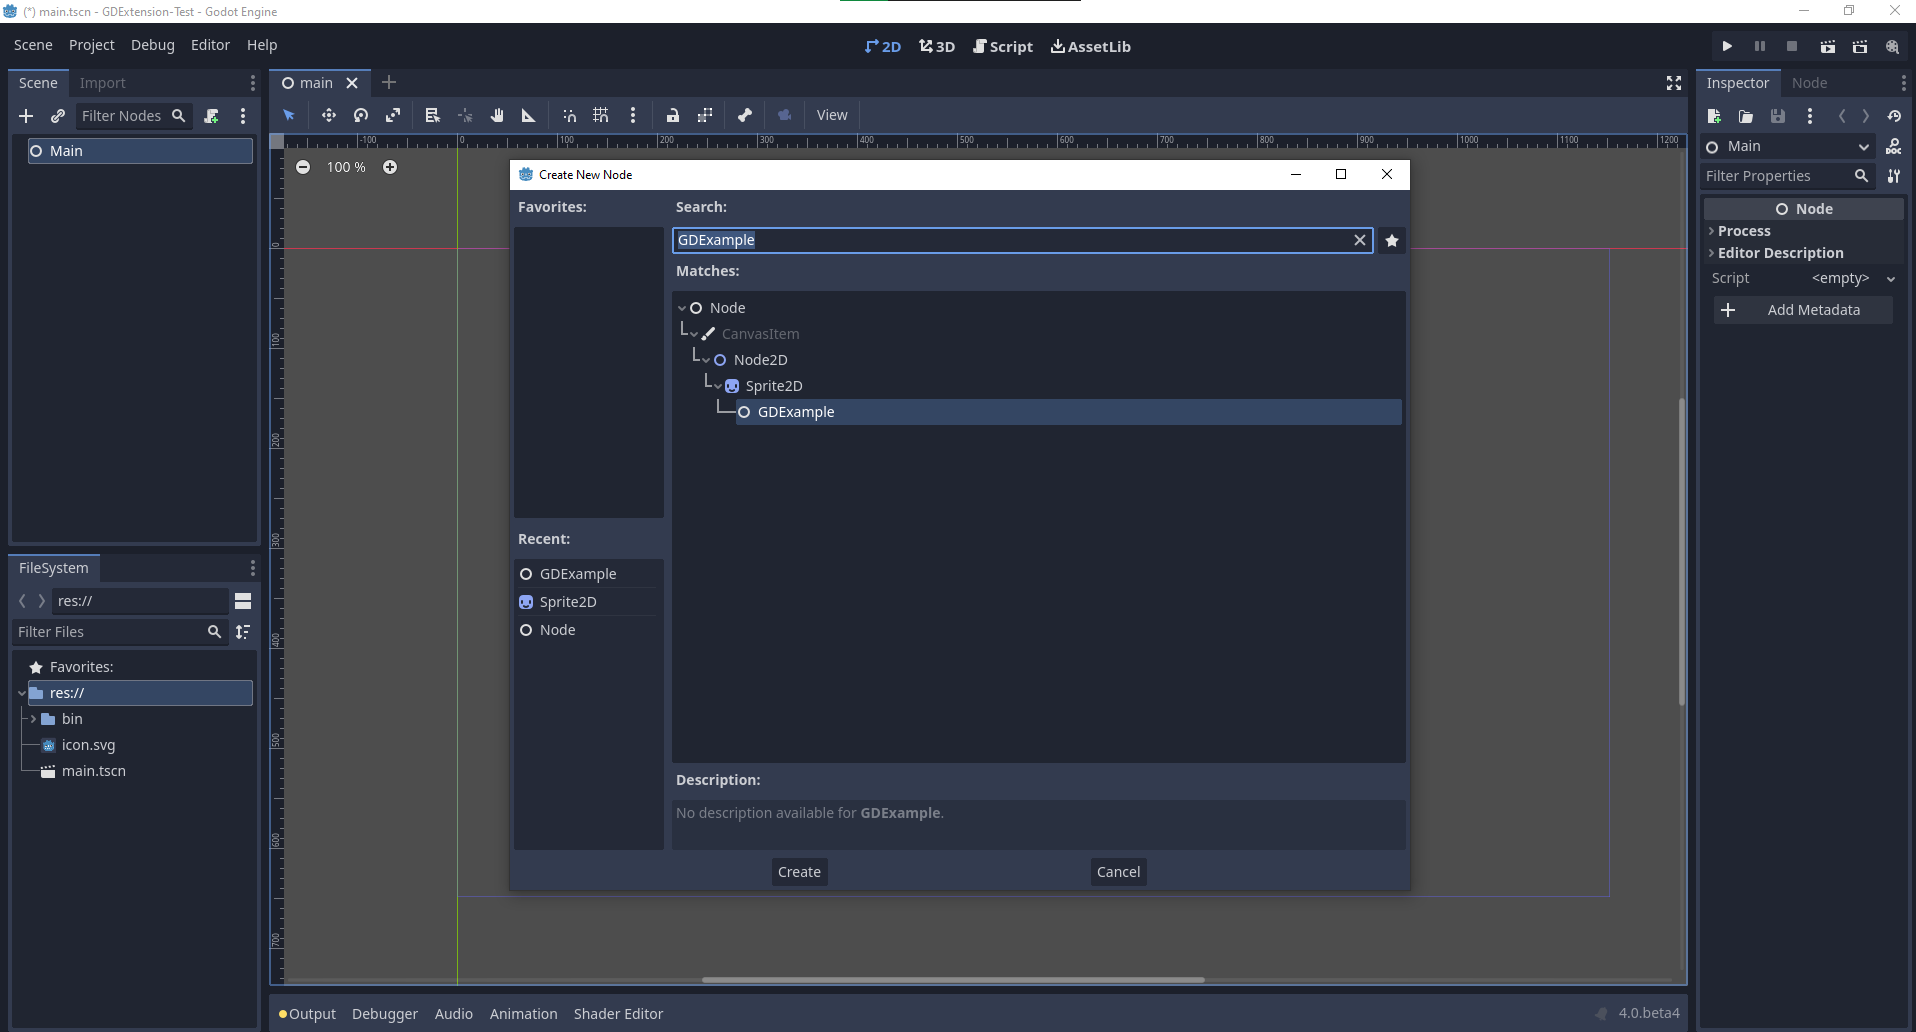
Time to jump back into Godot. We load up the main scene we created way back in the beginning and now add a newly available GDExample node to the scene:
We're going to assign the Godot logo to this node as our texture, disable the
centered property:
Finalmente, estamos listos para ejecutar el proyecto:
Agregando propiedades
GDScript allows you to add properties to your script using the export
keyword. In GDExtension you have to register the properties with a getter and
setter function or directly implement the _get_property_list, _get and
_set methods of an object (but that goes far beyond the scope of this
tutorial).
Lets add a property that allows us to control the amplitude of our wave.
In our gdexample.h file we need to add a member variable and getter and setter
functions:
...
private:
    double time_passed;
    double amplitude;

public:
    void set_amplitude(const double p_amplitude);
    double get_amplitude() const;
...
En nuestro archivo gdexample.cpp, necesitaremos realizar una serie de cambios. Solo mostraremos los métodos que terminamos modificando, sin eliminar las líneas que estamos omitiendo:
void GDExample::_bind_methods() {
    ClassDB::bind_method(D_METHOD("get_amplitude"), &GDExample::get_amplitude);
    ClassDB::bind_method(D_METHOD("set_amplitude", "p_amplitude"), &GDExample::set_amplitude);

    ADD_PROPERTY(PropertyInfo(Variant::FLOAT, "amplitude"), "set_amplitude", "get_amplitude");
}

GDExample::GDExample() {
    // Initialize any variables here.
    time_passed = 0.0;
    amplitude = 10.0;
}

void GDExample::_process(double delta) {
    time_passed += delta;

    Vector2 new_position = Vector2(
        amplitude + (amplitude * sin(time_passed * 2.0)),
        amplitude + (amplitude * cos(time_passed * 1.5))
    );

    set_position(new_position);
}

void GDExample::set_amplitude(const double p_amplitude) {
    amplitude = p_amplitude;
}

double GDExample::get_amplitude() const {
    return amplitude;
}
Una vez que compiles el módulo con estos cambios implementados, verás que se ha agregado una propiedad a nuestra interfaz. Ahora puedes cambiar esta propiedad y, cuando ejecutes tu proyecto, notarás que el icono de Godot se desplaza a lo largo de una figura más grande.
Hagamos lo mismo, pero para la velocidad de nuestra animación y usemos una función setter y getter. Nuestro archivo de encabezado gdexample.h solo necesita unas pocas líneas más de código:
...
    double amplitude;
    double speed;
...
    void _process(double delta) override;
    void set_speed(const double p_speed);
    double get_speed() const;
...
Esto requiere algunos cambios adicionales en nuestro archivo gdexample.cpp. Nuevamente, solo mostraremos los métodos que han cambiado, así que no eliminaré nada de lo que estamos omitiendo:
void GDExample::_bind_methods() {
    ...
    ClassDB::bind_method(D_METHOD("get_speed"), &GDExample::get_speed);
    ClassDB::bind_method(D_METHOD("set_speed", "p_speed"), &GDExample::set_speed);

    ADD_PROPERTY(PropertyInfo(Variant::FLOAT, "speed", PROPERTY_HINT_RANGE, "0,20,0.01"), "set_speed", "get_speed");
}

GDExample::GDExample() {
    time_passed = 0.0;
    amplitude = 10.0;
    speed = 1.0;
}

void GDExample::_process(double delta) {
    time_passed += speed * delta;

    Vector2 new_position = Vector2(
        amplitude + (amplitude * sin(time_passed * 2.0)),
        amplitude + (amplitude * cos(time_passed * 1.5))
    );

    set_position(new_position);
}

...

void GDExample::set_speed(const double p_speed) {
    speed = p_speed;
}

double GDExample::get_speed() const {
    return speed;
}
Now when the project is compiled, we'll see another property called speed. Changing its value will make the animation go faster or slower. Furthermore, we added a property range which describes in which range the value can be. The first two arguments are the minimum and maximum value and the third is the step size.
Nota
For simplicity, we've only used the hint_range of the property method. There are a lot more options to choose from. These can be used to further configure how properties are displayed and set on the Godot side.
Señales
Last but not least, signals fully work in GDExtension as well. Having your extension
react to a signal given out by another object requires you to call connect
on that object. We can't think of a good example for our wobbling Godot icon, we
would need to showcase a far more complete example.
Esta es la sintaxis requerida:
some_other_node->connect("the_signal", Callable(this, "my_method"));
To connect our signal the_signal from some other node with our method
my_method, we need to provide the connect method with the name of the signal
and a Callable. The Callable holds information about an object on which a method
can be called. In our case, it associates our current object instance this with the
method my_method of the object. Then the connect method will add this to the
observers of the_signal. Whenever the_signal is now emitted, Godot knows which
method of which object it needs to call.
Note that you can only call my_method if you've previously registered it in
your _bind_methods method. Otherwise Godot will not know about the existence
of my_method.
To learn more about Callable, check out the class reference here: Callable.
Enviar señales desde tu objeto es más común. Para nuestro icono de Godot tembloroso, haremos algo simple solo para mostrar cómo funciona. Emitiremos una señal cada vez que pase un segundo y pasaremos la nueva ubicación a lo largo de ella.
En nuestro archivo de encabezado gdexample.h, necesitamos definir un nuevo miembro llamado time_emit:
...
    double time_passed;
    double time_emit;
    double amplitude;
...
Esta vez, los cambios en gdexample.cpp son más elaborados. Primero, necesitarás establecer time_emit = 0.0; ya sea en nuestro método _init o en nuestro constructor. Veremos los otros 2 cambios necesarios uno por uno.
In our _bind_methods method, we need to declare our signal. This is done
as follows:
void GDExample::_bind_methods() {
    ...
    ADD_PROPERTY(PropertyInfo(Variant::FLOAT, "speed", PROPERTY_HINT_RANGE, "0,20,0.01"), "set_speed", "get_speed");

    ADD_SIGNAL(MethodInfo("position_changed", PropertyInfo(Variant::OBJECT, "node"), PropertyInfo(Variant::VECTOR2, "new_pos")));
}
Here, our ADD_SIGNAL macro can be a single call with a MethodInfo argument.
MethodInfo's first parameter will be the signal's name, and its remaining parameters
are PropertyInfo types which describe the essentials of each of the method's parameters.
PropertyInfo parameters are defined with the data type of the parameter, and then the name
that the parameter will have by default.
So here, we add a signal, with a MethodInfo which names the signal "position_changed". The
PropertyInfo parameters describe two essential arguments, one of type Object, the other
of type Vector2, respectively named "node" and "new_pos".
A continuación, necesitaremos cambiar nuestro método _process:
void GDExample::_process(double delta) {
    time_passed += speed * delta;

    Vector2 new_position = Vector2(
        amplitude + (amplitude * sin(time_passed * 2.0)),
        amplitude + (amplitude * cos(time_passed * 1.5))
    );

    set_position(new_position);

    time_emit += delta;
    if (time_emit > 1.0) {
        emit_signal("position_changed", this, new_position);

        time_emit = 0.0;
    }
}
Después de haber pasado un segundo, emitimos nuestra señal y reiniciamos nuestro contador. Podemos agregar los valores de los parámetros directamente a emit_signal.
Once the GDExtension library is compiled, we can go into Godot and select our sprite node. In the Node dock, we can find our new signal and link it up by pressing the Connect button or double-clicking the signal. We've added a script on our main node and implemented our signal like this:
extends Node

func _on_Sprite2D_position_changed(node, new_pos):
    print("The position of " + node.get_class() + " is now " + str(new_pos))
Cada segundo, mostramos nuestra posición en la consola.
Siguientes pasos
Esperamos que el ejemplo anterior te haya mostrado los conceptos básicos. ¡Puedes usar este ejemplo para crear scripts completos que controlen nodos en Godot usando C++!
Instead of basing your project off the above example setup, we recommend to restart now by cloning the
godot-cpp template, and base your project off of that.
It has better coverage of features, such as a GitHub build action and additional useful SConstruct boilerplate.