Lenguaje de shading
Introducción
Godot utiliza un lenguaje de shading similar a GLSL ES 3.0. La mayoría de los tipos de datos y funciones están soportados y los pocos que no figuran serán agregados posteriormente.
Si ya estás familiarizado con GLSL, la Guía de migración de shaders de Godot es un recurso que te ayudará a hacer la transición desde GLSL regular al lenguaje de sombreado de Godot.
Tipos de datos
La mayoría de los tipos de datos de GLSL ES 3.0 están soportados:
Tipo |
Descripción |
|---|---|
void |
Tipo de dato nulo, útil sólo para funciones que no retornan nada. |
bool |
Tipo de dato booleano, puede contener solamente |
bvec2 |
Vector de dos componentes booleanas. |
bvec3 |
Vector de tres componentes booleanas. |
bvec4 |
Vector de cuatro componentes booleanas. |
int |
32 bit signed scalar integer. |
ivec2 |
Vector de dos componentes de entero con signo. |
ivec3 |
Vector de tres componentes de enteros con signo. |
ivec4 |
Vector de cuatro componentes de enteros con signo. |
uint |
Escalar entero sin signo, no puede contener números negativos. |
uvec2 |
Vector de dos componentes de enteros sin signo. |
uvec3 |
Vector de tres componentes de enteros sin signo. |
uvec4 |
Vector de cuatro componentes de enteros sin signo. |
float |
32 bit floating-point scalar. |
vec2 |
Vector de dos componentes de valores de punto flotante. |
vec3 |
Vector de tres componentes de valores de punto flotante. |
vec4 |
Vector de cuatro componentes de valores de punto flotante. |
mat2 |
Matrix 2x2, ordenada por columna. |
mat3 |
Matriz 3x3, ordenada por columnas (column-major order). |
mat4 |
Matriz 4x4, ordenada por columnas (column-major order). |
sampler2D |
Tipo Sampler para vincular texturas 2D, las cuales son leídas como float. |
isampler2D |
Tipo Sampler para vincular texturas 2D, las cuales son leídas como enteros con signo. |
usampler2D |
Tipo Sampler para vincular texturas 2D, las cuales son leídas como enteros sin signo. |
sampler2DArray |
Tipo Sampler para vincular arrays de texturas 2D, las cuales son leídas como float. |
isampler2DArray |
Tipo Sampler para vincular arrays de texturas 2D, las cuales son leídas como enteros con signo. |
usampler2DArray |
Tipo Sampler para vincular arrays de texturas 2D, las cuales son leídas como enteros sin signo. |
sampler3D |
Tipo Sampler para vincular texturas 3D, las cuales son leídas como float. |
isampler3D |
Tipo Sampler para vincular texturas 3D, las cuales son leídas como enteros con signo. |
usampler3D |
Tipo Sampler para vincular texturas 3D, las cuales son leídas como enteros sin signo. |
samplerCube |
Sampler type for binding Cubemaps, which are read as float. |
samplerCubeArray |
Tipo Sampler para enlazar Cubemaps, que se leen como flotantes. Compatible solo con Forward+ y Mobile; no con Compatibility. |
samplerExternalOES |
Tipo de sampler externo. Solo compatible con la plataforma Compatibility/Android. |
Advertencia
Local variables are not initialized to a default value such as 0.0. If
you use a variable without assigning it first, it will contain whatever
value was already present at that memory location, and unpredictable visual
glitches will appear. However, uniforms and varyings are initialized to a
default value.
Casting
Como en GLSL ES 3.0, el casting implícito entre escalares y vectores del mismo tamaño pero distinto tipo no está permitido. Casting de tipos de distinto tamaño tampoco está permitido. La conversión debe ser explícita mediante el uso de constructores.
Ejemplo:
float a = 2; // invalid
float a = 2.0; // valid
float a = float(2); // valid
Las constantes enteras son con signo, siempre se necesitará casting para convertirlas a enteros sin signo:
int a = 2; // valid
uint a = 2; // invalid
uint a = uint(2); // valid
Miembros
Escalares individuales miembros de tipos vectores se acceden mediante los miembros "x", "y", "z" y "w". Alternativamente, "r", "g", "b" y "a" también funciona y es equivalente. Usa la que se ajuste mejor al caso.
For matrices, use the m[column][row] indexing syntax to access each scalar,
or m[column] to access a vector by column index. For example, for accessing the
y-component of the translation from a mat4 transform matrix (4th column, 2nd line) you use m[3][1] or m[3].y.
Construcción
La construcción de tipos vector deberá pasar siempre:
// The required amount of scalars
vec4 a = vec4(0.0, 1.0, 2.0, 3.0);
// Complementary vectors and/or scalars
vec4 a = vec4(vec2(0.0, 1.0), vec2(2.0, 3.0));
vec4 a = vec4(vec3(0.0, 1.0, 2.0), 3.0);
// A single scalar for the whole vector
vec4 a = vec4(0.0);
Construction of matrix types requires vectors of the same dimension as the
matrix, interpreted as columns. You can also build a diagonal matrix using matx(float) syntax.
Accordingly, mat4(1.0) is an identity matrix.
mat2 m2 = mat2(vec2(1.0, 0.0), vec2(0.0, 1.0));
mat3 m3 = mat3(vec3(1.0, 0.0, 0.0), vec3(0.0, 1.0, 0.0), vec3(0.0, 0.0, 1.0));
mat4 identity = mat4(1.0);
Matrices can also be built from a matrix of another dimension. There are two rules:
1. If a larger matrix is constructed from a smaller matrix, the additional rows and columns are set to the values they would have in an identity matrix. 2. If a smaller matrix is constructed from a larger matrix, the top, left submatrix of the larger matrix is used.
mat3 basis = mat3(MODEL_MATRIX);
mat4 m4 = mat4(basis);
mat2 m2 = mat2(m4);
Swizzling
Es posible obtener cualquier combinación de ellos en cualquier orden, siempre que el resultado sea igual a otro tipo vector (o escalar). Es más fácil mostrarlo que explicarlo:
vec4 a = vec4(0.0, 1.0, 2.0, 3.0);
vec3 b = a.rgb; // Creates a vec3 with vec4 components.
vec3 b = a.ggg; // Also valid; creates a vec3 and fills it with a single vec4 component.
vec3 b = a.bgr; // "b" will be vec3(2.0, 1.0, 0.0).
vec3 b = a.xyz; // Also rgba, xyzw are equivalent.
vec3 b = a.stp; // And stpq (for texture coordinates).
float c = b.w; // Invalid, because "w" is not present in vec3 b.
vec3 c = b.xrt; // Invalid, mixing different styles is forbidden.
b.rrr = a.rgb; // Invalid, assignment with duplication.
b.bgr = a.rgb; // Valid assignment. "b"'s "blue" component will be "a"'s "red" and vice versa.
Precisión
Es posible agregar modificadores de precisión a los tipos de datos, se pueden usar para uniforms, variables, argumentos y varyings:
lowp vec4 a = vec4(0.0, 1.0, 2.0, 3.0); // low precision, usually 8 bits per component mapped to 0-1
mediump vec4 a = vec4(0.0, 1.0, 2.0, 3.0); // medium precision, usually 16 bits or half float
highp vec4 a = vec4(0.0, 1.0, 2.0, 3.0); // high precision, uses full float or integer range (32 bit default)
El uso de baja precisión para algunas operaciones puede acelerar la matemática involucrada (al costo de, por supuesto, baja precisión). Esto es raramente necesitado en vertex shaders (donde precisión máxima es necesitada la mayor parte del tiempo), pero normalmente se necesita en los fragment.
Algunas arquitecturas (principalmente móviles) pueden beneficiarse significativamente de esto, pero existen desventajas como la sobrecarga adicional de conversión entre precisiones. Consulta la documentación de la arquitectura de destino para obtener más información. En muchos casos, los controladores móviles provocan un comportamiento incoherente o inesperado y es mejor evitar especificar la precisión a menos que sea necesario.
Arrays
Arrays are containers for multiple variables of a similar type.
Arrays locales
Los arrays locales se declaran en funciones. Pueden utilizar todos los tipos de datos permitidos, excepto los samplers. La declaración de los arrays sigue una sintaxis de tipo C: [const] + [precision] + typename + identifier + [array size].
void fragment() {
    float arr[3];
}
Pueden ser inicializados al principio como:
float float_arr[3] = float[3] (1.0, 0.5, 0.0); // first constructor

int int_arr[3] = int[] (2, 1, 0); // second constructor

vec2 vec2_arr[3] = { vec2(1.0, 1.0), vec2(0.5, 0.5), vec2(0.0, 0.0) }; // third constructor

bool bool_arr[] = { true, true, false }; // fourth constructor - size is defined automatically from the element count
Puedes declarar múltiples arrays (incluso con diferentes tamaños) en una expresión:
float a[3] = float[3] (1.0, 0.5, 0.0),
b[2] = { 1.0, 0.5 },
c[] = { 0.7 },
d = 0.0,
e[5];
Para acceder a un elemento del array, utiliza la sintaxis de indexación:
float arr[3];

arr[0] = 1.0; // setter

COLOR.r = arr[0]; // getter
Los arrays también tienen una función integrada .length() (que no debe confundirse con la función integrada length()). No acepta ningún parámetro y devolverá el tamaño del array.
float arr[] = { 0.0, 1.0, 0.5, -1.0 };
for (int i = 0; i < arr.length(); i++) {
    // ...
}
Nota
If you use an index either below 0 or greater than array size - the shader will
crash and break rendering. To prevent this, use length(), if, or
clamp() functions to ensure the index is between 0 and the array's
length. Always carefully test and check your code. If you pass a constant
expression or a number, the editor will check its bounds to prevent
this crash.
Global arrays
You can declare arrays in global space as either const or uniform:
shader_type spatial;

const lowp vec3 v[1] = lowp vec3[1] ( vec3(0, 0, 1) );
uniform lowp vec3 w[1];

void fragment() {
  ALBEDO = v[0] + w[0];
}
Nota
Global arrays use the same syntax as local arrays, except with a const
or uniform added to their declaration. Note that uniform arrays can't
have a default value.
Constantes
Use la palabra clave const antes de la declaración de la variable para hacerla inmutable, lo que significa que no puede ser modificada. Todos los tipos básicos, excepto las samplers pueden ser declarados como constantes. Acceder y utilizar un valor constante es ligeramente más rápido que utilizar un uniforme. Las constantes deben ser inicializadas en su declaración.
const vec2 a = vec2(0.0, 1.0);
vec2 b;

a = b; // invalid
b = a; // valid
Las constantes no pueden ser modificadas y además no pueden tener indicios, pero varias de ellas (si tienen el mismo tipo) pueden ser declaradas en una sola expresión, por ejemplo
const vec2 V1 = vec2(1, 1), V2 = vec2(2, 2);
Al igual que las variables, los arrays también pueden ser declarados con const.
const float arr[] = { 1.0, 0.5, 0.0 };

arr[0] = 1.0; // invalid

COLOR.r = arr[0]; // valid
Las constantes pueden ser declaradas tanto globalmente (fuera de cualquier función) como localmente (dentro de una función). Las constantes globales son útiles cuando se quiere tener acceso a un valor en todo el shader que no necesita ser modificado. Al igual que los uniformes, las constantes globales se comparten entre todas las etapas del shader, pero no son accesibles fuera del shader.
shader_type spatial;

const float GOLDEN_RATIO = 1.618033988749894;
Constants of the float type must be initialized using . notation after the
decimal part or by using the scientific notation. The optional f post-suffix is
also supported.
float a = 1.0;
float b = 1.0f; // same, using suffix for clarity
float c = 1e-1; // gives 0.1 by using the scientific notation
Constants of the uint (unsigned int) type must have a u suffix to differentiate them from signed integers.
Alternatively, this can be done by using the uint(x) built-in conversion function.
uint a = 1u;
uint b = uint(1);
Structs
Structs are compound types which can be used for better abstraction of shader code. You can declare them at the global scope like:
struct PointLight {
    vec3 position;
    vec3 color;
    float intensity;
};
After declaration, you can instantiate and initialize them like:
void fragment()
{
    PointLight light;
    light.position = vec3(0.0);
    light.color = vec3(1.0, 0.0, 0.0);
    light.intensity = 0.5;
}
Or use struct constructor for same purpose:
PointLight light = PointLight(vec3(0.0), vec3(1.0, 0.0, 0.0), 0.5);
Structs may contain other struct or array, you can also instance them as global constant:
shader_type spatial;

...

struct Scene {
    PointLight lights[2];
};

const Scene scene = Scene(PointLight[2](PointLight(vec3(0.0, 0.0, 0.0), vec3(1.0, 0.0, 0.0), 1.0), PointLight(vec3(0.0, 0.0, 0.0), vec3(1.0, 0.0, 0.0), 1.0)));

void fragment()
{
    ALBEDO = scene.lights[0].color;
}
You can also pass them to functions:
shader_type canvas_item;

...

Scene construct_scene(PointLight light1, PointLight light2) {
    return Scene({light1, light2});
}

void fragment()
{
    COLOR.rgb = construct_scene(PointLight(vec3(0.0, 0.0, 0.0), vec3(1.0, 0.0, 0.0), 1.0), PointLight(vec3(0.0, 0.0, 0.0), vec3(1.0, 0.0, 1.0), 1.0)).lights[0].color;
}
Operadores
El lenguaje de shading de Godot soporta el mismo conjunto de operadores de GLSL ES 3.0. Debajo está la lista de ellos en orden de precedencia:
Precedencia |
Clase |
Operador |
1 (más alta) |
agrupamiento entre paréntesis |
() |
2 |
unario |
+, -, !, ~ |
3 |
multiplicativo |
/, *, % |
4 |
aditivo |
+, - |
5 |
Desplazamiento bit-wise |
<<, >> |
6 |
relacional |
<, >, <=, >= |
7 |
igualdad |
==, != |
8 |
AND bit-wise |
& |
9 |
OR bit-wise excluyente |
^ |
10 |
OR bit-wise inclusivo |
| |
11 |
AND lógico |
&& |
12 (la más baja) |
OR lógico inclusivo |
|| |
Nota
Most operators that accept vectors or matrices (multiplication, division, etc) operate component-wise, meaning the function is applied to the first value of each vector and then on the second value of each vector, etc. Some examples:
Operation |
Equivalent Scalar Operation |
|---|---|
|
|
|
|
|
|
The GLSL Language Specification says under section 5.10 Vector and Matrix Operations:
With a few exceptions, operations are component-wise. Usually, when an operator operates on a vector or matrix, it is operating independently on each component of the vector or matrix, in a component-wise fashion. [...] The exceptions are matrix multiplied by vector, vector multiplied by matrix, and matrix multiplied by matrix. These do not operate component-wise, but rather perform the correct linear algebraic multiply.
Control de Flujo
El lenguaje de shading de Godot soporta los tipos más comunes de control de flujo:
// `if`, `else if` and `else`.
if (cond) {

} else if (other_cond) {

} else {

}

// Ternary operator.
// This is an expression that behaves like `if`/`else` and returns the value.
// If `cond` evaluates to `true`, `result` will be `9`.
// Otherwise, `result` will be `5`.
int result = cond ? 9 : 5;

// `switch`.
switch (i) { // `i` should be a signed integer expression.
    case -1:
        break;
    case 0:
        return; // `break` or `return` to avoid running the next `case`.
    case 1: // Fallthrough (no `break` or `return`): will run the next `case`.
    case 2:
        break;
    //...
    default: // Only run if no `case` above matches. Optional.
        break;
}

// `for` loop. Best used when the number of elements to iterate on
// is known in advance.
for (int i = 0; i < 10; i++) {

}

// `while` loop. Best used when the number of elements to iterate on
// is not known in advance.
while (cond) {

}

// `do while`. Like `while`, but always runs at least once even if `cond`
// never evaluates to `true`.
do {

} while (cond);
Keep in mind that in modern GPUs, an infinite loop can exist and can freeze your application (including editor). Godot can't protect you from this, so be careful not to make this mistake!
Also, when comparing floating-point values against a number, make sure to compare them against a range instead of an exact number.
A comparison like if (value == 0.3) may not evaluate to true.
Floating-point math is often approximate and can defy expectations. It can also
behave differently depending on the hardware.
No hagas esto.
float value = 0.1 + 0.2;

// May not evaluate to `true`!
if (value == 0.3) {
    // ...
}
Instead, always perform a range comparison with an epsilon value. The larger the floating-point number (and the less precise the floating-point number), the larger the epsilon value should be.
const float EPSILON = 0.0001;
if (value >= 0.3 - EPSILON && value <= 0.3 + EPSILON) {
    // ...
}
See floating-point-gui.de for more information.
Descartando
Fragment, light, and custom functions (called from fragment or light) can use the
discard keyword. If used, the fragment is discarded and nothing is written.
Beware that discard has a performance cost when used, as it will prevent the
depth prepass from being effective on any surfaces using the shader. Also, a
discarded pixel still needs to be rendered in the vertex shader, which means a
shader that uses discard on all of its pixels is still more expensive to
render compared to not rendering any object in the first place.
Funciones
Es posible definir cualquier función en un shader de Godot. Estas llevan la siguiente sintaxis:
ret_type func_name(args) {
    return ret_type; // if returning a value
}

// a more specific example:

int sum2(int a, int b) {
    return a + b;
}
You can only use functions that have been defined above (higher in the editor) the function from which you are calling them. Redefining a function that has already been defined above (or is a built-in function name) will cause an error.
Los argumentos de las funciones pueden tener calificadores especiales:
in: Significa que el argumento es sólo para lectura (por defecto).
out: Significa que el argumento es sólo para escritura.
inout: Significa que el argumento es pasado por referencia.
const: Means the argument is a constant and cannot be changed, may be combined with in qualifier.
Ejemplo:
void sum2(int a, int b, inout int result) {
    result = a + b;
}
Function overloading is supported. You can define multiple functions with the same
name, but different arguments. Note that implicit casting in overloaded
function calls is not allowed, such as from int to float (1 to 1.0).
vec3 get_color(int t) {
    return vec3(1, 0, 0); // Red color.
}
vec3 get_color(float t) {
    return vec3(0, 1, 0); // Green color.
}
void fragment() {
    vec3 red = get_color(1);
    vec3 green = get_color(1.0);
}
Varyings
Para enviar datos desde el procesador de vértices al procesador de fragmentos (o luz), se utilizan varyings. Se establecen para cada vértice primitivo en el procesador de vértices, y el valor se interpola para cada píxel en el procesador de fragmentos.
shader_type spatial;

varying vec3 some_color;

void vertex() {
    some_color = NORMAL; // Make the normal the color.
}

void fragment() {
    ALBEDO = some_color;
}

void light() {
    DIFFUSE_LIGHT = some_color * 100; // optionally
}
La variación también puede ser un array:
shader_type spatial;

varying float var_arr[3];

void vertex() {
    var_arr[0] = 1.0;
    var_arr[1] = 0.0;
}

void fragment() {
    ALBEDO = vec3(var_arr[0], var_arr[1], var_arr[2]); // red color
}
También es posible enviar datos desde el procesador de fragmentos al procesador de luz utilizando la palabra clave varying. Para hacerlo, puedes asignar un valor a una variable varying en el procesador de fragmentos y luego utilizarla en la función de luz.
shader_type spatial;

varying vec3 some_light;

void fragment() {
    some_light = ALBEDO * 100.0; // Make a shining light.
}

void light() {
    DIFFUSE_LIGHT = some_light;
}
Ten en cuenta que las variables varying no se pueden asignar en funciones personalizadas o en la función del procesador de luz, como:
shader_type spatial;

varying float test;

void foo() {
    test = 0.0; // Error.
}

void vertex() {
    test = 0.0;
}

void light() {
    test = 0.0; // Error too.
}
Esta limitación se introdujo para evitar un uso incorrecto antes de la inicialización.
Calificadores de interpolación
Ciertos valores son interpolados durante el shading pipeline. Puedes modificar cómo se harán esas interpolaciones usando calificadores de interpolación.
shader_type spatial;

varying flat vec3 our_color;

void vertex() {
    our_color = COLOR.rgb;
}

void fragment() {
    ALBEDO = our_color;
}
Estos son los dos posibles calificadores de interpolación:
Calificador |
Descripción |
|---|---|
flat |
El valor no es interpolado. |
smooth |
El valor es interpolado en una manera corregida por perspectiva. Es el modo por defecto. |
Uniforms
Passing values to shaders is possible with uniforms, which are defined in the
global scope of the shader, outside of functions. When a shader is later
assigned to a material, the uniforms will appear as editable parameters in the
material's inspector. Uniforms can't be written from within the shader. Any
data type except for void can be a uniform.
shader_type spatial;

uniform float some_value;

uniform vec3 colors[3];
Puedes configurar uniformes en el editor, en el inspector de materiales. También puedes configurarlos desde el código.
Uniform hints
Godot provides optional uniform hints to make the compiler understand what the uniform is used for, and how the editor should allow users to modify it.
shader_type spatial;

uniform vec4 color : source_color;
uniform float amount : hint_range(0, 1);
uniform vec4 other_color : source_color = vec4(1.0); // Default values go after the hint.
uniform sampler2D image : source_color;
A los uniforms se les pueden asignar valores por defecto:
shader_type spatial;

uniform vec4 some_vector = vec4(0.0);
uniform vec4 some_color : source_color = vec4(1.0);
Note that when adding a default value and a hint, the default value goes after the hint.
Full list of uniform hints below:
Tipo |
Hint |
Descripción |
|---|---|---|
vec3, vec4 |
source_color |
Utilizado como color. |
int |
hint_enum("String1", "String2") |
Displays int input as a dropdown widget in the editor. |
int, float |
hint_range(min, max[, step]) |
Restringido a valores en un rango (con min/max/step). |
sampler2D |
source_color |
Used as albedo color. |
sampler2D |
hint_normal |
Utilizado como normalmap. |
sampler2D |
hint_default_white |
As value or albedo color, default to opaque white. |
sampler2D |
hint_default_black |
As value or albedo color, default to opaque black. |
sampler2D |
hint_default_transparent |
As value or albedo color, default to transparent black. |
sampler2D |
hint_anisotropy |
Como flowmap, hacia la derecha por defecto. |
sampler2D |
hint_roughness[_r, _g, _b, _a, _normal, _gray] |
Used for roughness limiter on import (attempts reducing specular aliasing).
|
sampler2D |
filter[_nearest, _linear][_mipmap][_anisotropic] |
Enabled specified texture filtering. |
sampler2D |
repeat[_enable, _disable] |
Enabled texture repeating. |
sampler2D |
hint_screen_texture |
Texture is the screen texture. |
sampler2D |
hint_depth_texture |
Texture is the depth texture. |
sampler2D |
hint_normal_roughness_texture |
Texture is the normal roughness texture (only supported in Forward+). |
Using hint_enum
You can access int values as a readable dropdown widget using the hint_enum uniform:
uniform int noise_type : hint_enum("OpenSimplex2", "Cellular", "Perlin", "Value") = 0;
You can assign explicit values to the hint_enum uniform using colon syntax similar to GDScript:
uniform int character_speed: hint_enum("Slow:30", "Average:60", "Very Fast:200") = 60;
The value will be stored as an integer, corresponding to the index of the selected
option (i.e. 0, 1, or 2) or the value assigned by colon syntax
(i.e. 30, 60, or 200). When setting the value with
set_shader_parameter(), you must use the integer value, not the String
name.
Using source_color
Any texture which contains sRGB color data requires a source_color hint
in order to be correctly sampled. This is because Godot renders in linear
color space, but some textures contain sRGB color data. If this hint is not
used, the texture will appear washed out.
Albedo and color textures should typically have a source_color hint. Normal,
roughness, metallic, and height textures typically do not need a source_color
hint.
El uso de la sugerencia source_color es obligatorio en los renderizadores Forward+ y Mobile, y en los sombreadores canvas_item cuando HDR 2D está habilitado. La sugerencia source_color es opcional para el renderizador de compatibilidad y para los sombreadores canvas_item si HDR 2D está deshabilitado. Sin embargo, se recomienda usar siempre la sugerencia source_color, ya que funciona incluso si se cambian los renderizadores o se deshabilita HDR 2D.
Uniform groups
To group multiple uniforms in a section in the inspector, you can use a
group_uniform keyword like this:
group_uniforms MyGroup;
uniform sampler2D test;
You can close the group by using:
group_uniforms;
The syntax also supports subgroups (it's not mandatory to declare the base group before this):
group_uniforms MyGroup.MySubgroup;
Global uniforms
Sometimes, you want to modify a parameter in many different shaders at once.
With a regular uniform, this takes a lot of work as all these shaders need to be
tracked and the uniform needs to be set for each of them. Global uniforms allow
you to create and update uniforms that will be available in all shaders, in
every shader type (canvas_item, spatial, particles, sky and
fog).
Global uniforms are especially useful for environmental effects that affect many objects in a scene, like having foliage bend when the player is nearby, or having objects move with the wind.
Nota
Global uniforms are not the same as global scope for an individual shader. While regular uniforms are defined outside of shader functions and are therefore the global scope of the shader, global uniforms are global to all shaders in the entire project (but within each shader, are also in the global scope).
To create a global uniform, open the Project Settings then go to the Shader Globals tab. Specify a name for the uniform (case-sensitive) and a type, then click Add in the top-right corner of the dialog. You can then edit the value assigned to the uniform by clicking the value in the list of uniforms:

Adding a global uniform in the Shader Globals tab of the Project Settings
After creating a global uniform, you can use it in a shader as follows:
shader_type canvas_item;

global uniform vec4 my_color;

void fragment() {
    COLOR = my_color.rgb;
}
Note that the global uniform must exist in the Project Settings at the time
the shader is saved, or compilation will fail. While you can assign a default
value using global uniform vec4 my_color = ... in the shader code, it will
be ignored as the global uniform must always be defined in the Project Settings
anyway.
To change the value of a global uniform at runtime, use the RenderingServer.global_shader_parameter_set method in a script:
RenderingServer.global_shader_parameter_set("my_color", Color(0.3, 0.6, 1.0))
Assigning global uniform values can be done as many times as desired without impacting performance, as setting data doesn't require synchronization between the CPU and GPU.
You can also add or remove global uniforms at runtime:
RenderingServer.global_shader_parameter_add("my_color", RenderingServer.GLOBAL_VAR_TYPE_COLOR, Color(0.3, 0.6, 1.0))
RenderingServer.global_shader_parameter_remove("my_color")
Adding or removing global uniforms at runtime has a performance cost, although it's not as pronounced compared to getting global uniform values from a script (see the warning below).
Advertencia
While you can query the value of a global uniform at runtime in a script
using RenderingServer.global_shader_parameter_get("uniform_name"), this
has a large performance penalty as the rendering thread needs to synchronize
with the calling thread.
Therefore, it's not recommended to read global shader uniform values continuously in a script. If you need to read values in a script after setting them, consider creating an autoload where you store the values you need to query at the same time you're setting them as global uniforms.
Per-instance uniforms
Nota
Per-instance uniforms are available in both canvas_item (2D) and spatial (3D) shaders.
A veces, se desea modificar un parámetro en cada nodo mediante el uso del material. Por ejemplo, en un bosque lleno de árboles, cuando se desea que cada árbol tenga un color ligeramente diferente que se pueda editar a mano. Sin uniform por instancia, esto requiere la creación de un material único para cada árbol (cada uno con un tono ligeramente diferente). Esto hace que la gestión de materiales sea más compleja y también tiene una sobrecarga de rendimiento debido a que la escena requiere más instancias de material únicas. Los colores vertex también se pueden utilizar aquí, pero requerirían la creación de copias únicas de la malla para cada color diferente, lo que también tiene una sobrecarga de rendimiento.
Per-instance uniforms are set on each GeometryInstance3D, rather than on each Material instance. Take this into account when working with meshes that have multiple materials assigned to them, or MultiMesh setups.
shader_type spatial;

// Provide a hint to edit as a color. Optionally, a default value can be provided.
// If no default value is provided, the type's default is used (e.g. opaque black for colors).
instance uniform vec4 my_color : source_color = vec4(1.0, 0.5, 0.0, 1.0);

void fragment() {
    ALBEDO = my_color.rgb;
}
After saving the shader, you can change the per-instance uniform's value using the inspector:
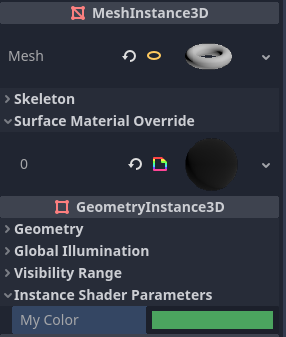
Setting a per-instance uniform's value in the GeometryInstance3D section of the inspector
Per-instance uniform values can also be set at runtime using set_instance_shader_parameter method on a node that inherits from GeometryInstance3D:
$MeshInstance3D.set_instance_shader_parameter("my_color", Color(0.3, 0.6, 1.0))
When using per-instance uniforms, there are some restrictions you should be aware of:
Per-instance uniforms do not support textures or arrays, only regular scalar and vector types. As a workaround, you can pass a texture array as a regular uniform, then pass the index of the texture to be drawn using a per-instance uniform.
There is a practical maximum limit of 16 instance uniforms per shader.
If your mesh uses multiple materials, the parameters for the first mesh material found will "win" over the subsequent ones, unless they have the same name, index and type. In this case, all parameters are affected correctly.
If you run into the above situation, you can avoid clashes by manually specifying the index (0-15) of the instance uniform by using the
instance_indexhint:
instance uniform vec4 my_color : source_color, instance_index(5);
Setting uniforms from code
You can set uniforms from GDScript using the set_shader_parameter() method:
material.set_shader_parameter("some_value", some_value)

material.set_shader_parameter("colors", [Vector3(1, 0, 0), Vector3(0, 1, 0), Vector3(0, 0, 1)])
Nota
The first argument to set_shader_parameter() is the name of the uniform
in the shader. It must match exactly to the name of the uniform in
the shader or else it will not be recognized.
GDScript usa tipos de variables diferentes a los que usa el GLSL, así que al pasar las variables de GDScript a los shaders, Godot convierte el tipo automáticamente. A continuación se muestra una tabla de los tipos correspondientes:
Tipo GLSL |
Tipo GDScript |
Notas |
|---|---|---|
bool |
bool |
|
bvec2 |
int |
Bitwise packed int where bit 0 (LSB) corresponds to x. For example, a bvec2 of (bx, by) could be created in the following way: bvec2_input: int = (int(bx)) | (int(by) << 1)
|
bvec3 |
int |
Bitwise packed int where bit 0 (LSB) corresponds to x. |
bvec4 |
int |
Bitwise packed int where bit 0 (LSB) corresponds to x. |
int |
int |
|
ivec2 |
Vector2i |
|
ivec3 |
Vector3i |
|
ivec4 |
Vector4i |
|
uint |
int |
|
uvec2 |
Vector2i |
|
uvec3 |
Vector3i |
|
uvec4 |
Vector4i |
|
float |
float |
|
vec2 |
Vector2 |
|
vec3 |
Vector3, Color |
When Color is used, it will be interpreted as (r, g, b). |
vec4 |
Vector4, Color, Rect2, Plane, Quaternion |
When Color is used, it will be interpreted as (r, g, b, a). When Rect2 is used, it will be interpreted as (position.x, position.y, size.x, size.y). When Plane is used it will be interpreted as (normal.x, normal.y, normal.z, d). |
mat2 |
Transform2D |
|
mat3 |
Basis |
|
mat4 |
Projection, Transform3D |
When a Transform3D is used, the w Vector is set to the identity. |
sampler2D |
Texture2D |
|
isampler2D |
Texture2D |
|
usampler2D |
Texture2D |
|
sampler2DArray |
Texture2DArray |
|
isampler2DArray |
Texture2DArray |
|
usampler2DArray |
Texture2DArray |
|
sampler3D |
Texture3D |
|
isampler3D |
Texture3D |
|
usampler3D |
Texture3D |
|
samplerCube |
Cubemap |
See Changing import type for instructions on importing cubemaps for use in Godot. |
samplerCubeArray |
CubemapArray |
Solo compatible con Forward+ y Mobile, no con Compatibility. |
samplerExternalOES |
ExternalTexture |
Solo compatible con la plataforma Compatibility/Android. |
Nota
Be careful when setting shader uniforms from GDScript, since no error will be thrown if the type does not match. Your shader will just exhibit undefined behavior. Specifically, this includes setting a GDScript int/float (64 bit) into a Godot shader language int/float (32 bit). This may lead to unintended consequences in cases where high precision is required.
Uniform limits
There is a limit to the total size of shader uniforms that you can use
in a single shader. On most desktop platforms, this limit is 65536
bytes, or 4096 vec4 uniforms. On mobile platforms, the limit is
typically 16384 bytes, or 1024 vec4 uniforms. Vector uniforms
smaller than a vec4, such as vec2 or vec3, are padded to
the size of a vec4. Scalar uniforms such as int or float
are not padded, and bool is padded to the size of an int.
Arrays count as the total size of their contents. If you need a uniform array that is larger than this limit, consider packing the data into a texture instead, since the contents of a texture do not count towards this limit, only the size of the sampler uniform.
Variables incorporadas
A large number of built-in variables are available, like UV, COLOR and
VERTEX. What variables are available depends on the type of shader
(spatial, canvas_item, particle, etc) and the
function used (vertex, fragment, light, start, process,
sky, or fog). For a list of the built-in variables that are available,
please see the corresponding pages:
Funciones integradas
A large number of built-in functions are supported, conforming to GLSL ES 3.0. See the Built-in functions page for details.
Comentarios
The shading language supports the same comment syntax as used in C# and C++, using
//for single-line comments and/* */for multi-line comments:Additionally, you can use documentation comments that are displayed in the inspector when hovering a shader parameter. Documentation comments are currently only supported when placed immediately above a
uniformdeclaration. These documentation comments only support the multiline comment syntax and must use two leading asterisks (/**) instead of just one (/*):The asterisks on the follow-up lines are not required, but are recommended as per the Guía de estilo de Shaders. These asterisks are automatically stripped by the inspector, so they won't appear in the tooltip.