Attention: Here be dragons
This is the latest
(unstable) version of this documentation, which may document features
not available in or compatible with released stable versions of Godot.
Checking the stable version of the documentation...
Главная сцена игры
Итак, настало время перенести всё, что мы сделали вместе, на играбельную игровую сцену.
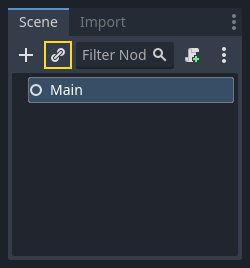
Создайте новую сцену и добавьте Node с именем Main. (Причиной, по которой мы используем Node, а не Node2D, является то, что узел будет контейнером для обработки игровой логики. Это не требует именно двумерного функционала.)
Нажмите на кнопку Instance (Экземпляр, выглядящий как иконка цепи) и выберите ваш сохраненный player.tscn.
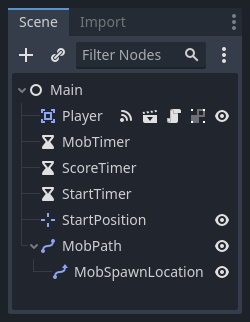
Теперь добавьте следующие узлы в виде дочерних элементов Main и назовите их как показано ниже:
Timer (названный
MobTimer) - чтобы контролировать частоту появления мобовTimer (названный
ScoreTimer) - чтобы каждую секунду увеличивать счетTimer (названный
StartTimer) - чтобы дать задержку перед стартом игрыMarker2D (названный
StartPosition) - чтобы указать начальную позицию игрока
Задайте значение Wait Time для каждого из узлов Timer следующим образом (значения в секундах):
MobTimer:0.5ScoreTimer:1StartTimer:2
Кроме того, установите для свойства One Shot узла StartTimer значение "Вкл" и для свойства Position узла StartPosition установите значение (240, 450).
Добавление мобов
Узел Main будет создавать новых мобов, и мы хотим, чтобы они появлялись в случайном месте на краю экрана. Щёлкните узел Main во вкладке сцены, затем добавьте дочерний узел Path2D с именем MobPath. При выборе Path2D в верхней части редактора появятся новые кнопки:

Выберите среднюю ("Добавить точку") и нарисуйте путь щелчками мыши, чтобы добавить точки в показанных углах. Чтобы точки привязывались к сетке, убедитесь, что нажаты кнопки "Использовать привязку к сетке" и "Использовать умную привязку". Эти опции можно найти слева от кнопки "Заблокировать узел", они отображаются в виде магнита с точками и магнита с пересекающимися линиями.

Важно
Нарисуйте путь по часовой стрелке, иначе ваши мобы будут направлены наружу, а не внутрь!
Поместив точку 4 на изображение, нажмите кнопку "Сомкнуть кривую", и она будет завершена.
Теперь, когда путь определен, добавьте узел PathFollow2D как дочерний элемент MobPath и назовите его MobSpawnLocation. Этот узел будет автоматически вращаться и следовать по пути при его перемещении, поэтому мы можем использовать его для выбора случайной позиции и направления вдоль пути.
Ваша сцена должна выглядеть так:
Главный скрипт
Добавьте скрипт к Main. В верхней части скрипта мы пишем @export var mob_scene: PackedScene, что позволяет нам выбрать сцену Mob, экземпляр которой мы хотим сделать.
extends Node

@export var mob_scene: PackedScene
var score
using Godot;

public partial class Main : Node
{
    // Don't forget to rebuild the project so the editor knows about the new export variable.

    [Export]
    public PackedScene MobScene { get; set; }

    private int _score;
}
Выберите узел Main и вы увидите свойство MobScene в окне Инспектора под "Main.gd".
Значение этого свойства можно присвоить двумя способами:
Перетащите
mob.tscnиз панели "Файловая система" в свойство Mob Scene.Нажмите стрелочку вниз рядом с "[пусто]" и выберите "Загрузить" ("Load"). Затем выберите
mob.tscn.
Next, select the instance of the Player scene under Main node in the Scene dock,
and access the Signals dock on the sidebar.
Вы должны увидеть список сигналов для узла Player. В списке найдите и дважды щелкните по сигналу hit (или щелкните по нему правой кнопкой мыши и выберите "Присоединить..."). Это откроет диалоговое окно подключения сигнала. Мы хотим создать новую функцию с именем game_over, которая будет обрабатывать то, что должно произойти, когда игра заканчивается. Введите "game_over" в поле "Receiver Method"("Метод-приемник") в нижней части диалогового окна подключения сигнала и нажмите "Присоединить". Вы хотите чтобы сигнал hit отправлялся из Player и обрабатывался в скрипте Main. Добавьте следующий код в новую функцию, а также функцию new_game, которая настроит всё для новой игры:
func game_over():
    $ScoreTimer.stop()
    $MobTimer.stop()

func new_game():
    score = 0
    $Player.start($StartPosition.position)
    $StartTimer.start()
public void GameOver()
{
    GetNode<Timer>("MobTimer").Stop();
    GetNode<Timer>("ScoreTimer").Stop();
}

public void NewGame()
{
    _score = 0;

    var player = GetNode<Player>("Player");
    var startPosition = GetNode<Marker2D>("StartPosition");
    player.Start(startPosition.Position);

    GetNode<Timer>("StartTimer").Start();
}
Теперь мы подключим сигнал timeout() каждого узла Timer (StartTimer, ScoreTimer и MobTimer) к основному скрипту. Для каждого из трех таймеров выберите таймер во вкладке Scene, откройте вкладку «Signals» во вкладке Node, затем дважды щелкните сигнал timeout() в списке. Откроется диалоговое окно подключения нового сигнала. Настройки по умолчанию в этом диалоговом окне должны быть подходящими, поэтому выберите Connect, чтобы создать новое сигнальное подключение.
После того, как все три таймера установили эту настройку, вы сможете увидеть, как каждый таймер имеет Signal connection (сигнальное соединение) для их соответствующего сигнала `timeout (), показывая зеленые, на их соответствующих вкладках Signals:
(Для MobTimer):
_on_mob_timer_timeout()(Для ScoreTimer):
_on_score_timer_timeout()(Для StartTimer):
_on_start_timer_timeout()
Теперь определим работу каждого из этих таймеров, добавив код ниже. Обратите внимание, что StartTimer запустит два других таймера, а ScoreTimer увеличит счёт на 1.
func _on_score_timer_timeout():
    score += 1

func _on_start_timer_timeout():
    $MobTimer.start()
    $ScoreTimer.start()
// We also specified this function name in PascalCase in the editor's connection window.
private void OnScoreTimerTimeout()
{
    _score++;
}

// We also specified this function name in PascalCase in the editor's connection window.
private void OnStartTimerTimeout()
{
    GetNode<Timer>("MobTimer").Start();
    GetNode<Timer>("ScoreTimer").Start();
}
В функции _on_mob_timer_timeout() мы создадим экземпляр моба, выберем случайное начальное местоположение вдоль Path2D и приведем его в движение. Узел PathFollow2D будет автоматически поворачивать его по направлению пути, поэтому мы воспользуемся этим, чтобы выбрать направление моба и его позицию. При создании моба, мы получим случайное значение от 150.0 до 250.0 - это определит скорость движения каждого моба (было бы скучно, если бы они все двигались с одинаковой скоростью).
Обратите внимание, что новый экземпляр должен быть добавлен в сцену с помощью функции add_child().
func _on_mob_timer_timeout():
    # Create a new instance of the Mob scene.
    var mob = mob_scene.instantiate()

    # Choose a random location on Path2D.
    var mob_spawn_location = $MobPath/MobSpawnLocation
    mob_spawn_location.progress_ratio = randf()

    # Set the mob's position to the random location.
    mob.position = mob_spawn_location.position

    # Set the mob's direction perpendicular to the path direction.
    var direction = mob_spawn_location.rotation + PI / 2

    # Add some randomness to the direction.
    direction += randf_range(-PI / 4, PI / 4)
    mob.rotation = direction

    # Choose the velocity for the mob.
    var velocity = Vector2(randf_range(150.0, 250.0), 0.0)
    mob.linear_velocity = velocity.rotated(direction)

    # Spawn the mob by adding it to the Main scene.
    add_child(mob)
// We also specified this function name in PascalCase in the editor's connection window.
private void OnMobTimerTimeout()
{
    // Create a new instance of the Mob scene.
    Mob mob = MobScene.Instantiate<Mob>();

    // Choose a random location on Path2D.
    var mobSpawnLocation = GetNode<PathFollow2D>("MobPath/MobSpawnLocation");
    mobSpawnLocation.ProgressRatio = GD.Randf();

    // Set the mob's direction perpendicular to the path direction.
    float direction = mobSpawnLocation.Rotation + Mathf.Pi / 2;

    // Set the mob's position to a random location.
    mob.Position = mobSpawnLocation.Position;

    // Add some randomness to the direction.
    direction += (float)GD.RandRange(-Mathf.Pi / 4, Mathf.Pi / 4);
    mob.Rotation = direction;

    // Choose the velocity.
    var velocity = new Vector2((float)GD.RandRange(150.0, 250.0), 0);
    mob.LinearVelocity = velocity.Rotated(direction);

    // Spawn the mob by adding it to the Main scene.
    AddChild(mob);
}
Важно
Почему PI? В функциях, требующих углы, Godot использует радианы, а не градусы. Число Пи представляет собой пол-оборота в радианах, примерно 3.1415 (также есть переменная TAU, которая равна 2 * PI). Если вам удобнее работать с градусами, вам нужно использовать функции deg2rad() и rad2deg().
Тестирование сцены
Давайте протестируем сцену, чтобы убедиться, что все работает. Добавьте в _ready() вызов new_game:
func _ready():
    new_game()
public override void _Ready()
{
    NewGame();
}
Также давайте назначим сцену Main в качестве нашей "Главной сцены", которая запускается автоматически при запуске игры. Нажмите кнопку "Запустить проект" и выберите main.tscn при появлении запроса.
Совет
Если вы уже установили другую сцену в качестве «Основной сцены», вы можете щелкнуть правой кнопкой мыши по main.tscn в панели «Файловая система» и выбрать «Установить как основную сцену».
У вас должна быть возможность перемещать игрока, видеть, как появляются мобы, и видеть, как игрок исчезает, когда его касается моб.
Когда вы убедитесь, что всё работает, удалите вызов new_game() из _ready() и замените его на pass.
Чего не хватает нашей игре? Какого-нибудь пользовательского интерфейса. В следующем уроке мы добавим заглавный экран и отобразим очки игрока.