Attention: Here be dragons
This is the latest
(unstable) version of this documentation, which may document features
not available in or compatible with released stable versions of Godot.
Checking the stable version of the documentation...
Воспроизведение видео
Godot поддерживает воспроизведение видео с помощью узла VideoStreamPlayer.
Поддерживаемые форматы воспроизведения
Единственный поддерживаемый формат в ядре — Ogg Theora (не путать с аудио Ogg Vorbis) с опциональными аудиодорожками Ogg Vorbis. Расширения могут обеспечить поддержку дополнительных форматов.
H.264 и H.265 не могут поддерживаться в ядре Godot, поскольку оба они обременены патентами на программное обеспечение. AV1 не требует авторских отчислений, но он по-прежнему медленно декодируется на CPU, а аппаратная поддержка декодирования пока доступна не на всех используемых GPU.
WebM поддерживался в ядре Godot 3.x, но в версии 4.0 его поддержка была удалена, так как он был слишком глючным и сложным в обслуживании.
Примечание
Вы можете найти видео с расширениями .ogg или .ogx, которые являются общими расширениями для данных внутри контейнера Ogg.
Переименование расширений этих файлов в .ogv может позволить импортировать видео в Godot. Однако не все файлы с расширениями .ogg или .ogx являются видео - некоторые из них могут содержать только аудио.
Настройка VideoStreamPlayer
Создайте узел VideoStreamPlayer, используя диалоговое окно "Создать новый узел".
Выберите узел VideoStreamPlayer в дереве сцены, перейдите в инспектор и загрузите файл
.ogvв свойстве Stream.Если у вас еще нет видео в формате Ogg Theora, перейдите к Рекомендуемые параметры кодировки Theora.
Если вы хотите, чтобы видео воспроизводилось сразу после загрузки сцены, установите флажок Автозапуск в инспекторе. Если нет, оставьте Автозапуск отключенным и вызовите
play()на узле VideoStreamPlayer в скрипте, чтобы начать воспроизведение по желанию.
Управление изменением размера и различных соотношений сторон
By default, the VideoStreamPlayer will automatically be resized to match the video's resolution. You can make it follow usual Control sizing by enabling Expand on the VideoStreamPlayer node.
Чтобы настроить изменение размера узла VideoStreamPlayer в зависимости от размера окна, отрегулируйте привязки с помощью меню Layout в верхней части окна просмотра 2D-редактора. Однако эта настройка может оказаться недостаточно мощной для обработки всех вариантов использования, таких как воспроизведение полноэкранных видеороликов без искажения видео (но с пустым пространством по краям). Для большего контроля вы можете использовать узел AspectRatioContainer, который предназначен для обработки такого рода вариантов использования:
Добавьте узел AspectRatioContainer. Убедитесь, что он не является дочерним узлом какого-либо другого узла контейнера. Выберите узел AspectRatioContainer, затем установите для его Layout в верхней части 2D-редактора значение Full Rect. Установите Ratio в узле AspectRatioContainer в соответствии с соотношением сторон вашего видео. Вы можете использовать математические формулы в инспекторе, чтобы помочь себе. Не забудьте сделать один из операндов плавающей величиной. В противном случае результатом деления всегда будет целое число.

Это составит (приблизительно) 1,777778
После настройки AspectRatioContainer измените родительский статус узла VideoStreamPlayer на дочерний для узла AspectRatioContainer. Убедитесь, что Expand отключен в VideoStreamPlayer. Теперь ваше видео должно автоматически масштабироваться так, чтобы поместиться на весь экран, избегая при этом искажений.
См. также
Смотрите Несколько резолюций для получения дополнительных советов по поддержке нескольких соотношений сторон в вашем проекте.
Отображение видео на 3D-поверхности
Используя узел VideoStreamPlayer как дочерний по отношению к узлу SubViewport, можно отобразить любой 2D-узел на 3D-поверхности. Например, это может быть использовано для отображения анимированных рекламных щитов(animated billboard), когда покадровая анимация требует слишком много памяти.
Это можно сделать, выполнив следующие действия:
Создайте узел SubViewport. Установите его размер таким образом, чтобы он соответствовал размеру вашего видео в пикселях.
Создайте узел VideoStreamPlayer как дочерний по отношению к узлу SubViewport и укажите в нем путь к видео. Убедитесь, что функция Развернуть отключена, и при необходимости включите функцию Автозапуск.
Создайте узел MeshInstance3D с ресурсом Plane Mesh или QuadMesh в свойстве Mesh. Измените размер сетки в соответствии с соотношением сторон видео (в противном случае оно будет выглядеть искаженным).
Создайте новый стандартный ресурс Material 3D в свойстве Material Override в разделе GeometryInstance3D.
Включите функцию Локально для сцены в разделе ресурсов StandardMaterial3D (внизу). Это необходимо для того, чтобы вы могли использовать ViewportTexture в свойстве текстуры альбедо.
В StandardMaterial3D установите для свойства Albedo > Texture значение New ViewportTexture. Отредактируйте новый ресурс, щелкнув по нему, затем укажите путь к узлу SubViewport в свойстве Viewport Path.
Включите Albedo Texture Force sRGB в StandardMaterial3D, чтобы предотвратить размывание цветов.
Если предполагается, что рекламный щит излучает свой собственный свет, установите Режим затенения на режим без затенения, чтобы повысить производительность рендеринга.
Смотрите = Использовать Viewports и Демо GUI в 3D для получения дополнительной информации о настройке.
Зацикливание видео
Для зацикливания видео можно включить свойство Loop. Это позволит плавно перезапустить видео, когда оно дойдет до конца.
Обратите внимание, что установка ненулевого значения параметра проекта Компенсация задержки видеосигнала может привести к тому, что ваш цикл не будет непрерывным, поскольку синхронизация аудио и видео происходит в начале каждого цикла, что иногда приводит к пропущенным кадрам. Установите Компенсацию задержки видео в настройках вашего проекта на значение 0, чтобы избежать проблем с выпадением кадров.
Условия декодирования видео и рекомендуемые разрешения
Декодирование видео выполняется на CPU, поскольку GPU не имеют аппаратного ускорения для декодирования видео Theora. Современные настольные процессоры могут декодировать видео Ogg Theora с разрешением 1440p @ 60 FPS или более, но мобильные процессоры низкого класса, скорее всего, не справятся с видео высокого разрешения.
Чтобы обеспечить плавное декодирование ваших видео на различном оборудовании:
При разработке игр для настольных платформ рекомендуется кодировать видео в формате 1080p (желательно с частотой 30 кадров в секунду). Большинство людей по-прежнему используют дисплеи с разрешением 1080p или ниже, поэтому кодирование видео с более высоким разрешением может не стоить увеличения размера файла и требований к процессору.
При разработке игр для мобильных или веб-платформ рекомендуется кодировать в формате 720p (предпочтительно с частотой 30 кадров в секунду или даже ниже). Визуальная разница между видео 720p и 1080p на мобильном устройстве обычно не так заметна.
Ограничения воспроизведения
Текущая реализация воспроизведения видео в Godot имеет некоторые ограничения:
Потоковая передача видео из URL-адреса не поддерживается.
Поддерживается только моно- и стереовыход. Видео с 4, 5.1 и 7.1 аудиоканалами поддерживаются, но с понижением качества звука до стерео.
Рекомендуемые параметры кодировки Theora
Небольшой совет: Не полагайтесь на встроенные программы экспортирования Ogg Theora (в большинстве случаев). Есть 2 причины, по которым вы, возможно, захотите использовать внешнюю программу для кодирования вашего видео:
Некоторые программы, такие как Blender, могут выполнять рендеринг в Ogg Theora. Однако предустановки качества по умолчанию обычно очень низкие по современным стандартам. Возможно, вы сможете увеличить параметры качества в используемой программе, но качество на выходе может оказаться ниже идеального (учитывая увеличенный размер файла). Обычно это означает, что программное обеспечение поддерживает кодирование только с постоянной скоростью передачи данных (CBR), а не с переменной скоростью передачи данных (VBR). В большинстве сценариев предпочтение следует отдавать кодированию VBR, поскольку оно обеспечивает лучшее соотношение качества и размера файла.
Другие программы совсем не могут рендерить в Ogg Theora.
В этом случае можно преобразовать видео в промежуточный высококачественный формат (например, высокобитрейтный H.264), а затем повторно закодировать его в Ogg Theora. В идеале для достижения максимального качества выходного видео Ogg Theora следует использовать в качестве промежуточного формата формат без потерь или без сжатия, но это может потребовать большого объема дискового пространства.
FFmpeg (CLI) — популярный инструмент с открытым исходным кодом для этой цели. FFmpeg требует сложного освоения, но это мощный инструмент.
Вот примеры команд FFmpeg для преобразования видео MP4 в Ogg Theora. Поскольку FFmpeg поддерживает множество входных форматов, вы сможете использовать приведенные ниже команды практически с любым входным видеоформатом (AVI, MOV, WebM, ...).
Примечание
Убедитесь, что ваша копия FFmpeg скомпилирована с поддержкой libtheora и libvorbis. Вы можете проверить это, запустив ffmpeg без каких-либо аргументов, а затем просмотрев строку configuration: в выходных данных команды.
Предупреждение
Текущие официальные версии FFmpeg содержат ошибки в мультиплексоре Ogg/Theora. Настоятельно рекомендуется использовать одну из последних статических ежедневных сборок или сборку из основной ветки, чтобы получить актуальные исправления.
On Windows, make sure to use 32-bit builds of FFmpeg. Windows 64-bit builds have known issues with Theora encoding, which result in artifacts in the output file.
Балансирует между качеством и размером файла
Уровень качества видео (-q:v) должен находиться в диапазоне от 1 до 10. Качество 6 является хорошим компромиссом между качеством и размером файла. При кодировании в высоком разрешении (например, 1440p или 4K) для сохранения приемлемого размера файла, вероятно, потребуется уменьшить -q:v до 5. Поскольку плотность пикселей на видео с разрешением 1440p или 4K выше, пресеты с более низким качеством при высоком разрешении будут выглядеть так же или даже лучше, чем видео с низким разрешением.
Уровень качества аудио (-q:a) должен находиться диапазоне от -1 до 10. Качество 6 обеспечивает хороший компромисс между качеством и размером файла. В отличие от качества видео, повышение качества звука не приводит к значительному увеличению размера выходного файла. Поэтому, если вы хотите получить максимально чистый звук, вы можете увеличить это значение до 9, чтобы получить звук без потерь восприятия. Это особенно ценно, если во входном файле уже используется сжатие звука с потерями. Более высокое качество звука увеличивает нагрузку на процессор декодера, поэтому при высокой нагрузке на систему это может привести к отключению звука. Смотрите таблицу с настройками качества звука Ogg Vorbis и соответствующими им переменными битрейтами на этой странице.
Размер GOP (группы изображений) (-g:v) — это максимальный интервал между ключевыми кадрами. Увеличение этого значения может улучшить сжатие практически без ущерба для качества. Размер по умолчанию (12) слишком мал для большинства типов контента, поэтому рекомендуется использовать более высокие значения GOP, прежде чем снижать качество видео. Однако преимущества сжатия будут исчезать по мере увеличения размера GOP. Значения между 64 и 512 обычно обеспечивают наилучшее сжатие.
Примечание
Больший размер GOP увеличит максимальное время поиска, причем оно резко возрастет при выходе за пределы степеней двойки, начиная с 64. Максимальное время поиска при размере GOP 65 может быть почти в два раза больше, чем при размере GOP 64, в зависимости от скорости декодирования.
FFmpeg: Конвертирование с сохранением исходного разрешения видео
Следующая команда преобразует видео с сохранением его исходного разрешения. Битрейт видео и аудио будет изменяться, чтобы обеспечить максимальное качество и одновременно сэкономить место в тех частях видео/аудио, которые не требуют высокого битрейта (например, в статичных сценах).
ffmpeg -i input.mp4 -q:v 6 -q:a 6 -g:v 64 output.ogv
FFmpeg: Изменить размер видео, затем конвертировать
Следующая команда изменяет разрешение видео до 720 пикселей в высоту(720p), при сохранении существующего соотношения сторон. Это поможет значительно снизить размер файла, если он записан с разрешением выше чем 720p:
ffmpeg -i input.mp4 -vf "scale=-1:720" -q:v 6 -q:a 6 -g:v 64 output.ogv
Видео с хромакеем
Хромакей(chroma key), широко известный как эффект "зеленого экрана" или "синего экрана", позволяет удалить определенный цвет из изображения или видео и заменить его другим фоном. Этот эффект широко используется в видеопроизводстве для плавного объединения различных элементов.
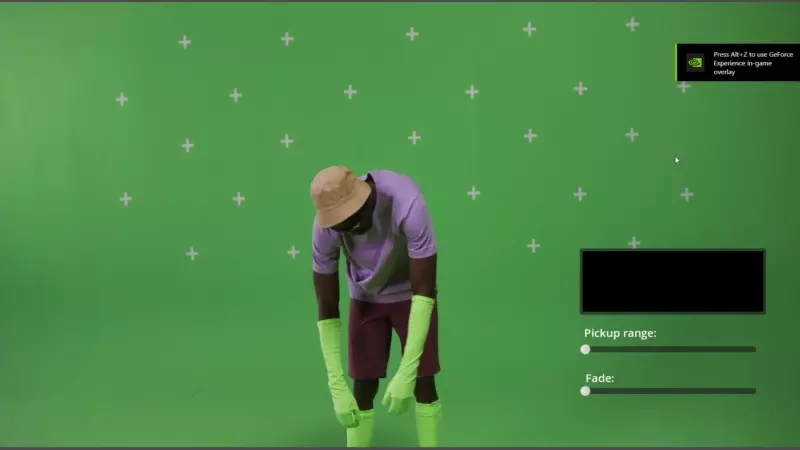
Мы добьемся эффекта хромакея, написав пользовательский шейдер на GDScript и используя узел VideoStreamPlayer для отображения видеоконтента.
Настройка сцены
Убедитесь, что сцена содержит узел VideoStreamPlayer для воспроизведения видео и узел Control для размещения элементов пользовательского интерфейса для управления эффектом хромакея.
Написание пользовательского шейдера
Чтобы реализовать эффект хромакея, выполните следующие действия:
Выберите узел VideoStreamPlayer в сцене и перейдите к его свойствам. В разделе CanvasItem > Material создайте новый шейдер с именем "ChromaKeyShader.gdshader."
В файле "ChromaKeyShader.gdshader" напишите пользовательский код шейдера, как показано ниже:
shader_type canvas_item;

// Uniform variables for chroma key effect
uniform vec3 chroma_key_color : source_color = vec3(0.0, 1.0, 0.0);
uniform float pickup_range : hint_range(0.0, 1.0) = 0.1;
uniform float fade_amount : hint_range(0.0, 1.0) = 0.1;

void fragment() {
    // Get the color from the texture at the given UV coordinates
    vec4 color = texture(TEXTURE, UV);

    // Calculate the distance between the current color and the chroma key color
    float distance = length(color.rgb - chroma_key_color);

    // If the distance is within the pickup range, discard the pixel
    // the lesser the distance more likely the colors are
    if (distance <= pickup_range) {
        discard;
    }

    // Calculate the fade factor based on the pickup range and fade amount
    float fade_factor = smoothstep(pickup_range, pickup_range + fade_amount, distance);

    // Set the output color with the original RGB values and the calculated fade factor
    COLOR = vec4(color.rgb, fade_factor);
}
Шейдер использует вычисление расстояния для определения пикселей, близких к цвету хромакея, и отбрасывает их, эффективно удаляя выбранный цвет. Пиксели, которые находятся немного дальше от цвета цветовой гаммы, затемняются в соответствии с параметром fade_factor, что позволяет плавно смешивать их с окружающими цветами. Этот процесс создает желаемый эффект цветности, создавая впечатление, что фон был заменен другим изображением или видео.
Приведенный выше код представляет собой простую демонстрацию шейдера хромакея, и пользователи могут настроить его в соответствии со своими конкретными требованиями.
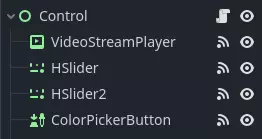
Элементы управления пользовательским интерфейсом
Чтобы пользователи могли управлять эффектом хромакея в режиме реального времени, мы создали ползунки в Control. Скрипт узла Control содержит следующие функции:
 extends Control

 func _on_color_picker_button_color_changed(color):
     # Update the "chroma_key_color" shader parameter of the VideoStreamPlayer's material.
     $VideoStreamPlayer.material.set("shader_parameter/chroma_key_color", color)

 func _on_h_slider_value_changed(value):
     # Update the "pickup_range" shader parameter of the VideoStreamPlayer's material.
     $VideoStreamPlayer.material.set("shader_parameter/pickup_range", value)

 func _on_h_slider_2_value_changed(value):
     # Update the "fade_amount" shader parameter of the VideoStreamPlayer's material.
     $VideoStreamPlayer.material.set("shader_parameter/fade_amount", value)

func _on_video_stream_player_finished():
     # Restart the video playback when it's finished.
     $VideoStreamPlayer.play()
using Godot;

public partial class MyControl : Control
{
    private VideoStreamPlayer _videoStreamPlayer;

    public override void _Ready()
    {
        _videoStreamPlayer = GetNode<VideoStreamPlayer>("VideoStreamPlayer");
    }

    private void OnColorPickerButtonColorChanged(Color color)
    {
        // Update the "chroma_key_color" shader parameter of the VideoStreamPlayer's material.
        _videoStreamPlayer.Material.Set("shader_parameter/chroma_key_color", color);
    }

    private void OnHSliderValueChanged(double value)
    {
        // Update the "pickup_range" shader parameter of the VideoStreamPlayer's material.
        _videoStreamPlayer.Material.Set("shader_parameter/pickup_range", value);
    }

    private void OnHSlider2ValueChanged(double value)
    {
        // Update the "fade_amount" shader parameter of the VideoStreamPlayer's material.
        _videoStreamPlayer.Material.Set("shader_parameter/fade_amount", value);
    }

    private void OnVideoStreamPlayerFinished()
    {
        // Restart the video playback when it's finished.
        _videoStreamPlayer.Play();
    }
}
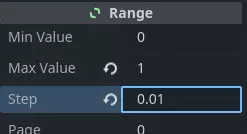
также убедитесь, что диапазон ползунков соответствующий, наши настройки следующие :
Обработка сигналов
Подключите соответствующий сигнал от элементов пользовательского интерфейса к скрипту узла Control. Вы создали в скрипте узла Control скрипт для управления эффектом хромакея. Эти обработчики сигналов будут обновлять переменные формы шейдера в ответ на вводимые пользователем данные.
Сохраните и запустите сцену, чтобы увидеть эффект хромакея в действии! С помощью встроенных элементов управления пользовательского интерфейса теперь вы можете настраивать цвет хромакея, диапазон захвата и степень затухания в режиме реального времени, добиваясь желаемой функциональности хромакея для вашего видеоконтента.