Attention: Here be dragons
This is the latest
(unstable) version of this documentation, which may document features
not available in or compatible with released stable versions of Godot.
Checking the stable version of the documentation...
2D анімація спрайтів
Вступ
У цьому посібнику ви дізнаєтеся, як створювати 2D-анімованих персонажів за допомогою класу AnimatedSprite2D і AnimationPlayer. Як правило, коли ви створюєте або завантажуєте анімованого персонажа, він надходить одним із двох способів: як окремі зображення або як єдиний аркуш спрайтів, що містить усі кадри анімації. Обидва можна анімувати в Godot за допомогою класу AnimatedSprite2D.
Спочатку ми використаємо AnimatedSprite2D для анімації колекції окремих зображень. Потім ми анімуємо аркуш спрайтів за допомогою цього класу. Нарешті, ми дізнаємося інший спосіб анімації аркуша спрайтів за допомогою AnimationPlayer і властивості Animation Sprite2D.
Примітка
Арт для наступних прикладів на https://opengameart.org/users/ansimuz та tgfcoder.
Окремі зображення за допомогою AnimatedSprite2D
У цьому випадку у вас є колекція зображень, кожен з яких містить один з анімаційних кадрів вашого персонажа. Для цього прикладу ми будемо використовувати наступну анімацію:

Ви можете завантажити зображення тут: 2d_sprite_animation_assets.zip
Розпакуйте зображення та розташуйте їх у папці проекту. Налаштуйте дерево сцен за допомогою таких вузлів:
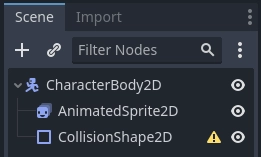
Примітка
Кореневим вузлом також може бути Area2D, або RigidBody2D. Анімація все одно буде зроблена таким же чином. Після завершення анімації можна призначити форму зіткнення CollisionShape2D. Докладніше про це можна дізнатися зі Вступу до фізики.
Тепер виберіть AnimatedSprite2D і в його властивості SpriteFrames виберіть «Нові SpriteFrames».
Натисніть на новий ресурс SpriteFrames, і ви побачите, що в нижній частині вікна редактора з'явиться нова панель:
На панелі Файлова система з лівого боку перетягніть 8 окремих зображень у центральну частину панелі "Кадри Спрайта". З лівого боку змініть назву анімації з "default" на "run".
Використовуйте кнопки «Відтворити» у верхньому правому куті входу Фільтрувати анімації, щоб переглянути анімацію. Тепер ви повинні побачити відтворення анімації у вікні перегляду. Однак це трохи повільно. Щоб виправити це, змініть параметр Speed (FPS) на панелі SpriteFrames на 10.
Ви можете додати додаткові анімації, натиснувши кнопку «Додати анімацію» та додавши додаткові зображення.
Керування анімацією
Після завершення анімації ви можете керувати анімацією за допомогою коду користуючись методами play() та stop(). Ось короткий приклад для відтворення анімації під час утримання клавіші зі стрілкою вправо та зупинки її, коли клавіша буде випущена.
extends CharacterBody2D

@onready var _animated_sprite = $AnimatedSprite2D

func _process(_delta):
    if Input.is_action_pressed("ui_right"):
        _animated_sprite.play("run")
    else:
        _animated_sprite.stop()
using Godot;

public partial class Character : CharacterBody2D
{
    private AnimatedSprite2D _animatedSprite;

    public override void _Ready()
    {
        _animatedSprite = GetNode<AnimatedSprite2D>("AnimatedSprite2D");
    }

    public override void _Process(double delta)
    {
        if (Input.IsActionPressed("ui_right"))
        {
            _animatedSprite.Play("run");
        }
        else
        {
            _animatedSprite.Stop();
        }
    }
}
Аркуш спрайтів з AnimatedSprite2D
Ви також можете легко анімувати з аркуша спрайтів за допомогою класу AnimatedSprite2D. Ми будемо використовувати цю таблицю спрайтів загальнодоступного домену:
Клацніть зображення правою кнопкою миші та виберіть "Зберегти зображення як", щоб завантажити його, а потім скопіюйте зображення в папку проекту.
Налаштуйте дерево сцен так само, як ви робили раніше, коли використовували окремі зображення. Виберіть AnimatedSprite2D і в його властивості SpriteFrames виберіть «Нові SpriteFrames».
Натисніть на новий ресурс SpriteFrames. Цього разу, коли з'явиться нижня панель, виберіть "Додати кадри з аркуша спрайтів".
Вам буде запропоновано відкрити файл. Виберіть спрайтовий аркуш.
Відкриється нове вікно, на якому буде показано ваш спрайтовий лист. Перше, що вам потрібно буде зробити, це змінити кількість вертикальних і горизонтальних зображень у вашому спрайтовому аркуші. На цьому аркуші спрайтів ми маємо чотири зображення горизонтально та два вертикально.
Далі виділіть кадри з спрайтового аркуша, які потрібно включити в анімацію. Ми виберемо четвірку кращих, а потім натиснемо "Додати 4 кадри", щоб створити анімацію.
Тепер ви побачите свою анімацію у списку анімацій на нижній панелі. Двічі клацніть на назві за замовчуванням, щоб змінити назву анімації на стрибок.
Нарешті, перевірте кнопку відтворення в редакторі SpriteFrames, щоб побачити, як ваша жаба стрибає!
Спрайтовий аркуш з AnimationPlayer
Ще один спосіб анімації під час використання аркуша спрайтів — використання стандартного вузла Sprite2D для відображення текстури, а потім анімація зміни текстури на текстуру за допомогою AnimationPlayer .
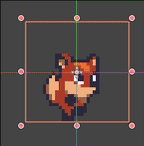
Розглянемо цей спрайтовий аркуш, який містить 6 кадрів анімації:

Клацніть зображення правою кнопкою мишки та виберіть "Зберегти зображення як", щоб завантажити, а потім скопіюйте зображення в папку проекту.
Наша мета полягає в тому, щоб відображати ці зображення один за одним в циклі. Почніть з налаштування вашого дерева сцени:
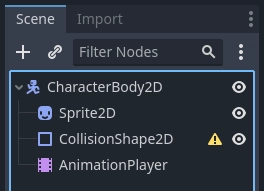
Примітка
Кореневим вузлом також може бути Area2D, або RigidBody2D. Анімація все одно буде зроблена таким же чином. Після завершення анімації можна призначити форму зіткнення CollisionShape2D. Докладніше про це можна дізнатися зі Вступу до фізики.
Перетягніть спрайтовий аркуш у властивість спрайта Sprite Texture, і ви побачите весь аркуш на екрані. Щоб розділити його на окремі кадри, розгорніть розділ Animation в Інспекторі та встановіть в Hframes значення 6. Hframes і Vframes - це кількість горизонтальних і вертикальних кадрів у вашому спрайтовому аркуші.
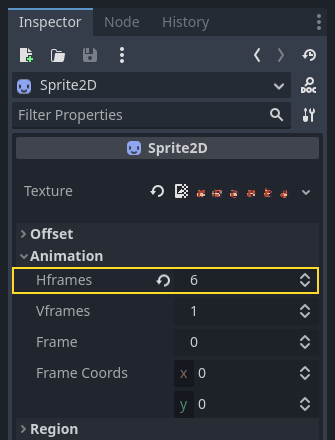
Тепер спробуйте змінити значення властивості Frame. Ви побачите, що він варіюється від 0 до 5, і зображення, яке відображає Sprite2D, змінюється відповідно. Це майно, яке ми будемо анімувати.
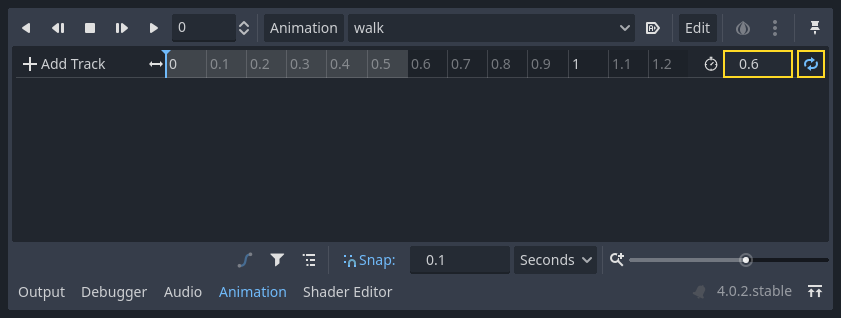
Виберіть AnimationPlayer і натисніть кнопку "Animation", а потім "New". Назвіть нову анімацію "walk". Встановіть довжину анімації 0.6 та натисніть значок зациклення, щоб наша анімація повторювалася.
Тепер виберіть вузол Sprite2D і клацніть значок ключа, щоб додати новий трек.

Продовжуйте додавати кадри в кожній точці часової шкали (0.1 секунди за замовчуванням), поки у вас не будуть всі кадри від 0 до 5. Ви побачите кадри, які насправді з'являються в анімаційній доріжці:
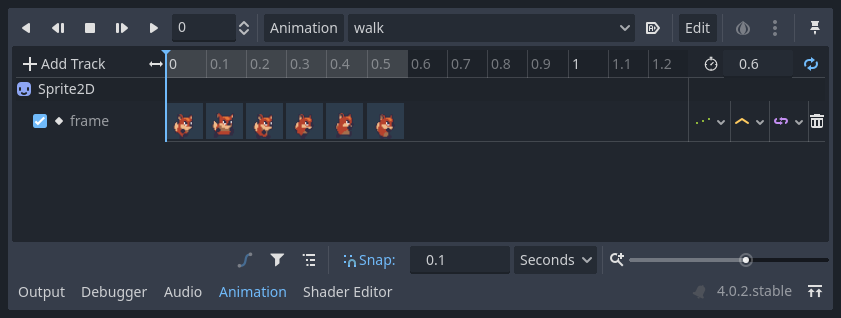
Натисніть "Відтворити" на анімації, щоб побачити, як вона виглядає.
Керування анімацією AnimationPlayer
Подібно до AnimatedSprite2D, ви можете керувати анімацією за допомогою коду за допомогою методів play() і stop(). Знову ж таки, ось приклад відтворення анімації, коли утримується клавіша зі стрілкою вправо, і зупиняється, коли клавіша відпущена.
extends CharacterBody2D

@onready var _animation_player = $AnimationPlayer

func _process(_delta):
    if Input.is_action_pressed("ui_right"):
        _animation_player.play("walk")
    else:
        _animation_player.stop()
using Godot;

public partial class Character : CharacterBody2D
{
    private AnimationPlayer _animationPlayer;

    public override void _Ready()
    {
        _animationPlayer = GetNode<AnimationPlayer>("AnimationPlayer");
    }

    public override void _Process(double delta)
    {
        if (Input.IsActionPressed("ui_right"))
        {
            _animationPlayer.Play("walk");
        }
        else
        {
            _animationPlayer.Stop();
        }
    }
}
Примітка
Якщо оновлювати анімацію та окрему властивість одночасно (наприклад, платформер може оновлювати властивості h_flip/v_flip спрайту, коли персонаж повертається під час запуску анімації «повороту»), важливо мати на увазі, що play() не застосовується миттєво. Натомість його буде застосовано під час наступної обробки AnimationPlayer. Це може закінчитися наступним кадром, спричиняючи кадр із «глюком», де зміну властивості було застосовано, але ні анімацію. Якщо це виявиться проблемою, після виклику play() ви можете викликати advance(0), щоб негайно оновити анімацію.
Підсумок
Ці приклади ілюструють два класи, які можна використовувати в Godot для 2D-анімації. AnimationPlayer є трохи складнішим, ніж AnimatedSprite2D, але він надає додаткові функції, оскільки ви також можете анімувати інші властивості, такі як положення або масштаб. Клас AnimationPlayer також можна використовувати з AnimatedSprite2D. Експериментуйте, щоб побачити, що найкраще підходить для ваших потреб.