Attention: Here be dragons
This is the latest
(unstable) version of this documentation, which may document features
not available in or compatible with released stable versions of Godot.
Checking the stable version of the documentation...
Обмеження 3D відображення
Вступ
Візуалізатор Godot, як і інші графічні рушії, що працюють в реальному часі, має багато обмежень у зв'язку з тим, що він орієнтований на швидкість. Для того, щоб ефективно працювати з цими обмеженнями, необхідно знати про них.
Межі розміру текстури
Більш старі ПК та ноутбуки можуть не підтримувати текстури більші ніж 8192×8192. Ви можете перевірити свій графічний процесор на GPUinfo.org.
Мобільні ГП зазвичай обмежують розмір текстур до 4096×4096. Окрім цього, деякі мобільні ГП не підтримують повторення текстур, розмір яких не є степенем двійки. Тому, якщо ви хочете, щоб ваша текстура правильно відображалась на всіх платформах то вам варто уникати текстур більших ніж 4096×4096 чи таких що мають розмір не степені двійки, якщо текстуру потрібно повторювати.
Щоб обмежити розмір певної текстури, яка може бути завеликою для візуалізації, ви можете встановити для параметра імпорту Процес > Обмеження розміру значення, що перевищує 0. Це зменшить розміри текстури під час імпорту (зберігаючи співвідношення сторін), не впливаючи на вихідний файл.
Розшарування кольорів
When using the Forward+ or Mobile rendering methods, Godot's 3D engine renders internally in HDR. However, the rendering output will typically be written to a lower precision buffer. This can result in visible banding, especially when using untextured materials. For performance reasons, color precision is also lower when using the Mobile rendering method compared to Forward+.
When using the Compatibility rendering method, internal HDR rendering is not used and the color precision is the lowest of all rendering methods. This also applies to 2D rendering, where banding may be visible when using smooth gradient textures.
Побороти розшарування можна двома способами:
Якщо ви використовуєте методи відтворення Forward+ або Forward Mobile, увімкніть Use Debanding у Project Settings > Rendering > Anti Aliasing. Це застосовує повноекранний шейдер, що знімає зони, як ефект постобробки, і це дуже дешево.
Крім того, додайте трохи шуму у свої текстури. Це в основному ефективно в 2D, напр. для ефектів віньєтування. У 3D ви також можете використовувати спеціальний шейдер дебандингу для застосування до ваших матеріалів. Ця техніка працює, навіть якщо ваш проект відтворюється з низькою точністю кольорів, що означає, що вона працюватиме під час використання методів візуалізації Mobile та Compatibility.
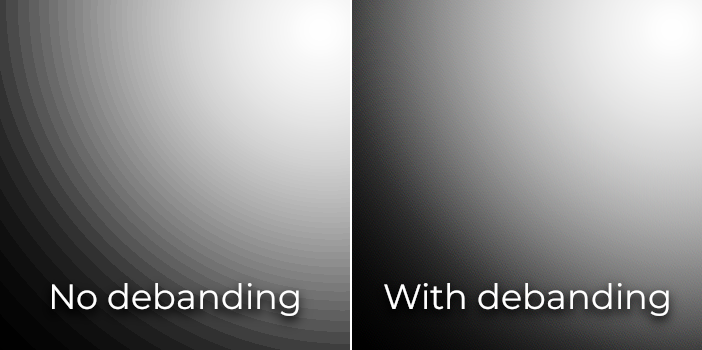
Порівняння кольорових смуг (збільшений контраст для кращої видимості)
Дивись також
Перегляньте Бандінг в іграх: галасливий вигук (PDF), щоб дізнатися більше про смуги та способи боротьби з ними.
Точність буфера глибини
To sort objects in 3D space, rendering engines rely on a depth buffer (also called Z-buffer). This buffer has a finite precision: 32-bit on desktop platforms, 24-bit on mobile platforms (for performance reasons). If two different objects end up on the same buffer value, then Z-fighting will occur. This will materialize as textures flickering back and forth as the camera moves or rotates.
Щоб зробити буфер глибини точнішим по області рендерингу, слід збільшити властивість вузла Camera Near. Однак будьте обережні: якщо встановити занадто високе значення, гравці зможуть бачити крізь сусідню геометрію. Також слід зменшити властивість вузла Camera Far до найнижчого допустимого значення для вашого випадку використання, хоча майте на увазі, що це не вплине на точність так сильно, як властивість Near.
Якщо вам потрібна висока точність лише коли гравець дивиться в далечінь, то ви можете змінювати її на ходу, залежно від ситуації. Для прикладу, якщо гравець сідає в літак, то параметр Near можна збільшити щоб уникнути конфліктів за Z-буфер на відстані. Значення можна зменшити щойно гравець покине літак.
Залежно від сцени та умов, у вас може бути можливість просто розсунути конфліктні об'єкти один від одного без суттєвого впливу на вигляд сцени.

Порівняння Z-fighting (до та після налаштування сцени шляхом зміщення Label3D від підлоги)
Перебір по прозорості
У Godot прозорі матеріали малюються після непрозорих матеріалів. Прозорі об’єкти сортуються задом наперед перед малюванням на основі положення Node3D, а не положення вершини у світовому просторі. Через це об’єкти, що накладаються, часто можуть бути відсортовані не по порядку. Щоб виправити неправильно відсортовані об’єкти, змініть властивість Render Priority матеріалу або Sorting Offset вузла. Пріоритет візуалізації змусить певні матеріали відображатися перед або позаду інших прозорих матеріалів, тоді як Зміщення сортування переміщуватиме об’єкт вперед або назад з метою сортування. Навіть тоді цього не завжди може бути достатньо.
Прозорі об'єкти не відображаються в буфері нормальної шорсткості, оскільки вони малюються після непрозорої геометрії. Як результат, об'єкти, що залежать від буфера нормальної шорсткості, не впливатимуть на прозорі матеріали.
Деякі візуалізатори мають змогу побороти це використовуючи порядко-незалежну прозорість, але вона сильно навантажує відеоприскорювач. На даний момент, Godot не має таких можливостей. Але у вас є декілька шляхів уникнення проблеми:
Робіть матеріали прозорими, лише якщо це вам дійсно потрібно. Якщо матеріал має лише невелику прозору частину, розгляньте можливість розділити його на окремий матеріал. Це дозволить непрозорій частині відкидати тіні, а також покращить продуктивність.
Якщо ваша текстура переважно має повністю непрозорі та повністю прозорі області, ви можете використовувати альфа-тестування замість альфа-змішування. Цей режим прозорості швидше візуалізується та не має проблем із прозорістю. Увімкніть Прозорість > Прозорість на Альфа-ножиці у StandardMaterial3D і відповідно налаштуйте Прозорість > Порогове значення альфа-ножиць, якщо потрібно. Зауважте, що MSAA не згладжуватиме краї текстури, якщо альфа-згладжування не ввімкнено у властивостях матеріалу. Однак FXAA, TAA та суперсемплінг зможуть згладжувати краї текстури незалежно від того, чи ввімкнено альфа-згладжування на матеріалі.
Якщо вам потрібно відрендерити напівпрозорі ділянки текстури, alpha scissor не підходить. Натомість встановлення властивості Прозорість > Прозорість StandardMaterial3D на Попередній проход глибини іноді може спрацювати (за ціною продуктивності). Ви також можете спробувати режим Alpha Hash.
Якщо ви хочете, щоб матеріал зникав із відстанню, використовуйте режим згасання на відстані StandardMaterial3D Pixel Dither або Object Dither замість Pixel Alpha. Це зробить матеріал непрозорим, що також прискорить рендеринг.
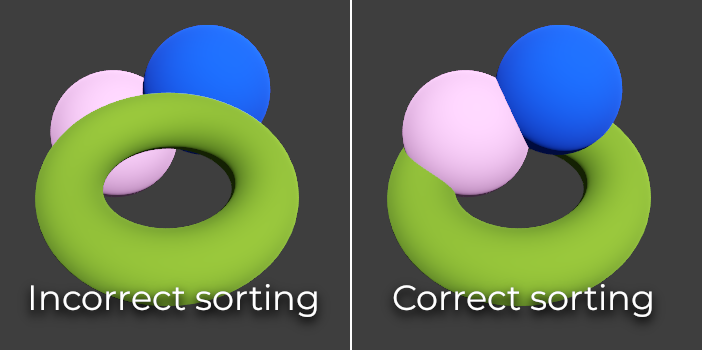
Порівняння сортування прозорості (альфа-змішані матеріали ліворуч, альфа-ножиці праворуч)