Attention: Here be dragons
This is the latest
(unstable) version of this documentation, which may document features
not available in or compatible with released stable versions of Godot.
Checking the stable version of the documentation...
Кінематичний персонаж (2D)
Вступ
Так, назва звучить дивно. «Кінематичний характер». Що це? Причина такої назви полягає в тому, що коли з’явилися фізичні двигуни, їх називали двигунами «Динамічні» (оскільки вони стосувалися в основному реакції на зіткнення). Було зроблено багато спроб створити контролер персонажа за допомогою динамічних двигунів, але це було не так просто, як здавалося. Godot має одну з найкращих реалізацій динамічного контролера персонажів, яку тільки можна знайти (як це можна побачити в демонстрації 2d/платформера), але його використання вимагає значного рівня навичок і розуміння фізичних движків (або багато терпіння під час випробувань). і помилка).
Деякі фізичні движки, такі як Havok, здається, вважають найкращим варіантом динамічні контролери символів, тоді як інші (PhysX) радше просувають кінематичні.
Отже, в чому різниця?:
Динамічний контролер символів використовує тверде тіло з нескінченним тензором інерції. Це тверде тіло, яке не може обертатися. Фізичні механізми завжди дозволяють об’єктам рухатися та стикатися, а потім разом вирішують їх зіткнення. Це дозволяє динамічним контролерам персонажів безперебійно взаємодіяти з іншими фізичними об’єктами, як видно з демонстрації платформера. Однак ці взаємодії не завжди передбачувані. Для розв’язання зіткнень може знадобитися більше одного кадру, тому може здатися, що кілька зіткнень дещо зміщуються. Ці проблеми можна вирішити, але вимагають певних навичок.
Передбачається, що контролер кінематичних символів завжди починається в стані без зіткнень і завжди переходитиме до стану без зіткнень. Якщо він починає зіткнутися, він намагатиметься звільнитися, як це роблять тверді тіла, але це виняток, а не правило. Це робить їхній контроль і рух набагато більш передбачуваним і легшим для програмування. Однак недоліком є те, що вони не можуть безпосередньо взаємодіяти з іншими фізичними об’єктами, якщо тільки це не зроблено вручну в коді.
Цей короткий підручник зосереджений на контролері кінематичних символів. Він використовує старий спосіб обробки зіткнень, який не обов’язково простіший під капотом, але добре прихований і представлений як API.
Фізика процесу
To manage the logic of a kinematic body or character, it is always advised to use physics process, because it's called before physics step and its execution is in sync with physics server, also it is called the same amount of times per second, always. This makes physics and motion calculation work in a more predictable way than using regular process, which might have spikes or lose precision if the frame rate is too high or too low.
extends CharacterBody2D

func _physics_process(delta):
    pass
using Godot;

public partial class MyCharacterBody2D : CharacterBody2D
{
    public override void _PhysicsProcess(double delta)
    {
    }
}
Налаштування сцени
Щоб було що перевірити, ось сцена (з підручника з мапи плиток): kinematic_character_2d_starter.zip. Ми створимо нову сцену для персонажа. Використовуйте спрайт робота та створіть таку сцену:
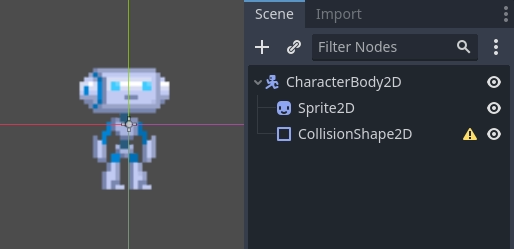
Ви помітите, що біля нашого вузла CollisionShape2D є значок попередження; це тому, що ми не визначили для нього форму. Створіть новий CircleShape2D у властивості форми CollisionShape2D. Клацніть на <CircleShape2D>, щоб перейти до його параметрів, і встановіть радіус 30:
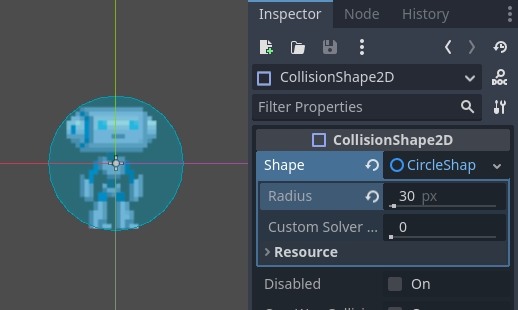
Примітка: як згадувалося раніше в підручнику з фізики, фізичний механізм не може обробляти масштаб більшості типів фігур (працюють лише багатокутники зіткнення, площини та сегменти), тому натомість завжди змінюйте параметри (такі як радіус) фігури його масштабування. Те саме стосується самих кінематичних/твердих/статичних тіл, оскільки їхній масштаб впливає на масштаб форми.
Тепер створіть скрипт для персонажа, той, що використовується як приклад вище, повинен працювати як основа.
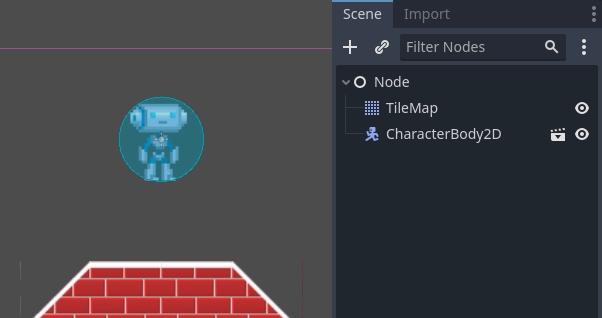
Нарешті, створіть екземпляр цієї сцени персонажа на карті плиток і зробіть сцену карти основною, щоб вона запускалася під час натискання кнопки відтворення.
Переміщення кінематичного характеру
Поверніться до сцени персонажа та відкрийте скрипт, магія починається зараз! Кінематичне тіло нічого не робитиме за замовчуванням, але воно має корисну функцію під назвою CharacterBody2D.move_and_collide(). Ця функція приймає Vector2 як аргумент і намагається застосувати цей рух до кінематичного тіла. Якщо відбувається зіткнення, він зупиняється в момент зіткнення.
Отже, давайте перемістимо наш спрайт вниз, поки він не впаде на підлогу:
extends CharacterBody2D

func _physics_process(delta):
    move_and_collide(Vector2(0, 1)) # Move down 1 pixel per physics frame
using Godot;

public partial class MyCharacterBody2D : CharacterBody2D
{
    public override void _PhysicsProcess(double delta)
    {
        // Move down 1 pixel per physics frame
        MoveAndCollide(new Vector2(0, 1));
    }
}
У результаті персонаж рухатиметься, але зупинятиметься одразу після удару об підлогу. Дуже круто, га?
Наступним кроком буде додавання тяжіння суміші, таким чином вона поводиться трохи більше, як звичайний ігровий персонаж:
extends CharacterBody2D

const GRAVITY = 200.0

func _physics_process(delta):
    velocity.y += delta * GRAVITY

    var motion = velocity * delta
    move_and_collide(motion)
using Godot;

public partial class MyCharacterBody2D : CharacterBody2D
{
    private const float Gravity = 200.0f;

    public override void _PhysicsProcess(double delta)
    {
        var velocity = Velocity;
        velocity.Y += (float)delta * Gravity;
        Velocity = velocity;

        var motion = velocity * (float)delta;
        MoveAndCollide(motion);
    }
}
Тепер персонаж плавно падає. Давайте змусимо його ходити в сторони, ліворуч і праворуч, торкаючись клавіш направлення. Пам’ятайте, що використовуються значення (принаймні для швидкості) – це пікселі на секунду.
Це додає базову підтримку для ходьби при натисканні ліворуч і праворуч:
extends CharacterBody2D

const GRAVITY = 200.0
const WALK_SPEED = 200

func _physics_process(delta):
    velocity.y += delta * GRAVITY

    if Input.is_action_pressed("ui_left"):
        velocity.x = -WALK_SPEED
    elif Input.is_action_pressed("ui_right"):
        velocity.x =  WALK_SPEED
    else:
        velocity.x = 0

    # "move_and_slide" already takes delta time into account.
    move_and_slide()
using Godot;

public partial class MyCharacterBody2D : CharacterBody2D
{
    private const float Gravity = 200.0f;
    private const int WalkSpeed = 200;

    public override void _PhysicsProcess(double delta)
    {
        var velocity = Velocity;

        velocity.Y += (float)delta * Gravity;

        if (Input.IsActionPressed("ui_left"))
        {
            velocity.X = -WalkSpeed;
        }
        else if (Input.IsActionPressed("ui_right"))
        {
            velocity.X = WalkSpeed;
        }
        else
        {
            velocity.X = 0;
        }

        Velocity = velocity;

        // "MoveAndSlide" already takes delta time into account.
        MoveAndSlide();
    }
}
І спробуйте.
Це хороша відправна точка для платформера. Більш повну демонстрацію можна знайти в демо-архіві zip, що розповсюджується разом із механізмом, або на https://github.com/godotengine/godot-demo-projects/tree/master/2d/kinematic_character.