Attention: Here be dragons
This is the latest
(unstable) version of this documentation, which may document features
not available in or compatible with released stable versions of Godot.
Checking the stable version of the documentation...
Вступ до функцій анімації
Вузол AnimationPlayer дозволяє створювати будь-які анімації від простих до складних.
З цього посібника ви дізнаєтеся про:
Роботу з панеллю Анімації
Анімацію будь-якої властивості будь-якого вузла
Створення простої анімації
У Godot ви можете анімувати будь-що, доступне в Inspector, як-от трансформації вузлів, спрайти, елементи інтерфейсу користувача, частинки, видимість і колір матеріалів тощо. Ви також можете змінювати значення змінних сценарію і навіть викликати функції.
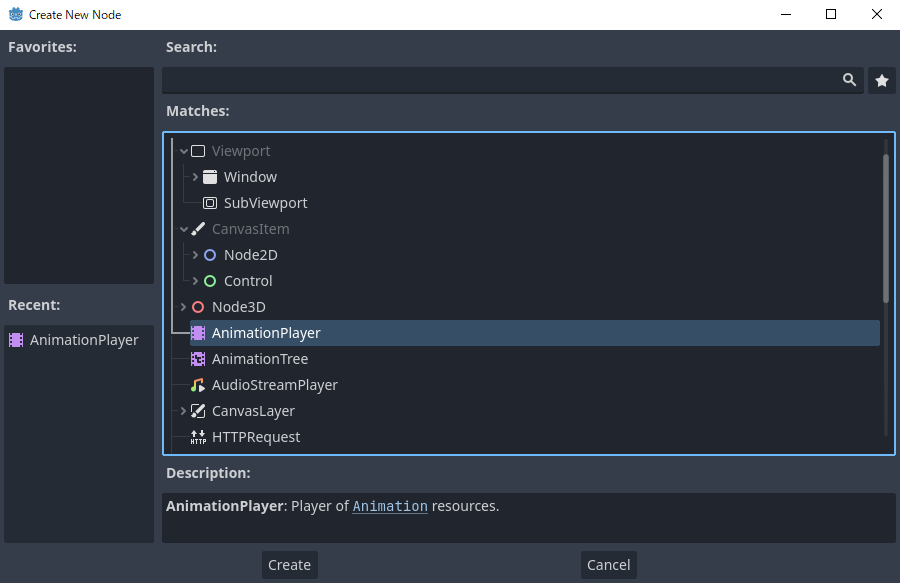
Створення вузла AnimationPlayer (Відтворювач Анімації)
Щоб використовувати інструменти анімації, спочатку потрібно створити вузол AnimationPlayer.
Тип вузла AnimationPlayer є контейнером даних для ваших анімацій. Один вузол AnimationPlayer може містити кілька анімацій, які можуть автоматично переходити одна в іншу.
Вузол AnimationPlayer
Після створення вузла AnimationPlayer клацніть його, щоб відкрити панель анімації внизу вікна перегляду.

Розташування панелі анімації
Панель анімації складається з чотирьох частин:
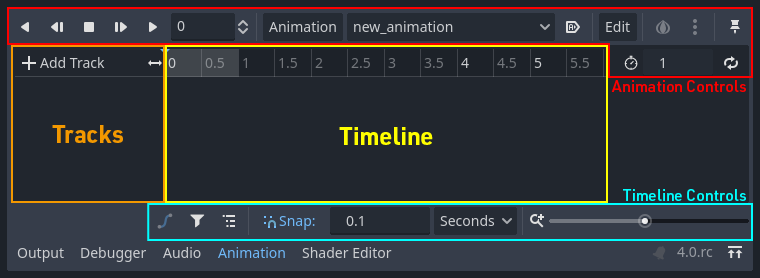
Панель анімації
Елементи керування анімацією (наприклад, додавання, завантаження, збереження та видалення анімацій)
Список доріжок (треків)
Шкала часу з ключовими кадрами
Елементи керування часовою шкалою та доріжкою, за допомогою яких можна, наприклад, масштабувати часову шкалу та редагувати доріжки.
Комп'ютерна анімація опирається на ключові кадри
Ключовий кадр визначає значення властивості в певний момент часу.
Ромби представляють ключові кадри на часовій шкалі. Лінія між двома ключовими кадрами означає, що значення між ними не змінюється.

Ключові кадри в Godot
Ви встановлюєте значення властивостей вузла та створюєте для них ключові кадри анімації. Під час запуску анімації механізм інтерполює значення між ключовими кадрами, у результаті чого вони поступово змінюються з часом.

Два ключових кадри - це все, що потрібно для отримання плавного руху
Шкала часу визначає, скільки часу триватиме анімація. Ви можете вставляти ключові кадри в різні точки та змінювати їх час.

Шкала часу на панелі анімації
Кожен рядок на панелі анімації — це доріжка анімації, яка посилається на властивість Normal або Transform вузла. Кожна доріжка зберігає шлях до вузла та його зачеплену властивість. Наприклад, трек позиції на ілюстрації стосується властивості position вузла Sprite2D.

Зразок Звичайних анімаційних доріжок
Порада
Якщо ви анімуєте неправильну властивість, ви можете будь-коли змінити шлях доріжки, двічі клацнувши на ньому та ввівши новий шлях. Відтворіть анімацію за допомогою кнопки «Відтворити з початку»  (або натиснувши Shift + D на клавіатурі), щоб миттєво побачити зміни.
Урок: Створення простої анімації
Налаштування сцени
Для цього уроку ми створимо вузол Sprite і дамо йому в нащадки AnimationPlayer. Ми анімуємо переміщення спрайту між двома точками на екрані.

Налаштування нашої сцени
Попередження
AnimationPlayer успадковує від Node замість Node2D або Node3D, що означає, що дочірні вузли не успадковуватимуть перетворення від батьківських вузлів через присутність голого вузла в ієрархії.
Тому не рекомендується додавати вузлу AnimationPlayer в нащадки вузли, які мають 2D/3D перетворення.
Спрайт містить текстуру зображення. Для цього підручника виберіть вузол Sprite2D, клацніть «Текстура» в інспекторі, а потім клацніть «Завантажити». Виберіть стандартну піктограму Godot для текстури спрайту.
Додавання анімації
Виберіть вузол AnimationPlayer і натисніть кнопку «Анімація» в редакторі анімації. У списку виберіть «Новий» ( ), щоб додати нову анімацію. У діалоговому вікні введіть назву анімації.
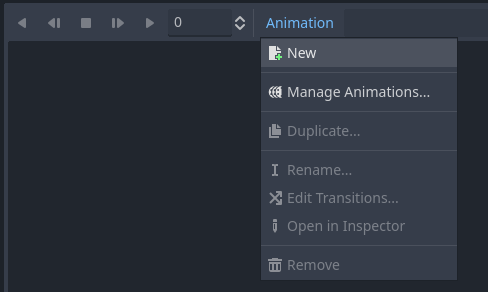
Додавання нової анімації
Управління бібліотеками анімації
Для повторного використання анімація зареєстрована в списку ресурсу бібліотеки анімації. Якщо ви додаєте анімацію до AnimationPlayer без визначення будь-яких конкретних налаштувань, анімація буде зареєстрована в бібліотеці анімацій [Global], яку AnimationPlayer має за замовчуванням.
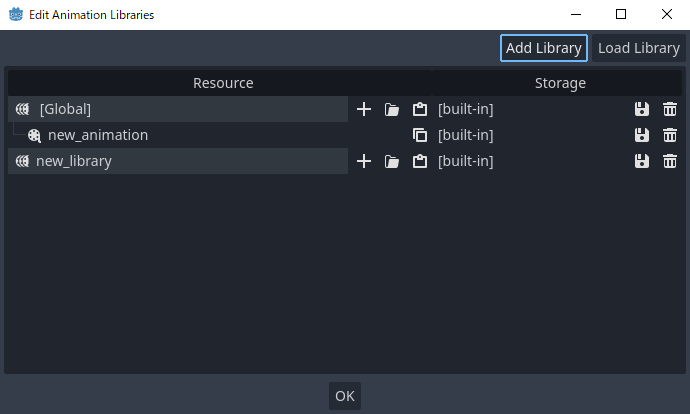
Керуйте анімаціями
Якщо існує кілька бібліотек анімації, і ви намагаєтеся додати анімацію, з’явиться діалогове вікно з параметрами.
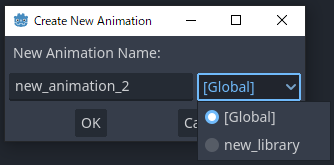
Додайте нову анімацію з опцією бібліотеки
Додавання доріжки
Щоб додати новий трек для нашого спрайту, виберіть його та подивіться на панель інструментів:

Зручні кнопки
Ці перемикачі та кнопки дозволяють додавати ключові кадри для розташування, обертання та масштабу вибраного вузла. Оскільки ми лише анімуємо позицію спрайту, переконайтеся, що вибрано лише перемикач розташування. Вибрані перемикачі сині.
Натисніть кнопку ключа, щоб створити перший ключовий кадр. Оскільки ми ще не налаштували трек для властивості Position, Godot запропонує створити його для нас. Натисніть Створити.
Godot створить новий трек і вставить наш перший ключовий кадр на початку шкали часу:

Доріжка спрайта
Другий ключовий кадр
Нам потрібно встановити кінцеве розташування нашого спрайту та скільки часу знадобиться, щоб він туди потрапив.
Скажімо, ми хочемо, щоб перехід між точками займав дві секунди. За замовчуванням анімація триває лише одну секунду, тому змініть тривалість анімації на 2 в елементах керування праворуч від заголовка шкали часу на панелі анімації.

Тривалість анімації
Тепер перемістіть спрайт праворуч, у його остаточне положення. Ви можете скористатися інструментом Переміщення на панелі інструментів або встановити значення X Позиції в Інспекторі.
Клацніть заголовок шкали часу біля двосекундної позначки на панелі анімації, а потім натисніть кнопку ключа на панелі інструментів, щоб створити другий ключовий кадр.
Запуск анімації
Натисніть кнопку «Відтворити з початку» ().
Вау! Наша анімація працює:
Анімація
Автовідтворення під час завантаження
Ви можете зробити так, щоб анімація відтворювалася автоматично, коли починається сцена вузлів AnimationPlayer або приєднується до іншої сцени. Для цього натисніть кнопку «Автовідтворення під час завантаження» в редакторі анімації, поруч із кнопкою редагування.

Її піктограма також з’явиться перед назвою анімації, тож ви зможете легко визначити, яка анімація автоматично відтворюється.
Туди-сюди
У Godot є цікава функція, яку ми можемо використовувати в анімації. Якщо налаштовано цикл анімації, але в кінці анімації не вказано ключовий кадр, перший ключовий кадр також є останнім.
Це означає, що тепер ми можемо збільшити тривалість анімації до чотирьох секунд, а Godot також обчислить кадри від останнього ключового кадру до першого, переміщуючи наш спрайт вперед і назад.

Циклічність анімації
Ви можете змінити цю поведінку, змінивши режим циклу доріжки. Це розглядається в наступному розділі.
Параметри доріжки
Кожна доріжка властивостей має панель налаштувань у кінці, де ви можете встановити її режим оновлення, інтерполяцію доріжки та режим циклу.

Параметри доріжки
Режим оновлення доріжки повідомляє Godot, коли оновлювати значення властивостей. Він може бути:
Неперервний: Оновлювати властивість на кожному кадрі
Дискретно: Оновлювати властивість лише на ключових кадрах
Capture: якщо час першого ключового кадру перевищує
0.0, поточне значення властивості буде запам’ятовано та змішано з першим ключем анімації. Наприклад, ви можете використовувати режим захоплення, щоб перемістити вузол, який знаходиться де завгодно, у певне місце.
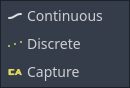
Режими доріжки
Зазвичай ви використовуєте режим «Безперервний». Інші типи використовуються для написання складних анімацій.
Інтерполяція доріжки повідомляє Godot, як обчислювати значення кадрів між ключовими кадрами. Підтримуються такі режими інтерполяції:
Найближчий: Встановлює найближче значення ключового кадру
Лінійний: Встановлює значення на основі обчислення лінійної функції між двома ключовими кадрами
Кубічний: Встановлює значення на основі обчислення кубічної функції між двома ключовими кадрами
Лінійний кут (з’являється лише у властивості обертання): лінійний режим із обертанням за найкоротшим шляхом
Кубічний кут (з’являється лише у властивості обертання): кубічний режим із обертанням за найкоротшим шляхом
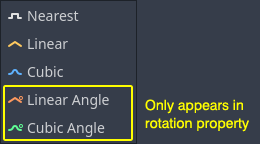
Режими інтерполяції
З кубічною інтерполяцією анімація повільніша на ключових кадрах і швидша між ними, що призводить до більш природного руху. Кубічна інтерполяція зазвичай використовується для анімації персонажів. Лінійна інтерполяція анімує зміни у фіксованому темпі, що призводить до більш роботизованого ефекту.
Godot підтримує два циклічні режими, які впливають на анімацію, коли вона налаштована на цикл:
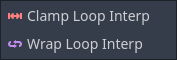
Режими циклу
Інтерполяція циклу затискання: Якщо вибрано цей параметр, анімація зупиняється після останнього ключового кадру для цієї доріжки. Коли знову досягається перший ключовий кадр, анімація скидається до своїх значень.
Інтерполяція циклу обгортання: Якщо вибрано цей параметр, Godot обчислює анімацію після останнього ключового кадру, щоб знову досягти значень першого ключового кадру.
Ключові кадри для інших властивостей
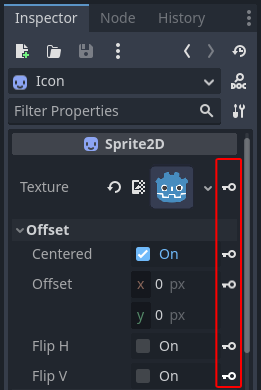
Система анімації Godot не обмежується положенням, обертанням і масштабом. Ви можете анімувати будь-яку властивість.
Якщо ви виберете свій спрайт, коли панель анімації видима, Godot відобразить маленьку кнопку ключового кадру в Інспекторі для кожної властивості спрайту. Натисніть одну з цих кнопок, щоб додати трек і ключовий кадр до поточної анімації.
Ключові кадри для інших властивостей
Редагування ключових кадрів
Ви можете клацнути на ключовому кадрі на часовій шкалі анімації, щоб відобразити та змінити його значення в Інспекторі.
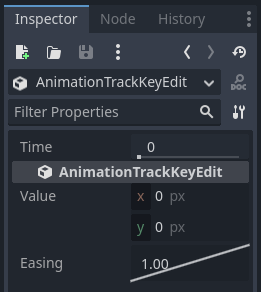
Редактор ключових кадрів
Ви також можете редагувати значення easing для ключового кадру тут, клацнувши та перетягнувши його криву easing. Це вказує Godot, як інтерполювати властивість анімації, коли вона досягає цього ключового кадру.
Ви можете налаштовувати анімацію таким чином, поки рух не стане "правильним."
Використання доріжок RESET
Ви можете налаштувати спеціальну анімацію RESET, щоб містити "позу за замовчуванням". Вона використовується для відновлення пози за замовчуванням під час збереження сцени та повторного відкриття її в редакторі.
Для наявних доріжок можна додати анімацію під назвою "RESET" (з урахуванням регістру), а потім додати доріжки для кожної властивості, яку потрібно оновити. Єдиний ключовий кадр повинен бути на часі 0, і містити потрібне значення за замовчуванням для кожної доріжки.
Якщо властивість Reset On Save AnimationPlayer встановлено на true, сцена буде збережена із застосованими ефектами анімації скидання (ніби її було переналаштовано на час 0.0). Це впливає лише на збережений файл – доріжки властивостей у редакторі залишаються там, де вони були.
Якщо ви хочете скинути доріжки в редакторі, виберіть вузол AnimationPlayer, відкрийте нижню панель Анімація, а потім виберіть Застосувати скидання у спадному меню Редагувати редактора анімації.
У разі використання піктограми ключового кадру поруч із властивістю в інспекторі редактор попросить вас автоматично створити трек RESET.
Примітка
Доріжки RESET також використовуються як еталонні значення для змішування. Дивіться також Для кращого змішування.
Очищення цибулі
Редактор анімації Godot дозволяє використовувати шкірку цибулі під час створення анімації. Щоб увімкнути цю функцію, клацніть піктограму цибулі у верхньому правому куті редактора анімації. Тепер будуть прозорі червоні копії того, що анімується, на своїх попередніх позиціях в анімації.

Кнопка з трьома крапками поруч із кнопкою очищення цибулі відкриває спадне меню, у якому можна налаштувати його роботу, зокрема можливість використовувати очищення цибулі для майбутніх кадрів.
Маркери анімації
Маркери анімації можна використовувати для відтворення певної частини анімації, а не всієї анімації. Ось приклад використання: є файл анімації, в якому персонаж виконує дві різні дії, і для проекту потрібна вся анімація, а також обидві дії окремо. Замість створення двох додаткових анімацій, маркери можна розмістити на часовій шкалі, і тепер обидві дії можна відтворювати окремо.
Щоб додати маркер до анімації, клацніть правою кнопкою миші на місці над часовою шкалою та виберіть Вставити маркер....

Усі маркери в анімації потребують унікальної назви. Ви також можете встановити колір маркерів для кращої організації.
Щоб відтворити частину анімації між двома маркерами, використовуйте методи play_section_with_markers() та play_section_with_markers_backwards(). Якщо початковий маркер не вказано, то використовується початок анімації, а якщо кінцевий маркер не вказано, то використовується кінець анімації.
Якщо кінцевий маркер знаходиться після кінця анімації, то AnimationPlayer затисне кінець секції, щоб вона не виходила за кінець анімації.
Щоб переглянути анімацію між двома маркерами, скористайтеся Shift + Click для вибору маркерів. Коли вибрано два, простір між ними має бути виділений червоним кольором.

Тепер усі кнопки відтворення анімації діятимуть так, ніби вибрана область є всією анімацією. Відтворити анімацію з початку вважатиме перший маркер початком анімації, Відтворити анімацію назад від кінця вважатиме другий маркер кінцем тощо.