Attention: Here be dragons
This is the latest
(unstable) version of this documentation, which may document features
not available in or compatible with released stable versions of Godot.
Checking the stable version of the documentation...
控制器功能
Godot 支持一些控制器专属功能,可以进一步提升游戏体验。本页面将介绍这些功能,现有游戏如何使用它们,以及如何在 Godot 中开始使用这些功能。
警告
目前,这些手柄功能仅在 Windows、macOS、iOS 和 Linux 平台上受支持。
警告
除非你明确宣传了你的游戏需要特定的控制器,否则请记住,不能保证玩家会拥有具有任何特定功能的控制器。
因此,我们建议使用这些功能来增强支持这些功能的控制器玩家的游戏体验,同时又不影响没有控制器的玩家的游戏体验。
LED 颜色
游戏可以利用某些控制器上的 LED 灯光,通过在玩家手中提供相应的视觉效果,巧妙地补充屏幕上的游戏画面。以下是一些值得注意的范例:
在 Hades (《哈迪斯》)中,灯光的颜色与你获得恩惠的神祇相对应。
在 生化危机2 中,灯光的颜色表示了你的生命值(绿色表示满,黄色表示中等,红色表示低)。
在 星球大战绝地:陨落的武士团 中,灯光的颜色与你的光剑颜色相匹配。
使用方法 Input.set_joy_light() 可设置给定控制器的 LED 的颜色。
要确定某个控制器是否支持设置 LED 灯光,请使用 Input.has_joy_light() 方法。已知 PlayStation DualShock 和 DualSense 控制器支持设置 LED 灯光。
以下 _process() 方法会根据当前按下的按钮设置 LED 颜色,如果没有按下按钮,则将其关闭:
func _process(_delta):
    var color := Color.BLACK

    if Input.is_joy_button_pressed(0, JOY_BUTTON_A):
        color = Color.BLUE
    elif Input.is_joy_button_pressed(0, JOY_BUTTON_X):
        color = Color.MAGENTA
    elif Input.is_joy_button_pressed(0, JOY_BUTTON_B):
        color = Color.RED
    elif Input.is_joy_button_pressed(0, JOY_BUTTON_Y):
        color = Color.GREEN

    Input.set_joy_light(0, color)
以下示例以循环方式平滑地淡入淡出 LED 灯的颜色:
var hue = 0.0

func _process(delta):
    var col = Color.from_hsv(hue, 1.0, 1.0)
    Input.set_joy_light(0, col)
    hue += delta * 0.1
以下示例演示了当按下南侧按钮(PlayStation 控制器上的十字/X 键)时,LED 指示灯将闪烁红色三次:
var blink_tween: Tween = null

func _process(_delta):
    var ready_to_blink = not blink_tween or not blink_tween.is_running()
    if Input.is_joy_button_pressed(0, JOY_BUTTON_A) and ready_to_blink:
        do_blink()

func do_blink():
    if blink_tween:
        blink_tween.kill()

    blink_tween = create_tween()
    blink_tween.tween_callback(func(): Input.set_joy_light(0, Color.RED))
    blink_tween.tween_interval(0.2)
    blink_tween.tween_callback(func(): Input.set_joy_light(0, Color.BLACK))
    blink_tween.tween_interval(0.2)
    blink_tween.set_loops(3)
运动传感器(陀螺仪和加速度计)
借助运动控制,游戏可以追踪控制器的物理旋转和移动。这可用于让玩家通过移动控制器来转动游戏内的相机视角,或通过摇晃控制器来执行特殊动作。
目前,已有多个控制器品牌在其现代手柄中集成了陀螺仪和加速度计传感器,其中最具代表性的两大品牌是 PlayStation 和 Nintendo。请注意,Xbox 手柄内部并未配备运动传感器。
要检查连接的手柄是否具备运动传感器,请使用 Input.has_joy_motion_sensors()。
默认情况下,运动传感器是禁用的,以避免在游戏不使用这些功能时消耗控制器的电池电量。要启用它们,请调用 Input.set_joy_motion_sensors_enabled()。
运动传感器报告的数值坐标轴始终相对于控制器的自然朝向。为了更清晰地说明,以下是坐标轴映射的示意图:
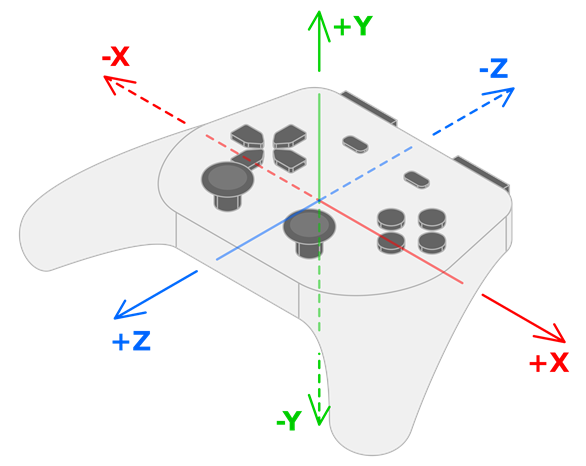
控制器的陀螺仪数值显示了其各自坐标轴上的旋转情况:
陀螺仪数据的 X 值表示绕 X 轴的旋转(滚转)。
陀螺仪数据的 Y 值表示绕 Y 轴的旋转(偏航)。
陀螺仪数据的 Z 值表示绕 Z 轴的旋转(俯仰)。
控制器的加速度计将以各自对应的方式提供以下数值:
左右移动分别报告为 +X 和 -X。
上下移动分别报告为 +Y 和 -Y。
远离和靠近用户移动分别报告为 +Z 和 -Z。
陀螺仪
陀螺仪 是一种用于检测控制器旋转的传感器。以下是陀螺仪在游戏中的几个典型应用示例:
在 Helldivers 2 、 Horizon Forbidden West 、 Star Wars: Dark Forces Remaster 以及 Fortnite 中,倾斜手柄会让游戏视角随之转动(也就是所谓的 "体感瞄准" )。This video by *Daven On The Moon* 更详细地演示并探讨了体感瞄准的相关细节。
在 《死亡搁浅》 中,轻轻转动手柄就能安抚 BB(小宝宝)。
下面的示例展示了如何使用手柄的陀螺仪传感器来旋转一个物体。你也可以通过查阅 Input.start_joy_motion_sensors_calibration() 的文档来查看这个示例。
const GYRO_SENSITIVITY = 10.0

func _ready():
    # In this example we only use the first connected joypad (id 0).
    if 0 not in Input.get_connected_joypads():
        return

    if not Input.has_joy_motion_sensors(0):
        return

    # We must enable the motion sensors before using them.
    Input.set_joy_motion_sensors_enabled(0, true)

    # (Tell the users here that they need to put their joypads on a flat surface and wait for confirmation.)

    # Start the calibration process.
    calibrate_motion()

func _process(delta):
    # Only move the object if the joypad motion sensors are calibrated.
    if Input.is_joy_motion_sensors_calibrated(0):
        move_object(delta)

func calibrate_motion():
    Input.start_joy_motion_sensors_calibration(0)

    # Wait for some time.
    await get_tree().create_timer(1.0).timeout

    Input.stop_joy_motion_sensors_calibration(0)
    # The joypad is now calibrated.

func move_object(delta):
    var node: Node3D = ... # Put your object here.

    var gyro := Input.get_joy_gyroscope(0)
    node.rotation.x -= -gyro.y * GYRO_SENSITIVITY * delta  # Use rotation around the Y axis (yaw) here.
    node.rotation.y += -gyro.x * GYRO_SENSITIVITY * delta  # Use rotation around the X axis (pitch) here.
需要注意的是,在使用陀螺仪的数据之前,我们必须先通过调用 Input.start_joy_motion_sensors_calibration() 和 Input.stop_joy_motion_sensors_calibration() 来对它进行校准。这是因为现代的陀螺仪通常都需要校准。这就好比电子秤需要校准来告诉它什么是 "零" 一样。就像电子秤一样,只有经过正确校准的陀螺仪才能给出准确的读数。在校准过程中,用户需要把手柄平放在一个平坦的表面上。手柄随后会测定它在实际完全静止不动时,陀螺仪所报告的数值(也就是它的 "偏差"),并利用这些信息来让它的旋转数据变得更加精准。
请参考 the article on GyroWiki 上的文章,了解如何将陀螺仪输入模拟为鼠标操作。
在启用手柄的陀螺仪并完成正确校准之后,你就可以通过调用 Input.get_joy_gyroscope() 来读取它上报的数值了。
加速度计
警告
不要试图用加速度计的数据来推算手柄在 3D 空间中的具体位置,因为一般的加速度计根本不够精准,做不到这一点。
加速度计 是一种能够检测手柄加速度(单位是 m/s²)的传感器。比如,当玩家快速举起手柄、向旁边挥动或者摇晃手柄时,它都能感应得到。
加速度计检测到的加速度默认是包含重力的。如果想 仅仅 获取由玩家施加(也就是你手部动作产生)的加速度,就需要从检测到的总加速度中减去重力的影响。
Input.get_joy_accelerometer(device) - Input.get_joy_gravity(device)
由于加速度计的物理工作原理,当朝某个方向的运动刚一停止,它几乎会立刻报告一个反方向的运动。因此,在检测到某个方向的运动后,你可能需要在短时间内忽略后续的读数,以避免误判这个反向运动。
下面的示例会在手柄被快速移动时,通过它的加速度计来打印出移动数据。如果你觉得(检测的)灵敏度不太合适,可以调整 THRESHOLD 这个常量,或者在下面的代码里直接换成别的数值。
var detect_accelerometer = true

# Change to make the game detect movement at different thresholds.
# With a lower value, smaller movements will be detected, and with a
# larger value, only big movements will be detected.
const THRESHOLD = 10.0

func _ready():
    # In this example, we only use the first connected joypad (ID 0).
    if 0 not in Input.get_connected_joypads():
        return

    if not Input.has_joy_motion_sensors(0):
        return

    # We must enable the motion sensors before using them.
    Input.set_joy_motion_sensors_enabled(0, true)

func _process(delta):
    if Input.has_joy_motion_sensors(0):
        accelerometer_example()

func accelerometer_example():
    if not detect_accelerometer:
        return

    var acceleration = Input.get_joy_accelerometer(0) - Input.get_joy_gravity(0)
    if acceleration.length() > THRESHOLD:
        if acceleration.x > THRESHOLD:
            print("Moved left")
        elif acceleration.x < -THRESHOLD:
            print("Moved right")
        if acceleration.y < -THRESHOLD:
            print("Moved up")
        elif acceleration.y > THRESHOLD:
            print("Moved down")
        if acceleration.z < -THRESHOLD:
            print("Moved closer to the player")
        elif acceleration.z > THRESHOLD:
            print("Moved away from the player")

        # After detecting movement in one direction, the accelerometer sensor
        # will briefly report movement in the opposite direction, even though the controller only moved once.
        # So we need to ignore these reported values for a short amount of time.
        detect_accelerometer = false
        await get_tree().create_timer(0.5, false).timeout
        detect_accelerometer = true