Attention: Here be dragons
This is the latest
(unstable) version of this documentation, which may document features
not available in or compatible with released stable versions of Godot.
Checking the stable version of the documentation...
Nodes and scene instances
This guide explains how to get nodes, create nodes, add them as a child, and instantiate scenes from code.
See also
Check the Creating instances tutorial to learn about Godot's approach to scene instancing.
Getting nodes
You can get a reference to a node by calling the Node.get_node() method. For this to work, the child node must be
present in the scene tree. Getting it in the parent node's _ready() function
guarantees that.
If, for example, you have a scene tree like this, and you want to get a reference to the Sprite2D and Camera2D nodes to access them in your script.
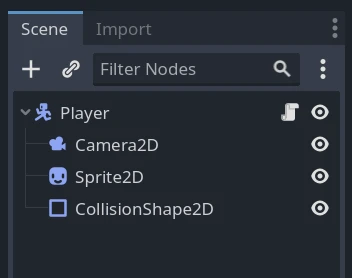
To do so, you can use the following code.
var sprite2d
var camera2d

func _ready():
    sprite2d = get_node("Sprite2D")
    camera2d = get_node("Camera2D")
private Sprite2D _sprite2D;
private Camera2D _camera2D;

public override void _Ready()
{
    base._Ready();

    _sprite2D = GetNode<Sprite2D>("Sprite2D");
    _camera2D = GetNode<Camera2D>("Camera2D");
}
Note that you get nodes using their name, not their type. Above, "Sprite2D" and "Camera2D" are the nodes' names in the scene.
If you rename the Sprite2D node as Skin in the Scene dock, you have to change the
line that gets the node to get_node("Skin") in the script.
Node paths
When getting a reference to a node, you're not limited to getting a direct child. The get_node() function
supports paths, a bit like when working with a file browser. Add a slash to
separate nodes.
Take the following example scene, with the script attached to the UserInterface node.
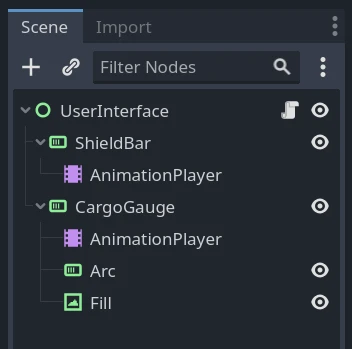
To get the AnimationPlayer node, you would use the following code.
var animation_player

func _ready():
    animation_player = get_node("ShieldBar/AnimationPlayer")
private AnimationPlayer _animationPlayer;

public override void _Ready()
{
    base._Ready();

    _animationPlayer = GetNode<AnimationPlayer>("ShieldBar/AnimationPlayer");
}
Note
As with file paths, you can use ".." to get a parent node. The best practice is to avoid doing that though not to break encapsulation. You can also start the path with a forward slash to make it absolute, in which case your topmost node would be "/root", the application's predefined root viewport.
Syntactic sugar
You can use two shorthands to shorten your code in GDScript. Firstly, putting the
@onready annotation before a member variable makes it initialize right before
the _ready() callback.
@onready var sprite2d = get_node("Sprite2D")
There is also a short notation for get_node(): the dollar sign, "$". You
place it before the name or path of the node you want to get.
@onready var sprite2d = $Sprite2D
@onready var animation_player = $ShieldBar/AnimationPlayer
Creating nodes
To create a node from code, call its new() method like for any other
class-based datatype.
You can store the newly created node's reference in a variable and call
add_child() to add it as a child of the node to which you attached the
script.
var sprite2d

func _ready():
    sprite2d = Sprite2D.new() # Create a new Sprite2D.
    add_child(sprite2d) # Add it as a child of this node.
private Sprite2D _sprite2D;

public override void _Ready()
{
    base._Ready();

    _sprite2D = new Sprite2D(); // Create a new Sprite2D.
    AddChild(_sprite2D); // Add it as a child of this node.
}
To delete a node and free it from memory, you can call its queue_free()
method. Doing so queues the node for deletion at the end of the current frame
after it has finished processing. At that point, the engine removes the node from
the scene and frees the object in memory.
sprite2d.queue_free()
_sprite2D.QueueFree();
Before calling sprite2d.queue_free(), the remote scene tree looks like this.
After the engine freed the node, the remote scene tree doesn't display the sprite anymore.
You can alternatively call free() to immediately destroy the node. You
should do this with care as any reference to it will instantly become null.
We recommend using queue_free() unless you know what you're doing.
When you free a node, it also frees all its children. Thanks to this, to delete an entire branch of the scene tree, you only have to free the topmost parent node.
Instancing scenes
Scenes are templates from which you can create as many reproductions as you'd like. This operation is called instancing, and doing it from code happens in two steps:
Loading the scene from the local drive.
Creating an instance of the loaded PackedScene resource.
var scene = load("res://my_scene.tscn")
var scene = GD.Load<PackedScene>("res://MyScene.tscn");
Preloading the scene can improve the user's experience as the load operation happens when the compiler reads the script and not at runtime. This feature is only available with GDScript.
var scene = preload("res://my_scene.tscn")
At that point, scene is a packed scene resource, not a node. To create the
actual node, you need to call PackedScene.instantiate(). It returns a tree of nodes that you can use
as a child of your current node.
var instance = scene.instantiate()
add_child(instance)
var instance = scene.Instantiate();
AddChild(instance);
The advantage of this two-step process is you can keep a packed scene loaded and create new instances on the fly. For example, to quickly instance several enemies or bullets.