Attention: Here be dragons
This is the latest
(unstable) version of this documentation, which may document features
not available in or compatible with released stable versions of Godot.
Checking the stable version of the documentation...
Using Fonts
Godot allows you to set specific fonts for different UI nodes.
There are three different places where you can setup font usage. The first is the theme editor. Choose the node you want to set the font for and select the font tab. The second is in the inspector for control nodes under Theme Overrides > Fonts. Lastly, in the inspector settings for themes under Default Font.
If no font override is specified anywhere, Open Sans SemiBold is used as the default project font.
Note
Since Godot 4.0, font sizes are no longer defined in the font itself but are instead defined in the node that uses the font. This is done in the Theme Overrides > Font Sizes section of the inspector.
This allows changing the font size without having to duplicate the font resource for every different font size.
There are 2 kinds of font files: dynamic (TTF/OTF/WOFF/WOFF2 formats) and
bitmap (BMFont .fnt format or monospaced image). Dynamic fonts are the
most commonly used option, as they can be resized and still look crisp at higher
sizes. Thanks to their vector-based nature, they can also contain a lot more
glyphs while keeping a reasonable file size compared to bitmap fonts. Dynamic
fonts also support some advanced features that bitmap fonts cannot support, such
as ligatures (several characters transforming into a single different design).
Tip
You can find freely licensed font files on websites such as Google Fonts and Font Library.
Fonts are covered by copyright. Double-check the license of a font before using it, as not all fonts allow commercial use without purchasing a license.
See also
You can see how fonts work in action using the BiDI and Font Features demo project.
Dynamic fonts
Godot supports the following dynamic font formats:
TrueType Font or Collection (
.ttf,.ttc)OpenType Font or Collection (
.otf,.otc)Web Open Font Format 1 (
.woff)Web Open Font Format 2 (
.woff2)
While .woff and especially .woff2 tend to result in smaller file sizes,
there is no universally "better" font format. In most situations, it's
recommended to use the font format that was shipped on the font developer's
website.
Bitmap fonts
Godot supports the BMFont (.fnt) bitmap font format. This is a format created
by the BMFont program. Many
BMFont-compatible programs also exist, like BMGlyph or web-based fontcutter.
Alternatively, you can import any image to be used as a bitmap font. To do so, select the image in the FileSystem dock, go to the Import dock, change its import type to Font Data (Image Font) then click Reimport:
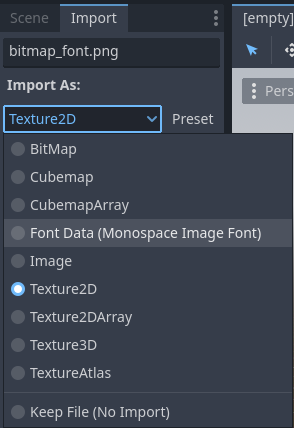
Changing import type to Font Data (Image Font)
The font's character set layout can be in any order, but orders that match standard Unicode are recommended as they'll require far less configuration to import. For example, the bitmap font below contains ASCII characters and follows standard ASCII ordering:
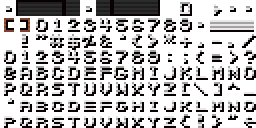
Credit: LibreQuake (scaled and cropped to exclude extended range)
The following import options can be used to import the above font image successfully:
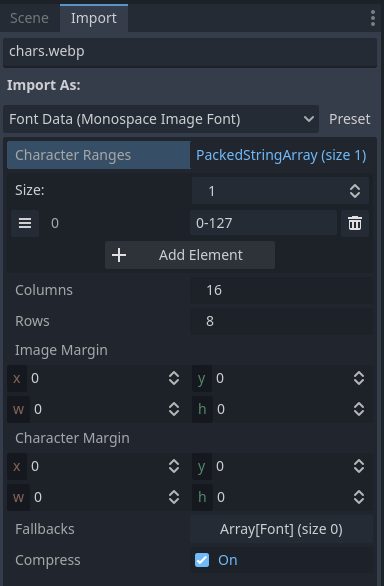
Import options to use for the above example font
The Character Ranges option is an array that maps each position on the image
(in tile coordinates, not pixels). The font atlas is traversed from left to
right and top to bottom. Characters can be specified with decimal numbers
(127), hexadecimal numbers (0x007f) or between single quotes
('~'). Ranges can be specified with a hyphen between characters.
For instance, 0-127 (or 0x0000-0x007f) denotes the full ASCII range.
As another example, ' '-'~' is equivalent to 32-127 and denotes the range
of printable (visible) ASCII characters.
Make sure the Character Ranges option doesn't exceed the number of Columns × Rows defined. Otherwise, the font will fail to import.
If your font image contains margins not used for font glyphs (such as attribution information), try adjusting Image Margin. This is a margin applied only once around the whole image.
If your font image contains guides (in the form of lines between glyphs) or if spacing between characters appears incorrect, try adjusting Character Margin. This margin is applied for every imported glyph.
If you need finer control over character spacing than what the Character Margin options provide, you have more options.
For one, Character Ranges supports 3 additional arguments after the specified range of characters. These additional arguments control their positioning and spacing. They represent space advance, X axis offset, and Y axis offset in that order. They will change the space advance and offset of each character by the amount of pixels written. Space advance is most useful if, for example, your lowercase letters are thinner than your uppercase letters.

Do note that the offsets can cause your text to be cropped off the edge of your label boundaries.
Secondly, you can also set up Kerning Pairs for individual characters. Specify your kerning pair by typing two sets of characters separated by a space, then followed by another space, a number to specify how many extra/less pixels to space those two sets of characters when placed next to each other.

If needed, your kerning pair characters can be specified by Unicode character code
by entering \uXXXX where XXXX is the hexadecimal value of the Unicode character.
Loading a font file
To load a font file (dynamic or bitmap), use the resource dropdown's Quick Load or Load option next to a font property, then navigate to the font file in question:
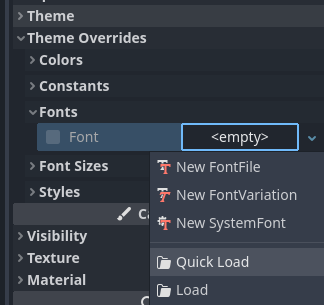
Loading a font file
You can also drag-and-drop a font file from the FileSystem dock to the inspector property that accepts a Font resource.
Warning
In Godot 4.0 and later, texture filter and repeat properties are defined in the location where the texture is used, rather than on the texture itself. This also applies to fonts (both dynamic fonts and bitmap fonts).
Fonts that have a pixel art appearance should have bilinear filtering disabled by changing the Rendering > Textures > Canvas Textures > Default Texture Filter project setting to Nearest.
The font size must also be an integer multiple of the design size (which varies on a per-font basis), and the Control node using the font must be scaled by an integer multiple as well. Otherwise, the font may look blurry. Font sizes in Godot are specified in pixels (px), not points (pt). Keep this in mind when comparing font sizes across different software.
The texture filter mode can also be set on individual nodes that inherit from CanvasItem by setting CanvasItem.texture_filter.
Font outlines and shadows
Font outlines and shadows can be used to improve readability when the background color isn't known in advance. For instance, this is the case for HUD elements that are drawn over a 2D/3D scene.
Font outlines are available in most nodes that derive from Control, in addition to Label3D.
To enable outline for a font on a given node, configure the theme overrides Font Outline Color and Outline Size in the inspector. The result should look like this:

Font outline example
Note
If using a font with MSDF rendering, its MSDF Pixel Range import option be set to at least twice the value of the outline size for outline rendering to look correct. Otherwise, the outline may appear to be cut off earlier than intended.
Support for font shadows is more limited: they are only available in Label and RichTextLabel. Additionally, font shadows always have a hard edge (but you can reduce their opacity to make them look more subtle). To enable font shadows on a given node, configure the Font Shadow Color, Shadow Offset X, and Shadow Offset Y theme overrides in a Label or RichTextLabel node accordingly:
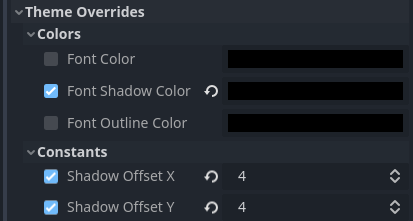
Configuring font shadow in a Label node
The result should look like this:

Font shadow example
Tip
You can create local overrides to font display in Label nodes by creating a LabelSettings resource that you reuse across Label nodes. This resource takes priority over theme properties.
Advanced font features
Antialiasing
You can adjust how the font should be smoothed out when rendering by adjusting antialiasing and hinting. These are different properties, with different use cases.
Antialiasing controls how glyph edges should be smoothed out when rasterizing the font. The default antialiasing method (Grayscale) works well on every display technology. However, at small sizes, grayscale antialiasing may result in fonts looking blurry.
The antialiasing sharpness can be improved by using LCD subpixel optimization, which exploits the subpixel patterns of most LCD displays by offsetting the font antialiasing on a per-channel basis (red/green/blue). The downside is that this can introduce "fringing" on edges, especially on display technologies that don't use standard RGB subpixels (such as OLED displays).
In most games, it's recommended to stick to the default Grayscale antialiasing. For non-game applications, LCD subpixel optimization is worth exploring.
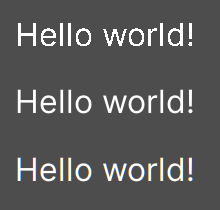
From top to bottom: Disabled, Grayscale, LCD Subpixel (RGB)
Note
Antialiasing cannot be changed on MSDF-rendered fonts – these are always rendered with grayscale antialiasing.
Hinting
Hinting controls how aggressively glyph edges should be snapped to pixels when rasterizing the font. None results in the smoothest appearance, which can make the font look blurry at small sizes. Light (default) is sharper by snapping glyph edges to pixels on the Y axis only, while Full is even sharper by snapping glyph edges to pixels on both X and Y axes. Depending on personal preference, you may prefer using one hinting mode over the other.
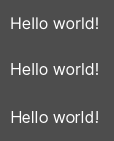
From top to bottom: None, Light, Full hinting
Note
If changing the hinting mode has no visible effect after clicking Reimport, it's usually because the font doesn't include hinting instructions. This can be resolved by looking for a version of the font file that includes hinting instructions, or enabling Force Autohinter in the Import dock. This will use FreeType's autohinter to automatically add hinting instructions to the imported font.
Subpixel positioning
Subpixel positioning can be adjusted. This is a FreeType feature that allows glyphs to be rendered more closely to their intended form. The default setting of Auto automatically enables subpixel positioning at small sizes, but disables it at large font sizes to improve rasterization performance.
You can force the subpixel positioning mode to Disabled, One half of a pixel or One quarter of a pixel. One quarter of a pixel provides the best quality, at the cost of longer rasterization times.
Changing antialiasing, hinting and subpixel positioning has the most visible effect at smaller font sizes.
Warning
Fonts that have a pixel art appearance should have their subpixel positioning mode set to Disabled. Otherwise, the font may appear to have uneven pixel sizes.
This step is not required for bitmap fonts, as subpixel positioning is only relevant for dynamic fonts (which are usually made of vector elements).
Mipmaps
By default, fonts do not have mipmaps generated to reduce memory usage and speed
up rasterization. However, this can cause downscaled fonts to become grainy. This
can be especially noticeable with 3D text that doesn't have Fixed
Size enabled. This can also occur when displaying text with a traditional rasterized
(non-MSDF) font in a Control node that has its scale
lower than (1, 1).
After selecting a font in the FileSystem dock, you can enable the Mipmaps in the Import dock to improve downscaled font rendering appearance.
Mipmaps can be enabled on MSDF fonts as well. This can improve font rendering quality a little at smaller-than-default sizes, but MSDF fonts are already resistant to graininess out of the box.
MSDF font rendering
Multi-channel signed distance field (MSDF) font rendering allows rendering fonts at any size, without having to re-rasterize them when their size changes.
MSDF font rendering has 2 upsides over traditional font rasterization, which Godot uses by default:
The font will always look crisp, even at huge sizes.
There is less stuttering when rendering characters at large font sizes for the first time, as there is no rasterization performed.
The downsides of MSDF font rendering are:
Higher baseline cost for font rendering. This is usually not noticeable on desktop platforms, but it can have an impact on low-end mobile devices.
Fonts at small sizes will not look as clear as rasterized fonts, due to the lack of hinting.
Rendering new glyphs for the first time at small font sizes may be more expensive compared to traditional rasterized fonts. Font prerendering can be used to alleviate this.
LCD subpixel optimization cannot be enabled for MSDF fonts.
Fonts with self-intersecting outlines will not render correctly in MSDF mode. If you notice rendering issues on fonts downloaded from websites such as Google Fonts, try downloading the font from the font author's official website instead.
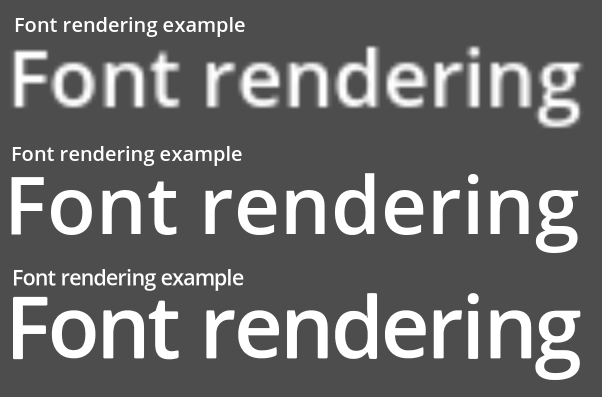
Comparison of font rasterization methods. From top to bottom: rasterized without oversampling, rasterized with oversampling, MSDF
To enable MSDF rendering for a given font, select it in the FileSystem dock, go to the Import dock, enable Multichannel Signed Distance Field, then click Reimport:
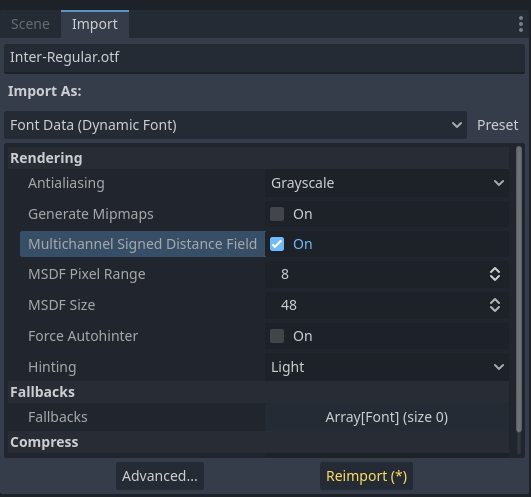
Enabling MSDF in the font's import options
Using emoji
Godot has limited support for emoji fonts:
CBDT/CBLC (embedded PNGs) and SVG emoji fonts are supported.
COLR/CPAL emoji fonts (custom vector format) are not supported.
EMJC bitmap image compression (used by iOS' system emoji font) is not supported. This means that to support emoji on iOS, you must use a custom font that uses SVG or PNG bitmap compression instead.
For Godot to be able to display emoji, the font used (or one of its fallbacks) needs to include them. Otherwise, emoji won't be displayed and placeholder "tofu" characters will appear instead:

Default appearance when trying to use emoji in a label
After adding a font to display emoji such as Noto Color Emoji, you get the expected result:

Correct appearance after adding an emoji font to the label
To use a regular font alongside emoji, it's recommended to specify a fallback font that points to the emoji font in the regular font's advanced import options. If you wish to use the default project font while displaying emoji, leave the Base Font property in FontVariation empty while adding a font fallback pointing to the emoji font:
Tip
Emoji fonts are quite large in size, so you may want to load a system font to provide emoji glyphs rather than bundling it with your project. This allows providing full emoji support in your project without increasing the size of its exported PCK. The downside is that emoji will look different depending on the platform, and loading system fonts is not supported on all platforms.
It's possible to use a system font as a fallback font too.
Using icon fonts
Tools like Fontello can be used to generate font files containing vectors imported from SVG files. This can be used to render custom vector elements as part of your text, or to create extruded 3D icons with 3D text and TextMesh.
Note
Fontello currently does not support creating multicolored fonts (which Godot can render). As of November 2022, support for multicolored fonts in icon font generation tools remains scarce.
Depending on your use cases, this may lead to better results compared to using
the img tag in RichTextLabel. Unlike
bitmap images (including SVGs which are rasterized on import by Godot),
true vector data can be resized to any size without losing quality.
After downloading the generated font file, load it in your Godot project then specify it as a custom font for a Label, RichTextLabel or Label3D node. Switch over to the Fontello web interface, then copy the character by selecting it then pressing Ctrl + C (Cmd + C on macOS). Paste the character in the Text property of your Label node. The character will appear as a placeholder glyph in the inspector, but it should appear correctly in the 2D/3D viewport.
To use an icon font alongside a traditional font in the same Control, you can specify the icon font as a fallback. This works because icon fonts use the Unicode private use area, which is reserved for use by custom fonts and doesn't contain standard glyphs by design.
Note
Several modern icon fonts such as Font Awesome 6
have a desktop variant that uses ligatures to specify icons. This allows you to
specify icons by entering their name directly in the Text property of any
node that can display fonts. Once the icon's name is fully entered as text
(such as house), it will be replaced by the icon.
While easier to use, this approach cannot be used with font fallbacks as the main font's characters will take priority over the fallback font's ligatures.
Font fallbacks
Godot supports defining one or more fallbacks when the main font lacks a glyph to be displayed. There are 2 main use cases for defining font fallbacks:
Use a font that only supports Latin character sets, but use another font to be able to display text another character set such as Cyrillic.
Use a font to render text, and another font to render emoji or icons.
Open the Advanced Import Settings dialog by double-clicking the font file in the FileSystem dock. You can also select the font in the FileSystem dock, go to the Import dock then choose Advanced… at the bottom:
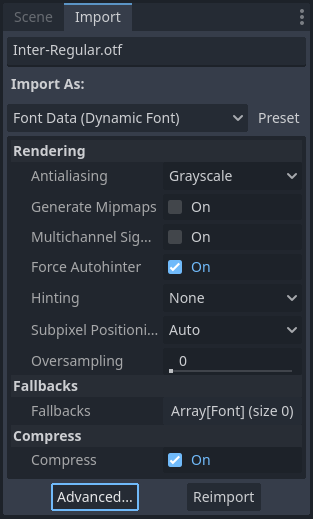
Import dock
In the dialog that appears, look for Fallbacks section on the sidebar on the right, click the Array[Font] (size 0) text to expand the property, then click Add Element:
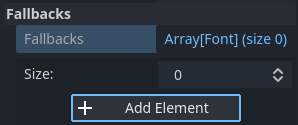
Adding font fallback
Click the dropdown arrow on the new element, then choose a font file using the Quick Load or Load options:
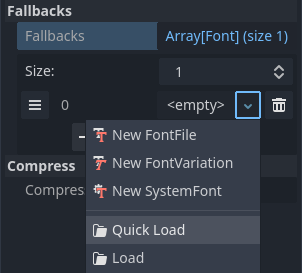
Loading font fallback
It is possible to add fallback fonts while using the default project font. To do so, leave the Base Font property empty while adding one or more font fallbacks.
Note
Font fallbacks can also be defined on a local basis similar to OpenType font features, but this is not covered here for brevity reasons.
Variable fonts
Godot has full support for variable fonts, which allow you to use a single font file to represent various font weights and styles (regular, bold, italic, …). This must be supported by the font file you're using.
To use a variable font, create a FontVariation resource in the location where you intend to use the font, then load a font file within the FontVariation resource:
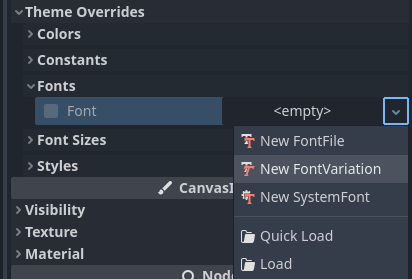
Creating a FontVariation resource
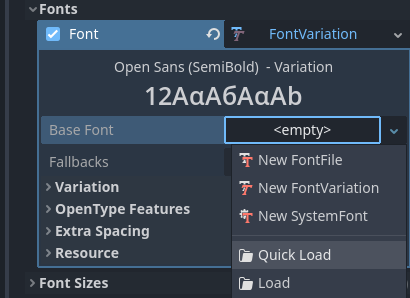
Loading a font file into the FontVariation resource
Scroll down to the FontVariation's Variation section, then click the Variation Coordinates text to expand the list of axes that can be adjusted:
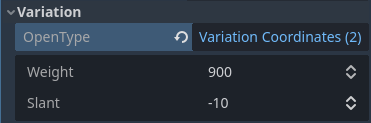
List of variation axes
The set of axes you can adjust depends on the font loaded. Some variable fonts only support one axis of adjustment (typically weight or slant), while others may support multiple axes of adjustment.
For example, here's the Inter V font with a
weight of 900 and a slant of -10:

Variable font example (Inter V)
Tip
While variable font axis names and scales aren't standardized, some common conventions are usually followed by font designers. The weight axis is standardized in OpenType to work as follows:
Axis value |
Effective font weight |
|---|---|
|
Thin (Hairline) |
|
Extra Light (Ultra Light) |
|
Light |
|
Regular (Normal) |
|
Medium |
|
Semi-Bold (Demi-Bold) |
|
Bold |
|
Extra Bold (Ultra Bold) |
|
Black (Heavy) |
|
Extra Black (Ultra Black) |
You can save the FontVariation to a .tres resource file to reuse it in other
places:
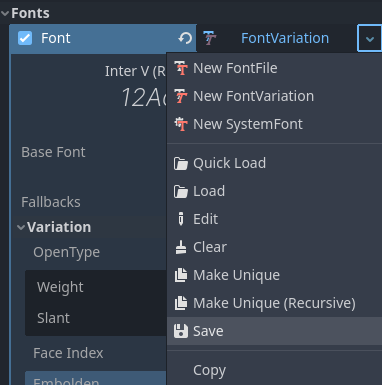
Saving FontVariation to an external resource file
Faux bold and italic
When writing text in bold or italic, using font variants specifically designed for this looks better. Spacing between glyphs will be more consistent when using a bold font, and certain glyphs' shapes may change entirely in italic variants (compare "a" and "a").
However, real bold and italic fonts require shipping more font files, which increases distribution size. A single variable font file can also be used, but this file will be larger than a single non-variable font. While file size is usually not an issue for desktop projects, it can be a concern for mobile/web projects that strive to keep distribution size as low as possible.
To allow bold and italic fonts to be displayed without having to ship additional fonts (or use a variable font that is larger in size), Godot supports faux bold and italic.
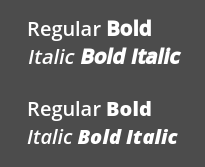
Faux bold/italic (top), real bold/italic (bottom). Normal font used: Open Sans SemiBold
Faux bold and italic is automatically used in RichTextLabel's bold and italic tags if no custom fonts are provided for bold and/or italic.
To use faux bold, create a FontVariation resource in a property where a Font
resource is expected. Set Variation > Embolden to a positive value to make a
font bolder, or to a negative value to make it less bold. Recommended values are
between 0.5 and 1.2 depending on the font.
Faux italic is created by skewing the text, which is done by modifying the
per-character transform. This is also provided in FontVariation using the
Variation > Transform property. Setting the yx component of the
character transform to a positive value will italicize the text. Recommended
values are between 0.2 and 0.4 depending on the font.
Adjusting font spacing
For stylistic purposes or for better readability, you may want to adjust how a font is presented in Godot.
Create a FontVariation resource in a property where a Font resource is expected. There are 4 properties available in the Variation > Extra Spacing section, which accept positive and negative values:
Glyph: Additional spacing between every glyph.
Space: Additional spacing between words.
Top: Additional spacing above glyphs. This is used for multiline text, but also to calculate the minimum size of controls such as Label and Button.
Bottom: Additional spacing below glyphs. This is used for multiline text, but also to calculate the minimum size of controls such as Label and Button.
The Variation > Transform property can also be adjusted to stretch
characters horizontally or vertically. This is specifically done by adjusting
the xx (horizontal scale) and yy (vertical scale) components. Remember
to adjust glyph spacing to account for any changes, as glyph transform doesn't
affect how much space each glyph takes in the text. Non-uniform scaling of this
kind should be used sparingly, as fonts are generally not designed to be
displayed with stretching.
OpenType font features
Godot supports enabling OpenType font features, which are a standardized way to
define alternate characters that can be toggled without having to swap font
files entirely. Despite being named OpenType font features, these are also
supported in TrueType (.ttf) and WOFF/WOFF2 font files.
Support for OpenType features highly depends on the font used. Some fonts don't support any OpenType features, while other fonts can support dozens of toggleable features.
There are 2 ways to use OpenType font features:
Globally on a font file
Open the Advanced Import Settings dialog by double-clicking the font file in the FileSystem dock. You can also select the font in the FileSystem dock, go to the Import dock then choose Advanced… at the bottom:
Import dock
In the dialog that appears, look for the Metadata Overrides > OpenType Features section on the sidebar on the right, click the Features (0 of N set) text to expand the property, then click Add Feature:
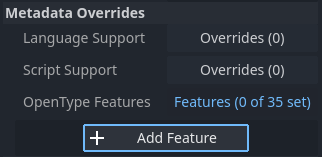
OpenType feature overrides in Advanced Import Settings
In a specific font usage (FontVariation)
To use a font feature, create a FontVariation resource like you would do for a variable font, then load a font file within the FontVariation resource:
Creating a FontVariation resource
Loading a font file into a FontVariation resource
Scroll down to the FontVariation's OpenType Features section, click the Features (0 of N set) text to expand the property, then click Add Feature and select the desired feature in the dropdown:
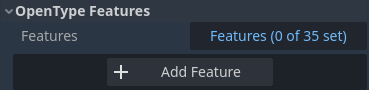
Specifying OpenType features in a FontVariation resource
For example, here's the Inter font without the Slashed Zero feature (top), then with the Slashed Zero OpenType feature enabled (bottom):
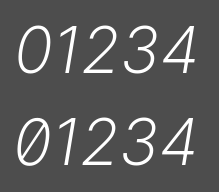
OpenType feature comparison (Inter)
You can disable ligatures and/or kerning for a specific font by adding OpenType features, then unchecking them in the inspector:
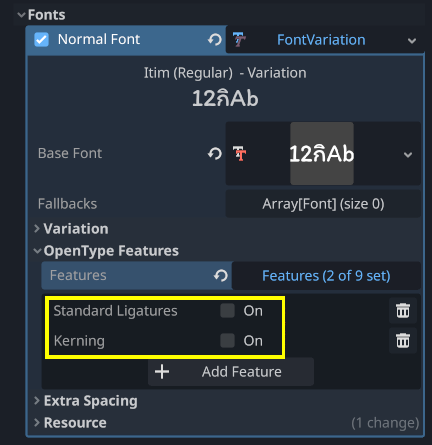
Disabling ligatures and kerning for a font
System fonts
Warning
Loading system fonts is only supported on Windows, macOS, Linux, Android and iOS.
However, loading system fonts on Android is unreliable as there is no official API for doing so. Godot has to rely on parsing system configuration files, which can be modified by third-party Android vendors. This may result in non-functional system font loading.
System fonts are a different type of resource compared to imported fonts. They are never actually imported into the project, but are loaded at runtime. This has 2 benefits:
The fonts are not included within the exported PCK file, leading to a smaller file size for the exported project.
Since fonts are not included with the exported project, this avoids licensing issues that would occur if proprietary system fonts were distributed alongside the project.
The engine automatically uses system fonts as fallback fonts, which makes it possible to display CJK characters and emoji without having to load a custom font. There are some restrictions that apply though, as mentioned in the Using emoji section.
Create a SystemFont resource in the location where you desire to use the system font:
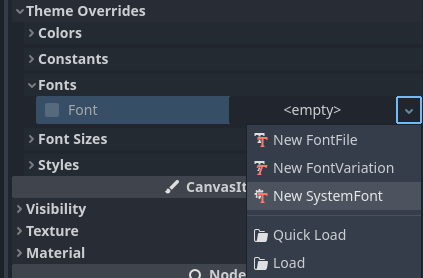
Creating a SystemFont resource
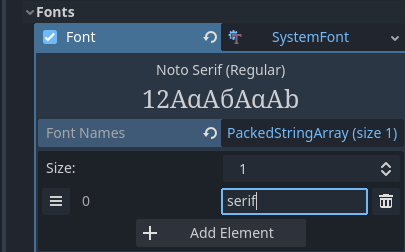
Specifying a font name to use in a SystemFont resource
You can either specify one or more font names explicitly (such as Arial), or
specify the name of a font alias that maps to a "standard" default font for
the system:
Font alias |
Windows |
macOS/iOS |
Linux |
Android |
|---|---|---|---|---|
|
Arial |
Helvetica |
Handled by fontconfig |
Roboto / Noto Sans |
|
Times New Roman |
Times |
Handled by fontconfig |
Noto Serif |
|
Courier New |
Courier |
Handled by fontconfig |
Droid Sans Mono |
|
Comic Sans MS |
Apple Chancery |
Handled by fontconfig |
Dancing Script |
|
Gabriola |
Papyrus |
Handled by fontconfig |
Droid Sans Mono |
On Android, Roboto is used for Latin/Cyrillic text and Noto Sans is used for other languages' glyphs such as CJK. On third-party Android distributions, the exact font selection may differ.
If specifying more than one font, the first font that is found on the system will be used (from top to bottom). Font names and aliases are case-insensitive on all platforms.
Like for font variations, you can save the SystemFont arrangement to a resource file to reuse it in other places.
Remember that different system fonts have different metrics, which means that text that can fit within a rectangle on one platform may not be doing so on another platform. Always reserve some additional space during development so that labels can extend further if needed.
Note
Unlike Windows and macOS/iOS, the set of default fonts shipped on Linux depends on the distribution. This means that on different Linux distributions, different fonts may be displayed for a given system font name or alias.
It is also possible to load fonts at runtime even if they aren't installed on the system. See Runtime loading and saving for details.
Font prerendering
When using traditional rasterized fonts, Godot caches glyphs on a per-font and per-size basis. This reduces stuttering, but it can still occur the first time a glyph is displayed when running the project. This can be especially noticeable at higher font sizes or on mobile devices.
When using MSDF fonts, they only need to be rasterized once to a special signed distance field texture. This means caching can be done purely on a per-font basis, without taking the font size into consideration. However, the initial rendering of MSDF fonts is slower compared to a traditional rasterized font at a medium size.
To avoid stuttering issues related to font rendering, it is possible to prerender certain glyphs. This can be done for all glyphs you intend to use (for optimal results), or only for common glyphs that are most likely to appear during gameplay (to reduce file size). Glyphs that aren't pre-rendered will be rasterized on-the-fly as usual.
Note
In both cases (traditional and MSDF), font rasterization is done on the CPU. This means that the GPU performance doesn't affect how long it takes for fonts to be rasterized.
Open the Advanced Import Settings dialog by double-clicking the font file in the FileSystem dock. You can also select the font in the FileSystem dock, go to the Import dock then choose Advanced… at the bottom:
Import dock
Move to the Pre-render Configurations tab of the Advanced Import Settings dialog, then add a configuration by clicking the "plus" symbol:

Adding a new prerendering configuration in the Advanced Import Settings dialog
After adding a configuration, make sure it is selected by clicking its name once. You can also rename the configuration by double-clicking it.
There are 2 ways to add glyphs to be prerendered to a given configuration. It is possible to use both approaches in a cumulative manner:
Using text from translations
For most projects, this approach is the most convenient to use, as it automatically sources text from your language translations. The downside is that it can only be used if your project supports internationalization. Otherwise, stick to the "Using custom text" approach described below.
After adding translations to the Project Settings, use the Glyphs from the Translations tab to check translations by double-clicking them, then click Shape All Strings in the Translations and Add Glyphs at the bottom:
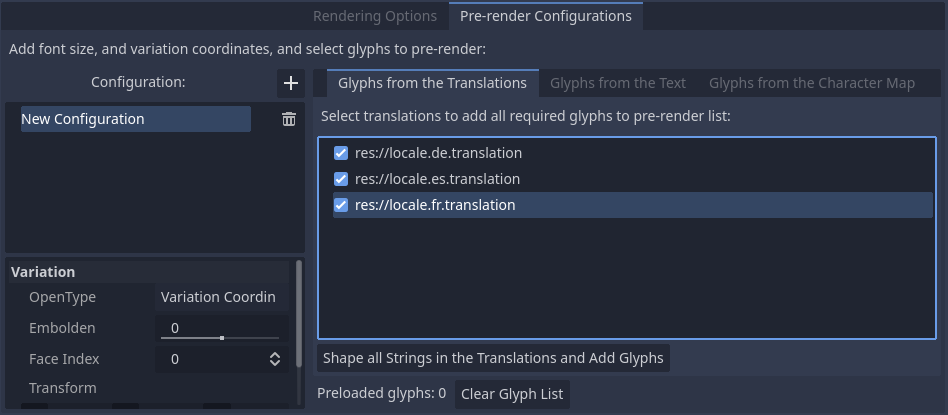
Enabling prerendering in the Advanced Import Settings dialog with the Glyphs from the Translations tab
Note
The list of prerendered glyphs is not automatically updated when translations are updated, so you need to repeat this process if your translations have changed significantly.
Using custom text
While it requires manually specifying text that will appear in the game, this is the most efficient approach for games which don't feature user text input. This approach is worth exploring for mobile games to reduce the file size of the distributed app.
To use existing text as a baseline for prerendering, go to the Glyphs from the Text sub-tab of the Advanced Import Settings dialog, enter text in the window on the right, then click Shape Text and Add Glyphs at the bottom of the dialog:
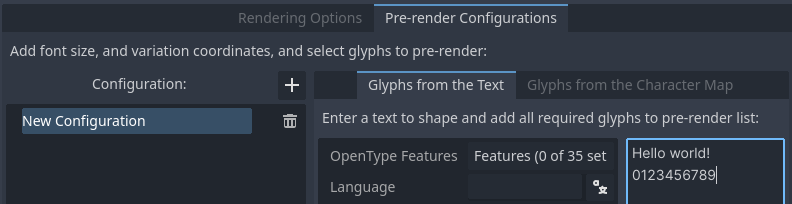
Enabling prerendering in the Advanced Import Settings dialog with the Glyphs from the Text tab
Tip
If your project supports internationalization, you can paste the contents of your CSV or PO files in the above box to quickly prerender all possible characters that may be rendered during gameplay (excluding user-provided or non-translatable strings).
By enabling character sets
The second method requires less configuration and fewer updates if your game's text changes, and is more suited to text-heavy games or multiplayer games with chat. On the other hand, it may cause glyphs that never show up in the game to be prerendered, which is less efficient in terms of file size.
To use existing text as a baseline for prerendering, go to the Glyphs from the Character Map sub-tab of the Advanced Import Settings dialog, then double-click character sets to be enabled on the right:
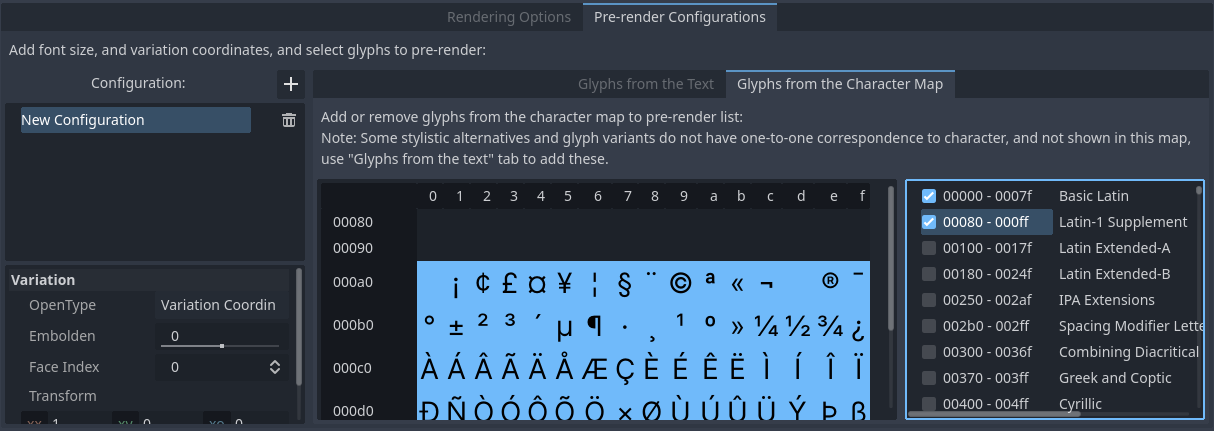
Enabling prerendering in the Advanced Import Settings dialog with the Glyphs from the Character Map tab
To ensure full prerendering, the character sets you need to enable depend on which languages are supported in your game. For English, only Basic Latin needs to be enabled. Enabling Latin-1 Supplement as well allows fully covering many more languages, such as French, German and Spanish. For Russian, Cyrillic needs to be enabled, and so on.
Default project font properties
In the GUI > Theme section of the advanced Project Settings, you can choose how the default font should be rendered:
Default Font Antialiasing: Controls the antialiasing method used for the default project font.
Default Font Hinting: Controls the hinting method used for the default project font.
Default Font Subpixel Positioning: Controls the subpixel positioning method for the default project font.
Default Font Multichannel Signed Distance Field: If
true, makes the default project font use MSDF font rendering instead of traditional rasterization.Default Font Generate Mipmaps: If
true, enables mipmap generation and usage for the default project font.
Note
These project settings only affect the default project font (the one that is hardcoded in the engine binary).
Custom fonts' properties are governed by their respective import options instead. You can use the Import Defaults section of the Project Settings dialog to override default import options for custom fonts.