Attention: Here be dragons
This is the latest
(unstable) version of this documentation, which may document features
not available in or compatible with released stable versions of Godot.
Checking the stable version of the documentation...
Standard Material 3D and ORM Material 3D
Introduction
StandardMaterial3D and ORMMaterial3D (Occlusion, Roughness, Metallic)
are default 3D materials that aim to provide most of the features artists look
for in a material, without the need for writing shader code. However, they can
be converted to shader code if additional functionality is needed.
This tutorial explains the parameters present in both materials.
There are 4 ways to add these materials to an object. A material can be added in the Material property of the mesh. It can be added in the Material property of the node using the mesh (such as a MeshInstance3D node), the Material Override property of the node using the mesh, and the Material Overlay.
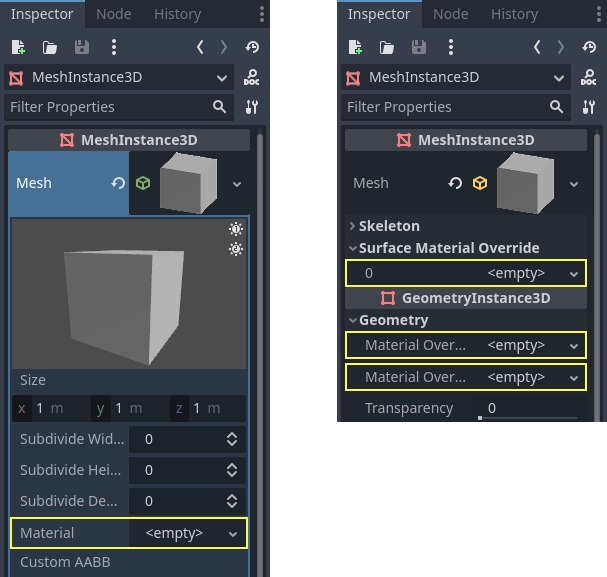
If you add a material to the mesh itself, every time that mesh is used it will have that material. If you add a material to the node using the mesh, the material will only be used by that node, it will also override the material property of the mesh. If a material is added in the Material Override property of the node, it will only be used by that node. It will also override the regular material property of the node and the material property of the mesh.
The Material Overlay property will render a material over the current one being used by the mesh. As an example, this can be used to put a transparent shield effect on a mesh.
BaseMaterial 3D settings
StandardMaterial3D has many settings that determine the look of a material. All of these are under the BaseMaterial3D category

ORM materials are almost exactly the same with one difference. Instead of separate settings and textures for occlusion, roughness, and metallic, there is a single ORM texture. The different color channels of that texture are used for each parameter. Programs such as Substance Painter and Armor Paint will give you the option to export in this format, for these two programs it's with the export preset for unreal engine, which also uses ORM textures.
Transparency
By default, materials in Godot are opaque. This is fast to render, but it means the material can't be seen through even if you use a transparent texture in the Albedo > Texture property (or set Albedo > Color to a transparent color).
To be able to see through a material, the material needs to be made transparent. Godot offers several transparency modes:
Disabled: Material is opaque. This is the fastest to render, with all rendering features supported.
Alpha: Material is transparent. Semi-transparent areas are drawn with blending. This is slow to render, but it allows for partial transparency (also known as translucency). Materials using alpha blending also can't cast shadows, and are not visible in screen-space reflections.
Alpha is a good fit for particle effects and VFX.
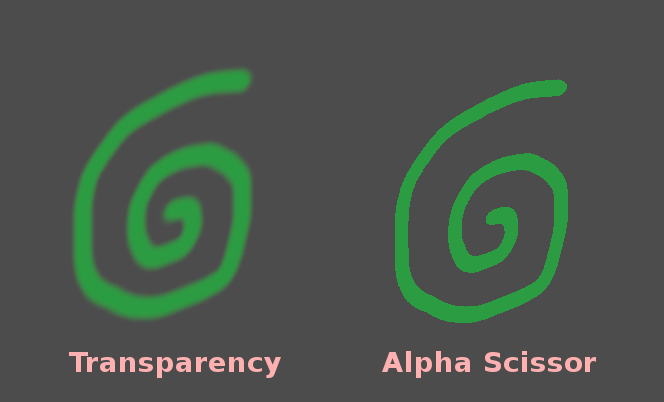
Alpha Scissor: Material is transparent. Semi-transparent areas whose opacity is below Alpha Scissor Threshold are not drawn (above this opacity, these are drawn as opaque). This is faster to render than Alpha and doesn't exhibit transparency sorting issues. The downside is that this results in "all or nothing" transparency, with no intermediate values possible. Materials using alpha scissor can cast shadows.
Alpha Scissor is ideal for foliage and fences, since these have hard edges and require correct sorting to look good.
Alpha Hash: Material is transparent. Semi-transparent areas are drawn using dithering. This is also "all or nothing" transparency, but dithering helps represent partially opaque areas with limited precision depending on viewport resolution. Materials using alpha hash can cast shadows.
Alpha Hash is suited for realistic-looking hair, although stylized hair may work better with alpha scissor.
Depth Pre-Pass: This renders the object's fully opaque pixels via the opaque pipeline first, then renders the rest with alpha blending. This allows transparency sorting to be mostly correct (albeit not fully so, as partially transparent regions may still exhibit incorrect sorting). Materials using depth prepass can cast shadows.
Note
Godot will automatically force the material to be transparent with alpha blending if any of these conditions is met:
Setting the transparency mode to Alpha (as described here).
Setting a blend mode other than the default Mix
Enabling Refraction, Proximity Fade, or Distance Fade.
Comparison between alpha blending (left) and alpha scissor (right) transparency:
Warning
Alpha-blended transparency has several limitations:
Alpha-blended materials are significantly slower to render, especially if they overlap.
Alpha-blended materials may exhibit sorting issues when transparent surfaces overlap each other. This means that surfaces may render in the incorrect order, with surfaces in the back appearing to be in front of those which are actually closer to the camera.
Alpha-blended materials don't cast shadows, although they can receive shadows.
Alpha-blended materials don't appear in any reflections (other than reflection probes).
Screen-space reflections and sharp SDFGI reflections don't appear on alpha-blended materials. When SDFGI is enabled, rough reflections are used as a fallback regardless of material roughness.
Before using the Alpha transparency mode, always consider whether another transparency mode is more suited for your needs.
Alpha Antialiasing
Note
This property is only visible when the transparency mode is Alpha Scissor or Alpha Hash.
While alpha scissor and alpha hash materials are faster to render than alpha-blended materials, they exhibit hard edges between opaque and transparent regions. While it's possible to use post-processing-based antialiasing techniques such as FXAA and TAA, this is not always desired as these techniques tend to make the final result look blurrier or exhibit ghosting artifacts.
There are 3 alpha antialiasing modes available:
Disabled: No alpha antialiasing. Edges of transparent materials will appear aliased unless a post-processing-based antialiasing solution is used.
Alpha Edge Blend: Results in a smooth transition between opaque and transparent areas. Also known as "alpha to coverage".
Alpha Edge Clip: Results in a sharp, but still antialiased transition between opaque and transparent areas. Also known as "alpha to coverage + alpha to one".
When the alpha antialiasing mode is set to Alpha Edge Blend or Alpha Edge
Clip, a new Alpha Antialiasing Edge property becomes visible below in the
inspector. This property controls the threshold below which pixels should be
made transparent. While you've already defined an alpha scissor threshold (when
using Alpha Scissor only), this additional threshold is used to smoothly
transition between opaque and transparent pixels. Alpha Antialiasing Edge
must always be set to a value that is strictly below the alpha scissor
threshold. The default of 0.3 is a sensible value with an alpha scissor of
threshold of 0.5, but remember to adjust this alpha antialiasing edge when
modifying the alpha scissor threshold.
If you find the antialiasing effect not effective enough, try increasing Alpha Antialiasing Edge while making sure it's below Alpha Scissor Threshold (if the material uses alpha scissor). On the other hand, if you notice the texture's appearance visibly changing as the camera moves closer to the material, try decreasing Alpha Antialiasing Edge.
Important
For best results, MSAA 3D should be set to at least 2× in the Project Settings when using alpha antialiasing. This is because this feature relies on alpha to coverage, which is a feature provided by MSAA.
Without MSAA, a fixed dithering pattern is applied on the material's edges, which isn't very effective at smoothing out edges (although it can still help a little).
Blend Mode
Controls the blend mode for the material. Keep in mind that any mode other than Mix forces the object to go through the transparent pipeline.
Mix: Default blend mode, alpha controls how much the object is visible.
Add: The final color of the object is added to the color of the screen, nice for flares or some fire-like effects.
Subtract: The final color of the object is subtracted from the color of the screen.
Multiply: The final color of the object is multiplied with the color of the screen.
Premultiplied Alpha: The color of the object is expected to have already been multiplied by the alpha. This behaves like Add when the alpha is
0.0(fully transparent) and like Mix when the alpha is1.0(opaque).
Cull Mode
Determines which side of the object is not drawn when backfaces are rendered:
Back: The back of the object is culled when not visible (default).
Front: The front of the object is culled when not visible.
Disabled: Used for objects that are double-sided (no culling is performed).
Note
By default, Blender has backface culling disabled on materials and will export materials to match how they render in Blender. This means that materials in Godot will have their cull mode set to Disabled. This can decrease performance since backfaces will be rendered, even when they are being culled by other faces. To resolve this, enable Backface Culling in Blender's Materials tab, then export the scene to glTF again.
Depth Draw Mode
Specifies when depth rendering must take place.
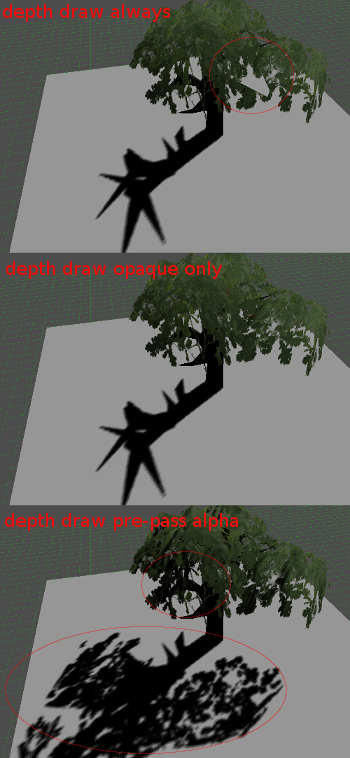
Opaque Only (default): Depth is only drawn for opaque objects.
Always: Depth draw is drawn for both opaque and transparent objects.
Never: No depth draw takes place (do not confuse this with the No Depth Test option below).
Depth Pre-Pass: For transparent objects, an opaque pass is made first with the opaque parts, then transparency is drawn above. Use this option with transparent grass or tree foliage.
No Depth Test
In order for close objects to appear over far away objects, depth testing is performed. Disabling it has the result of objects appearing over (or under) everything else.
Disabling this makes the most sense for drawing indicators in world space, and works very well with the Render Priority property of Material (see the bottom of this page).
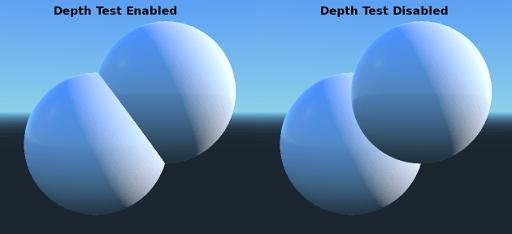
Depth Test
This can be used to invert the standard depth test. When set to Inverted, the object will only appear when occluded, and will be hidden otherwise.
This has no effect if No Depth Test is enabled.

Shading
Shading mode
Materials support three shading modes: Per-Pixel, Per-Vertex, and Unshaded.

The Per-Pixel shading mode calculates lighting for each pixel, and is a good fit for most use cases. However, in some cases you may want to increase performance by using another shading mode.
The Per-Vertex shading mode, often called "vertex shading" or "vertex lighting", instead calculates lighting once for each vertex, and interpolates the result between each pixel.
On low-end or mobile devices, using per-vertex lighting can considerably increase rendering performance. When rendering several layers of transparency, such as when using particle systems, using per-vertex shading can improve performance, especially when the camera is close to particles.
You can also use per-vertex lighting to achieve a retro look.

The Unshaded shading mode does not calculate lighting at all. Instead, the Albedo color is output directly. Lights will not affect the material at all, and unshaded materials will tend to appear considerably brighter than shaded materials.
Rendering unshaded is useful for some specific visual effects. If maximum performance is needed, it can also be used for particles, or low-end or mobile devices.
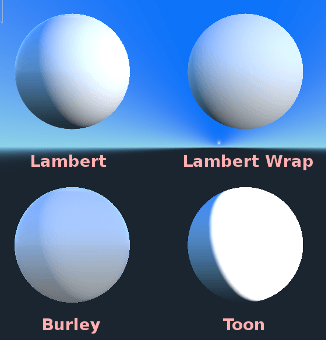
Diffuse Mode
Specifies the algorithm used by diffuse scattering of light when hitting the object. The default is Burley. Other modes are also available:
Burley: Default mode, the original Disney Principled PBS diffuse algorithm.
Lambert: Is not affected by roughness.
Lambert Wrap: Extends Lambert to cover more than 90 degrees when roughness increases. Works great for hair and simulating cheap subsurface scattering. This implementation is energy conserving.
Toon: Provides a hard cut for lighting, with smoothing affected by roughness. It is recommended you disable sky contribution from your environment's ambient light settings or disable ambient light in the StandardMaterial3D to achieve a better effect.
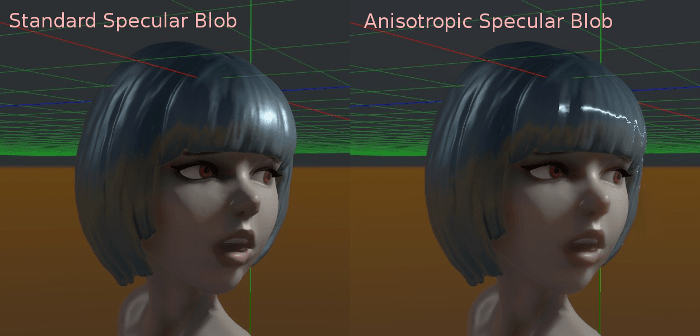
Specular Mode
Specifies how the specular blob will be rendered. The specular blob represents the shape of a light source reflected in the object.
SchlickGGX: The most common blob used by PBR 3D engines nowadays.
Toon: Creates a toon blob, which changes size depending on roughness.
Disabled: Sometimes the blob gets in the way. Begone!

Disable Ambient Light
Makes the object not receive any kind of ambient lighting that would otherwise light it.
Disable Fog
Makes the object unaffected by depth-based or volumetric fog. This is useful for particles or other additively blended materials that would otherwise show the shape of the mesh (even in places where it would be invisible without the fog).
Disable Specular Occlusion
Makes the object not have its reflections reduced where they would usually be occluded.
Vertex Color
This setting allows choosing what is done by default to vertex colors that come from your 3D modeling application. By default, they are ignored.
Use as Albedo
Choosing this option means vertex color is used as albedo color.
Is sRGB
Most 3D modeling software will likely export vertex colors as sRGB, so toggling this option on will help them look correct.
Albedo
Albedo is the base color for the material, on which all the other settings operate. When set to Unshaded, this is the only color that is visible. In previous versions of Godot, this channel was named Diffuse. The change of name mainly happened because, in PBR (Physically Based Rendering), this color affects many more calculations than just the diffuse lighting path.
Albedo color and texture can be used together as they are multiplied.
Alpha channel in albedo color and texture is also used for the object transparency. If you use a color or texture with alpha channel, make sure to either enable transparency or alpha scissoring for it to work.
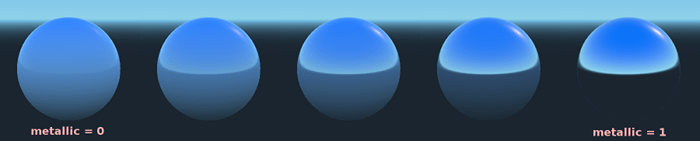
Metallic
Godot uses a metallic model over competing models due to its simplicity. This parameter defines how reflective the material is. The more reflective, the less diffuse/ambient light affects the material and the more light is reflected. This model is called "energy-conserving".
The Specular parameter is a general amount for the reflectivity (unlike
Metallic, this is not energy-conserving, so leave it at 0.5 and don't touch
it unless you need to).
The minimum internal reflectivity is 0.04, so it's impossible to make a
material completely unreflective, just like in real life.
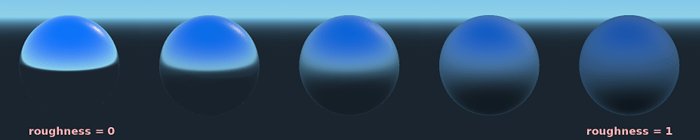
Roughness
Roughness affects the way reflection happens. A value of 0 makes it a
perfect mirror while a value of 1 completely blurs the reflection (simulating
natural microsurfacing). Most common types of materials can be achieved with
the right combination of Metallic and Roughness.
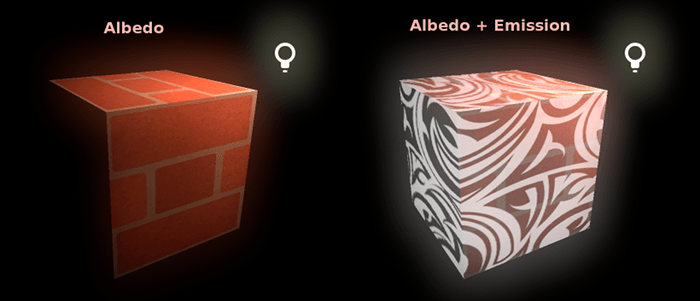
Emission
Emission specifies how much light is emitted by the material (keep in mind this does not include light surrounding geometry unless VoxelGI or SDFGI are used). This value is added to the resulting final image and is not affected by other lighting in the scene.
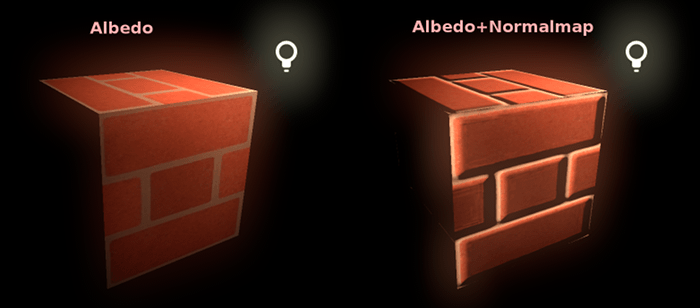
Normal map
Normal mapping allows you to set a texture that represents finer shape detail. This does not modify geometry, only the incident angle for light. In Godot, only the red and green channels of normal maps are used for better compression and wider compatibility.
Note
Godot requires the normal map to use the X+, Y+ and Z+ coordinates, this is known as OpenGL style. If you've imported a material made to be used with another engine it may be DirectX style, in which case the normal map needs to be converted so its Y axis is flipped.
More information about normal maps (including a coordinate order table for popular engines) can be found here.
Bent normal map
A bent normal map describes the average direction of ambient lighting. Unlike a regular normal map, this is used to improve how a material reacts to lighting rather than add surface detail.
This is achieved in two ways:
Indirect diffuse lighting is made to match global illumination more closely.
If specular occlusion is enabled, it is calculated using the bent normals and ambient occlusion instead of just from ambient light. This includes screen-space ambient occlusion (SSAO) and other sources of ambient occlusion.

Godot only uses the red and green channels of a bent normal map for better compression and wider compatibility.
When creating a bent normal map, there are three things required for it to work correctly in Godot:
A cosine distribution of rays has to be used when baking.
The texture must be created in tangent space.
The bent normal map needs to use the X+, Y+, and Z+ coordinates, this is known as OpenGL style. If you've imported a material made to be used with another engine it may be DirectX style, in which case the bent normal map needs to be converted so its Y axis is flipped. This can be achieved by setting the green channel under the Channel Remap section to Inverted Green in the import dock.
Note
A bent normal map is different from a regular normal map. The two are not interchangeable.
Rim
Some fabrics have small micro-fur that causes light to scatter around it. Godot emulates this with the Rim parameter. Unlike other rim lighting implementations, which just use the emission channel, this one actually takes light into account (no light means no rim). This makes the effect considerably more believable.
Rim size depends on roughness, and there is a special parameter to specify how
it must be colored. If Tint is 0, the color of the light is used for the
rim. If Tint is 1, then the albedo of the material is used. Using
intermediate values generally works best.
Clearcoat
The Clearcoat parameter is used to add a secondary pass of transparent coat to the material. This is common in car paint and toys. In practice, it's a smaller specular blob added on top of the existing material.
Anisotropy
This changes the shape of the specular blob and aligns it to tangent space. Anisotropy is commonly used with hair, or to make materials such as brushed aluminum more realistic. It works especially well when combined with flowmaps.
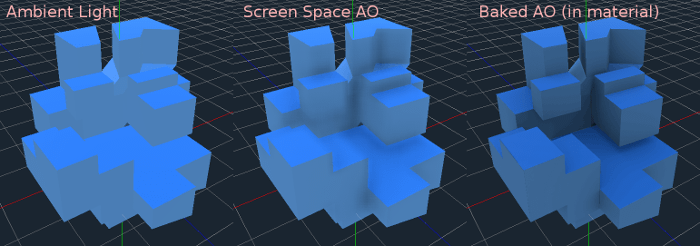
Ambient Occlusion
It is possible to specify a baked ambient occlusion map. This map affects how much ambient light reaches each surface of the object (it does not affect direct light by default). While it is possible to use Screen-Space Ambient Occlusion (SSAO) to generate ambient occlusion, nothing beats the quality of a well-baked AO map. It is recommended to bake ambient occlusion whenever possible.
Height
Setting a height map on a material produces a ray-marched search to emulate the proper displacement of cavities along the view direction. This only creates an illusion of depth, and does not add real geometry — for a height map shape used for physics collision (such as terrain), see HeightMapShape3D. It may not work for complex objects, but it produces a realistic depth effect for textures. For best results, Height should be used together with normal mapping.
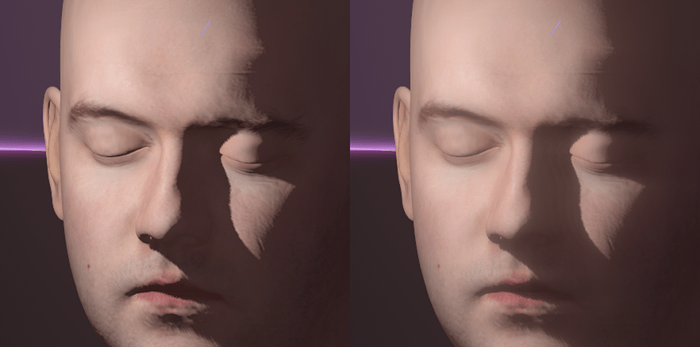
Subsurface Scattering
This is only available in the Forward+ renderer, not the Mobile or Compatibility renderers.
This effect emulates light that penetrates an object's surface, is scattered, and then comes out. It is useful to create realistic skin, marble, colored liquids, etc.
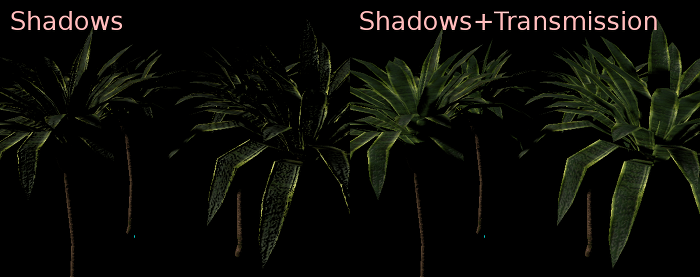
Back Lighting
This controls how much light from the lit side (visible to light) is transferred to the dark side (opposite from the light). This works well for thin objects such as plant leaves, grass, human ears, etc.
Refraction
When refraction is enabled, Godot attempts to fetch information from behind the object being rendered. This allows distorting the transparency in a way similar to refraction in real life.
Remember to use a transparent albedo texture (or reduce the albedo color's alpha channel) to make refraction visible, as refraction relies on transparency to have a visible effect.
Refraction also takes the material roughness into account. Higher roughness values will make the objects behind the refraction look blurrier, which simulates real life behavior. If you can't see behind the object when refraction is enabled and albedo transparency is reduced, decrease the material's Roughness value.
A normal map can optionally be specified in the Refraction Texture property to allow distorting the refraction's direction on a per-pixel basis.
Note
Refraction is implemented as a screen-space effect and forces the material to be transparent. This makes the effect relatively fast, but this results in some limitations:
Transparency sorting issues may occur.
The refractive material cannot refract onto itself, or onto other transparent materials. A refractive material behind another transparent material will be invisible.
Off-screen objects cannot appear in the refraction. This is most noticeable with high refraction strength values.
Opaque materials in front of the refractive material will appear to have "refracted" edges, even though they shouldn't.
Detail
Godot allows using secondary albedo and normal maps to generate a detail texture, which can be blended in many ways. By combining this with secondary UV or triplanar modes, many interesting textures can be achieved.
There are several settings that control how detail is used.
Mask: The detail mask is a black and white image used to control where the blending takes place on a texture. White is for the detail textures, Black is for the regular material textures, different shades of gray are for partial blending of the material textures and detail textures.
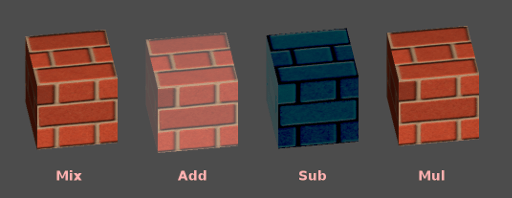
Blend Mode: These four modes control how the textures are blended together.
Mix: Combines pixel values of both textures. At black, only show the material texture, at white, only show the detail texture. Values of gray create a smooth blend between the two.
Add: Adds pixel values of one Texture with the other. Unlike mix mode both textures are completely mixed at white parts of a mask and not at gray parts. The original texture is mostly unchanged at black
Sub: Subtracts pixel values of one texture with the other. The second texture is completely subtracted at white parts of a mask with only a little subtraction in black parts, gray parts being different levels of subtraction based on the exact texture.
Mul: Multiplies the RGB channel numbers for each pixel from the top texture with the values for the corresponding pixel from the bottom texture.
Albedo: This is where you put an albedo texture you want to blend. If nothing is in this slot it will be interpreted as white by default.
Normal: This is where you put a normal texture you want to blend. If nothing is in this slot it will be interpreted as a flat normal map. This can still be used even if the material does not have normal map enabled.
UV1 and UV2
Godot supports two UV channels per material. Secondary UV is often useful for ambient occlusion or emission (baked light). UVs can be scaled and offset, which is useful when using repeating textures.
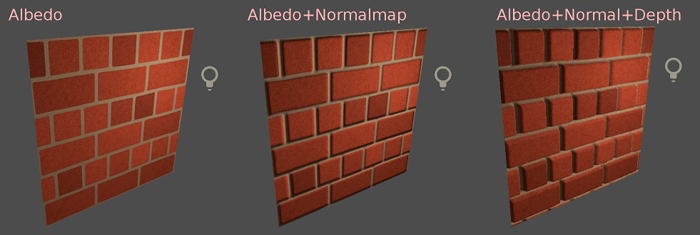
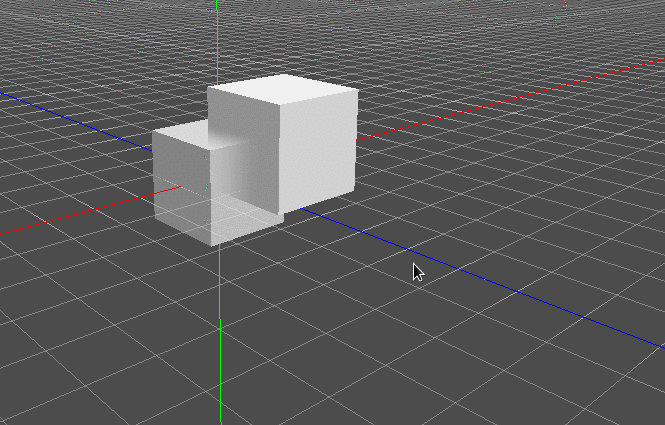
Triplanar Mapping
Triplanar mapping is supported for both UV1 and UV2. This is an alternative way to obtain texture coordinates, sometimes called "Autotexture". Textures are sampled in X, Y and Z and blended by the normal. Triplanar mapping can be performed in either world space or object space.
In the image below, you can see how all primitives share the same material with world triplanar, so the brick texture continues smoothly between them.
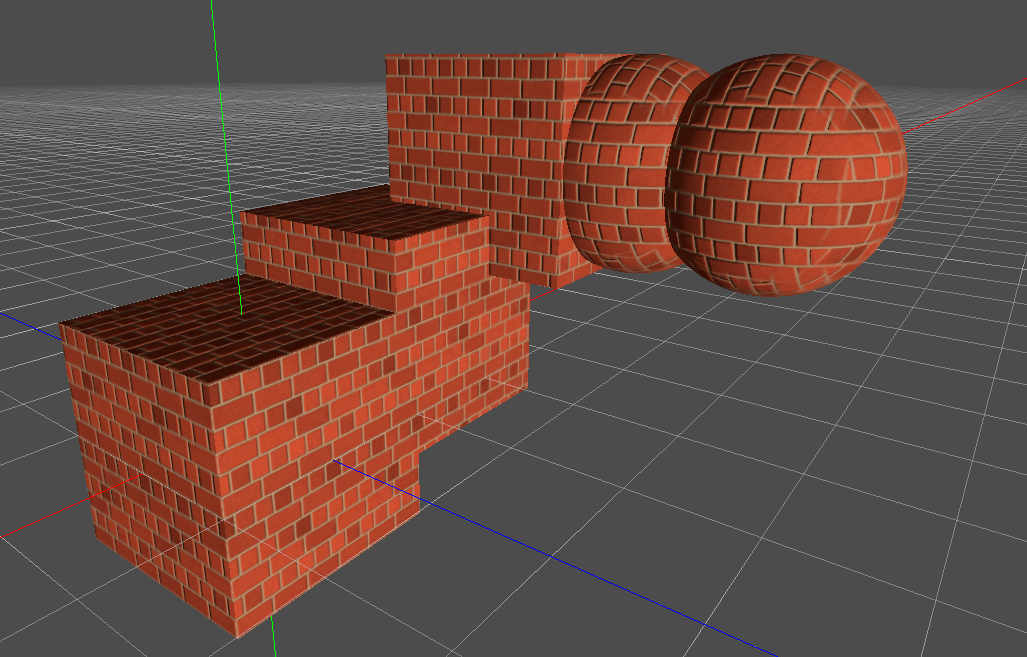
World Triplanar
When using triplanar mapping, it is computed in object local space. This option makes it use world space instead.
Sampling
Filter
The filtering method for the textures used by the material. See this page for a full list of options and their description.
Repeat
if the textures used by the material repeat, and how they repeat. See this page for a full list of options and their description.
Shadows
Disable Receive Shadows
Makes the object not receive any kind of shadow that would otherwise be cast onto it.
Shadow to Opacity
Lighting modifies the alpha so shadowed areas are opaque and non-shadowed areas are transparent. Useful for overlaying shadows onto a camera feed in AR.
Billboard
Billboard Mode
Enables billboard mode for drawing materials. This controls how the object faces the camera:
Disabled: Billboard mode is disabled.
Enabled: Billboard mode is enabled. The object's -Z axis will always face the camera's viewing plane.
Y-Billboard: The object's X axis will always be aligned with the camera's viewing plane.
Particle Billboard: Most suited for particle systems, because it allows specifying flipbook animation.

The Particles Anim section is only visible when the billboard mode is Particle Billboard.
Billboard Keep Scale
Enables scaling a mesh in billboard mode.
Grow
Grows the object vertices in the direction pointed by their normals:
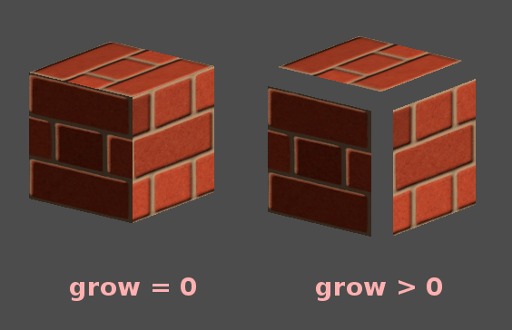
This is commonly used to create cheap outlines. Add a second material pass, make it black and unshaded, reverse culling (Cull Front), and add some grow:

Note
For Grow to work as expected, the mesh must have connected faces with shared vertices, or "smooth shading". If the mesh has disconnected faces with unique vertices, or "flat shading", the mesh will appear to have gaps when using Grow.
Note that in Godot 4.5 onwards, stencil buffer-based outlines are available using the Outline stencil mode. This can be used as an alternative to Grow for outlines.
Transform
Fixed Size
This causes the object to be rendered at the same size no matter the distance. This is useful mostly for indicators (no depth test and high render priority) and some types of billboards.
Use Point Size
This option is only effective when the geometry rendered is made of points (generally it's made of triangles when imported from 3D modeling software). If so, then those points can be resized (see below).
Point Size
When drawing points, specify the point size in pixels.
Use Particle Trails
This is only available in the Forward+ and Mobile renderers, not the Compatibility renderer.
If true, enables parts of the shader required for GPUParticles3D trails to function. This also requires using a mesh with appropriate skinning, such as RibbonTrailMesh or TubeTrailMesh. Enabling this feature outside of materials used in GPUParticles3D meshes will break material rendering.
Use Z Clip Scale
Scales the object being rendered towards the camera to avoid clipping into things like walls. This is intended to be used for objects that are fixed with respect to the camera like player arms, tools, etc. Lighting and shadows will continue to work correctly when this setting is adjusted, but screen-space effects like SSAO and SSR may break with lower scales. Therefore, try to keep this setting as close to 1.0 as possible.
Use FOV Override
Overrides the Camera3D's field of view angle (in degrees).
Note
This behaves as if the field of view is set on a Camera3D with
Camera3D.keep_aspect set to Camera3D.KEEP_HEIGHT. Additionally, it may not
look correct on a non-perspective camera where the field of view setting is
ignored.
Proximity and Distance Fade
Godot allows materials to fade by proximity to each other as well as depending on the distance from the viewer. Proximity fade is useful for effects such as soft particles or a mass of water with a smooth blending to the shores.
Distance fade is useful for light shafts or indicators that are only present after a given distance.
Keep in mind enabling proximity fade or distance fade with Pixel Alpha mode enables alpha blending. Alpha blending is more GPU-intensive and can cause transparency sorting issues. Alpha blending also disables many material features such as the ability to cast shadows.
Note
To hide a character when they get too close to the camera, consider using Pixel Dither or better, Object Dither (which is even faster than Pixel Dither).
Pixel Alpha mode: The actual transparency of a pixel of the object changes with distance to the camera. This is the most effect, but forces the material into the transparency pipeline (which leads, for example, to no shadows).
Pixel Dither mode: What this does is sort of approximate the transparency by only having a fraction of the pixels rendered.
Object Dither mode: Like the previous mode, but the calculated transparency is the same across the entire object's surface.

Stencil
Since Godot 4.5, Godot allows materials to make use of the stencil buffer. This feature is commonly used to create outlines and X-ray effects, which can be useful to highlight objects, especially behind walls.
The Outline and X-Ray modes assign a preconfigured stencil material in the material's Next Pass property. The Custom mode can be used for advanced effects.

Materials that write to the stencil buffer are always drawn in the transparent pass, so they are subject to the usual transparency limitations.
Note
Like with the Grow property, for the stencil outline to work as expected, the mesh must have connected faces with shared vertices, or "smooth shading". If the mesh has disconnected faces with unique vertices, or "flat shading", the mesh will appear to have gaps when using a stencil outline.
Stencil outlines render similarly to the Grow property, but won't look identical in every scenario, especially when intersections with opaque surfaces are involved.
Material Settings
Render priority
The rendering order of objects can be changed, although this is mostly useful for transparent objects (or opaque objects that perform depth draw but no color draw, such as cracks on the floor).
Objects are sorted by an opaque/transparent queue, then render_priority, with higher priority being drawn later. Transparent objects are also sorted by depth.
Depth testing overrules priority. Priority alone cannot force opaque objects to be drawn over each other.
Next Pass
Setting next_pass on a material will cause an object to be rendered again with that next material.
Materials are sorted by an opaque/transparent queue, then render_priority, with higher priority being drawn later.

Depth will test equal between both materials unless the grow setting or other vertex transformations are used. Multiple transparent passes should use render_priority to ensure correct ordering.