Attention: Here be dragons
This is the latest
(unstable) version of this documentation, which may document features
not available in or compatible with released stable versions of Godot.
Checking the stable version of the documentation...
Limitazioni del rendering 3D
Introduzione
Poiché danno priorità alle prestazioni, i motori di rendering in tempo reale hanno numerose limitazioni. Il renderer di Godot non fa eccezione. Per lavorare efficacemente con tali limitazioni, è necessario comprenderle.
Limiti di dimensioni delle texture
Su desktop e laptop, le texture con risoluzioni superiori a 8192×8192 potrebbero non essere supportate sui dispositivi più vecchi. È possibile verificare le limitazioni della GPU di interesse su GPUinfo.org.
Mobile GPUs are typically limited to 4096×4096 textures. Also, some mobile GPUs don't support repeating non-power-of-two-sized textures. Therefore, if you want your texture to display correctly on all platforms, you should avoid using textures larger than 4096×4096 and use a power of two size if the texture needs to repeat.
Per limitare le dimensioni di una specifica texture che potrebbe essere troppo grande da renderizzare, è possibile impostare l'opzione di importazione Process > Size Limit su un valore maggiore di 0. Facendo così, le dimensioni della texture saranno ridotte durante l'importazione (mantenendo le proporzioni) senza influire sul file sorgente.
Color banding
Quando si utilizzano i metodi di rendering Forward+ o Mobile, il motore 3D di Godot renderizza internamente in HDR. Tuttavia, il risultato del rendering sarà solitamente scritto in un buffer a precisione più bassa. Ciò può far comparire bande visibili, soprattutto quando si usano materiali senza texture. Per motivi di prestazioni, anche la precisione del colore è più bassa quando si utilizza il metodo di rendering Mobile in confronto a Forward+.
Quando si utilizza il metodo di rendering Compatibilità, Il rendering interno in HDR non è utilizzato e la precisione del colore è la più bassa tra tutti i metodi di rendering. Questo vale anche per il rendering 2D, dove potrebbero comparire bande quando si usano texture con gradienti uniformi.
Esistono due modi principali per alleviare il banding:
If using the Forward+ or Forward Mobile rendering methods, enable Use Debanding in Project Settings > Rendering > Anti Aliasing. This applies a fullscreen debanding shader as a post-processing effect and is very cheap.
Alternatively, bake some noise into your textures. This is mainly effective in 2D, e.g. for vignetting effects. In 3D, you can also use a custom debanding shader to be applied on your materials. This technique works even if your project is rendered with low color precision, which means it will work when using the Mobile and Compatibility rendering methods.

Color banding comparison (contrast increased for more visibility)
Vedi anche
See Banding in Games: A Noisy Rant (PDF) for more details about banding and ways to combat it.
Precisione del buffer di profondità
Per ordinare gli oggetti nello spazio 3D, i motori di rendering si affidano a un buffer di profondità (chiamato anche Z-buffer). Questo buffer ha una precisione finita: 32 bit sulle piattaforme desktop, 24 bit sulle piattaforme mobili (per motivi di prestazioni). Se due oggetti diversi finiscono sullo stesso valore nel buffer, avviene lo Z-fighting. Questo si manifesta con uno sfarfallio delle texture quando la telecamera si muove o ruota.
To make the depth buffer more precise over the rendered area, you should increase the Camera node's Near property. However, be careful: if you set it too high, players will be able to see through nearby geometry. You should also decrease the Camera node's Far property to the lowest permissible value for your use case, though keep in mind it won't impact precision as much as the Near property.
If you only need high precision when the player can see far away, you could change it dynamically based on the game conditions. For instance, if the player enters an airplane, the Near property can be temporarily increased to avoid Z-fighting in the distance. It can then be decreased once the player leaves the airplane.
A seconda della scena e delle condizioni di visualizzazione, potrebbe essere possibile allontanare di più gli oggetti in Z-fighting senza che la differenza sia evidente al giocatore.

Confronto di Z-fighting (prima e dopo aver ritoccato la scena scostando il Label3D lontano dal pavimento)
Transparency sorting
In Godot, i materiali trasparenti sono disegnati dopo quelli opachi. Gli oggetti trasparenti sono ordinati in avanti prima di essere disegnati in base alla posizione del Node3D, non alla posizione dei vertici nello spazio globale. Per questo motivo, è possibile che gli oggetti sovrapposti siano ordinati incorrettamente. Per correggerli, modifica la proprietà Render Priority del materiale o Sorting Offset del nodo. La priorità di rendering forza materiali specifici a comparire davanti o dietro altri materiali trasparenti, mentre l'offset di ordinamento sposta l'oggetto avanti o indietro per l'ordinamento. Anche così, non sempre queste impostazioni potrebbero bastare.
Gli oggetti trasparenti non sono renderizzati nel buffer di normali-rugosità, poiché sono disegnati dopo la geometria opaca. Pertanto, le funzionalità che dipendono dal buffer di normali-rugosità non influiranno sui materiali trasparenti.
Some rendering engines feature order-independent transparency techniques to alleviate this, but this is costly on the GPU. Godot currently doesn't provide this feature. There are still several ways to avoid this problem:
Rendere trasparenti i materiali solo se effettivamente necessario. Se un materiale ha solo una piccola parte trasparente, si consideri di suddividerla in un materiale separato. Questo permetterà alla parte opaca di proiettare ombre e migliorerà anche le prestazioni.
Se la propria texture ha principalmente aree completamente opache e completamente trasparenti, si potrebbe utilizzare il test alfa anziché fusione alfa. Questa modalità di trasparenza è più veloce da renderizzare e non presenta problemi di trasparenza. Abilita Transparency > Transparency su Alpha Scissor in StandardMaterial3D e regola Transparency > Alpha Scissor Threshold adeguatamente, se necessario. Si noti che l'MSAA non applicherà l'antialiasing ai bordi della texture a meno che l'antialiasing alfa non sia abilitato nelle proprietà del materiale. Tuttavia, l'FXAA, il TAA e il sovracampionamento saranno in grado di applicare l'antialiasing ai bordi della texture, a prescindere dal fatto che l'antialiasing alfa sia abilitato sul materiale.
Se è necessario renderizzare aree semitrasparenti della texture, la modalità ritaglio alfa non è adatta. Al suo posto, impostare la proprietà Transparency > Transparency dello StandardMaterial3D su Depth Pre-Pass può talvolta funzionare (a scapito delle prestazioni). Si potrebbe anche provare la modalità Alpha Hash.
Se si desidera che un materiale si dissolva con la distanza, utilizzare la modalità di dissolvenza a distanza Pixel Dither o Object Dither dello StandardMaterial3D anziché Pixel Alpha. Questo renderà il materiale opaco, velocizzando anche il rendering.
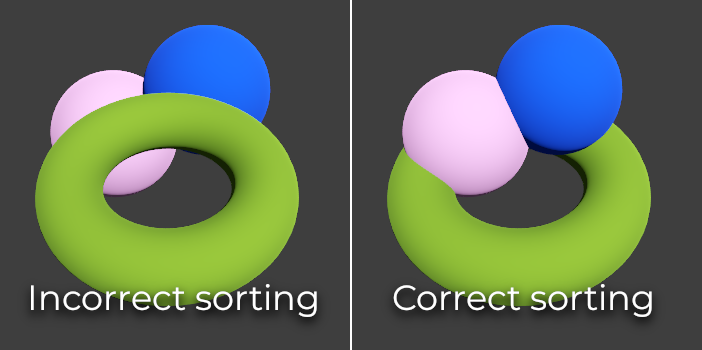
Transparency sorting comparison (alpha-blended materials on the left, alpha scissor materials on the right)