Attention: Here be dragons
This is the latest
(unstable) version of this documentation, which may document features
not available in or compatible with released stable versions of Godot.
Checking the stable version of the documentation...
Utilizzo dello SceneTree
Introduzione
Nei tutorial precedenti, tutto ruotava intorno al concetto dei nodi. Le scene sono raccolte di nodi. Diventano attivi una volta entrati nell'albero di scene.
MainLoop
Il modo in cui Godot funziona internamente è il seguente. Esiste la classe OS, che è l'unica istanza che viene eseguita all'inizio. Successivamente, vengono caricati tutti i driver, i server, i linguaggi di scripting, il sistema di scene, ecc.
Una volta completata l'inizializzazione, è necessario fornire a OS un MainLoop da eseguire. Fino a questo punto, si trattano di operazioni interne (puoi dare un'occhiata al file main/main.cpp nel codice sorgente se sei interessato a vedere come funziona internamente).
Il programma utente, o gioco, inizia nella classe MainLoop. Questa classe ha alcuni metodi, per l'inizializzazione, lo stato di inattività (callback sincronizzato con il frame), lo stato fisso (callback sincronizzato con la fisica) e l'input. Anche in questo caso, si tratta di un livello basso e, quando si sviluppano giochi in Godot, scrivere una propria classe MainLoop raramente ha senso.
Albero di scene (SceneTree)
Uno dei modi per spiegare come funziona Godot è considerarlo un motore di gioco di alto livello basato su un middleware di basso livello.
Il sistema di scene è il motore di gioco, mentre l'OS e i server sono le API di basso livello.
Il sistema di scene fornisce all'OS il proprio ciclo principale, SceneTree. Questo è istanziato e impostato automaticamente all'eseguzione di una scena, senza dover fare altro.
È importante sapere che questa classe esiste perché ha alcuni utilizzi importanti:
It contains the root Viewport, to which a scene is added as a child when it's first opened to become part of the Scene Tree (more on that next).
Contiene informazioni sui gruppi ed è in grado di chiamare tutti i nodi di un gruppo o di ottenerne un elenco.
Contiene alcune funzionalità di gestione dello stato globale, come l'impostazione della modalità di pausa o la chiusura del processo.
Quando un nodo fa parte dell'albero di scene, è possibile ottenere il singleton SceneTree chiamando Node.get_tree().
Viewport radice
La Viewport radice si trova sempre in alto la scena. Da un nodo, è possibile ricavarla in due modi diversi:
get_tree().root # Access via scene main loop.
get_node("/root") # Access via absolute path.
GetTree().Root // Access via scene main loop.
GetNode("/root"); // Access via absolute path.
Questo nodo contiene la viewport principale. Tutto ciò che è figlio di una Viewport è disegnato al suo interno come predefinito, quindi è logico che il nodo più in alto sia sempre un nodo di questo tipo, altrimenti non si vedrebbe nulla.
Sebbene nella scena sia possibile creare altre viewport (per effetti a schermo diviso e simili), questa è l'unica che non viene mai creata dall'utente. Viene creata automaticamente all'interno dello SceneTree.
Albero di scene
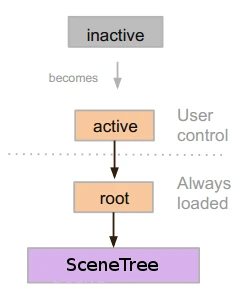
Quando un nodo è connesso, direttamente o indirettamente, alla viewport radice, diventa parte dell'albero di scene.
This means that as explained in previous tutorials, it will get the
_enter_tree() and _ready() callbacks (as well as _exit_tree()).
When nodes enter the Scene Tree, they become active. They get access to everything they need to process, get input, display 2D and 3D visuals, receive and send notifications, play sounds, etc. When they are removed from the scene tree, they lose these abilities.
Ordine d'albero
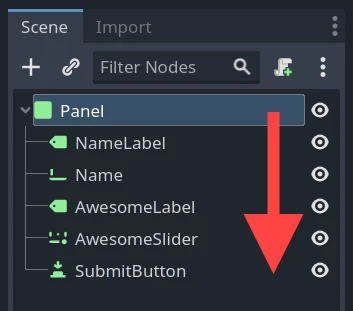
Most node operations in Godot, such as drawing 2D, processing, or getting notifications are done in tree order, or top to bottom as seen in the editor (also known as pre-order traversal):
For example, the top node in a scene has its _process() function
called first, then the node below it has its _process() function called,
then the node below that and so on.
An important exception is the _ready() function: each parent node has its
_ready() function called only after all its child nodes have their
_ready() functions called, so that the parent knows its children are
completely ready to be accessed. This is also known as post-order traversal.
In the above image, NameLabel would be notified first (but only after its
children, if it had any!), followed by Name, etc., and Panel would be
notified last.
The order of operations can also be overridden using the process_priority
node property. Nodes with a lower number are called first. For example, nodes
with the priorities "0, 1, 2, 3" would be called in that order from left to right.
"Becoming active" by entering the Scene Tree
A scene is loaded from disk or created by scripting.
Il nodo radice di quella scena (ricorda, c'è solo una radice) viene aggiunto come figlio della Viewport "radice" (da SceneTree) o a uno qualsiasi dei suoi discendenti.
Ogni nodo della scena appena aggiunta riceverà la notifica "enter_tree" (callback
_enter_tree()in GDScript) dall'alto verso il basso (attraversamento in pre-ordine).Per comodità, ogni nodo riceverà la notifica "ready" (callback
_ready()in GDScript), una volta che tutti i suoi figli avranno ricevuto la notifica "ready" (attraversamento in post-ordine).Quando una scena (o parte di essa) viene rimossa, ricevono la notifica "exist scene" (callback
_exit_tree()in GDScript) dal basso verso l'alto (l'esatto contrario dell'ordine dall'alto verso il basso).
Cambiare la scena attuale
Dopo aver caricato una scena, potresti volerla sostituire con un'altra. Un modo per farlo è tramite la funzione SceneTree.change_scene_to_file():
func _my_level_was_completed():
    get_tree().change_scene_to_file("res://levels/level2.tscn")
public void _MyLevelWasCompleted()
{
    GetTree().ChangeSceneToFile("res://levels/level2.tscn");
}
Anziché utilizzare percorsi di file, è anche possibile utilizzare risorse PackedScene già pronte tramite la funzione equivalente SceneTree.change_scene_to_packed(PackedScene scene):
var next_scene = preload("res://levels/level2.tscn")

func _my_level_was_completed():
    get_tree().change_scene_to_packed(next_scene)
public void _MyLevelWasCompleted()
{
    var nextScene = (PackedScene)ResourceLoader.Load("res://levels/level2.tscn");
    GetTree().ChangeSceneToPacked(nextScene);
}
Questi sono metodi rapidi e utili per cambiare scene, ma hanno lo svantaggio che il gioco si blocca finché la nuova scena non viene caricata e avviata. Ad un certo punto dello sviluppo del gioco, potrebbe essere preferibile creare schermate di caricamento adeguate con barra di avanzamento, indicatori animati o caricamento su un altro thread (in background). Lo si deve fare manualmente attraverso Singleton (Autoload) e Caricamento nello sfondo.