Attention: Here be dragons
This is the latest
(unstable) version of this documentation, which may document features
not available in or compatible with released stable versions of Godot.
Checking the stable version of the documentation...
Build Gradle per Android
Godot provides the option to build using the Gradle build system. Instead of using the already pre-built template that ships with Godot, an Android Java project gets installed into your project folder. Godot will then build it and use it as an export template every time you export the project.
Ci sono alcune ragioni per cui si potrebbe volerlo fare:
Export an AAB file for Google Play.
Modificare il progetto prima che sia compilato.
Aggiungere SDK esterni che sono compilati con il proprio progetto.
The native portion of the template (the .so library included in the APK)
remains precompiled. This means that unlike
compiling a custom Android export template,
you don't need to install a C++ toolchain or clone the Godot source code.
Configuring the Gradle build is a fairly straightforward process. But first, you need to follow the steps in exporting for android up to Setting it up in Godot. After doing that, follow the steps below.
Set up the Gradle build environment
Andare al menu Progetto e installare il modello Build Gradle:
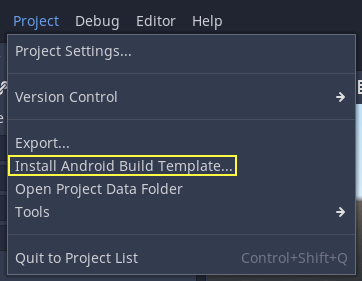
Assicurarsi che i modelli di esportazione siano scaricati. Se non lo sono, questo menu aiuterà a scaricarli.
Un progetto Android basato su Gradle verrà creato in res://android/build. Non è necessario modificare questi file, a meno che non sia davvero necessario modificare il progetto.
Performing Gradle builds from the Android editor
Since Godot 4.6, it is possible to perform Gradle builds from the Android editor. This requires installing the Godot Android Build Environment (GABE) application on the same device the editor is running on.
Nota
This application is not required when exporting from the Android editor with pre-built APK templates, or when exporting to other platforms.
This application lets you install everything required to build Android projects with Gradle. It is called by the editor to perform Gradle builds when exporting to Android.
To set up the build environment, open the app and follow these instructions:
Ensure you have an active Internet connection.
Open the tab from the bottom navigation bar.
Click .
After the installation completes, you can export projects using Gradle builds from the Godot editor.
Enabling the Gradle build and exporting
Quando si configura il progetto Android nella finestra Progetto > Esporta, è necessario abilitare Build Gradle:
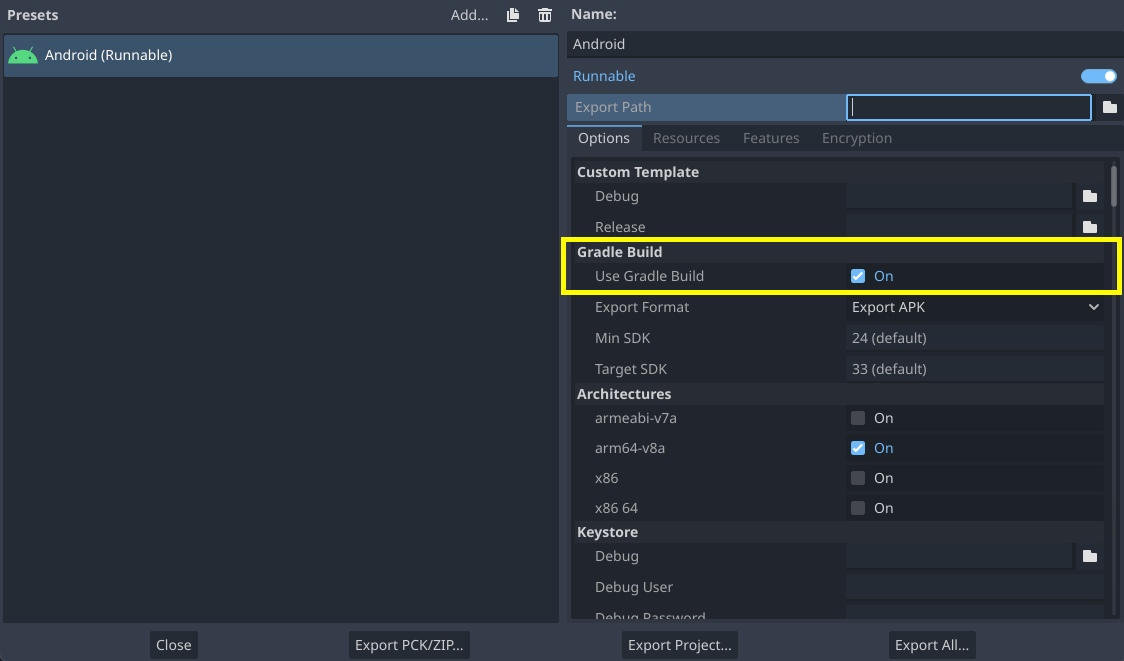
From now on, attempting to export the project or one-click deploy will call the Gradle build system to generate fresh templates. The templates built will be used automatically afterwards, so no further configuration is needed.
Nota
When using the Gradle Android build system, assets that are placed within a folder whose name begins with an underscore will not be included in the generated APK. This does not apply to assets whose file name begins with an underscore.
Ad esempio, _example/image.png non sarà incluso come risorsa, ma _image.png sì.