Attention: Here be dragons
This is the latest
(unstable) version of this documentation, which may document features
not available in or compatible with released stable versions of Godot.
Checking the stable version of the documentation...
Environment and post-processing
Godot 4 provides a redesigned Environment resource, as well as a new post-processing system with many available effects right out of the box.
Nota
As of Godot 4, Environment performance/quality settings are defined in the project settings instead of in the Environment resource. This makes global adjustments easier, as you no longer have to tweak Environment resources individually to suit various hardware configurations.
Note that most Environment performance/quality settings are only visible after enabling the Advanced toggle in the Project Settings.
Ambiente
The Environment resource stores all the information required for controlling the 2D and 3D rendering environment. This includes the sky, ambient lighting, tone mapping, effects, and adjustments. By itself, it does nothing, but you can enable it by using it in one of the following locations, in order of priority:
Nodo Camera3D (massima priorità)
An Environment can be set to a Camera3D node. It will have priority over any other setting.
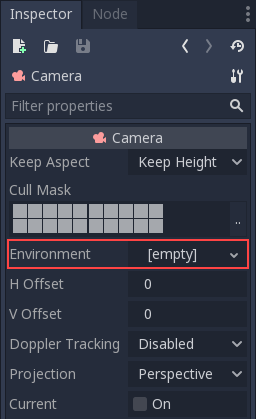
This is mostly useful when you want to override an existing environment, but in general it's a better idea to use the option below.
WorldEnvironment node (medium priority, recommended)
The WorldEnvironment node can be added to any scene, but only one can exist per active scene tree. Adding more than one will result in a warning.
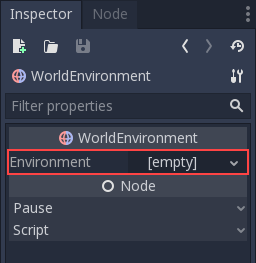
Any Environment added has higher priority than the default Environment (explained below). This means it can be overridden on a per-scene basis, which makes it quite useful.
Ambiente e sole in anteprima (minima priorità)
Nota
Since Godot 4, the preview environment and sun system replace the
default_env.tres file that was used in Godot 3 projects.
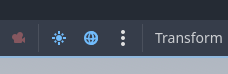
If no WorldEnvironment node or DirectionalLight3D node is present in the current scene, the editor will display a preview environment and sun instead. This can be disabled using the buttons at the top of the 3D editor:
Clicking on the 3 vertical dots on the right will display a dialog which allows you to customize the appearance of the preview environment:
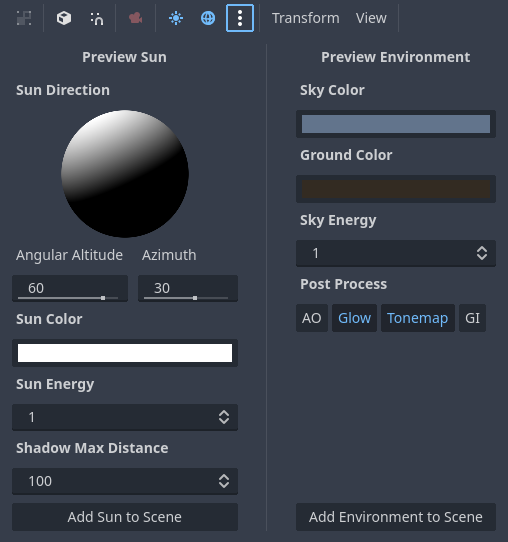
The preview sun and sky is only visible in the editor, not in the running project. Using the buttons at the bottom of the dialog, you can add the preview sun and sky into the scene as nodes.
Suggerimento
If you hold Shift while clicking Add Sun to Scene or Add Environment to Scene in the preview environment editor, this will add both a preview sun and environment to the current scene (as if you clicked both buttons separately). Use this to speed up project setup and prototyping.
Attributi di telecamera
Nota
In Godot 4, le informazioni sull'esposizione e sulla profondità di campo sono state separate dalla risorsa Environment e inserite in una propria risorsa CameraAttributes. Ciò consente di regolare più facilmente tali proprietà indipendentemente dalle altre impostazioni di Environment.
La risorsa CameraAttributes memorizza le informazioni sull'esposizione e sulla profondità di campo. Consente inoltre di abilitare la regolazione automatica dell'esposizione in base alla luminosità della scena.
Sono disponibili due tipi di risorse CameraAttribute:
CameraAttributesPractical: le funzionalità sono esposte usando unità arbitrarie, che sono più facili da interpretare in gran parte dei casi nei giochi.
CameraAttributesPhysical: le funzionalità sono esposte usando unità di misura reali, in modo simile a una telecamera digitale. Ad esempio, il campo visivo viene impostato usando una lunghezza focale in millimetri anziché un valore in gradi. Consigliato quando la precisione fisica è importante, ad esempio per un rendering fotorealistico.
Entrambi i tipi di risorsa CameraAttribute consentono di utilizzare le stesse funzionalità, ma sono configurati diversamente. Se non sai quale scegliere, usa CameraAttributesPractical.
Nota
Utilizzare un CameraAttributesPhysical su un nodo Camera3D bloccherà le regolazioni del campo visivo e dell'aspetto in quella Camera3D, poiché il campo visivo viene regolato nella risorsa CameraAttributesPhysical. Se utilizzato in un WorldEnvironment, CameraAttributesPhysical non sovrascriverà alcuna Camera3D nella scena.
È possibile aggiungere una risorsa CameraAttributes a un nodo Camera3D o WorldEnvironment. Quando la telecamera attuale ha un CameraAttributes impostato, questo sovrascriverà quello impostato in WorldEnvironment (se presente).
Perlopiù delle volte, si consiglia di impostare la risorsa CameraAttributes sul nodo Camera3D anziché su WorldEnvironment. A differenza di WorldEnvironment, assegnare la risorsa CameraAttributes al nodo Camera3D impedisce di mostrare la profondità di campo nella viewport dell'editor 3D, a meno che la telecamera non sia in anteprima.
Opzioni di ambiente
Di seguito è fornita una descrizione dettagliata di tutte le opzioni dell'ambiente e come utilizzarle.
Sfondo
La sezione Background contiene le impostazioni su come riempire lo sfondo (le parti dello schermo in cui non sono stati disegnati oggetti). Lo sfondo non serve solo a visualizzare un'immagine o un colore. Normalmente, influisce anche sul modo in cui gli oggetti sono influenzati dalla luce ambientale e riflessa. Ciò è detto image-based lighting (IBL).
Pertanto, lo sfondo del cielo può influenzare molto l'aspetto generale della scena, anche se non è mai direttamente visibile sullo schermo. Va tenuto in considerazione quando si regola l'illuminazione della scena.
Sono disponibili diverse modalità di sfondo:
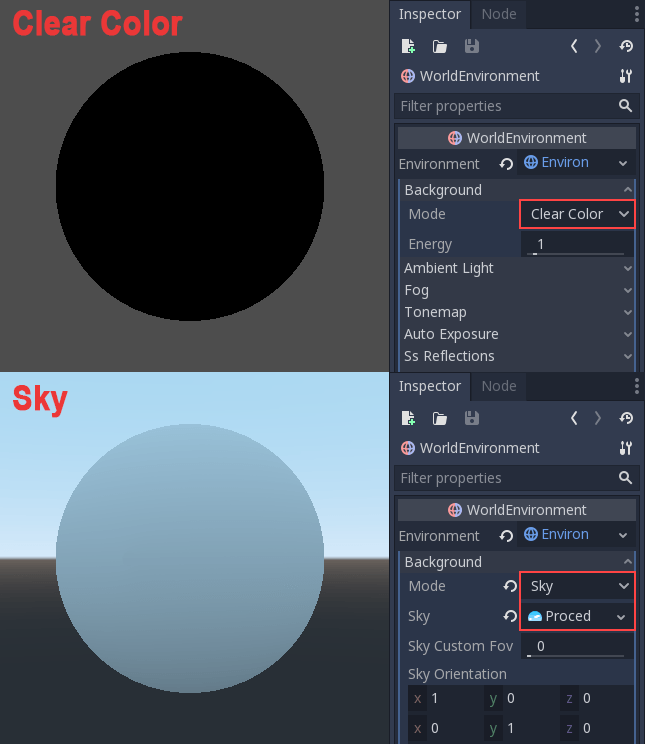
Clear Color utilizza il colore di cancellazione predefinito, definito nelle impostazioni del progetto. Lo sfondo avrà un colore costante.
Custom Color è simile a Clear Color, ma con un valore di colore personalizzato.
Sky consente di definire un materiale per il cielo di sfondo (vedi sotto). Normalmente, gli oggetti nella scena rifletteranno questo materiale e assorbiranno la luce ambientale da esso.
Canvas visualizza la scena 2D come sfondo della scena 3D. Questo può servire per rendere visibili gli effetti ambientali nel rendering 2D, come ad esempio il bagliore in 2D.
Keep does not draw any sky, keeping what was present on previous frames instead. This improves performance in purely indoor scenes, but creates a "hall of mirrors" visual glitch if the sky is visible at any time.
Camera Feed visualizza un CameraFeed proveniente da una fotocamera fisica come sfondo, utile per i giochi AR sui dispositivi mobili.
Materiali di cielo
Quando si utilizza la modalità di sfondo Sky (o quando la modalità luce ambientale/riflessa è impostata su Sky), una sotto-risorsa Sky diventa disponibile per la modifica nella risorsa Environment. Modificare questa sotto-risorsa consente di creare una risorsa SkyMaterial all'interno dello Sky.
Esistono 3 materiali integrati per il cielo tra cui scegliere:
PanoramaSkyMaterial: utilizza un'immagine panoramica di cielo a 360 gradi (rapporto d'aspetto 2:1 consigliato). Per sfruttare al meglio l'ampia gamma dinamica, l'immagine panoramica deve essere in un formato compatibile con HDR come
.hdro.exranziché in un formato standard a gamma dinamica come.pngo.jpg.ProceduralSkyMaterial: utilizza un cielo generato proceduralmente con colori di terreno, sole, cielo e orizzonte regolabili. Questo è il tipo di cielo utilizzato nell'anteprima dell'editor. La posizione del sole viene derivata automaticamente dai primi 4 nodi DirectionalLight3D presenti nella scena. Possono esserci fino a 4 soli alla volta.
PhysicalSkyMaterial: utilizza un cielo procedurale basato sulla fisica con parametri di scattering regolabili. La posizione del sole viene derivata automaticamente dal primo nodo DirectionalLight3D presente nella scena. Renderizzare un PhysicalSkyMaterial è leggermente più costoso rispetto a ProceduralSkyMaterial. Può esserci fino a 1 sole alla volta.
Le immagini panoramiche di cielo sono talvolta chiamate HDRI (High Dynamic Range Images). Puoi trovare immagini HDRI con licenza gratuita su Poly Haven.
Nota
HDR PanoramaSkyMaterial textures with very bright spots (such as real life photos with the sun visible) may result in visible sparkles on ambient and specular reflections. This is caused by the texture's peak exposure being too high.
Per risolvere il problema, seleziona la texture panoramica nel pannello Filesystem, vai al pannello Importazione, abilita HDR Clamp Exposure e poi clicca su Reimporta.
Se hai bisogno di un materiale personalizzato per il cielo (ad esempio per nuvole procedurali), puoi creare uno shader personalizzato per il cielo.
Luce ambientale
Ambient light (as defined here) is a type of light that affects every piece of geometry with the same intensity. It is global and independent of lights that might be added to the scene. Ambient light is one of the two components of image-based lighting. Unlike reflected light, ambient light does not vary depending on the camera's position and viewing angle.
Esistono diversi tipi di luce ambientale tra cui scegliere:
Background: deriva la luce ambientale dallo sfondo, come il cielo, un colore personalizzato o il colore di cancellazione (predefinito). L'intensità della luce ambientale varierà a seconda del contenuto dell'immagine del cielo, il che può produrre un'illuminazione ambientale visivamente più gradevole. Affinché questa modalità funzioni bisogna impostare un cielo come sfondo.
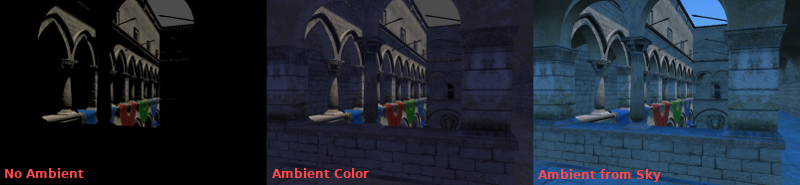
Disabled: non utilizzare alcuna luce ambientale. Utile per scene esclusivamente in interni.
Colore: utilizza un colore costante per la luce ambientale, ignorando il cielo di sfondo. L'intensità della luce ambientale sarà la stessa su tutti i lati, il che potrebbe rendere l'illuminazione della scena più piatta. Utile per scene interne in cui le ombre completamente nere potrebbero apparire troppo scure, o per massimizzare le prestazioni sui dispositivi di fascia bassa.
Sky: Deriva la luce ambientale dal cielo specificato, anche se lo sfondo è impostato su una modalità diversa da Sky. Se la modalità di sfondo è già Sky, questa modalità si comporta in modo identico a Background.
Quando la modalità di luce ambientale è impostata su Sky o Background (e lo sfondo è impostato su Sky), è possibile fondere il colore ambientale e il cielo attraverso la proprietà Sky Contribution. Questo valore è impostato su 1.0 normalmente, il che significa che solo il cielo ambientale viene utilizzato. Il colore ambientale è ignorato a meno che Sky Contribution non sia minore di 1.0.
Ecco un confronto di come diverse luci ambientali influenzano una scena:
Infine, c'è l'impostazione Energia, che è un moltiplicatore. È utile quando si lavora con l'HDR.
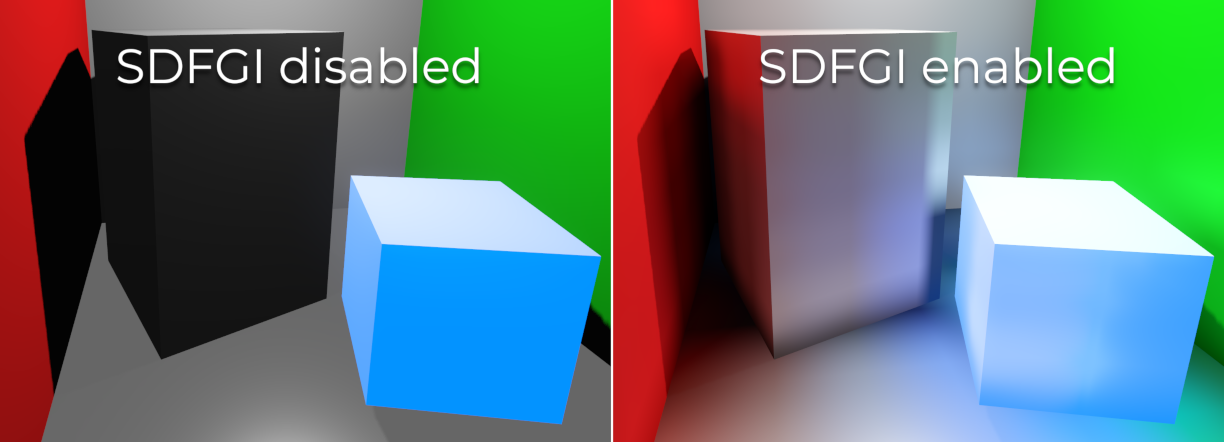
In generale, dovresti affidarti esclusivamente alla luce ambientale per scene semplici o ampi esterni. Puoi fare così anche per migliorare le prestazioni. La luce ambientale è veloce da renderizzare, ma non offre la migliore qualità di illuminazione. È meglio generare la luce ambientale da ReflectionProbe, VoxelGI o SDFGI, poiché questi simulano con maggiore precisione il modo in cui la luce indiretta si propaga. Di seguito è riportato un confronto, in termini di qualità, tra l'uso di un colore ambientale piatto e di un VoxelGI:
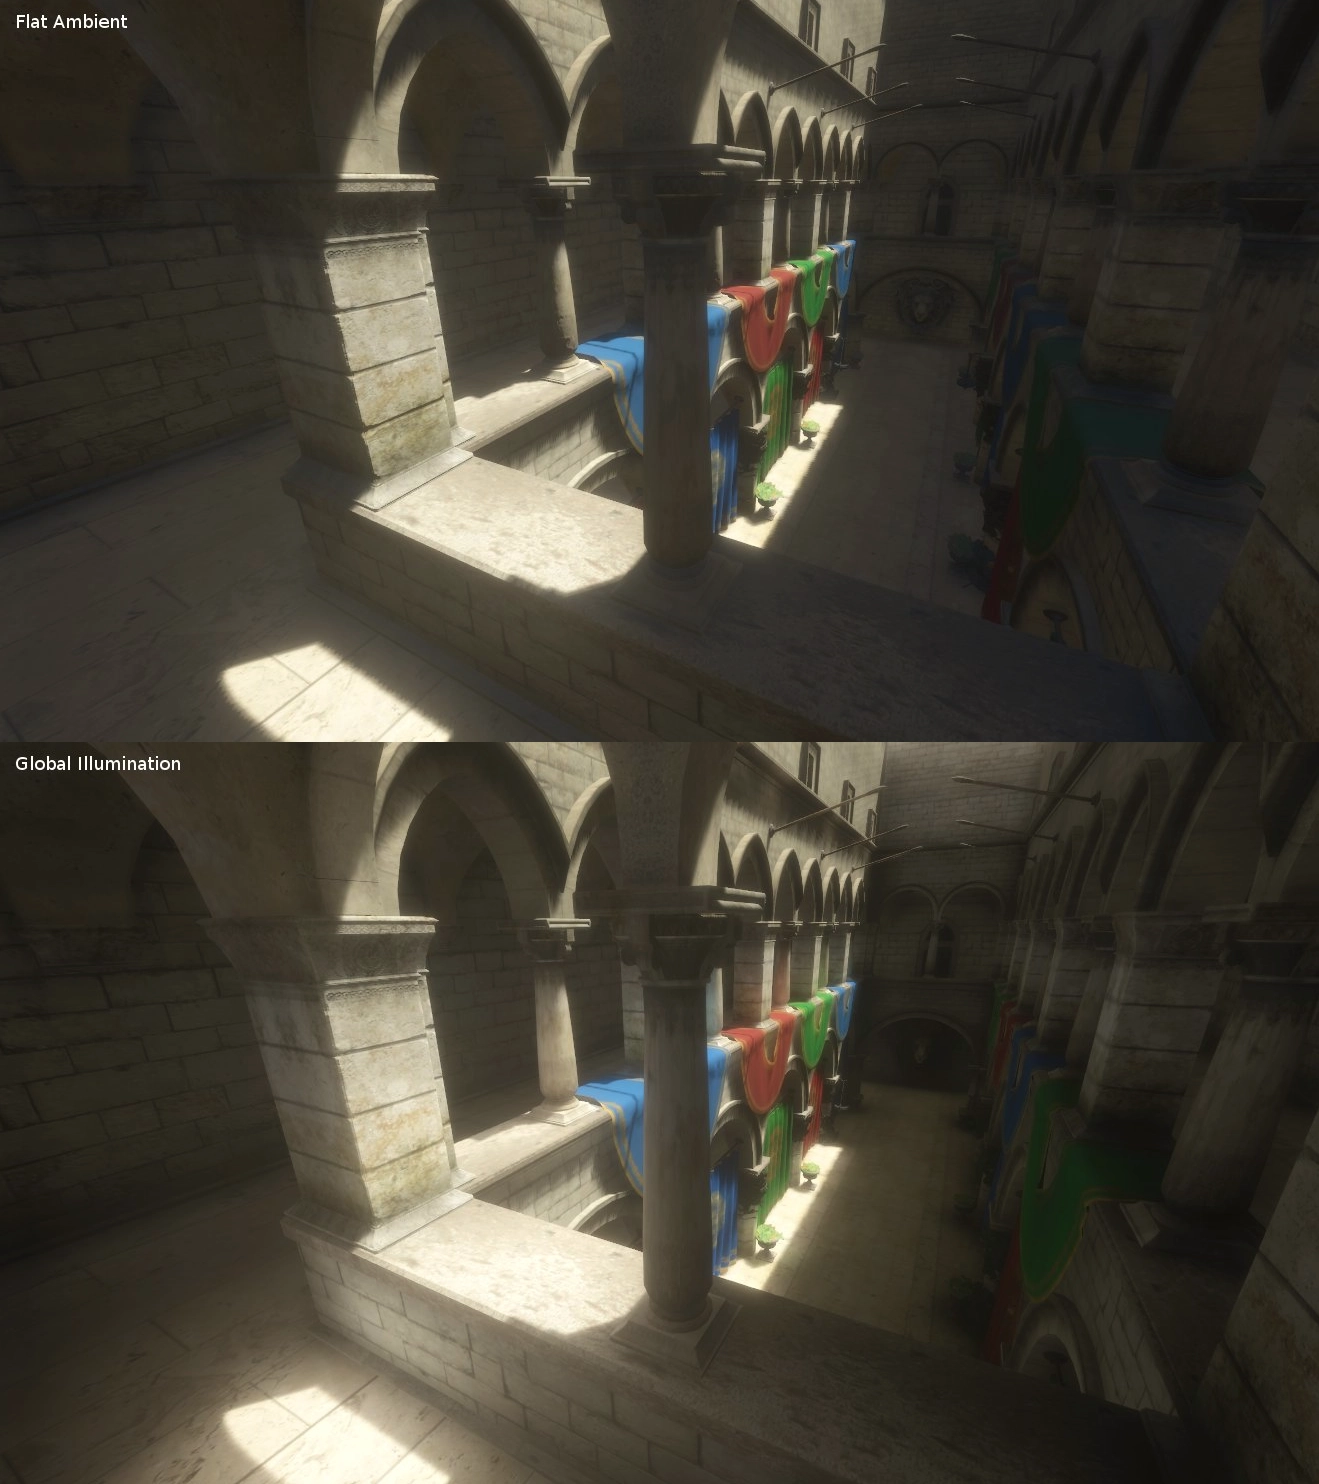
Utilizzando uno dei metodi descritti sopra, l'illuminazione ambientale costante sarà sostituita dall'illuminazione ambientale delle sonde.
Luce riflessa
La luce riflessa (detta anche luce speculare) è l'altro dei due componenti dell'illuminazione basata sulle immagini.
È possibile impostare la luce riflessa su una tra 3 modalità:
Background: rifletti dallo sfondo, come il cielo, un colore personalizzato o il colore di cancellazione (predefinito).
Disabled: non riflette proprio la luce dall'ambiente. Utile per scene esclusivamente in interni o per massimizzare le prestazioni sui dispositivi di fascia bassa.
Sky: riflette lo sfondo del cielo, anche se lo sfondo è impostato su una modalità diversa da Sky. Se la modalità di sfondo è già Sky, questa modalità si comporta in modo identico a Background.
Mappa dei toni
Tonemap sceglie l'algoritmo di mappatura dei toni da applicare alla scena, scegliendolo da un elenco di algoritmi standard utilizzati nell'industria cinematografica e dei videogiochi. Le modalità di mappatura diverse da Linear servono per rendere più omogenee le aree chiare e scure, evitando al contempo il clipping delle alte luci. Ogni algoritmo ha diverse caratteristiche prestazionali da considerare per scegliere appropriatamente.
Le opzioni di mappatura dei toni sono:
Mode: La modalità di mappatura dei toni da utilizzare.
Lineare: mon modifica i dati di colore, risultando in una curva lineare di mappatura dei toni che satura innaturalmente i valori luminosi, rendendo le luci luminose molto sovraesposte. La mappatura dei toni più semplice e veloce.
Reinhard: Una semplice curva di mappatura dei toni che attenua i valori luminosi per evitare il clipping. Il risultato è un'immagine che può apparire opaca e a basso contrasto. Più lento di Linear. Quando White è lasciato al valore predefinito di
1.0, Reinhard produce un'immagine identica a Linear.Filmic: utilizza una curva di mappatura dei toni simile a quella di una pellicola per impedire il clipping dei valori luminosi e fornire un contrasto migliore rispetto a Reinhard. Leggermente più lento di Reinhard.
ACES: utilizza una curva di mappatura dei toni ad alto contrasto simile a quella di un film e desatura i valori luminosi per un aspetto più realistico. Leggermente più lento di Filmic.
AgX: utilizza una curva di mappatura dei toni simile a quella di una pellicola e desatura i valori brillanti per un aspetto più realistico. Meglio di altri mappatori dei toni nel mantenere la tonalità dei colori mentre diventano più brillanti. L'opzione di mappatura dei toni più lenta.
Exposure: Regola la luminosità dei valori prima che vengano forniti al mappatore dei toni. Valori di Exposure più alti producono un'immagine più luminosa. I valori forniti al mappatore saranno inoltre moltiplicati per
2.0e1.8rispettivamente per Film e ACES per produrre una luminosità apparente simile a Linear.White: Il valore di riferimento bianco per la mappatura dei toni (detto anche "punto di bianco"), che indica dove si trova il bianco brillante nella scala di valori forniti al mappatore dei toni. Per l'illuminazione fotorealistica, i valori consigliati sono compresi tra
6.0e8.0. Valori più alti rendono i valori chiari più spenti, ma potrebbero far apparire la scena meno contrastata. White non è disponibile quando si utilizza Linear. Se si utilizza AgX, il renderer mobile, e HDR 2D è disabilitato, il valore impostato qui verrà ignorato e verrà utilizzato un valore di2.0al suo posto.AGX Contrast: disponibile solo quando si utilizza AgX. Aumentandolo renderà i valori scuri più scuri, e i valori chiari più chiari. Porta migliori risultati rispetto all'opzione di contrasto nella sezione di regolazione, senza alcun impatto in più sulle prestazioni.
Mid- and post-processing effects
The Environment resource supports many popular mid- and post-processing effects.
Nota
Gli effetti nello spazio dello schermo come SSR, SSAO, SSIL e il bagliore non agiscono sulla geometria che si trova fuori dal campo visivo della telecamera o che è occlusa da altra geometria opaca. Tienilo a mente quando regoli le loro impostazioni per evitare cambiamenti fastidiosi durante il gioco.
Riflessi nello spazio dello schermo (SSR)
Questa funzionalità è disponibile solo quando si utilizza il renderer Forward+, non Mobile o Compatibilità.
While Godot supports several sources of reflection data such as Sonde di riflessi, they may not provide enough detail for all situations. Scenarios where screen-space reflections make the most sense are when objects are in contact with each other (object over floor, over a table, floating on water, etc).
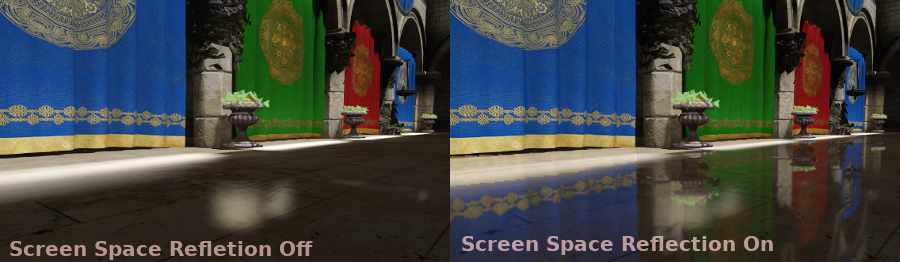
Oltre a fornire maggiori dettagli, i riflessi nello spazio dello schermo funzionano anche in tempo reale (mentre altri tipi di riflessi sono solitamente precalcolati). Questo può servire per far riflettere personaggi, automobili, ecc. sulle superfici circostanti mentre si muovono.
I riflessi nello spazio dello schermo si possono usare allo stesso tempo di altre sorgenti di riflessi, per avere riflessi dettagliati quando possibile, e avendo anche un'alternativa quando i riflessi nello spazio dello schermo non si possono usare (ad esempio, per riflettere oggetti fuori dallo schermo).
Sono disponibili alcuni parametri controllabili dall'utente per aggiustare meglio la tecnica:
Max Steps: determina la lunghezza massima della riflessione. Maggiore è questo numero, più costoso sarà da calcolare.
*Fade In: consente di regolare la curva di dissolvenza in entrata, utile per rendere più sfumata l'area di contatto.
Fade Out: consente di regolare la curva di dissolvenza in uscita, in modo che il limite di passaggi si attenui gradualmente.
Depth Tolerance: può servire per consentire ai raggi dello spazio dello schermo di passare dietro gli oggetti. I raggi tratteranno ciascun oggetto come se avesse questa profondità per determinare se possono passare dietro di esso. Valori più alti faranno presentare i riflessi nello spazio dello schermo con meno "interruzioni", a scapito di creare riflessi fisicamente sbagliati per alcuni oggetti.
Inoltre, è possibile regolare la qualità dell'SSR nelle impostazioni del progetto con Rendering > Environment > Screen Space Reflection > Half Size. Come predefinito, i riflessi nello spazio dello schermo sono renderizzati a metà risoluzione per motivi di prestazioni. Disabilitando questa impostazione, l'effetto sarà renderizzato a piena risoluzione, migliorando la qualità a scapito di un maggiore utilizzo della GPU.
Nota
Ricorda che i riflessi nello spazio dello schermo funzionano solo per la riflessione di geometrie opache. I materiali trasparenti non saranno riflessi, poiché non scrivono nel buffer di profondità. Questo vale anche per gli shader che utilizzano le uniformi hint_screen_texture o hint_depth_texture.
Occlusione ambientale nello spazio dello schermo (SSAO)
Questa funzionalità è disponibile solo se si utilizzano i renderer Forward+ e Compatibilità, non Mobile.
Come accennato nella sezione Ambient, le aree non illuminate dai nodi luce (perché fuori dalla loro portata o in ombra) sono illuminate con una luce ambientale. Godot la può simulare tramite VoxelGI, ReflectionProbe, Sky o un colore ambientale costante. Il problema, però, è che tutti i metodi proposti in precedenza agiscono più su larga scala (grandi regioni) che a livello di geometria più piccola.
Il colore ambientale costante e il cielo sono gli stessi ovunque, mentre le sonde GI e Reflection hanno maggiori dettagli locali, ma non abbastanza per simulare situazioni in cui la luce non riesce a riempire gli elementi vuoti o concavi.
Questo si può simulare con l'occlusione ambientale nello spazio dello schermo. Come puoi vedere nell'immagine sottostante, il suo scopo è quello di rendere le aree concave più scure, simulando un percorso più stretto in cui passa la luce:
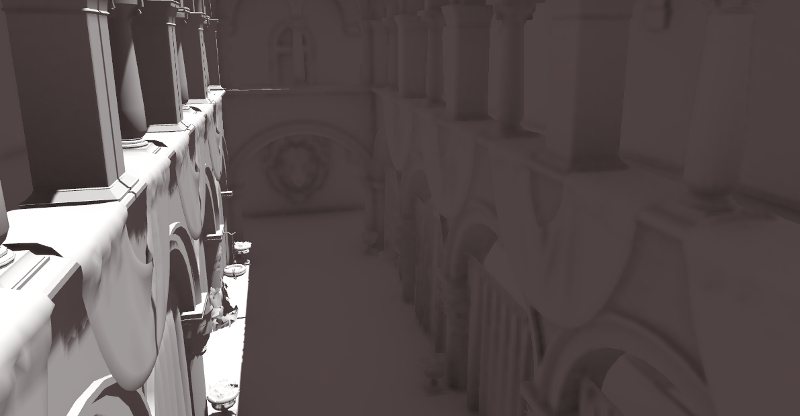
È un errore comune abilitare questo effetto, accendere una luce e poi non riuscire ad apprezzarlo. Questo perché l'SSAO agisce solo sulla luce ambientale. Non influisce sulla luce diretta.
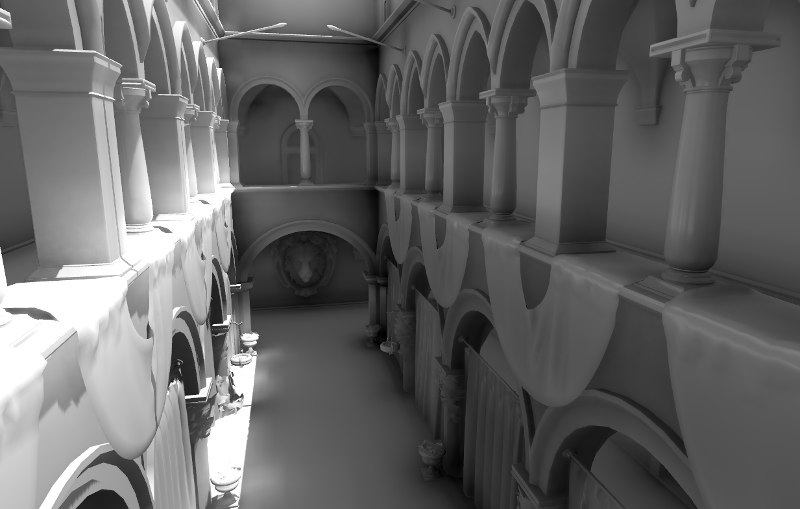
Ecco perché, nell'immagine qui sopra, l'effetto è meno evidente sotto la luce diretta (a sinistra). Se vuoi forzare l'SSAO a funzionare anche con la luce diretta, utilizza il parametro Light Affect. Sebbene non sia fisicamente corretto, ad alcuni artisti piace questo aspetto.
SSAO appare al meglio se combinato con una vera fonte di luce indiretta, come VoxelGI:
È possibile regolare l'SSAO tramite diversi parametri:
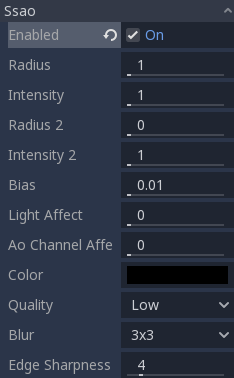
Raggio: La distanza alla quale gli oggetti possono occludersi a vicenda durante il calcolo dell'occlusione ambientale nello spazio dello schermo. Valori più elevati risulteranno in un'occlusione su una distanza maggiore, a scapito delle prestazioni e della qualità.
Intensitày l'intensità primaria dell'occlusione ambientale nello spazio dello schermo. Agisce come un moltiplicatore per questo effetto. Un valore più alto risulta in un'occlusione più scura. Poiché l'SSAO è un effetto nello spazio dello schermo, si consiglia di essere prudenti con questo valore. Un SSAO troppo intenso può essere fastidioso durante il gioco.
Power: la distribuzione dell'occlusione. Un valore più alto risulta in un'occlusione più scura, simile a 'Intensity, ma con una sfumatura più netta.
Detail: imposta l'intensità del livello di dettaglio aggiuntivo per l'effetto di occlusione ambientale nello spazio dello schermo. Un valore alto rende il passaggio di dettaglio più evidente, ma potrebbe contribuire all'aliasing nell'immagine finale.
Horizon: la soglia per considerare se un determinato punto su una superficie è occluso o no, rappresentato come un angolo dall'orizzonte mappato nell'intervallo 0,0-1,0. Un valore di 1,0 risulta in nessuna occlusione.
Sharpness: la quantità di sfocatura consentita all'effetto di occlusione ambientale nello spazio dello schermo sui bordi degli oggetti. Un valore troppo alto farà comparire aliasing attorno ai bordi degli oggetti. Un valore troppo basso renderà i bordi degli oggetti sfocati.
Light Affect: L'intensità dell'occlusione ambientale nello spazio dello schermo, sottoposta a luce diretta. Nella realtà, l'occlusione ambientale si applica solo alla luce indiretta, il che significa che i suoi effetti non sono visibili sotto la luce diretta. Valori più alti di 0 renderanno visibile l'effetto SSAO sotto la luce diretta. Valori più alti di
0.0non sono fisicamente accurati, ma alcuni artisti lo preferiscono così.AO Channel Affect l'intensità dell'occlusione ambientale nello spazio dello schermo sui materiali che hanno una texture AO definita. Valori più alti di
0.0renderanno visibile l'effetto SSAO nelle aree oscurate dalle texture AO.
Inoltre, è possibile regolare la qualità dell'SSAO nella sezione Rendering > Environment > SSAO delle impostazioni del progetto:
Quality: imposta la qualità dell'effetto di occlusione ambientale nello spazio dello schermo. Valori più alti richiedono più campioni e risulteranno in una qualità migliore a scapito delle prestazioni. Impostandola su Ultra sarà utilizzata l'impostazione Adaptive Target (vedi sotto).
Half Size: se
true, l'occlusione ambientale nello spazio dello schermo sarà renderizzata a metà dimensione e poi ingrandita prima di essere aggiunta alla scena. Questo è significativamente più veloce, ma potrebbe non includere piccoli dettagli. Sefalse, l'occlusione ambientale nello spazio dello schermo sarà renderizzata a dimensione intera.Adaptive Target: obiettivo di qualità da usare quando Quality è impostato su Ultra. Un valore di
0.0offre una qualità e una velocità simili a quelle di Medium, mentre un valore di1.0offre una qualità molto più elevata rispetto a qualsiasi altra impostazione, a scapito delle prestazioni.Blur Passes: il numero di passaggi di sfocatura da utilizzare quando si calcola l'occlusione ambientale nello spazio dello schermo. Un numero più alto produrrà un aspetto più fluido, ma sarà più lento da calcolare e avrà meno dettagli ad alta frequenza.
Fadeout From: distanza alla quale l'effetto di occlusione ambientale nello spazio dello schermo inizia a svanire. Usa questa per nascondere l'occlusione ambientale da lontano.
Fadeout To: distanza alla quale l'occlusione ambientale nello spazio sullo schermo svanisce totalmente. Usa questa per nascondere l'occlusione ambientale da lontano.
Nota
A partire da Godot 4.6, è disponibile una versione semplificata dell'SSAO nel renderer Compatibilità. Questa implementazione ha un aspetto diverso, ma dovrebbe offrire prestazioni significativamente migliori sui dispositivi di fascia bassa rispetto all'SSAO in Forward+.
Quando si utilizza il renderer Compatibilità, solo i parametri Radius e Intensity si possono regolare.
Illuminazione indiretta nello spazio dello schermo (SSIL)
Questa funzionalità è disponibile solo quando si utilizza il renderer Forward+, non Mobile o Compatibilità.
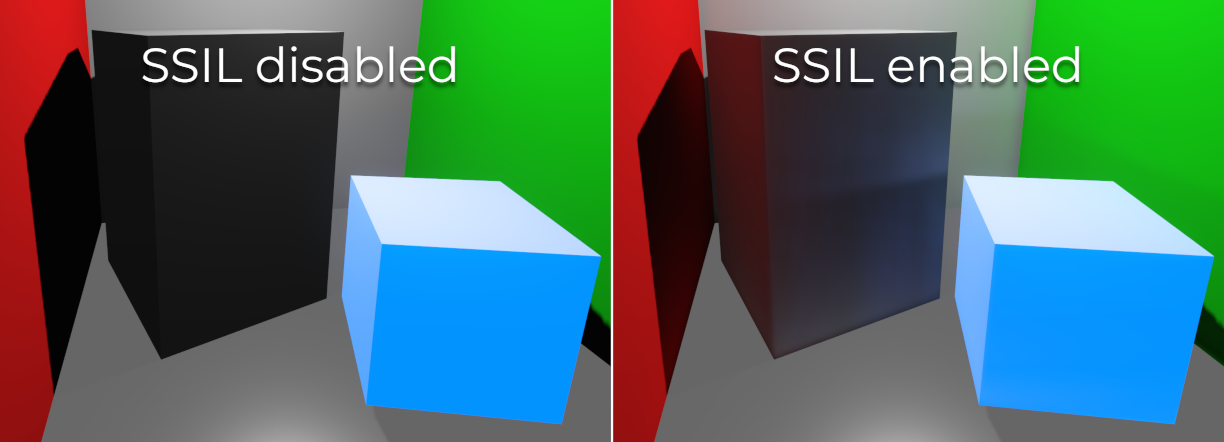
SSIL provides indirect lighting for small details or dynamic geometry that other global illumination techniques cannot cover. This applies to bounced diffuse lighting, but also emissive materials. When SSIL is enabled on its own, the effect may not be that noticeable, which is intended.
Invece, SSIL è concepito da complemento ad altre tecniche di illuminazione globale come VoxelGI, SDFGI e LightmapGI. SSIL fornisce anche un lieve effetto di occlusione ambientale, simile a SSAO, ma con meno dettagli.
This feature only provides indirect lighting. It is not a full global illumination solution. This makes it different from screen-space global illumination (SSGI) offered by other 3D engines. SSIL can be combined with SSR and/or SSAO for greater visual quality (at the cost of performance).
Tweaking SSIL is possible with several parameters:
Radius: The distance that bounced lighting can travel when using the screen space indirect lighting effect. A larger value will result in light bouncing further in a scene, but may result in under-sampling artifacts which look like long spikes surrounding light sources.
Intensity: The brightness multiplier for the screen-space indirect lighting effect. A higher value will result in brighter light.
Sharpness: The amount that the screen-space indirect lighting effect is allowed to blur over the edges of objects. Setting too high will result in aliasing around the edges of objects. Setting too low will make object edges appear blurry.
Normal Rejection: Amount of normal rejection used when calculating screen-space indirect lighting. Normal rejection uses the normal of a given sample point to reject samples that are facing away from the current pixel. Normal rejection is necessary to avoid light leaking when only one side of an object is illuminated. However, normal rejection can be disabled if light leaking is desirable, such as when the scene mostly contains emissive objects that emit light from faces that cannot be seen from the camera.
Inoltre, è possibile regolare la qualità dell'SSIL nelle impostazioni del progetto, nella sezione Rendering > Environment > SSIL:
Quality: imposta la qualità dell'effetto di occlusione ambientale nello spazio dello schermo. Valori più alti richiedono più campioni e risulteranno in una qualità migliore a scapito delle prestazioni. Impostandola su Ultra sarà utilizzata l'impostazione Adaptive Target (vedi sotto).
Half Size: se
true, l'occlusione ambientale nello spazio dello schermo sarà renderizzata a metà dimensione e poi ingrandita prima di essere aggiunta alla scena. Questo è significativamente più veloce, ma potrebbe non includere piccoli dettagli. Sefalse, l'occlusione ambientale nello spazio dello schermo sarà renderizzata a dimensione intera.Adaptive Target: obiettivo di qualità da usare quando Quality è impostato su Ultra. Un valore di
0.0offre una qualità e una velocità simili a quelle di Medium, mentre un valore di1.0offre una qualità molto più elevata rispetto a qualsiasi altra impostazione, a scapito delle prestazioni. Quando si usa l'obiettivo adattivo, l'impatto sulle prestazioni aumenta con la complessità della scena.Blur Passes: Il numero di passaggi di sfocatura da utilizzare quando si calcola l'illuminazione indiretta nello spazio sullo schermo. Un numero più alto produrrà un aspetto più fluido, ma sarà più lento da calcolare e avrà meno dettagli ad alta frequenza.
Fadeout From: distanza alla quale l'effetto di illuminazione indiretta nello spazio dello schermo inizia a svanire. Usa questa per nascondere l'illuminazione indiretta nello spazio dello schermo da lontano.
Fadeout To: distanza alla quale l'effetto di illuminazione indiretta nello spazio dello schermo svanisce totalmente. Usa questa per nascondere l'illuminazione indiretta nello spazio dello schermo da lontano.
Signed Distance Field Global Illumination (SDFGI)
Questa funzionalità è disponibile solo quando si utilizza il renderer Forward+, non Mobile o Compatibilità.
Signed distance field global illumination (SDFGI) is a form of real-time global illumination. It is not a screen-space effect, which means it can provide global illumination for off-screen elements (unlike SSIL).
Vedi anche
See Signed distance field global illumination (SDFGI) for instructions on setting up this global illumination technique.
Bagliore
Nota
When using the Compatibility rendering method, glow uses a different implementation with some properties being unavailable and hidden from the inspector: Levels, Normalized, Strength, Blend Mode, Mix, Map, and Map Strength.
This implementation is optimized to run on low-end devices and is less flexible as a result.
In photography and film, when light amount exceeds the maximum luminance (brightness) supported by the media, it generally bleeds outwards to darker regions of the image. This is simulated in Godot with the Glow effect.
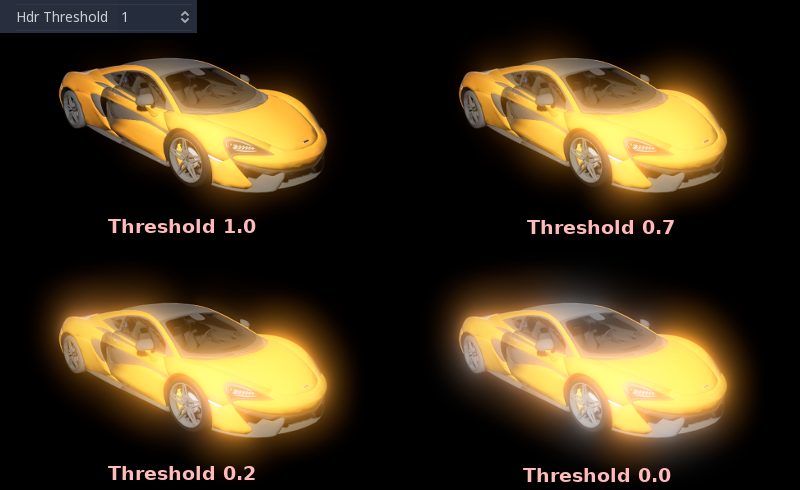
By default, even if the effect is enabled, it will be weak or invisible. One of two conditions need to happen for it to actually show:
The light in a pixel surpasses the HDR Threshold (where 0 is all light surpasses it, and 1.0 is light over the tonemapper White value). Normally, this value is expected to be at 1.0, but it can be lowered to allow more light to bleed. There is also an extra parameter, HDR Scale, that allows scaling (making brighter or darker) the light surpassing the threshold.
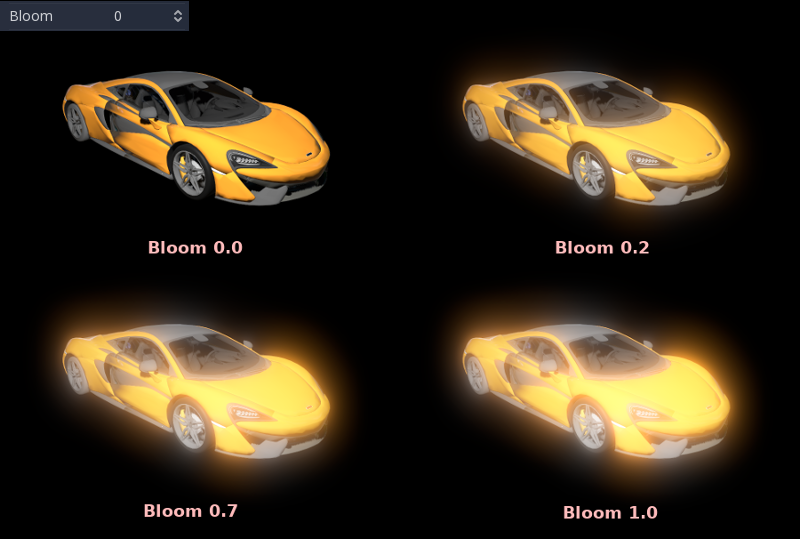
The Bloom property has a value greater than
0.0. As it increases, it sends the whole screen to the glow processor at higher amounts.
Both will cause the light to start bleeding out of the brighter areas.
Once glow is visible, it can be controlled with a few extra parameters:
Intensity is an overall scale for the effect, it can be made stronger or weaker (
0.0removes it).Strength is how strong the gaussian filter kernel is processed. Greater values make the filter saturate and expand outwards. In general, changing this is not needed, as the size can be adjusted more efficiently with the Levels.
È possibile anche cambiare la Modalità di fusione dell'effetto:
Additive is the strongest one, as it only adds the glow effect over the image with no blending involved. In general, it's too strong to be used, but can look good with low-intensity Bloom (produces a dream-like effect).
Screen ensures glow never brightens more than itself and it works great as an all around.
Softlight is the default and weakest one, producing only a subtle color disturbance around the objects. This mode works best on dark scenes.
Replace can be used to blur the whole screen or debug the effect. It only shows the glow effect without the image below.
Mix mixes the glow effect with the main image. This can be used for greater artistic control. The mix factor is controlled by the Mix property which appears above the blend mode (only when the blend mode is set to Mix). High mix factor values will appear to darken the image unless Bloom is increased.
To change the glow effect size and shape, Godot provides Levels. Smaller levels are strong glows that appear around objects, while large levels are hazy glows covering the whole screen:
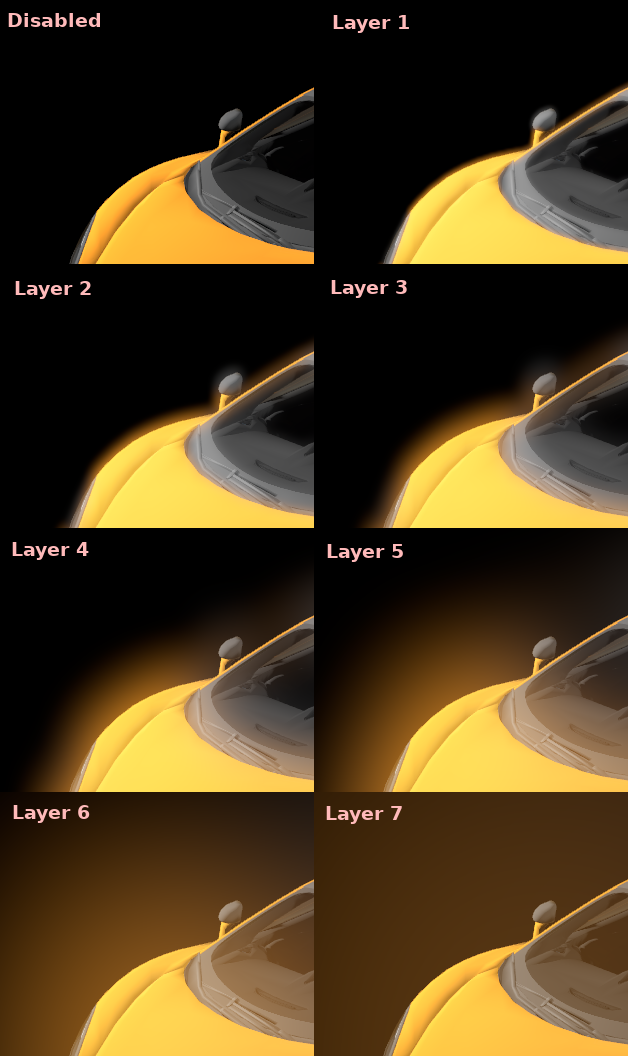
The real strength of this system, though, is to combine levels to create more interesting glow patterns:
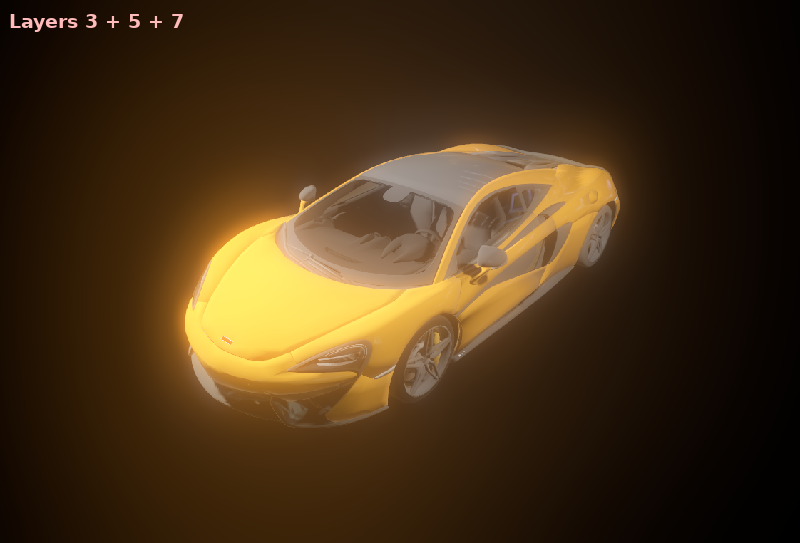
Finally, the glow effect can be controlled using a glow map, which is a texture that determines how bright glow should be on each part of the screen. This texture can optionally be colored to tint the glow effect to the glow map's color. The texture is stretched to fit the viewport, so using an aspect ratio that matches your viewport's most common aspect ratio (such as 16:9) is recommended to avoid visible distortion.
There are 2 main use cases for a glow map texture:
Create a "lens dirt" effect using a dirt pattern texture.
Make glow less strong on specific parts of the screen by using a gradient texture.
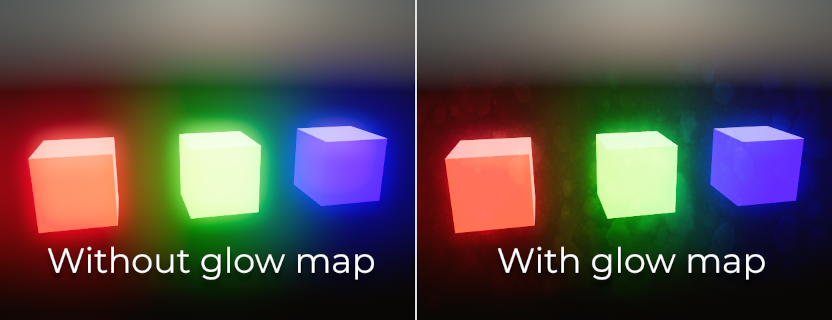
By default, glow uses a bicubic scaling filter on desktop platforms and a bilinear scaling filter on mobile platforms. The bicubic scaling filter results in higher quality with a less blocky appearance, but it has a performance cost on the GPU which can be significant on integrated graphics. The scale mode can be controlled using the Rendering > Environment > Glow > Upscale Mode project setting. This setting is only effective when using the Forward+ or Mobile renderers, as Compatibility uses a different glow implementation.
Utilizzo di bagliore in 2D
Esistono due modi per utilizzare il bagliore in 2D:
A partire da Godot 4.2, è possibile abilitare l'HDR per il rendering 2D quando si utilizzano i metodi di rendering Forward+ e Mobile. Ciò ha un impatto sulle prestazioni, ma consente una maggiore gamma dinamica. Permette inoltre di controllare quali oggetti si illuminano tramite le loro proprietà Modulate o Self Modulate individuali (usando lo slider dell'intensità nel selettore di colore). Abilitare l'HDR può anche ridurre il banding nell'output di rendering 2D.
To enable HDR in 2D, open the Project Settings, enable Rendering > Viewport > HDR 2D then restart the editor.
If you want to maximize performance, you can leave HDR disabled for 2D rendering. However, you will have less control on which objects glow.
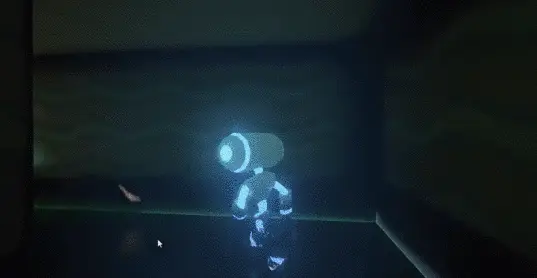
Enable glow, set the environment background mode to Canvas then decrease Glow HDR Threshold so that pixels that are not overbright will still glow. To prevent UI elements from glowing, make them children of a CanvasLayer node. You can control which layers are affected by glow using the Background > Canvas Max Layer property of the Environment resource.
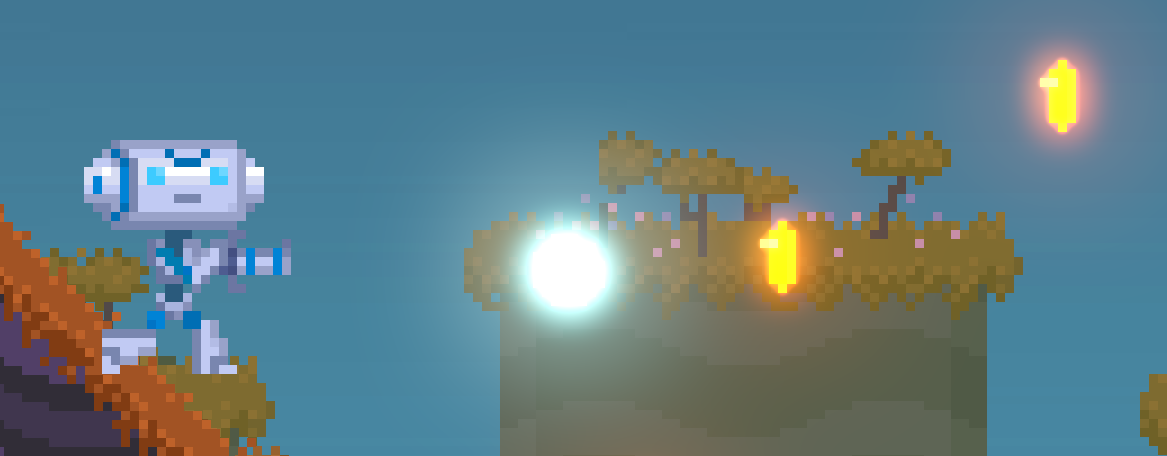
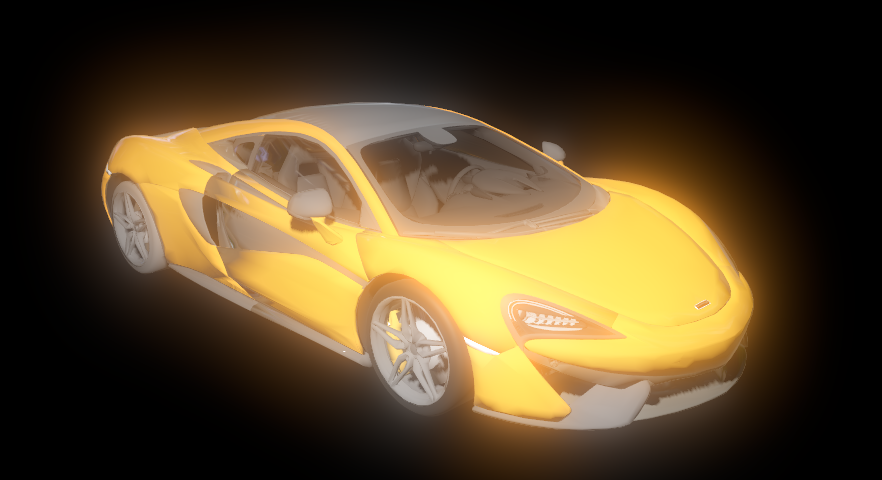
Esempio di utilizzo dell'effetto bagliore in una scena 2D. L'HDR 2D è abilitato, mentre le monete e il proiettile hanno la proprietà Modulate aumentata a valori sovra-luminosi tramite lo slider dell'intensità nel selettore di colore.
Avvertimento
The 2D renderer renders in linear color space if the
Rendering > Viewport > HDR 2D
project setting is enabled, so the source_color hint must also be used
for uniform samplers that are used as color input in canvas_item shaders.
If this is not done, the texture will appear washed out.
If 2D HDR is disabled, source_color will keep working correctly in
canvas_item shaders, so it's recommend to use it when relevant either
way.
Using linear color space also means that alpha blending will change. Sprites with low opacity values generally become more visible, and font rendering will look bolder due to the low-opacity pixels from the font antialiasing becoming more visible. This also affects the editor's own rendering.
Using glow to blur the screen
Glow can be used to blur the whole viewport, which is useful for background blur when a menu is open. Only 3D rendering will be affected unless the environment's background mode is set to Canvas. To prevent UI elements from being blurred when using the Canvas background mode, make them children of a CanvasLayer node. You can control which layers are affected by this blurring effect using the Background > Canvas Max Layer property of the Environment resource.
To use glow as a blurring solution:
Enable Normalized and adjust levels according to preference. Increasing higher level indices will result in a more blurred image. It's recommended to leave a single glow level at
1.0and leave all other glow levels at0.0, but this is not required. Note that the final appearance will vary depending on viewport resolution.Set Intensity to
1.0and Bloom to1.0.Set the blend mode to Replace and HDR Luminance Cap to
1.0.
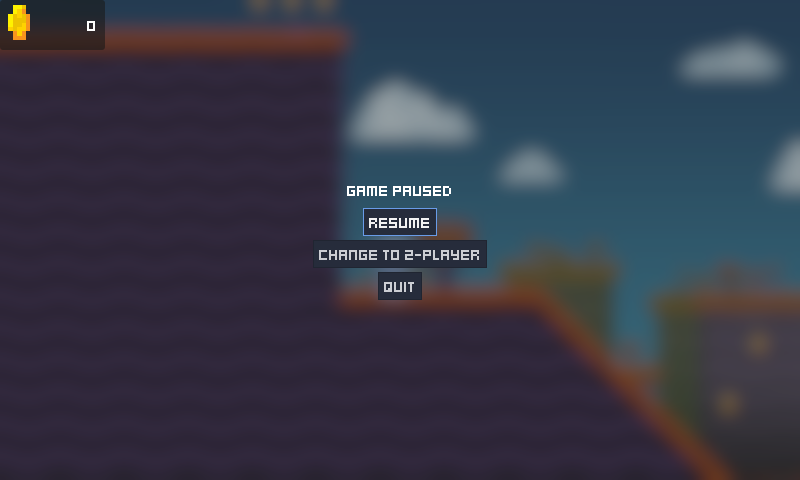
Example of using glow to blur the 2D rendering in the menu's background
Nebbia
Nota
This section refers to non-volumetric fog only. It is possible to use both non-volumetric fog and Nebbia volumetrica e volumi di nebbia at the same time.
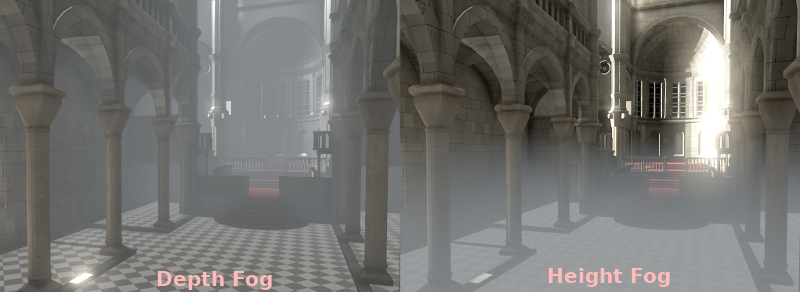
Fog, as in real life, makes distant objects fade away into a uniform color. There are two kinds of fog in Godot:
Depth Fog: This one is applied based on the distance from the camera.
Height Fog: This one is applied to any objects below (or above) a certain height, regardless of the distance from the camera.
Entrambi questi tipi di nebbia possono avere loro curve regolate, rendendo la loro transizione più o meno netta.
Two properties can be tweaked to make the fog effect more interesting:
La prima è Sun Scatter, che utilizza il colore e l'energia della DirectionalLight3D nella scena attuale. Quando si guarda verso la luce direzionale (di solito un sole), la nebbia sarà colorata in base al colore della luce per simulare la luce solare che la attraversa.
The second is Aerial Perspective, which tints the fog color according to the
sky color to better blend the sky with the background. Higher values will result
in more tinting, with 1.0 fully replacing the regular fog color with aerial
perspective. This can be used in large open world levels to provide a better
sense of depth, or to avoid color discontinuities between the sky and fog colors.
If both Sun Scatter and Aerial Perspective are greater than 0.0, sun
scattering is applied on top of aerial perspective.
Nota
Fog can cause banding to appear on the viewport, especially at higher density levels. See Color banding for guidance on reducing banding.
Volumetric Fog
Volumetric fog provides a realistic fog effect to the scene, with fog color being affected by the lights that traverse the fog.
Vedi anche
Consulta Nebbia volumetrica e volumi di nebbia per la documentazione sulla configurazione della nebbia volumetrica.
Aggiustamenti
At the end of processing, Godot offers the possibility to do some standard image adjustments.
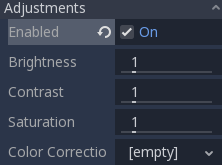
Aggiustamenti BCS basilari
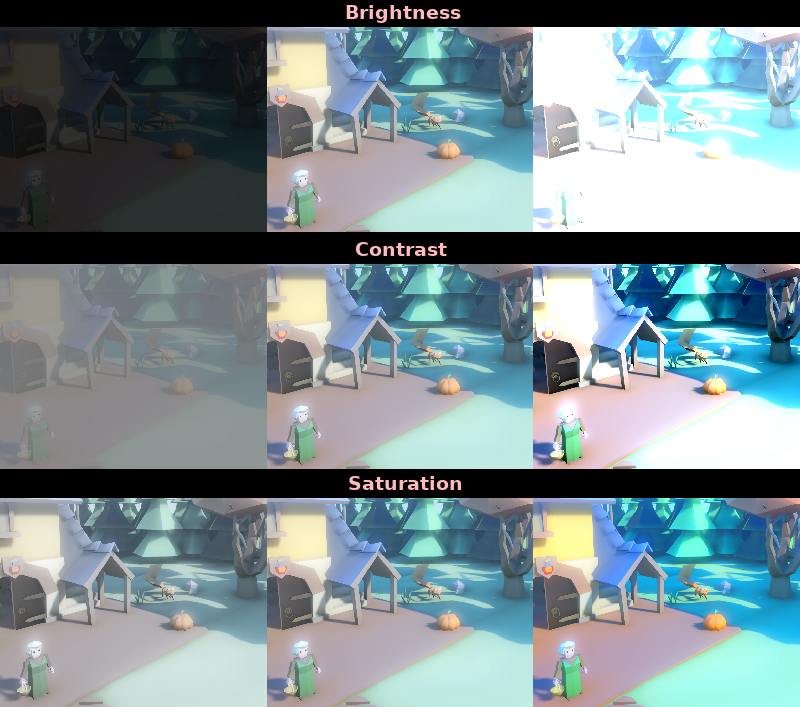
The first adjustment is being able to change the typical Brightness, Contrast, and Saturation properties:
Correzione del colore tramite una gradiente unidimensionale
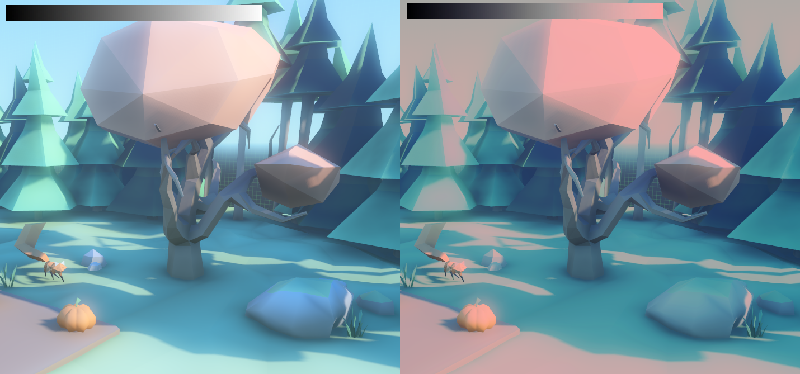
The second adjustment is by supplying a color correction gradient. This can be done by assigning a GradientTexture1D resource to the Color Correction property, or by loading a texture containing a horizontal gradient. The leftmost part of the gradient represents black in the source image, whereas the rightmost part of the gradient represents white in the source image.
A linear black-to-white gradient like the following one will produce no effect:

But creating custom ones will allow to map each channel to a different color:
Correzione del colore tramite un LUT 3D
A 3D look-up-texture (LUT) can also be used for color correction. This is a special texture used to modify each color channel separately from one another (red, green, blue). This image can be of any resolution, but since color correction is low-frequency data, sticking to low resolutions is recommended for performance reasons. A LUT texture's resolution is typically 17×17×17, 33×33×33, 51×51×51 or 65×65×65 (the odd size allows for better interpolation).
For this to work, the look-up texture's import mode must be set to Texture3D in the Import dock (instead of being imported as a regular Texture2D):
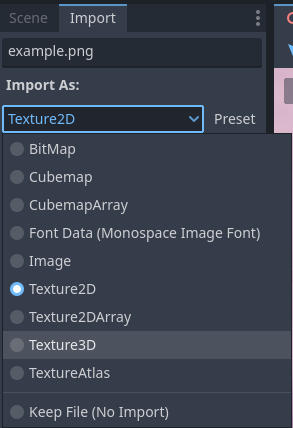
Make sure to configure the number of horizontal and vertical slices to import as well. If you don't do this, the LUT texture will not affect the viewport correctly when used. You can preview how the 3D texture was imported by double-clicking it, in the FileSystem dock, then going to the inspector to flip through the texture's layers.
Puoi usare questo modello LUT neutro 33×33×33 come base (fai clic destro e scegli Salva come…):

With the above LUT template, after changing its import mode to Texture3D,
set its number of Horizontal slices to 33 in the Import dock then click
Reimport. If you load this LUT into the Color Correction property, you
won't see any visible difference for now since this texture is designed to be a
neutral starting point.
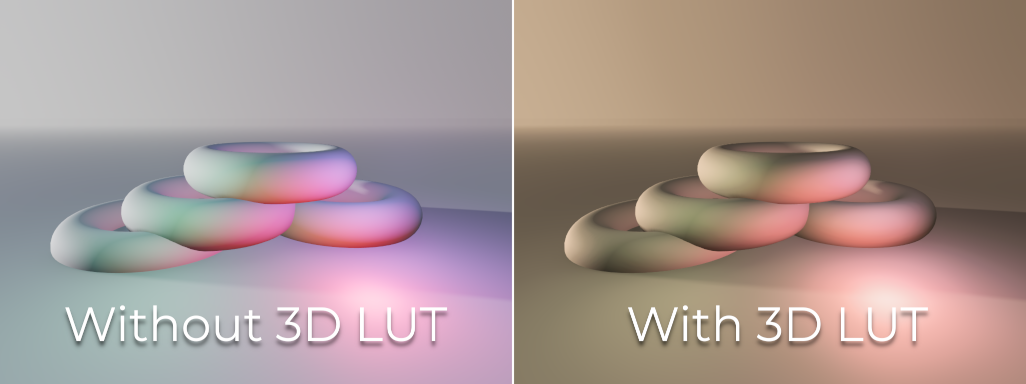
This LUT template can be modified in an image editor to provide a different mood to the image. A common workflow is to place the LUT image next to a screenshot of the project's 3D viewport, then use an image editor to modify both the LUT image and the screenshot at the same time. The LUT can then be saved and applied to the game engine to perform the same color correction in real-time.
For example, modifying the LUT template in an image editor to give it a "sepia" look results in the image on the right:
Nota
Adjustments and color correction are applied after tonemapping. This means the tonemapping properties defined above still have an effect when adjustments are enabled.
Opzioni di attributi della telecamera
Godot offre due tipi di attributi di telecamera: fisico e pratico. Quando si usa CameraAttributesPhysical anziché CameraAttributesPractical, la profondità di campo è calcolata automaticamente in base alla distanza della messa a fuoco, alla lunghezza focale e all'apertura specificate dagli attributi di telecamera. Sono inoltre disponibili opzioni relative al frustum.
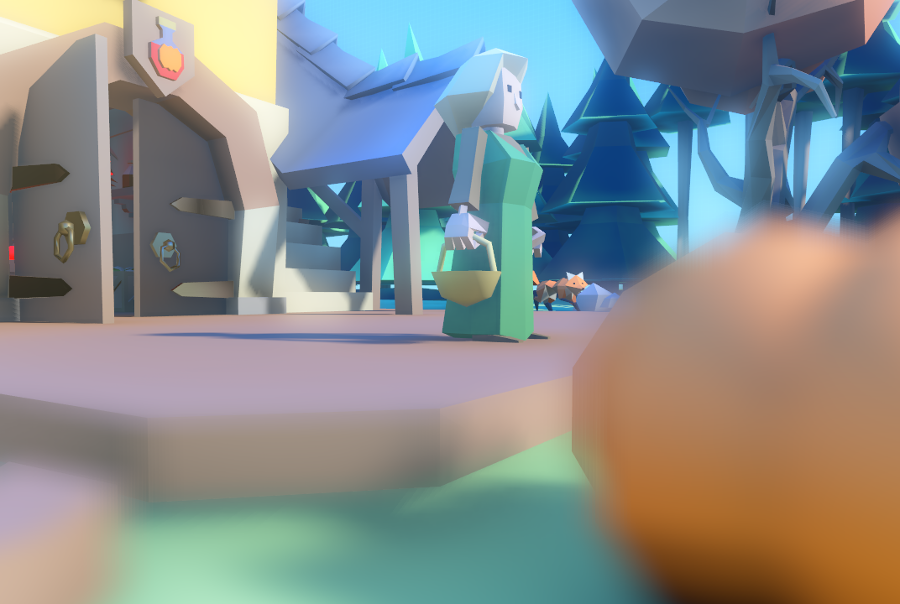
Depth of Field / Far Blur
Questo effetto simula la distanza focale delle telecamere. Sfoca gli oggetti dietro una determinata distanza. Ha una distanza (Distance) iniziale con una regione di transizione (Transition) (in unità del mondo):
Il parametro Amount controlla l'intensità della sfocatura. Per sfocature più grandi, potrebbe essere necessario regolare la qualità della profondità di campo nelle impostazioni avanzate del progetto per evitare artefatti.
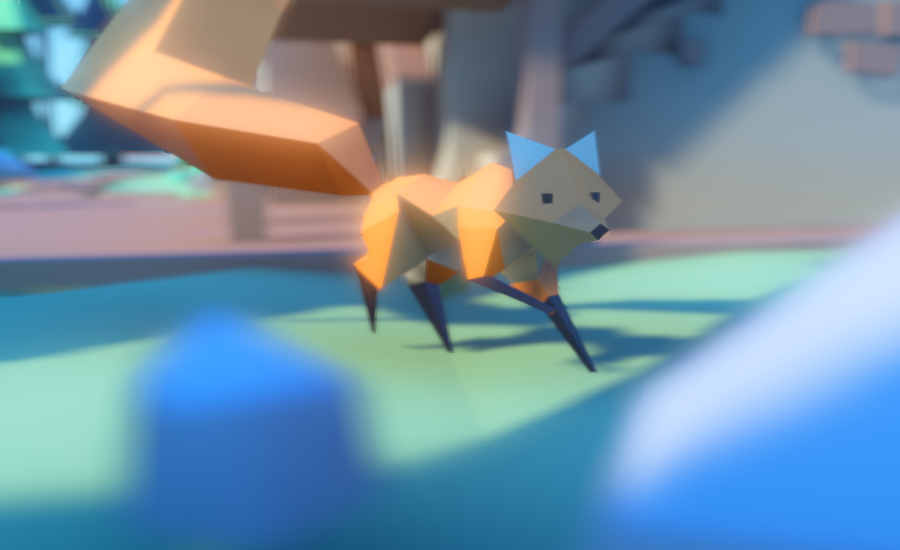
Depth of Field / Near Blur
Questo effetto simula la distanza focale delle telecamere. Sfoca gli oggetti vicini alla telecamera (agisce in direzione opposta rispetto alla sfocatura lontana). Ha una distanza (Distance) iniziale con una regione di transizione (Transition) (in unità del mondo):
Il parametro Amount controlla l'intensità della sfocatura. Per sfocature più grandi, potrebbe essere necessario regolare la qualità della profondità di campo nelle impostazioni avanzate del progetto per evitare artefatti.
È comune utilizzare entrambe le sfocature insieme per focalizzare l'attenzione dello spettatore su un determinato oggetto, o per creare il cosiddetto effetto "tilt shift" <https://en.wikipedia.org/wiki/Miniature_faking>`__.
Esposizione
Questo moltiplica la luminosità generale della scena visibile dalla telecamera. Valori più alti risultano in una scena visivamente più luminosa.
Esposizione automatica
Questa funzionalità è disponibile solo quando si utilizza il renderer Forward+, non Mobile o Compatibilità.
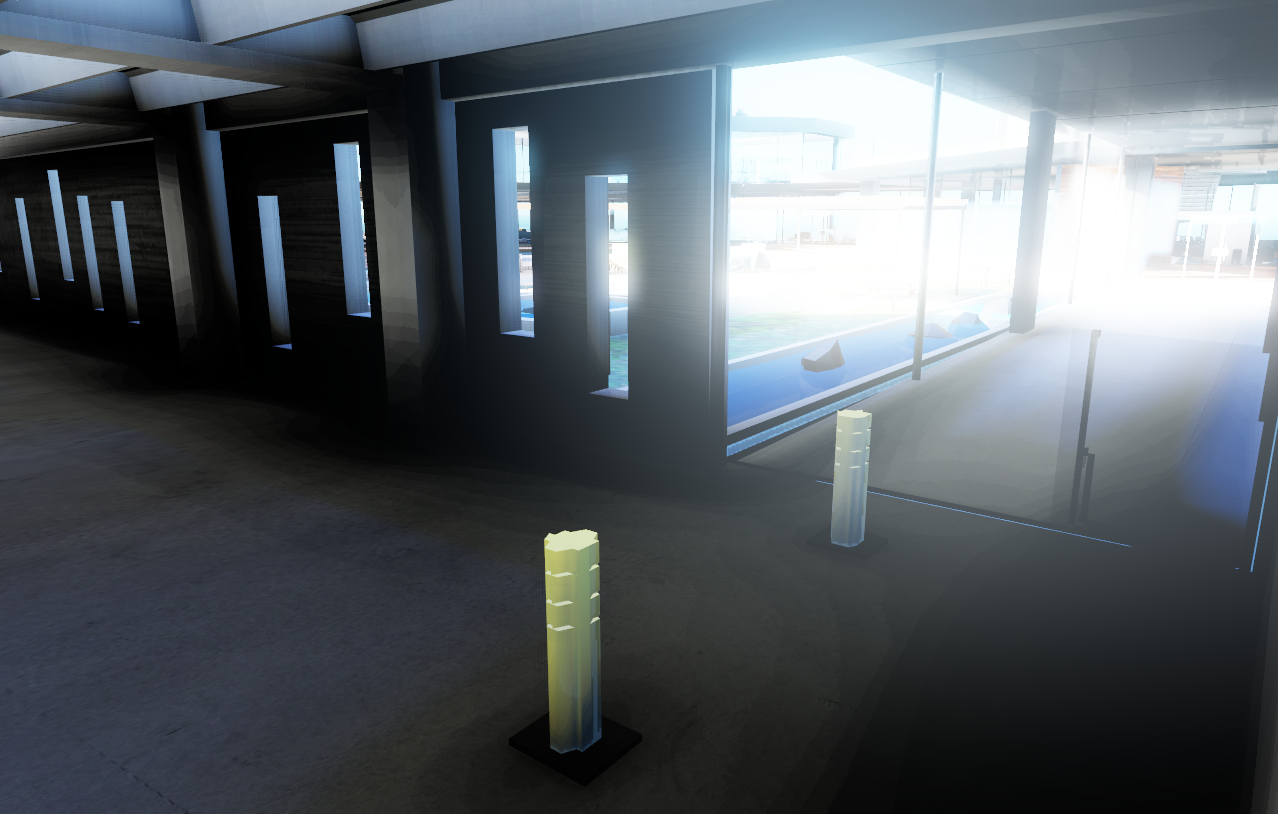
Sebbene, perlopiù delle volte, l'illuminazione e le texture siano fortemente controllate dagli artisti, Godot supporta un'implementazione basilare dell'ampia gamma dinamica tramite il meccanismo di esposizione automatica. Serve generalmente per aggiungere realismo quando si combinano aree interne con poca luce e aree esterne luminose. L'esposizione automatica simula la fotocamera (o l'occhio) che tenta di adattarsi tra ambienti chiari e scuri e le loro diverse quantità di luce.
Nota
L'esposizione automatica richiede di valutare la luminosità della scena a ogni frame, il che ha un moderato impatto sulle prestazioni. Pertanto, si consiglia di lasciare l'esposizione automatica disabilitata se non fa molta differenza nella scena.
Il modo più semplice per utilizzare l'esposizione automatica è assicurarsi che le luci esterne (o altre luci intense) abbiano un'energia superiore a 1.0. Lo si ottiene regolando il moltiplicatore dell'energia (Energy) (sulla luce stessa). Per renderlo coerente, anche il cielo (Sky) di solito deve utilizzare il moltiplicatore dell'energia, per corrispondere alla luce direzionale. Normalmente, valori compresi tra 3.0 e 6.0 bastano per simulare le condizioni interne-esterne.
Combinando l'esposizione automatica con la post-elaborazione Bagliore, i pixel che superano il bianco della mappa dei toni si diffonderanno nel buffer di bagliore, creando il tipico effetto bloom in fotografia.
I valori regolabili dall'utente nella sezione Auto Exposure sono preimpostati con valori ragionevoli, ma è comunque possibile modificarli:
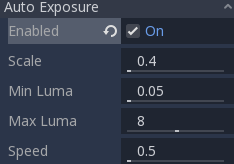
Scale: valore per scalare l'illuminazione. Valori più alti producono immagini più luminose, mentre valori più bassi producono immagini più scure.
Min Sensitivity / Min Exposure Value: luminanza minima a cui l'esposizione automatica tenterà di adattarsi (in ISO quando si utilizza CameraAttributesPractical, o in EV100 quando si utilizza CameraAttributesPhysical). La luminanza è la media della luce in tutti i pixel dello schermo.
Max Sensitivity / Max Exposure Value: luminanza massima a cui l'esposizione automatica tenterà di adattarsi (in ISO quando si utilizza CameraAttributesPractical, o in EV100 quando si utilizza CameraAttributesPhysical).
Speed: Speed at which luminance corrects itself. The higher the value, the faster luminance correction happens. High values may be more suited to fast-paced games, but can be distracting in some scenarios.
Quando si utilizza CameraAttributesPractical, l'esposizione viene impostata utilizzando la sensibilità definita in ISO anziché un valore di esposizione in EV100. I valori ISO tipici sono compresi tra 50 e 3200, con valori più alti che risultano in un'esposizione finale maggiore. Nella vita reale, la fotografia diurna utilizza generalmente valori ISO compresi tra 100 e 800.
Vedi anche
Consultare Unità fisiche di luce e telecamera se si desidera utilizzare unità di misura reali per configurare l'esposizione, il campo visivo e la profondità di campo della telecamera.