Attention: Here be dragons
This is the latest
(unstable) version of this documentation, which may document features
not available in or compatible with released stable versions of Godot.
Checking the stable version of the documentation...
Using Lightmap global illumination
Le lightmap precalcolate sono una procedura per aggiungere illuminazione indiretta (o completamente precalcolata) a una scena. A differenza degli approcci VoxelGI e SDFGI, le lightmap precalcolate funzionano bene anche su PC di fascia bassa e dispositivi mobili, poiché consumano pochissime risorse in fase di esecuzione. Inoltre, a differenza di VoxelGI e SDFGI, le lightmap precalcolate si possono utilizzare, facoltativamente, per memorizzare l'illuminazione diretta, il che offre ulteriori miglioramenti sulle prestazioni.
Unlike VoxelGI and SDFGI, baked lightmaps are completely static. Once baked, they can't be modified at all. They also don't provide the scene with reflections, so using Sonde di riflessi together with it on interiors (or using a Sky on exteriors) is a requirement to get good quality.
Essendo precalcolate, soffrono meno da perdite di luce rispetto a VoxelGI e SDFGI, e l'illuminazione indiretta appare spesso migliore. Lo svantaggio è che la preparazione delle lightmap richiede più tempo rispetto alla preparazione di VoxelGI. Mentre la preparazione di VoxelGI può essere completata in pochi secondi, quella delle lightmap può richiedere diversi minuti, se non di più. Questo può rallentare notevolmente la velocità di iterazione, quindi si consiglia di generare le lightmap solo quando è effettivamente necessario vedere cambiamenti nell'illuminazione. Le lightmap sono preparate sulla GPU, il che rende la preparazione più veloce se si dispone di una GPU dedicata di fascia media o alta.
La preparazione delle lightmap riserva anche lo slot UV2 dei materiali, il che significa che non si potrà più utilizzare per altri motivi nei materiali (né nel Standard Material 3D and ORM Material 3D integrato né negli shader personalizzati).
Nonostante la loro scarsa flessibilità, le lightmap precalcolate offrono in genere la migliore qualità e le migliori prestazioni allo stesso tempo nelle scene (perlopiù) statiche. Questo rende le lightmap ancora popolari nello sviluppo di giochi, nonostante siano la tecnica più antica per l'illuminazione globale nei videogiochi.
Vedi anche
Non sai se LightmapGI è adatto alle tue esigenze? Consulta Quale tecnica di illuminazione globale dovrei utilizzare? per un confronto tra le tecniche di illuminazione globale disponibili in Godot 4.
Confronto visivo
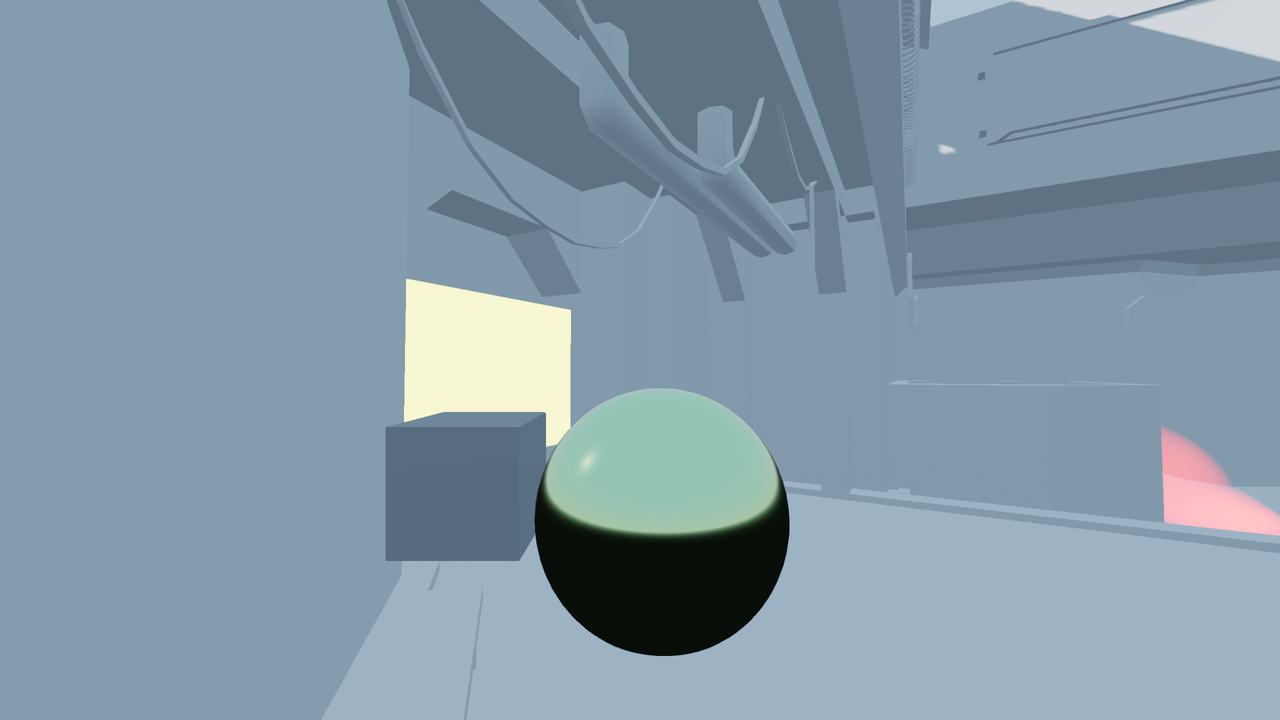
LightmapGI disabilitato.
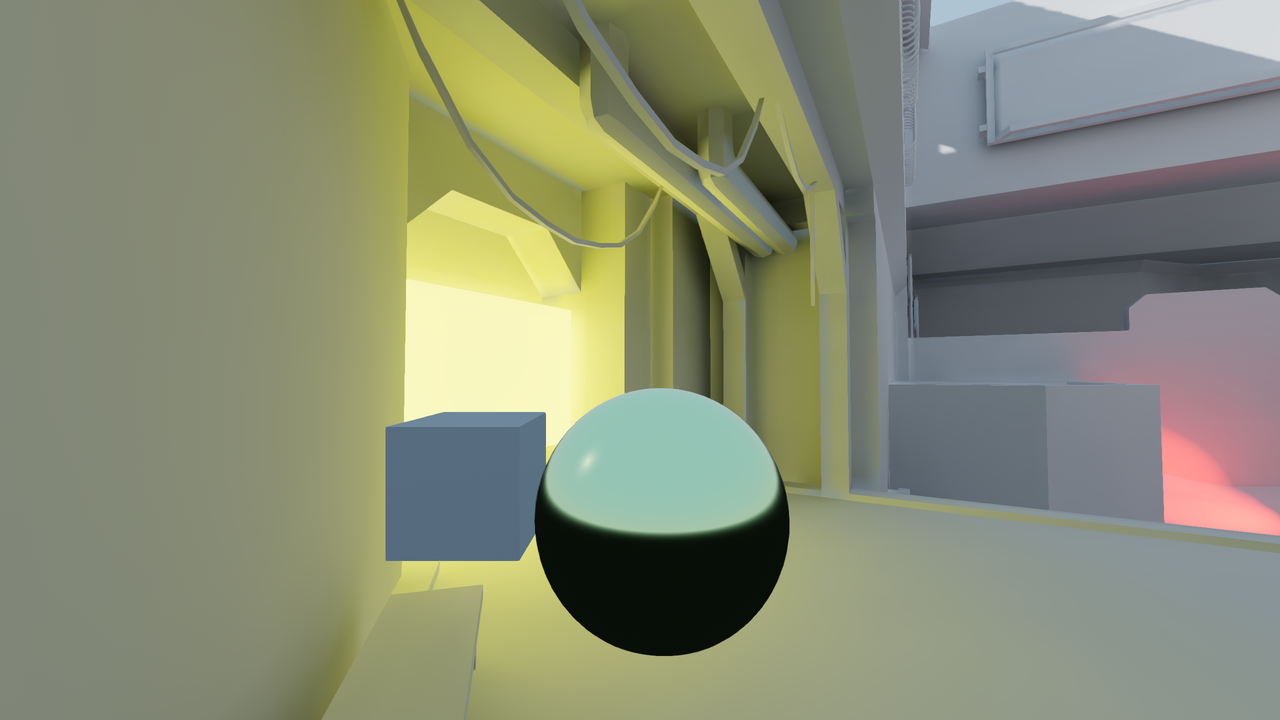
LightmapGI abilitato (solo con illuminazione indiretta precalcolata). L'illuminazione diretta rimane in tempo reale, consentendo lievi modifiche durante il gioco.
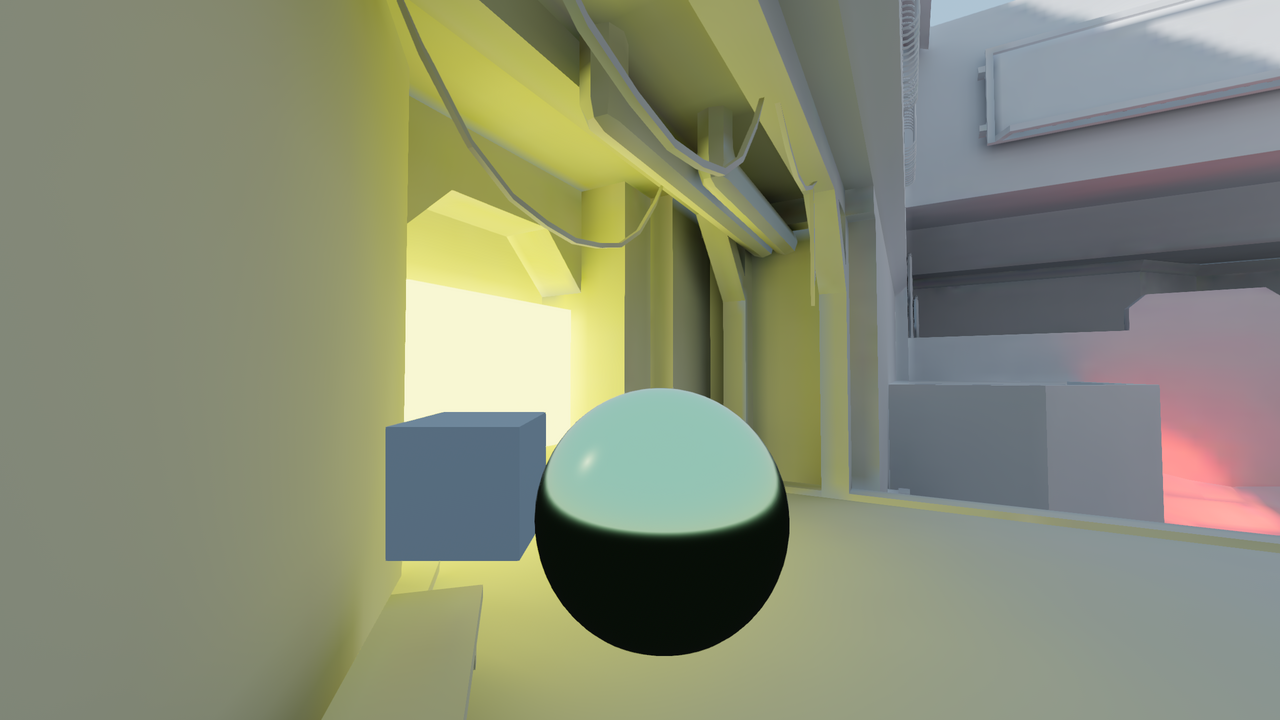
LightmapGI abilitato (con illuminazione diretta e indiretta precalcolata). Prestazioni migliori, ma qualità visiva inferiore. Notare l'ombra del sole più sfocata nell'angolo in alto a destra.
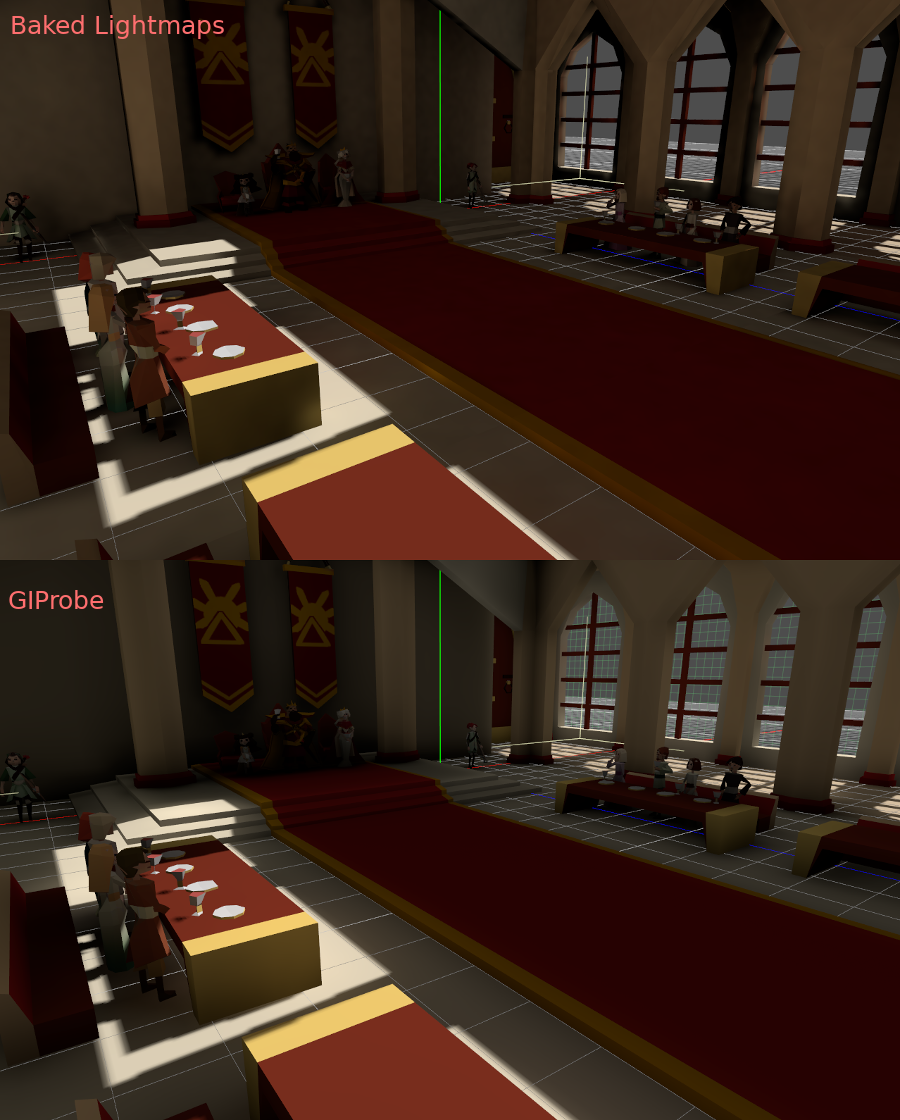
Ecco alcuni confronti tra l'aspetto di LightmapGI e VoxelGI. Si noti che le lightmap sono più precise, ma soffrono anche del fatto che l'illuminazione è applicata a una texture non mappata, quindi le transizioni e la risoluzione potrebbero non essere così buone. VoxelGI appare meno preciso (essendo un'approssimazione), ma nel complesso più fluido.
SDFGI è anche meno preciso rispetto a LightmapGI. Tuttavia, SDFGI è in grado di supportare grandi mondi aperti senza bisogno di preparazione.
Configurazione
Avvertimento
La preparazione automatica di lightmap negli editor web non è supportata a causa delle limitazioni dell'API grafica. Sulla piattaforma web, è supportato solo il rendering di lightmap preparate su una piattaforma diversa.
Nota
Il nodo LightmapGI prepara solo i nodi che si trovano allo stesso livello del nodo LightmapGI (nodi fratelli) o i nodi che sono figli del nodo LightmapGI. Questo permette di utilizzare più nodi LightmapGI per preparare diverse parti della scena, in modo indipendente l'una dall'altra.
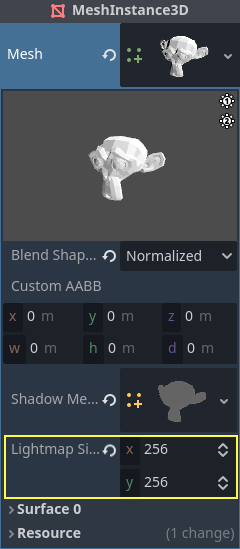
Innanzitutto, prima che il lightmapper possa fare qualcosa, gli oggetti da renderizzare necessitano di un livello UV2 e di una dimensione della texture. Un livello UV2 è un insieme di coordinate secondarie di texture che garantisce che ogni faccia dell'oggetto abbia un proprio posto nella mappa UV. Le facce non devono condividere pixel nella texture.
Ci sono diversi modi per garantire che un oggetto abbia un livello UV2 univoco e una dimensione di texture:
Srotola all'importazione della scena (consigliato)
Nella maggior parte degli scenari, questo è l'approccio migliore da utilizzare. L'unica pecca è che, sui modelli grandi, lo srotolamento può richiedere un bel po' di tempo durante l'importazione. Nonostante ciò, Godot memorizzerà nella cache l'UV2 tra più reimportazioni, quindi verrà rigenerato solo quando necessario.
Seleziona la scena importata nel pannello Filesystem, poi vai al pannello Importazione. Lì, puoi modificare la seguente opzione:
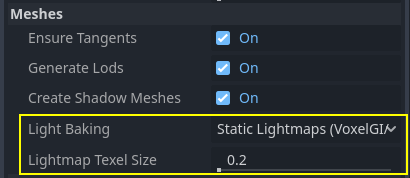
L'opzione Mesh > Precalcolo della luce deve essere impostata su Static Lightmaps (VoxelGI/SDFGI/LightmapGI):
Nello srotolamento durante l'importazione, è possibile regolare la dimensione della texture tramite l'opzione Mesh > Dimensione dei texel delle lightmap. Valori più bassi produrranno lightmap più dettagliate, con una possibile maggiore qualità visiva, a scapito di tempi di preparazione più lunghi e file lightmap più grandi. Il valore predefinito di 0.2 è adatto a scene di piccole/medie dimensioni, ma potrebbe essere opportuno aumentarlo a 0.5 o anche di più per scene più grandi. Questo è particolarmente importante se si prepara solo l'illuminazione indiretta, poiché la luce indiretta è costituita da dati a bassa frequenza (il che significa che non necessita di texture ad alta risoluzione per poterla rappresentare accuratamente).
L'effetto di impostare questa opzione è che tutte le mesh all'interno della scena avranno le loro mappe UV2 generate adeguatamente.
Avvertimento
Quando si riutilizza una mesh all'interno di una scena, è importante tenere presente che gli UV verranno generati per la prima istanza trovata. Se la mesh è riutilizzata con scale diverse (e le scale sono molto diverse, più della metà o del doppio), ciò produrrà lightmap inefficienti. Per evitarlo, bisogna regolare la proprietà Lightmap Scale nella sezione GeometryInstance3D di un nodo MeshInstance3D. Ciò permette di aumentare il livello di dettaglio delle lightmap per specifici nodi MeshInstance3D (ma non di diminuirlo).
Inoltre, i file *.unwrap_cache non si dovrebbero ignorare nel controllo versioni, poiché garantiscono che le reimportazioni degli UV2 siano coerenti tra piattaforme e versioni del motore.
Srotola dall'interno di Godot
Avvertimento
Se si utilizza questa operazione del menu Mesh su una scena 3D importata, gli UV2 generati andranno persi al ricaricamento della scena.
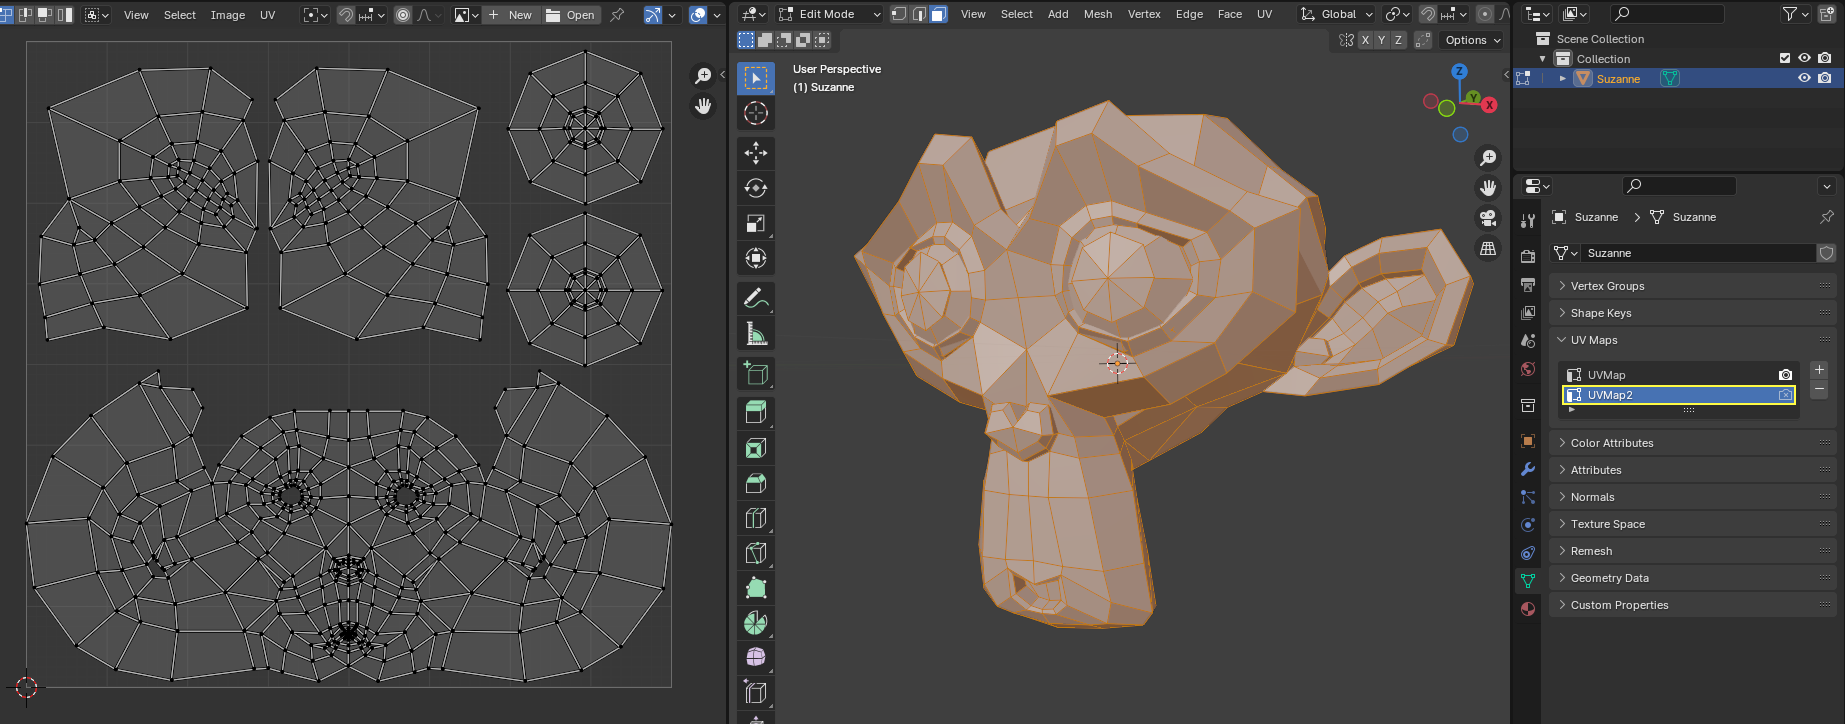
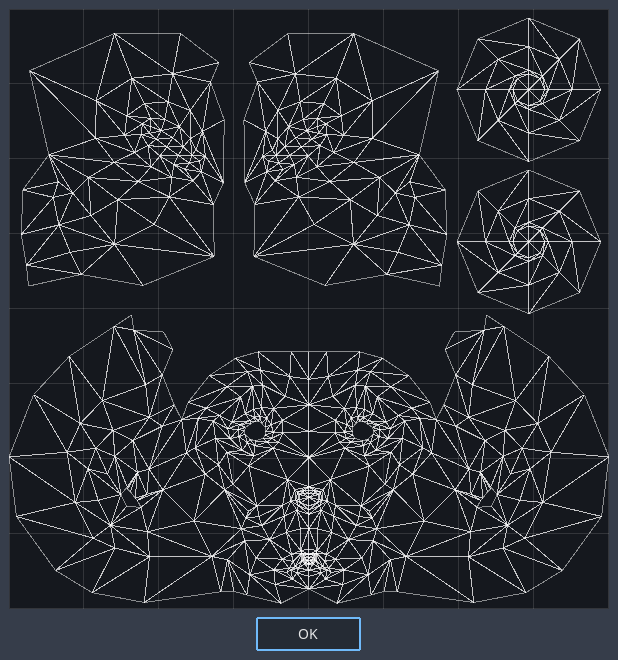
Godot offre la possibilità di srotolare le mesh e visualizzare i canali UV. Dopo aver selezionato un nodo MeshInstance3D, lo si può trovare nel menu Mesh in cima la viewport dell'editor 3D:
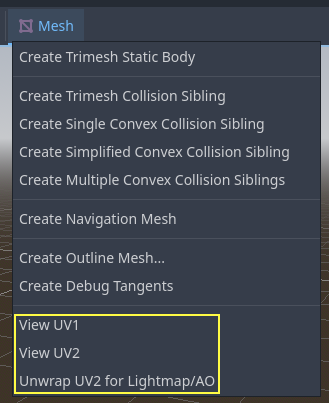
Questo genererà un secondo insieme di coordinate UV2 che si potranno utilizzate per la preparazione. Imposterà anche le dimensioni della texture automaticamente.
Srotola dal software di modellazione 3D
L'ultima opzione è quella di farlo attraverso la tua applicazione 3D preferita. Questo approccio è generalmente sconsigliato, ma viene spiegato per farti sapere che esiste. Il vantaggio principale è che, su oggetti complessi che potresti voler reimportare spesso, il processo di generazione delle texture all'interno di Godot può essere piuttosto impegnativo, quindi avere la mappatura UV prima dell'importazione potrebbe essere più veloce.
Basta srotolare sul secondo livello UV2.
Dopodiché, importa la scena 3D normalmente. Ricorda che dovrai impostare la dimensione della texture sulla mesh dopo l'importazione.
Se si utilizzano mesh esterne all'importazione, le dimensioni verranno mantenute. Tieni presente che la maggior parte degli strumenti di mappatura UV nei software di modellazione 3D non danno priorità alla qualità, poiché sono progettati per essere veloci. Perlopiù delle volte, sarà necessario utilizzare cuciture o altre tecniche per ottenere una mappatura UV migliore.
Generare UV2 per le mesh primitive
Nota
Questa opzione è disponibile solo per mesh primitive come BoxMesh, CylinderMesh, PlaneMesh, ecc.
Abilitando UV2 sulle mesh primitive le consente di ricevere e contribuire all'illuminazione precalcolata. Questa funzionalità può servire in alcune configurazioni di illuminazione. Ad esempio, è possibile nascondere un toro con un materiale emissivo dopo aver precalcolato le lightmap per creare una luce ad area che segua la forma di un toro.
Normalmente, le mesh primitive non generano UV2 per risparmiare risorse (poiché queste mesh si potrebbero creare durante il gioco). È possibile modificare una mesh primitiva nell'ispettore e abilitare Aggiungi UV2 per fare in modo che il motore generi proceduralmente UV2 per una mesh primitiva. Il valore predefinito di Padding UV2 è ottimizzato per evitare la maggiorità delle sbavature nella lightmap, senza sprecare troppo spazio sui bordi. Se si nota una sbavatura nella lightmap solo su una specifica mesh primitiva, potrebbe essere necessario aumentare Padding UV2.
Lightmap Size Hint represents the size taken by a single mesh on the lightmap texture, which varies depending on the mesh's size properties and the UV2 Padding value. Lightmap Size Hint should not be manually changed, as any modifications will be lost when the scene is reloaded.
Generazione di UV2 per i nodi CSG
Da Godot 4.4 in poi, è possibile convertire un nodo CSG e i suoi figli in un MeshInstance3D. Ciò può servire per preparare lightmap su un nodo CSG seguendo questi passaggi:
Seleziona il nodo CSG radice e scegli CSG > Prepara istanza di mesh in cima la viewport dell'editor 3D.
Hide the root CSG node that was just baked (it is not hidden automatically).
Select the newly created MeshInstance3D node and choose Mesh > Unwrap UV2 for Lightmap/AO.
Prepara le lightmap.
Suggerimento
Remember to keep the original CSG node in the scene tree, so that you can perform changes to the geometry later if needed. To make changes to the geometry, remove the MeshInstance3D node and make the root CSG node visible again.
Verifica degli UV2
In the Mesh menu mentioned before, the UV2 texture coordinates can be visualized. If something is failing, double-check that the meshes have these UV2 coordinates:
Setting up the scene
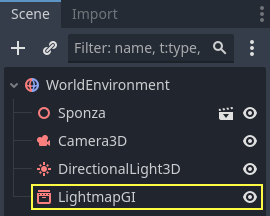
Before anything is done, a LightmapGI node needs to be added to a scene. This will enable light baking on all nodes (and sub-nodes) in that scene, even on instanced scenes.
A sub-scene can be instanced several times, as this is supported by the baker. Each instance will be assigned a lightmap of its own. To avoid issues with inconsistent lightmap texel scaling, make sure to respect the rule about mesh scaling mentioned before.
Setting up meshes
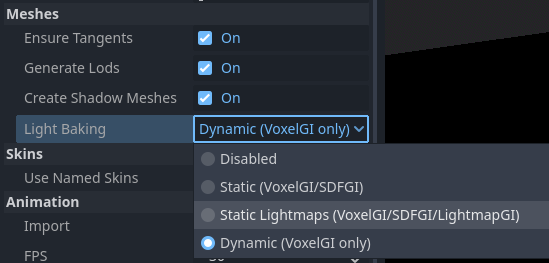
For a MeshInstance3D node to take part in the baking process, it needs to have its bake mode set to Static. Meshes that have their bake mode set to Disabled or Dynamic will be ignored by the lightmapper.
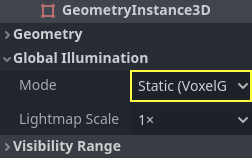
When auto-generating lightmaps on scene import, this is enabled automatically.
Setting up lights
Lights are baked with indirect light only by default. This means that shadowmapping and lighting are still dynamic and affect moving objects, but light bounces from that light will be baked.
Lights can be disabled (no bake) or be fully baked (direct and indirect). This can be controlled from the Bake Mode menu in lights:
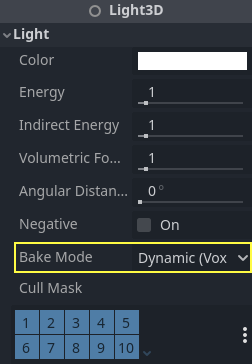
Le modalità sono:
Disabilitata
La luce è ignorata durante la preparazione delle lightmap. Questa è la modalità da utilizzare per effetti di illuminazione dinamici come esplosioni ed effetti delle armi.
Avvertimento
Nascondere una luce non ha alcun effetto sul precalcolo risultante della lightmap. Ciò significa che è necessario utilizzare la modalità di precalcolo Disabled anziché nascondere il nodo Luce disabilitandone la proprietà Visible.
Dinamica
This is the default mode, and is a compromise between performance and real-time friendliness. Only indirect lighting will be baked. Direct light and shadows are still real-time, as they would be without LightmapGI.
This mode allows performing subtle changes to a light's color, energy and position while still looking fairly correct. For example, you can use this to create flickering static torches that have their indirect light baked.
Depending on the value of Shadowmask Mode, it is possible to still get distant baked shadows for DirectionalLight3D. This allows shadows up close to be real-time and show dynamic objects, while allowing static objects in the distance to still cast shadows.
Statica
Both indirect and direct lighting will be baked. Since static surfaces can skip lighting and shadow computations entirely, this mode provides the best performance along with smooth shadows that never fade based on distance. The real-time light will not affect baked surfaces anymore, but it will still affect dynamic objects. When using the All bake mode on a light, dynamic objects will not cast real-time shadows onto baked surfaces, so you need to use a different approach such as blob shadows instead. Blob shadows can be implemented with a Decal node.
The light will not be adjustable at all during gameplay. Moving the light or changing its color (or energy) will not have any effect on static surfaces.
Since bake modes can be adjusted on a per-light basis, it is possible to create hybrid baked light setups. One popular option is to use a real-time DirectionalLight with its bake mode set to Dynamic, and use the Static bake mode for OmniLights and SpotLights. This provides good performance while still allowing dynamic objects to cast real-time shadows in outdoor areas.
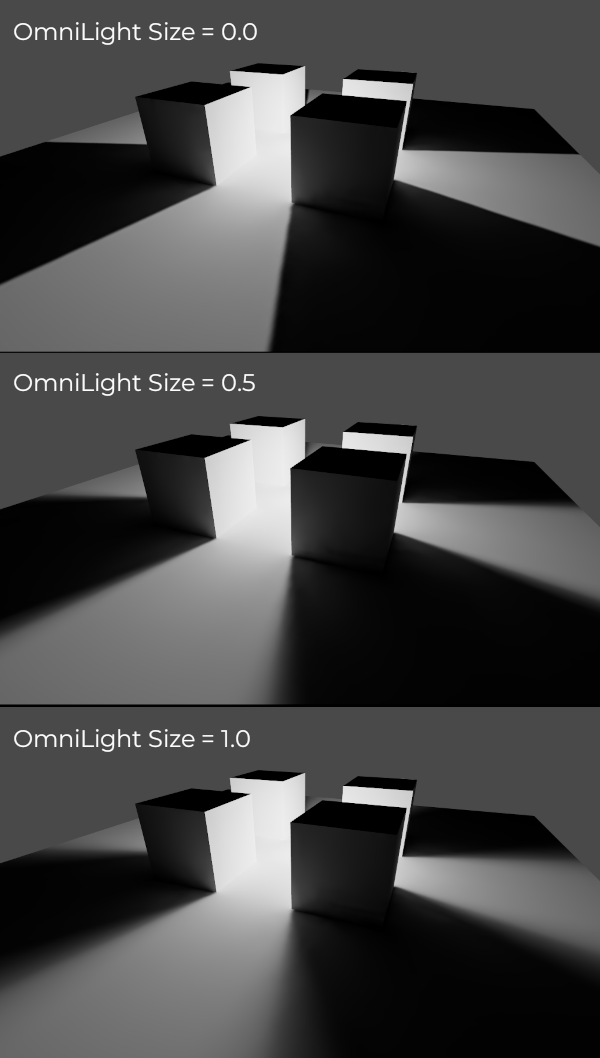
Fully baked lights can also make use of light nodes' Size (omni/spot) or Angular Distance (directional) properties. This allows for shadows with realistic penumbra that increases in size as the distance between the caster and the shadow increases. This also has a lower performance cost compared to real-time PCSS shadows, as only dynamic objects have real-time shadows rendered on them.
Preparazione (Baking)
To begin the bake process, click the Bake Lightmaps button at the top of the 3D editor viewport when selecting the LightmapGI node:

This can take from seconds to minutes (or hours) depending on scene size, bake method and quality selected.
Avvertimento
Baking lightmaps is a process that can require a lot of video memory, especially if the resulting texture is large. Due to internal limitations, the engine may also crash if the generated texture size is too large (even on systems with a lot of video memory).
To avoid crashes, make sure the lightmap texel size in the Import dock is set to a high enough value.
Ritocchi
Quality: Four bake quality modes are provided: Low, Medium, High, and Ultra. Higher quality takes more time, but result in a better-looking lightmap with less noise. The difference is especially noticeable with emissive materials or areas that get little to no direct lighting. Each bake quality mode can be further adjusted in the Project Settings.
Supersampling: This creates the lightmap at a higher resolution and then downsamples it. This reduces noise and light leaking, and produces better shadows with small scale details. However, using it will increase bake times and memory usage during lightmap baking. The Supersampling Factor changes the size the lightmap is rendered at before downsampling.
Bounces: The number of bounces to use for indirect lighting. The default value (
3) is a good compromise between bake times and quality. Higher values will make light bounce around more times before it stops, which makes indirect lighting look smoother (but also possibly brighter depending on materials and geometry).Bounce Indirect Energy: The global multiplier to use when baking lights' indirect energy. This multiplies each light's own Indirect Energy value. Values different from
1.0are not physically accurate, but can be used for artistic effect.Directional: If enabled, stores directional information for lightmaps. This improves normal mapped materials' appearance for baked surfaces, especially with fully baked lights (since they also have direct light baked). The downside is that directional lightmaps are slightly more expensive to render. They also require more time to bake and result in larger file sizes.
Shadowmask Mode: If set to a mode other than None, the first DirectionalLight3D in the scene with the Dynamic global illumination mode will have its static shadows baked to a separate texture called a shadowmask. This can be used to allow distant static objects to cast shadows onto other static objects regardless of the distance from the camera. See the section on shadowmasking for further details.
Interior: If enabled, environment lighting will not be sourced. Use this for purely indoor scenes to avoid light leaks.
Use Texture for Bounces: If enabled, a texture with the lighting information will be generated to speed up the generation of indirect lighting at the cost of some accuracy. The geometry might exhibit extra light leak artifacts when using low resolution lightmaps or UVs that stretch the lightmap significantly across surfaces. Leave this enabled if unsure.
Use Denoiser: se abilitata, utilizza un algoritmo di riduzione del rumore per rendere la lightmap molto meno granulosa. Ciò aumenta i tempi di preparazione e può occasionalmente introdurre artefatti, ma il risultato spesso ne vale la pena. Consulta Riduzione del rumore per ulteriori informazioni.
Intensità del denoiser: l'intensità della fase di riduzione del rumore applicata alle lightmap generate. Valori più alti sono più efficaci a rimuovere il rumore, ma possono ridurre i dettagli delle ombre statiche. Efficace solo se la riduzione è abilitata e il metodo di riduzione è JNLM (OIDN non ha un'impostazione per l'intensità del denoiser).
Bias: Il valore di deviazione da utilizzare per le ombre, in unità 3D. In genere non è necessario modificare questo valore, a meno che non ci siano sbavature di luce o punti scuri nella lightmap dopo la preparazione. Questa impostazione non influisce sulle ombre in tempo reale proiettate sulle superfici preparate (per le luci con modalità di preparazione Dynamic).
Max Texture Size: The maximum texture size for the generated texture atlas. Higher values will result in fewer slices being generated, but may not work on all hardware as a result of hardware limitations on texture sizes. Leave this at its default value of
16384if unsure.Environment > Mode: Controls how environment lighting is sourced when baking lightmaps. The default value of Scene is suited for levels with visible exterior parts. For purely indoor scenes, set this to Disabled to avoid light leaks and speed up baking. This can also be set to Custom Sky or Custom Color to use environment lighting that differs from the actual scene's environment sky.
Gen Probes > Subdiv: See Oggetti dinamici.
Data > Light Data: See Lightmap data.
Using shadowmasking for distant directional shadows
When using a DirectionalLight3D, the maximum distance at which it can draw real-time shadows is limited by its Shadow Max Distance property. This can be an issue in large scenes, as distant objects won't appear to have any shadows from the DirectionalLight3D. While this can be resolved by using the Static global illumination mode on the DirectionalLight3D, this has several downsides:
Since both direct and indirect light are baked, there is no way for dynamic objects to cast shadows onto static surfaces in a realistic manner. Godot skips shadow sampling entirely in this case to avoid "double lighting" artifacts.
Static shadows up close lack in detail, as they only rely on the lightmap texture and not on real-time shadow cascades.
We can avoid these downsides while still benefiting from distant shadows by using shadowmasking. While dynamic objects won't receive shadows from the shadowmask, it still greatly improves visuals since most scenes are primarily comprised of static objects.
Since the lightmap texture alone doesn't contain shadow information, we can bake this shadow information to a separate texture called a shadowmask.
Shadowmasking only affects the first DirectionalLight3D in the scene (determined by tree order) that has the Dynamic global illumination mode. It is not possible to use shadowmasking with the Static global illumination mode, as this mode skips shadow sampling on static objects entirely. This is because the Static global illumination mode bakes both direct and indirect light.
Sono disponibili tre modalità di shadowmasking:
None (default): Don't bake a shadowmask texture. Directional shadows will not be visible outside the range specified by the DirectionalLight3D's Shadow Max Distance property.
Replace: Bakes a shadowmask texture, and uses it to draw directional shadows when outside the range specified by the DirectionalLight3D's Shadow Max Distance property. Shadows within this range remain fully real-time. This option generally makes the most sense for most scenes, as it can deal well with static objects that exhibit subtle motion (e.g. foliage shadows).
Overlay: Bakes a shadowmask texture, and uses it to draw directional shadows regardless of the distance from the camera. Shadows within the range of the DirectionalLight3D's Shadow Max Distance property will be overlaid with real-time shadows. This can make the transition between real-time and baked shadows less jarring, at the cost of a "smearing" effect present on static object shadows depending on lightmap texel density. Also, this mode can't deal as well with static objects that exhibit subtle motion (such as foliage), as the baked shadows can't be animated over time. Still, for scenes where the camera moves quickly, this may be a better choice than Replace.
Here's a visual comparison of the shadowmask modes with a scene where the Shadow Max Distance was set very low for comparison purposes. The blue boxes are dynamic objects, while the rest of the scene is a static object. There is only a single DirectionalLight3D in the scene with the Dynamic global illumination mode:
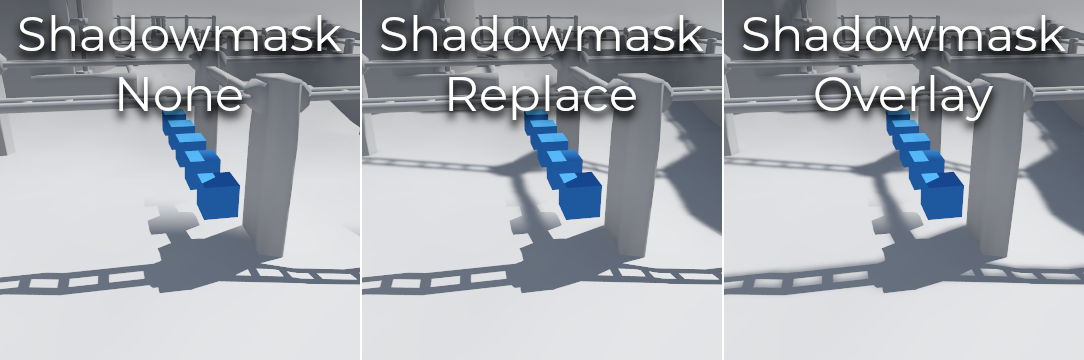
Comparison between shadowmask modes
Nota
It is possible to switch between the Replace and Overlay shadowmask modes without having to bake lightmaps again.
Balancing bake times with quality
Since high-quality bakes can take very long (up to dozens of minutes for large complex scenes), it is recommended to use lower quality settings at first. Then, once you are confident with your scene's lighting setup, raise the quality settings and perform a "final" bake before exporting your project.
Reducing the lightmap resolution by increasing Lightmap Texel Size on the imported 3D scenes will also speed up baking significantly. However, this will require you to reimport all lightmapped 3D scenes before you can bake lightmaps again.
Riduzione del rumore
Since baking lightmaps relies on raytracing, there will always be visible noise in the "raw" baked lightmap. Noise is especially visible in areas that are difficult to reach by bounced light, such as indoor areas with small openings where the sunlight can enter. Noise can be reduced by increasing bake quality, but doing so will increase bake times significantly.
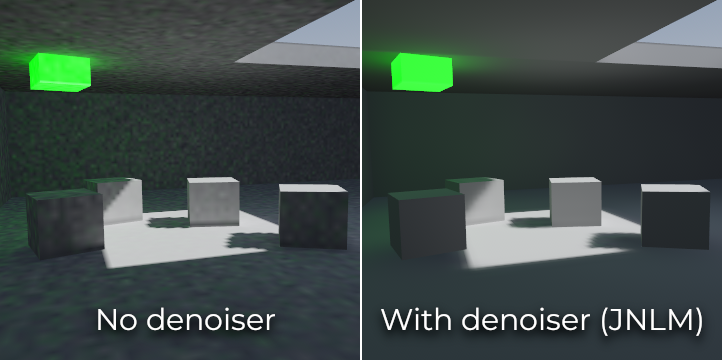
Comparison between denoising disabled and enabled (with the default JNLM denoiser).
To combat noise without increasing bake times too much, a denoiser can be used. A denoiser is an algorithm that runs on the final baked lightmap, detects patterns of noise and softens them while attempting to best preserve detail. Godot offers two denoising algorithms:
JNLM (Non-Local Means with Joint Filtering)
JNLM è il metodo di riduzione del rumore predefinito ed è incluso in Godot. Utilizza un algoritmo di riduzione semplice ma efficiente, noto come non-local means. JNLM è eseguito sulla GPU tramite uno shader di calcolo ed è compatibile con qualsiasi GPU in grado di eseguire i renderer basati su RenderingDevice di Godot 4. Non è richiesta alcuna configurazione in più.
JNLM's denoising can be adjusted using the Denoiser Strength property that is visible when Use Denoiser enabled. Higher values can be more effective at removing noise, at the cost of suppressing shadow detail for static shadows.
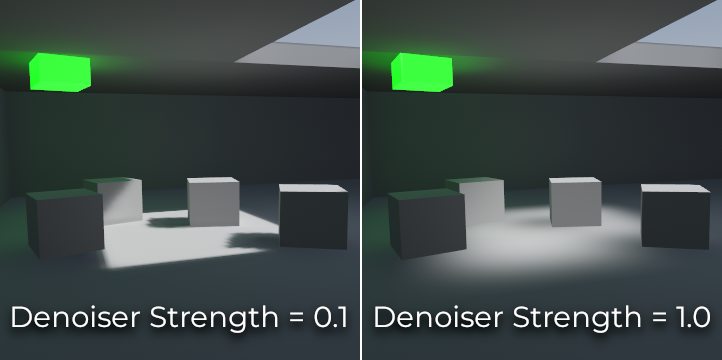
Comparison between JNLM denoiser strength values. Higher values can reduce detail.
OIDN (Open Image Denoise)
Unlike JNLM, OIDN uses a machine learning approach to denoising lightmaps. It features a model specifically trained to remove noise from lightmaps while preserving more shadow detail in most scenes compared to JNLM.
OIDN can run on the GPU if hardware acceleration is configured. With a modern high-end GPU, this can provide a speedup of over 50× over CPU-based denoising:
On AMD GPUs, HIP must be installed and configured.
On NVIDIA GPUs, CUDA must be installed and configured. This may automatically be done by the NVIDIA installer, but on Linux, CUDA libraries may not be installed by default. Double-check that the CUDA packages from your Linux distribution are installed.
On Intel GPUs, SYCL must be installed and configured.
If hardware acceleration is not available, OIDN will fall back to multithreaded
CPU-based denoising. To confirm whether GPU-based denoising is working, use a
GPU utilization monitor while baking lightmaps and look at the GPU utilization
percentage and VRAM utilization while the denoising step is shown in the Godot
editor. The nvidia-smi command line tool can be useful for this.
OIDN is not included with Godot due to its relatively large download size. You
can download precompiled OIDN binary packages from its
website.
Extract the package to a location on your PC, then specify the path to the
oidnDenoise executable in the Editor Settings (FileSystem > Tools > OIDN >
OIDN Denoise Path). This executable is located within the bin folder of
the binary package you extracted.
After specifying the path to the OIDN denoising executable, change the denoising method in the project settings by setting Rendering > Lightmapping > Denoiser to OIDN. This will affect all lightmap bakes on this project after the setting is changed.
Nota
The denoising method is configured in the project settings instead of the editor settings. This is done so that different team members working on the same project are assured to be using the same denoising method for consistent results.
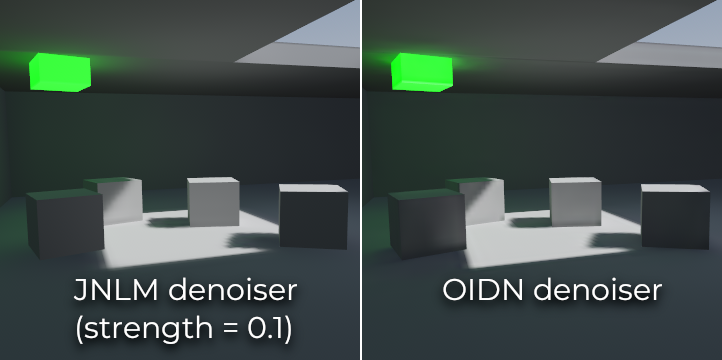
Confronto tra i denoiser JNLM e OIDN. Si noti come OIDN preservi meglio i dettagli e riduca le cuciture tra i diversi oggetti.
Oggetti dinamici
A differenza di VoxelGI e SDFGI, gli oggetti dinamici ricevono l'illuminazione indiretta diversamente rispetto agli oggetti statici. Questo perché il lightmapping è effettuato solo sugli oggetti statici.
To display indirect lighting on dynamic objects, a 3D probe system is used, with light probes being spread throughout the scene. When baking lightmaps, the lightmapper will calculate the amount of indirect light received by the probe. Direct light is not stored within light probes, even for lights that have their bake mode set to Static (as dynamic objects continue to be lit in real-time).
Esistono due modi per aggiungere sonde di luce a una scena:
Automatic: Set Gen Probes > Subdiv to a value other than Disabled, then bake lightmaps. The default is
8, but you can choose a greater value to improve precision at the cost of longer bake times and larger output file size.Manual: In addition or as an alternative to generating probes automatically, you can add light probes manually by adding LightmapProbe nodes to the scene. This can be used to improve lighting detail in areas frequently travelled by dynamic objects. After placing LightmapProbe nodes in the scene, you must bake lightmaps again for them to be effective.
Nota
After baking lightmaps, you will notice white spheres in the 3D scene that represent how baked lighting will affect dynamic objects. These spheres do not appear in the running project.
If you want to hide these spheres in the editor, toggle View > Gizmos > LightmapGI at the top of the 3D editor (a "closed eye" icon indicates the gizmo is hidden).
Lightmap data
The Data > Light Data property in the LightmapGI node contains the lightmap
data after baking. Textures are saved to disk, but this also contains the
capture data for dynamic objects, which can be heavy. If you are using a scene
in .tscn format, you should save this resource to an external binary
.lmbake file to avoid bloating the .tscn scene with binary data encoded
in Base64.
Suggerimento
The generated EXR file can be viewed and even edited using an image editor to perform post-processing if needed. However, keep in mind that changes to the EXR file will be lost when baking lightmaps again.
Ridurre gli artefatti di LightmapGI
If you notice LightmapGI nodes popping in and out of existence as the camera moves, this is most likely because the engine is rendering too many LightmapGI instances at once. Godot is limited to rendering 8 LightmapGI nodes at once, which means up to 8 instances can be in the camera view before some of them will start flickering.