Attention: Here be dragons
This is the latest
(unstable) version of this documentation, which may document features
not available in or compatible with released stable versions of Godot.
Checking the stable version of the documentation...
WebRTC
HTML5, WebSocket, WebRTC
Una delle grandi caratteristiche di Godot è la sua capacità di esportare sulla piattaforma HTML5/WebAssembly, consentendo al proprio gioco di essere eseguito direttamente nel browser quando un utente visita la propria pagina web.
Questa è un'ottima opportunità sia per le demo sia per i giochi completi, ma in passato presentava alcune limitazioni. Nell'ambito del networking, i browser supportavano solo HTTPRequest fino a poco tempo fa, quando WebSocket e poi WebRTC sono stati proposti come standard.
WebSocket
Quando il protocollo WebSocket è stato standardizzato nel dicembre 2011, ha consentito ai browser di creare connessioni stabili e bidirezionali a un server WebSocket. Il protocollo è uno strumento molto potente per inviare notifiche push ai browser ed è stato utilizzato per implementare chat, giochi a turni, ecc.
I WebSocket, tuttavia, utilizzano ancora una connessione TCP, che è buona per l'affidabilità ma non per la latenza, quindi non è adatta per applicazioni in tempo reale come VoIP e giochi frenetici.
WebRTC
Per questo motivo, dal 2010, Google ha iniziato a lavorare su una nuova tecnologia chiamata WebRTC, che in seguito, nel 2017, è diventata una raccomandazione candidata di W3C. WebRTC è un insieme di specifiche molto più complesso e si basa su molte altre tecnologie (ICE, DTLS, SDP) per una comunicazione veloce, in tempo reale e sicura tra due peer.
L'idea è quella di trovare il percorso più veloce tra i due peer e stabilire, ove possibile, una comunicazione diretta (vale a dire, cercare di evitare un server di relay).
Tuttavia, questo ha un prezzo: prima che la comunicazione possa iniziare, è necessario che alcune informazioni multimediali vengano scambiate tra i due peer (sotto forma di stringhe SDP - Session Description Protocol). Questo solitamente avviene tramite un cosiddetto WebRTC Signaling Server.
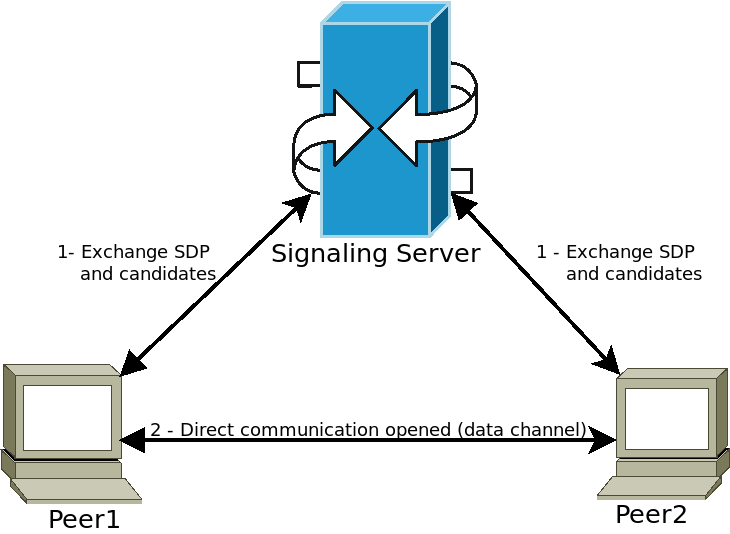
I peer si connettono a un server di segnalazione (ad esempio un server WebSocket) e inviano le proprie informazioni multimediali. Il server poi inoltra queste informazioni agli altri peer, consentendo loro di stabilire la comunicazione diretta desiderata. Una volta completato questo passaggio, i peer possono disconnettersi dal server di segnalazione e mantenere aperta la connessione Peer-to-Peer (P2P) diretta.
Utilizzare WebRTC in Godot
WebRTC è implementato in Godot tramite due classi principali WebRTCPeerConnection e WebRTCDataChannel, oltre all'implementazione dell'API multigiocatore WebRTCMultiplayerPeer. Consultare la sezione multigiocatore di alto livello per maggiori dettagli.
Nota
Queste classi sono disponibili automaticamente in HTML5, ma richiedono un'estensione GDExtension esterna su piattaforme native (non HTML5). Consultare il repository delle estensioni webrtc-native per istruzioni e per ottenere l'ultimo rilascio.
Avvertimento
When exporting to Android, make sure to enable the INTERNET
permission in the Android export preset before exporting the project or
using one-click deploy. Otherwise, network communication of any kind will be
blocked by Android.
Esempio minimo di connessione
Questo esempio mostrerà come creare una connessione WebRTC tra due peer nella stessa applicazione. Non è molto utile nella vita reale, ma fornirà una buona panoramica di come è configurata una connessione WebRTC.
extends Node

# Create the two peers
var p1 = WebRTCPeerConnection.new()
var p2 = WebRTCPeerConnection.new()
# And a negotiated channel for each each peer
var ch1 = p1.create_data_channel("chat", {"id": 1, "negotiated": true})
var ch2 = p2.create_data_channel("chat", {"id": 1, "negotiated": true})

func _ready():
    # Connect P1 session created to itself to set local description.
    p1.session_description_created.connect(p1.set_local_description)
    # Connect P1 session and ICE created to p2 set remote description and candidates.
    p1.session_description_created.connect(p2.set_remote_description)
    p1.ice_candidate_created.connect(p2.add_ice_candidate)

    # Same for P2
    p2.session_description_created.connect(p2.set_local_description)
    p2.session_description_created.connect(p1.set_remote_description)
    p2.ice_candidate_created.connect(p1.add_ice_candidate)

    # Let P1 create the offer
    p1.create_offer()

    # Wait a second and send message from P1.
    await get_tree().create_timer(1).timeout
    ch1.put_packet("Hi from P1".to_utf8_buffer())

    # Wait a second and send message from P2.
    await get_tree().create_timer(1).timeout
    ch2.put_packet("Hi from P2".to_utf8_buffer())

func _process(_delta):
    # Poll connections
    p1.poll()
    p2.poll()

    # Check for messages
    if ch1.get_ready_state() == ch1.STATE_OPEN and ch1.get_available_packet_count() > 0:
        print("P1 received: ", ch1.get_packet().get_string_from_utf8())
    if ch2.get_ready_state() == ch2.STATE_OPEN and ch2.get_available_packet_count() > 0:
        print("P2 received: ", ch2.get_packet().get_string_from_utf8())
Questo stamperà:
P1 received: Hi from P1
P2 received: Hi from P2
Esempio di segnalazione locale
Questo esempio espande quello precedente, separando i peer in due scene diverse e utilizzando un singleton come server di segnalazione.
extends Node
# An example p2p chat client.

var peer = WebRTCPeerConnection.new()

# Create negotiated data channel.
var channel = peer.create_data_channel("chat", {"negotiated": true, "id": 1})

func _ready():
    # Connect all functions.
    peer.ice_candidate_created.connect(self._on_ice_candidate)
    peer.session_description_created.connect(self._on_session)

    # Register to the local signaling server (see below for the implementation).
    Signaling.register(String(get_path()))


func _on_ice_candidate(mid, index, sdp):
    # Send the ICE candidate to the other peer via signaling server.
    Signaling.send_candidate(String(get_path()), mid, index, sdp)


func _on_session(type, sdp):
    # Send the session to other peer via signaling server.
    Signaling.send_session(String(get_path()), type, sdp)
    # Set generated description as local.
    peer.set_local_description(type, sdp)


func _process(delta):
    # Always poll the connection frequently.
    peer.poll()
    if channel.get_ready_state() == WebRTCDataChannel.STATE_OPEN:
        while channel.get_available_packet_count() > 0:
            print(String(get_path()), " received: ", channel.get_packet().get_string_from_utf8())


func send_message(message):
    channel.put_packet(message.to_utf8_buffer())
E ora, il server di segnalazione locale:
Nota
Questo server di segnalazione locale dovrebbe essere usato come singleton per connettere due peer nella stessa scena.
# A local signaling server. Add this to autoloads with name "Signaling" (/root/Signaling)
extends Node

# We will store the two peers here
var peers = []

func register(path):
    assert(peers.size() < 2)
    peers.append(path)
    if peers.size() == 2:
        get_node(peers[0]).peer.create_offer()


func _find_other(path):
    # Find the other registered peer.
    for p in peers:
        if p != path:
            return p
    return ""


func send_session(path, type, sdp):
    var other = _find_other(path)
    assert(other != "")
    get_node(other).peer.set_remote_description(type, sdp)


func send_candidate(path, mid, index, sdp):
    var other = _find_other(path)
    assert(other != "")
    get_node(other).peer.add_ice_candidate(mid, index, sdp)
Poi si può usare in questo modo:
# Main scene (main.gd)
extends Node

const Chat = preload("res://chat.gd")

func _ready():
    var p1 = Chat.new()
    var p2 = Chat.new()
    add_child(p1)
    add_child(p2)

    # Wait a second and send message from P1
    await get_tree().create_timer(1).timeout
    p1.send_message("Hi from %s" % String(p1.get_path()))

    # Wait a second and send message from P2
    await get_tree().create_timer(1).timeout
    p2.send_message("Hi from %s" % String(p2.get_path()))
Questo stamperà qualcosa di simile a questo:
/root/main/@@3 received: Hi from /root/main/@@2
/root/main/@@2 received: Hi from /root/main/@@3
Segnalazione remota con WebSocket
Una demo più avanzata che utilizza WebSocket per la segnalazione dei peer e per WebRTCMultiplayerPeer è disponibile nei progetti demo godot in networking/webrtc_signaling.