Attention: Here be dragons
This is the latest
(unstable) version of this documentation, which may document features
not available in or compatible with released stable versions of Godot.
Checking the stable version of the documentation...
Importazione di immagini
Formati di immagine supportati
Godot può importare i seguenti formati di immagine:
Raster:
BMP (
.bmp) - Tutti i formati pixel sono supportati, ma la compressione RLE non è supportata.Superficie DirectDraw (
.dds) - Se nella texture sono presenti mipmap, verranno caricate direttamente. Questo si può utilizzare per ottenere effetti tramite mipmap personalizzate.Khronos Texture (
.ktx) - La decodifica si fa tramite libktx. Supporta solo immagini 2D. Cubemap, array di texture e rimozione di spaziatura non sono supportati.OpenEXR (
.exr) - Supporta HDR (altamente consigliato per i cieli panoramici).Radiance HDR (
.hdr) - Supporta HDR (altamente consigliato per cieli panoramici).JPEG (
.jpg,.jpeg) - Non supporta la trasparenza a causa delle limitazioni del formato.PNG (
.png) - La precisione è limitata a 8 bit per canale all'importazione (niente immagini HDR).Truevision Targa (
.tga)WebP (
.webp) - I file WebP supportano la trasparenza e possono essere compressi con o senza perdita di dati. La precisione è limitata a 8 bit per canale.
Vector2:
SVG (
.svg)By default, SVGs are rasterized at import-time.
SVG è l'unico formato di immagine che può essere importato come DPITexture, il che consente alla rasterizzazione durante l'esecuzione di adattarsi al fattore di sovracampionamento attuale. Vedi Cambiare il tipo da importare per i dettagli.
Godot utilizza la libreria ThorVG per il rendering SVG. Il supporto per le funzionalità SVG è limitato; i vettori complessi potrebbero non essere renderizzati correttamente. Bisogna convertire il testo in tracciati; altrimenti, non apparirà nell'immagine rasterizzata. Per i vettori complessi, renderizzarli in PNG tramite Inkscape è spesso una soluzione migliore. Si potrebbe automatizzare grazie alla sua interfaccia a riga di comando.
È possibile verificare se ThorVG è in grado di visualizzare correttamente un determinato vettore attraverso il `suo visualizzatore sul web <https://www.thorvg.org/viewer>__.
Nota
If you've compiled the Godot editor from source with specific modules disabled, some formats may not be available.
Importazione di texture
The default action in Godot is to import images as textures. Textures are stored in video memory. Their pixel data can't be accessed directly from the CPU without converting them back to an Image in a script. This is what makes drawing them efficient.
There are over a dozen import options that can be adjusted after selecting an image in the FileSystem dock:
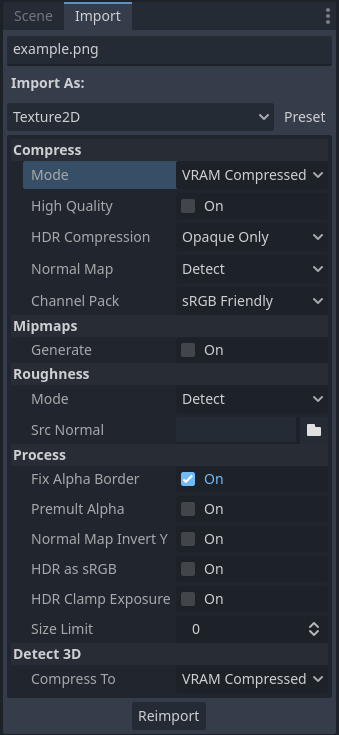
Opzioni di importazione nel pannello Importazione dopo aver selezionato un'immagine nel pannello FileSystem Alcune di queste opzioni sono visibili solo con determinate modalità di compressione.
Cambiare il tipo da importare
È possibile scegliere altri tipi di risorse importate nel pannello Importazione:
BitMap: Texture monocromatica a 1 bit (pensata all'uso come maschera di clic in TextureButton e TouchScreenButton). Questo tipo di risorsa non si può visualizzare direttamente su nodi 2D o 3D, ma è possibile richiedere i valori dei pixel da uno script tramite get_bit.
Cubemap: Importa la texture come cubemap a 6 lati, con interpolazione tra i lati della cubemap (continua senza bordi netti), che può essere campionata in shader personalizzati.
CubemapArray: Import the texture as a collection of 6-sided cubemaps, which can be sampled in custom shaders. This resource type can only be displayed when using the Forward+ or Mobile renderers, not the Compatibility renderer.
DPITexture: disponibile solo per le immagini SVG. Simile a Texture2D, ma può essere rasterizzata a diverse scale nell'editor e in fase di esecuzione senza bisogno di reimportarla. Vedi Sovracampionamento di font e immagini per i dettagli.
Font Data (Monospace Image Font): Import the image as a bitmap font where all characters have the same width. See Utilizzare i font.
Immagine: importa l'immagine così com'è. Questo tipo di risorsa non può essere visualizzato direttamente su nodi 2D o 3D, ma è possibile richiedere i valori dei pixel da uno script tramite get_pixel.
Texture2D: importa l'immagine come texture bidimensionale, adatta alla visualizzazione su superfici 2D e 3D. Questa è la modalità di importazione predefinita.
Texture2DArray: Importa l'immagine come una raccolta di texture bidimensionali. Texture2DArray è simile a una texture tridimensionale, ma senza interpolazione tra i livelli. Gli shader 2D e 3D integrati non possono visualizzare array di texture, quindi è necessario creare uno shader personalizzato in 2D o 3D per visualizzare una texture da un array di texture.
Texture3D: importa l'immagine come texture tridimensionale. Questa non è una texture 2D applicata su una superficie 3D. Texture3D è simile a un array di texture, ma con interpolazione tra i livelli. Texture3D è in genere utilizzata per le mappe di densità di un FogMaterial nella nebbia volumetrica, per i campi vettoriali degli attrattori di particelle, per la correzione del colore LUT 3D Environment e per shader personalizzati.
TextureAtlas: importa l'immagine come un atlante di diverse texture. Si può usare per ridurre l'uso di memoria per gli sprite 2D animati. Supportato solo in 2D a causa del supporto mancante negli shader 3D integrati.
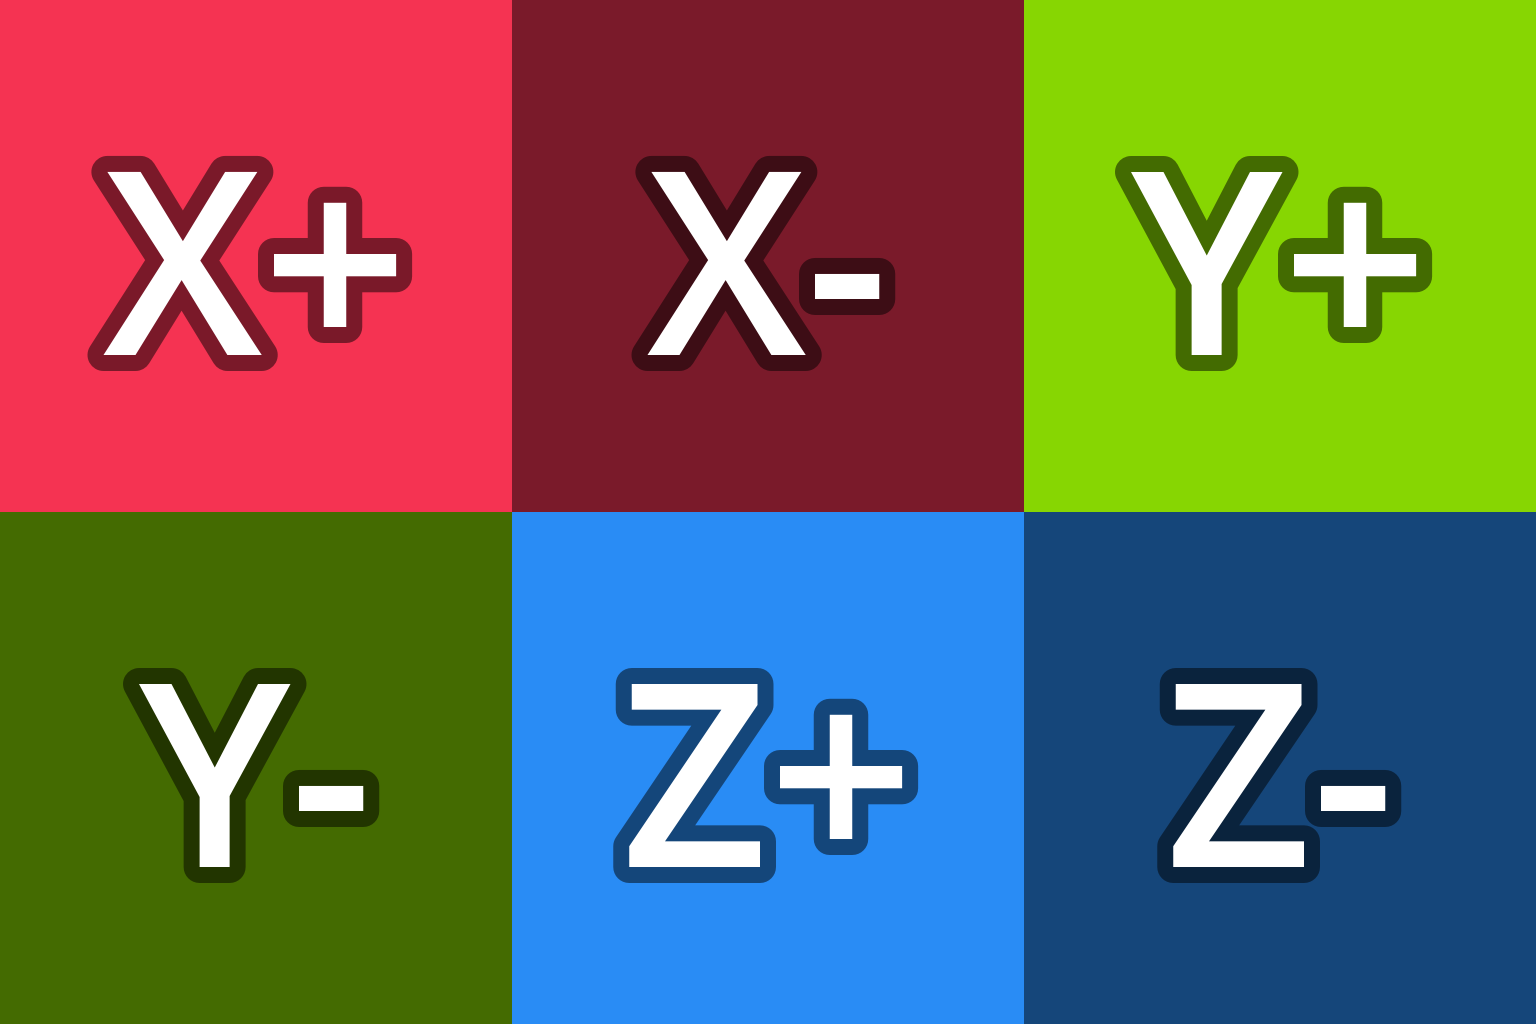
Per Cubemap, l'ordine previsto delle immagini è X+, X-, Y+, Y-, Z+, Z- (nel sistema di coordinate di Godot, quindi Y+ è "su" e Z- è "avanti"). Ecco alcuni modelli che si possono utilizzare per le immagini cubemap (clic destro > Salva collegamento con nome…):
Rileva 3D
The default import options (no mipmaps and Lossless compression) are suited for 2D, but are not ideal for most 3D projects. Detect 3D makes Godot aware of when a texture is used in a 3D scene (such as a texture in a BaseMaterial3D). If this happens, several import options are changed so the texture flags are friendlier to 3D. Mipmaps are enabled and the compression mode is changed to VRAM Compressed unless Detect 3D > Compress To is changed. The texture is also reimported automatically.
Quando viene rilevata una texture utilizzata in 3D, viene visualizzato un messaggio nel pannello Output.
If you run into quality issues when a texture is detected to be used in 3D (e.g. for pixel art textures), change the Detect 3D > Compress To option before using the texture in 3D, or change Compress > Mode to Lossless after using the texture in 3D. This is preferable to disabling Detect 3D, as mipmap generation remains enabled to prevent textures from looking grainy at a distance.
Opzioni di importazione
Vedi anche
A partire da Godot 4.0, il filtro delle texture e le modalità di ripetizione si modificano nelle proprietà di CanvasItem in 2D (con un'impostazione del progetto che funge da predefinita) e in una configurazione per ogni materiale in 3D. Negli shader personalizzati, il filtro e la modalità di ripetizione si cambiano nell'uniforme sampler2D tramite le indicazioni descritte nella documentazione di Linguaggio di shading.
Compress > Mode
Le immagini sono una delle risorse più importanti di un gioco. Per gestirle in modo efficiente, devono essere compresse. Godot offre diversi metodi di compressione, a seconda del caso d'uso.
Lossless: Questa è la modalità di compressione predefinita e più comune per le risorse 2D. Mostra le risorse senza alcun tipo di artefatto e la compressione su disco è decente. Tuttavia, utilizzerà una quantità di memoria video considerevolmente maggiore rispetto alla compressione VRAM. Questa è anche l'impostazione consigliata per la pixel art.
Lossy: Questa è una buona scelta per grandi risorse 2D. Presenta alcuni artefatti, ma di meno rispetto alla compressione VRAM, e la dimensione dei file è molto più bassa rispetto a Lossless o VRAM Uncompressed. L'utilizzo della memoria video non viene ridotto da questa modalità; rimane lo stesso di Lossless o VRAM Uncompressed.
VRAM Compressed: Questa è la modalità di compressione predefinita e più comune per le risorse 3D. Le dimensioni su disco vengono ridotte e anche l'utilizzo della memoria video diminuisce considerevolmente (di solito di un fattore compreso tra 4 e 6). Questa modalità si dovrebbe evitare per il 2D poiché presenta artefatti evidenti, soprattutto per le texture a bassa risoluzione.
VRAM Uncompressed: Utile solo per formati non comprimibili, come immagini grezze a virgola mobile .
Basis Universal: Questa modalità di compressione VRAM alternativa codifica la texture in un formato che può essere transcodificato nella maggioranza dei formati compressi dalla GPU al momento del caricamento. Ciò produce file molto piccoli che utilizzano la compressione VRAM, a scapito di una qualità inferiore rispetto a VRAM Compressed e di tempi di compressione più lunghi. L'utilizzo della VRAM è generalmente lo stesso di VRAM Compressed. Basis Universal non supporta i formati di immagine a virgola mobile (il motore utilizzerà internamente VRAM Compressed come alternativa).
Nota
Anche nelle applicazioni 3D, la compressione VRAM delle texture stile "pixel art" dovrebbe essere disabilitata, poiché ciò influirebbe negativamente sul loro aspetto, senza migliorare significativamente le prestazioni a causa della loro bassa risoluzione.
In questa tabella, ciascuna delle 5 opzioni è descritta insieme ai relativi vantaggi e svantaggi ( = la migliore,
  = la peggiore):
Modalità di compressione |
Senza perdita |
Con perdita |
Compresso per VRAM |
Non compresso per VRAM |
Basis Universal |
|---|---|---|---|---|---|
Descrizione |
Memorizzato come WebP/PNG senza perdita (lossless) |
Memorizzato come WebP con perdita (Lossy) |
Memorizzato come S3TC, BPTC o ETC2 a seconda della piattaforma |
Memorizzati come pixel grezzi |
Transcodificato in formato compresso per VRAM |
Dimensione sul disco |
|
|
|
|
|
Utilizzo di memoria |
|
|
|
|
|
Prestazioni |
|
|
|
|
|
Perdita di qualità |
|
|
|
|
|
Tempo di caricamento |
|
|
|
|
|
 Piccolo
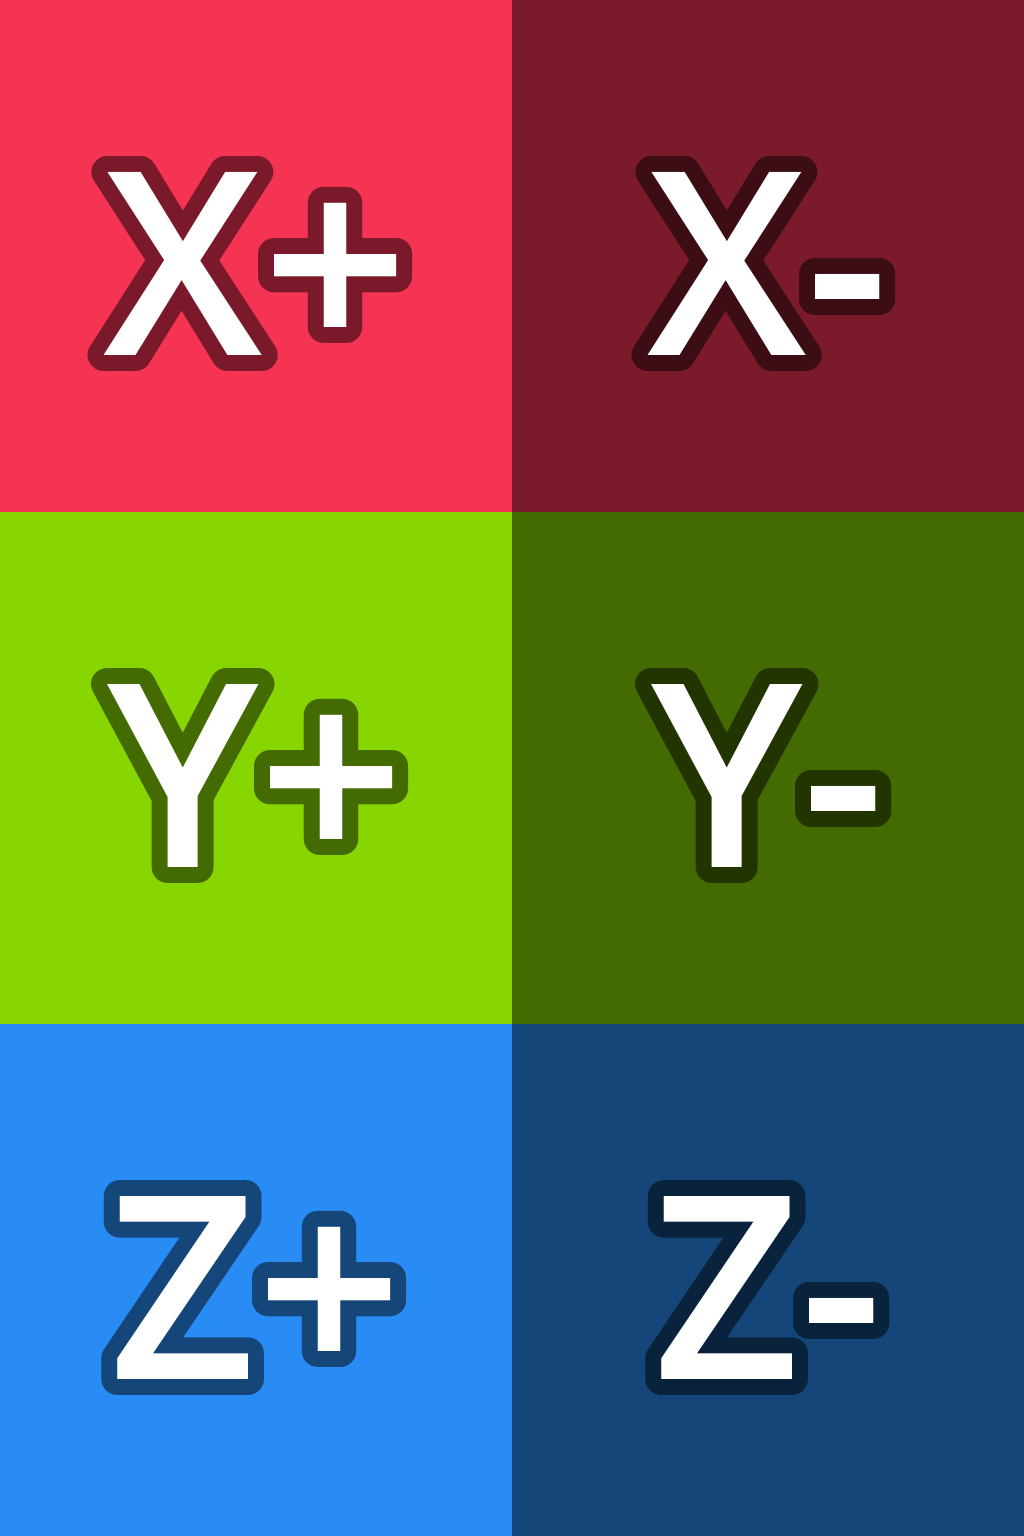
Utilizzo stimato della memoria per una singola texture RGBA8 con mipmap abilitate:
Dimensioni della texture |
Senza perdita |
Con perdita |
Compresso per VRAM |
Non compresso per VRAM |
Basis Universal |
|---|---|---|---|---|---|
128×128 |
|
|
|
|
|
256×256 |
|
|
|
|
|
512×512 |
|
|
|
|
|
1024×1024 |
|
|
|
|
|
2048×2048 |
|
|
|
|
|
4096×4096 |
|
|
|
|
|
Nota
Nella tabella sopra, l'utilizzo della memoria sarà ridotto del 25% per le immagini che non hanno un canale alfa (RGB8). L'utilizzo della memoria sarà ulteriormente ridotto del 25% per le immagini con mipmap disabilitate.
Si noti come, a risoluzioni più elevate, l'impatto della compressione VRAM sia molto maggiore. Con un rapporto di compressione di 4:1 (6:1 per texture opache con S3TC), la compressione VRAM consente effettivamente di raddoppiare le dimensioni di una texture su ciascun asse, utilizzando la stessa quantità di memoria sulla GPU.
La compressione VRAM riduce anche la larghezza di banda di memoria necessaria per campionare la texture, il che può accelerare il rendering in scenari limitati dalla larghezza di banda (frequenti su schede grafiche integrate e dispositivi mobili). Questi fattori combinati rendono la compressione VRAM un must per i giochi 3D con texture ad alta risoluzione.
È possibile vedere in anteprima la quantità di memoria occupata da una texture facendo doppio clic su di essa nel pannello FileSystem, quindi osservando l'Ispettore:
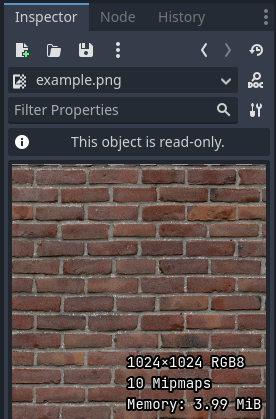
Anteprima di una texture nell'Ispettore. Crediti: Red Brick 03 - Poly Haven
Compress > High Quality
Nota
La compressione delle texture in VRAM di alta qualità è supportata solo nei renderer Forward+ e Mobile.
Quando si utilizza il renderer Compatibilità, questa opzione è sempre considerata disabilitata.
Se abilitato, utilizza la compressione BPTC sulle piattaforme desktop e la compressione ASTC sulle piattaforme mobili. Quando si utilizza BPTC, BC7 è utilizzato per le texture SDR e BC6H per le texture HDR.
Se disabilitato (predefinito), utilizza la compressione S3TC, più veloce ma di qualità inferiore, sulle piattaforme desktop e ETC2 sulle piattaforme mobile/web. Quando si utilizza S3TC, DXT1 (BC1) è utilizzato per le texture opache e DXT5 (BC3) per le texture trasparenti o a mappa di normali (RGTC).
BPTC e ASTC supportano la compressione VRAM per le texture HDR, ma S3TC ed ETC2 no (vedere Compressione HDR di seguito).
Comprimi > Compressione HDR
Nota
Questa opzione ha effetto solo sulle texture importate in formati HDR in Godot (file .hdr e .exr).
If set to Disabled, never uses VRAM compression for HDR textures, regardless of whether they're opaque or transparent. Instead, the texture is converted to RGBE9995 (9-bits per channel + 5-bit exponent = 32 bits per pixel) to reduce memory usage compared to a half-float or single-precision float image format.
If set to Opaque Only (default), only uses VRAM compression for opaque HDR textures. This is due to a limitation of HDR formats, as there is no VRAM-compressed HDR format that supports transparency at the same time.
If set to Always, will force VRAM compression even for HDR textures with an alpha channel. To perform this, the alpha channel is discarded on import.
Comprimi > Mappa di normali
When using a texture as normal map, only the red and green channels are required. Given regular texture compression algorithms produce artifacts that don't look that nice in normal maps, the RGTC compression format is the best fit for this data. Forcing this option to Enable will make Godot import the image as RGTC compressed. By default, it's set to Detect. This means that if the texture is ever detected to be used as a normal map, it will be changed to Enable and reimported automatically.
Note that RGTC compression affects the resulting normal map image. You will have to adjust custom shaders that use the normal map's blue channel to take this into account. Built-in material shaders already ignore the blue channel in a normal map (regardless of the actual normal map's contents).
In the example below, the normal map with RGTC compression is able to preserve its detail much better, while using the same amount of memory as a standard RGBA VRAM-compressed texture:
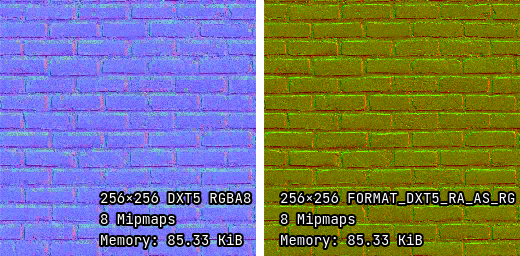
Mappa di normali con compressione VRAM standard (a sinistra) e con compressione VRAM RGTC (a destra)
Nota
Godot richiede che la mappa di normali utilizzi le coordinate X+, Y+ e Z+, ovvero una mappa di normali in stile OpenGL. Se hai importato un materiale creato per l'uso con un altro motore, potrebbe essere in stile DirectX. In tal caso, bisogna convertire la mappa di normali abilitando l'opzione di importazione Inverti Y in mappa di normali.
Ulteriori informazioni sulle mappe di normali (inclusa una tabella di ordine delle coordinate per i motori più diffusi) sono disponibili qui.
Compress > Channel Pack
Se impostato su sRGB Friendly (predefinito), impedisce l'utilizzo del formato colore RG poiché non supporta il colore sRGB.
If set to Optimized, allows the RG color format to be used if the texture does not use the blue channel.
A third option Normal Map (RG Channels) is only available in layered textures (Cubemap, CubemapArray, Texture2DArray and Texture3D). This forces all layers from the texture to be imported with the RG color format, with only the red and green channels preserved. RGTC compression is able to preserve its detail much better, while using the same amount of memory as a standard RGBA VRAM-compressed texture. This only has an effect on textures with the VRAM Compressed or Basis Universal compression modes.
Mipmap > Genera
If enabled, smaller versions of the texture are generated on import. For example, a 64×64 texture will generate 6 mipmaps (32×32, 16×16, 8×8, 4×4, 2×2, 1×1). This has several benefits:
Le texture non risulteranno sgranate in lontananza (in 3D) o se rimpicciolite a causa dello zoom della telecamera o della scala dei CanvasItem (in 2D).
Le prestazioni miglioreranno se la texture è visualizzata in lontananza, poiché il campionamento di versioni più piccole della texture originale è più veloce e richiede meno larghezza di banda della memoria.
Lo svantaggio delle mipmap è che aumentano l'utilizzo della memoria di circa il 33%.
Si consiglia di abilitare le mipmap in 3D. Tuttavia, in 2D, questa opzione si dovrebbe abilitare solo se il progetto ne usufruisce effettivamente. Se la telecamera non si allontana mai di molto, abilitare le mipmap non sarà molto vantaggioso, ma aumenterà comunque il consumo di memoria.
Mipmap > Limite
Avvertimento
Mipmap > Limite non è attualmente implementato e la sua modifica non ha alcun effetto.
Se impostato su un valore maggiore di -1, limita il numero massimo di mipmap che si possono generare. Questo valore si può ridurre se non si desidera che la risoluzione delle texture diventi troppo bassa da molto lontano, a scapito di una certa granulosità.
Rugosità > Modalità
Il canale colore da considerare come mappa di rugosità in questa texture. Efficace solo se Rugosità > Sorgente delle normali non è vuoto.
Rugosità > Sorgente di normali
Il percorso della texture da considerare come mappa di normali per il filtro di rugosità durante l'importazione. Specificandolo, è possibile ridurre leggermente l'aliasing speculare in 3D.
Il filtro di rugosità durante l'importazione è utilizzato solo nel rendering 3D, non in 2D.
Processo > Correggi l'alfa sui bordi
Questo inserisce pixel dello stesso colore circostante in transizione dalle aree trasparenti alle aree opache. Per le texture visualizzate con il filtro bilineare, questo aiuta a ridurre l'effetto contorno quando si esportano immagini da un editor di immagini.
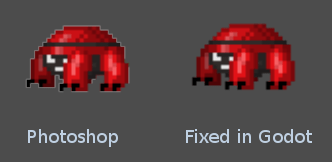
Si consiglia di lasciare questa opzione abilitata (come lo è solitamente), a meno che non causi problemi con una particolare immagine.
Processo > Premoltiplica l'alfa
Un'alternativa alla correzione dei bordi scuriti con Correggi l'alfa sui bordi è utilizzare l'alfa premoltiplicato. Abilitando questa opzione, la texture verrà convertita in questo formato. Una texture con alfa premoltiplicato richiede materiali specifici per apparire correttamente:
In 2D, a CanvasItemMaterial will need to be created and configured to use the Premul Alpha blend mode on CanvasItems that use this texture. In custom canvas item shaders,
render_mode blend_premul_alpha;should be used.In 3D, a BaseMaterial3D will need to be created and configured to use the Premul Alpha blend mode on materials that use this texture. In custom spatial shaders,
render_mode blend_premul_alpha;should be used.
Process > Normal Map Invert Y
Godot richiede che la mappa di normali utilizzi le coordinate X+, Y+ e Z+, ovvero una mappa di normali in stile OpenGL. Se hai importato un materiale creato per l'uso con un altro motore, potrebbe essere in stile DirectX. In tal caso, bisogna convertire la mappa di normali abilitando l'opzione di importazione Inverti Y in mappa di normali.
Ulteriori informazioni sulle mappe di normali (inclusa una tabella di ordine delle coordinate per i motori più diffusi) sono disponibili qui.
Process > HDR as sRGB
Some HDR images you can find online may be broken and contain sRGB color data (instead of linear color data). It is advised not to use those files. If you absolutely have to, enabling this option on will make them look correct.
Avvertimento
Enabling HDR as sRGB on well-formatted HDR images will cause the resulting image to look too dark, so leave this disabled if unsure.
Process > HDR Clamp Exposure
Some HDR panorama images you can find online may contain extremely bright pixels, due to being taken from real life sources without any clipping.
While these HDR panorama images are accurate to real life, this can cause the radiance map generated by Godot to contain sparkles when used as a background sky. This can be seen in material reflections (even on rough materials in extreme cases). Enabling HDR Clamp Exposure can resolve this using a smart clamping formula that does not introduce visible clipping – glow will keep working when looking at the background sky.
Process > Size Limit
If set to a value greater than 0, the size of the texture is limited on
import to a value smaller than or equal to the value specified here. For
non-square textures, the size limit affects the longer dimension, with the
shorter dimension scaled to preserve aspect ratio. Resizing is performed using
cubic interpolation.
This can be used to reduce memory usage without affecting the source images, or avoid issues with textures not displaying on mobile/web platforms (as these usually can't display textures larger than 4096×4096).
Detect 3D > Compress To
This changes the Compress > Mode option that is used when a texture is detected as being used in 3D.
Modificare questa opzione di importazione ha effetto solo se una texture viene considerata utilizzata in 3D. Impostandola su Disabled e reimportandola, la modalità di compressione esistente di una texture (se viene considerata utilizzata in 3D) non cambierà, mentre scegliendo VRAM Compressed o Basis Universal sì.
SVG > Scala
Questa è disponibile solo per le immagini SVG.
La scala con cui l'SVG deve essere renderizzato, dove 1.0 rappresenta la dimensione originale del disegno. Valori più alti risultano in un'immagine più grande. Si noti che, a differenza del sovracampionamento dei font, questo influisce sulla dimensione fisica con cui l'SVG è renderizzato in 2D. Vedere anche Editor > Scala con la scala dell'editor di seguito.
Editor > Scala con la scala dell'editor
Questa è disponibile solo per le immagini SVG.
Se true, ridimensiona l'immagine importata in modo che corrisponda al fattore di scala di visualizzazione dell'editor. Si dovrebbe abilitare per le icone dei plugin dell'editor e per le icone delle classi personalizzate, altrimenti dovrebbe rimanere disabilitata.
Editor > Converti i colori con il tema dell'editor
Questa è disponibile solo per le immagini SVG.
Se selezionata, converte i colori dell'immagine importata così da corrispondere alla tavolozza dei colori delle icone e dei font dell'editor. Questo presuppone che l'immagine utilizzi esattamente gli stessi colori della tavolozza di colori di Godot per le icone dell'editor, con il file sorgente progettato per un tema scuro dell'editor. Si dovrebbe abilitare per le icone dei plugin dell'editor e per le icone delle classi personalizzate, altrimenti dovrebbe rimanere disabilitata.
Importare immagini SVG con testo
Poiché la libreria SVG utilizzata in Godot non supporta la rasterizzazione del testo presente nelle immagini SVG, il testo deve essere prima convertito in un tracciato. Altrimenti, il testo non apparirà nell'immagine rasterizzata.
Ci sono due modi per farlo in modo non distruttivo, permettendo di continuare a modificare il testo originale in seguito:
Seleziona l'oggetto di testo in Inkscape, poi duplicalo nella stessa posizione premendo Ctrl + D e usa Path > Object to Path. Nascondi l'oggetto di testo originale in seguito tramite il pannello Layers and Objects.
Utilizza la riga di comando di Inkscape per esportare un file SVG da un altro file SVG, convertendo il testo in tracciati:
inkscape --export-text-to-path --export-filename svg_with_text_converted_to_path.svg svg_with_text.svg
Le migliori pratiche
Supportare dimensioni di texture ad alta risoluzione in 2D senza artefatti
Per supportare più risoluzioni con immagini nitide ad alta risoluzione, sarà necessario utilizzare immagini sorgente ad alta risoluzione (adatte alla risoluzione più alta che serve supportare senza sfocature, che in genere è 4K nei moderni giochi per desktop).
Ci sono due modi per procedere:
Utilizza una risoluzione base elevata nelle impostazioni del progetto (ad esempio 4K), quindi utilizza le texture nella scala originale. Questo è un approccio più semplice.
Utilizza una risoluzione base bassa nelle impostazioni del progetto (ad esempio 1080p), poi riduci la risoluzione delle texture quando le usi. Questo è spesso più difficile e può rendere noiosi vari calcoli nello script, quindi si consiglia l'approccio descritto in precedenza.
Dopo averlo fatto, potresti notare che le texture diventano granulose a risoluzioni più basse. Per risolvere questo problema, abilita Mipmap sulle texture utilizzate in 2D nel pannello Importazione. Questo aumenterà l'utilizzo di memoria.
Abilitare le mipmap può rendere le texture più sfocate, ma è possibile renderle più nitide (a scapito di una maggiore granulosità) impostando Rendering > Texture > Filtri predefiniti > Bias delle mipmap delle texture su un valore negativo.
Usa dimensioni di texture appropriate in 3D
Sebbene non ci sia una raccomandazione valida per tutto, ecco alcuni consigli generali per scegliere le dimensioni delle texture in 3D:
Le dimensioni di una texture si dovrebbero regolare in modo da avere una densità di texel uniforme rispetto agli oggetti circostanti. Sebbene ciò non si possa garantire perfettamente mantenendo le dimensioni pari a potenze di due, di solito è possibile mantenere un dettaglio della texture abbastanza uniforme in tutta una scena 3D.
Più piccolo appare l'oggetto sullo schermo, più piccola dovrebbe essere la sua texture. Ad esempio, un albero che appare solo sullo sfondo non ha bisogno di una risoluzione di texture elevata quanto quella di altri oggetti vicino ai quali il giocatore potrebbe camminare.
Si consiglia di utilizzare dimensioni di texture pari a potenze di due, ma non è obbligatorio. Le texture non devono essere quadrate: dimensioni come 1024×512 sono accettabili.
There are diminishing returns to using large texture sizes, despite the increased memory usage and loading times. Most modern 3D games not using a pixel art style stick to 2048×2048 textures on average, with 1024×1024 and 512×512 for textures spanning smaller surfaces.
Quando si lavora con materiali basati sulla fisica in 3D, è possibile ridurre l'utilizzo di memoria e le dimensioni dei file senza compromettere eccessivamente la qualità, utilizzando una risoluzione più bassa per alcune mappe di texture. Questo funziona particolarmente bene per le texture che presentano solo dettagli a bassa frequenza (come una mappa di normali per una texture di neve).
Se hai il controllo sul modo in cui sono creati i modelli 3D, vale la pena di approfondire anche questi suggerimenti:
Quando si lavora con modelli 3D prevalentemente simmetrici, si potrebbero utilizzare UV speculari per raddoppiare la densità effettiva dei texel. Tuttavia, ciò potrebbe apparire innaturale se applicato ai volti umani.
Quando si lavora con modelli 3D aventi uno stile low-poly e colori semplici, è possibile affidarsi ai colori dei vertici anziché alle texture per rappresentare i colori sulle superfici del modello.
Vedi anche
Le immagini si possono caricare e salvare in fase di esecuzione utilizzando caricamento e salvataggio di file in fase di esecuzione, anche da un progetto esportato.