Attention: Here be dragons
This is the latest
(unstable) version of this documentation, which may document features
not available in or compatible with released stable versions of Godot.
Checking the stable version of the documentation...
Luci e ombre 3D
Introduzione
Le sorgenti luminose emettono luce che si fonde ai materiali e produce un risultato visibile. La luce può provenire da diversi tipi di sorgenti in una scena:
Dal materiale stesso, sotto forma di colore di emissione (sebbene non influisca sugli oggetti vicini, a meno che non sia abilitata l'illuminazione precalcolata o indiretta nello spazio dello schermo).
Nodi di luce: DirectionalLight3D, OmniLight3D e SpotLight3D.
Luce ambientale in Environment o Sonde di riflessi.
Illuminazione globale (LightmapGI, VoxelGI o SDFGI).
Il colore di emissione è una proprietà del materiale. Si può saperne di più nel tutorial Standard Material 3D and ORM Material 3D.
Vedi anche
È possibile confrontare vari tipi di luci in azione attraverso il progetto demo Luci e ombre 3D.
Nodi di luce
Esistono tre tipi di nodi di luce: DirectionalLight3D, OmniLight3D e SpotLight3D. Diamo un'occhiata ai parametri più comuni per le luci:
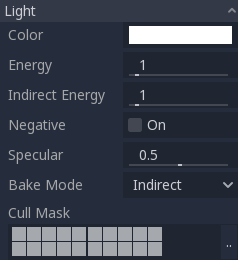
Ogni proprietà ha una funzione specifica:
Colore: colore base della luce emessa.
Energia: moltiplicatore di energia. Utile per saturare le luci o per lavorare con Illuminazione ad alta gamma dinamica.
Energia indiretta: moltiplicatore secondario utilizzato con la luce indiretta (rimbalzi della luce). Funziona con Using Lightmap global illumination, VoxelGI o SDFGI.
Energia della nebbia volumetrica: moltiplicatore secondario utilizzato con la nebbia volumetrica. Ha effetto solo quando la nebbia volumetrica è abilitata.
Negativa: la luce diventa sottrattiva anziché additiva. A volte è utile compensare manualmente alcuni angoli bui.
Speculare: influisce sull'intensità della macchia speculare negli oggetti colpiti da questa luce. A zero, questa luce diventa una luce puramente diffusa.
Modo di precalcolo: imposta la modalità di precalcolo per la luce. Consultare Using Lightmap global illumination.
Maschera di selezione: Gli oggetti che si trovano negli strati selezionati sottostanti saranno influenzati da questa luce. Si noti che gli oggetti disabilitati tramite questa maschera di culling proietteranno comunque ombre. Se non si desidera che gli oggetti disabilitati proiettino ombre, regolare la proprietà Proietta ombra su GeometryInstance3D al valore desiderato.
Vedi anche
Consultare Unità fisiche di luce e telecamera se si desidera utilizzare unità di misura del mondo reale per configurare l'intensità e la temperatura del colore delle luci.
Limiti al numero di luci
Quando si utilizza il renderer Forward+, Godot utilizza un approccio di clustering per l'illuminazione in tempo reale. È possibile aggiungere tutte le luci che desiderate (purché le prestazioni lo permettano). Tuttavia, esiste ancora un limite predefinito di 512 elementi cluster che possono essere presenti nella vista della telecamera attuale. Un elemento cluster è una luce omnidirezionale, un riflettore, una decalcomania o una sonda di riflessione. È possibile aumentare questo limite regolando Elementi clusterizzati massimi in Impostazioni del progetto > Rendering > Limiti > Costruttore cluster.
Utilizzando il renderer Mobile, c'è un limite di 8 OmniLight + 8 SpotLight per ogni risorsa mesh. C'è anche un limite di 256 OmniLight + 256 SpotLight che si possono renderizzare nella vista della telecamera attuale. Al momento non è possibile cambiare questi limiti.
Utilizzando il renderer Compatibilità, è possibile renderizzare fino a 8 OmniLight + 8 SpotLight per ogni risorsa mesh. È possibile aumentare questo limite nelle Impostazioni del progetto avanzate regolando il Numero massimo di elementi renderizzabili e/o Numero massimo di luci per oggetto in Rendering > Limiti > OpenGL, a scapito delle prestazioni e di tempi più lunghi per compilare gli shader. È possibile anche ridurre il limite per ridurre i tempi di compilazione degli shader e migliorare leggermente le prestazioni.
Con tutti i metodi di rendering, è possibile visualizzare fino a 8 DirectionalLight allo stesso tempo. Tuttavia, ogni DirectionalLight in più con ombre abilitate ridurrà la risoluzione effettiva delle ombre di ogni DirectionalLight. Questo perché l'atlante delle ombre direzionali è condiviso tra tutte le luci.
Se si supera il limite di rendering, le luci cominceranno a comparire e scomparire durante il movimento della telecamera, il che può essere fastidioso. Abilitare Dissolvenza a distanza sui nodi di luce può aiutare a ridurre questo problema, migliorando allo stesso tempo le prestazioni. Anche suddividere le mesh in porzioni più piccole può aiutare, soprattutto per la geometria dei livelli (il che migliora anche l'efficienza del culling).
Se è necessario renderizzare più luci di quante ne sia possibile in un certo renderer, considera di utilizzare lightmap precalcolate con la modalità di precalcolo delle luci impostata su Static. Questo consente alle luci di essere completamente precalcolare, rendendole anche molto più rapide da renderizzare. Si possono anche utilizzare materiali emissivi con qualsiasi tecnica di illuminazione globale al posto dei nodi di luce per emettere luce su un'area più ampia.
Mappatura delle ombre
Le luci possono facoltativamente proiettare ombre. Questo offre loro un maggiore realismo (la luce non raggiunge le aree occluse), ma può comportare un maggiore costo di prestazioni. Esiste un elenco di parametri generici per le ombre, ognuno dei quali ha una funzione specifica:
Enabled: Selezionare per abilitare la mappatura delle ombre in questa luce.
Opacità: Le aree occluse sono oscurate da questo fattore di opacità. Le ombre sono completamente opache normalmente, ma si può cambiare per renderle traslucide per una determinata luce.
Bias: Quando questo parametro è troppo basso, le ombre degli oggetti rischiano di proiettarsi su loro stessi. Quando è troppo alto, le ombre si separano dalla loro origine. Regolare il valore in base alle proprie esigenze.
Bias normale: Quando questo parametro è troppo basso, le ombre degli oggetti rischiano di proiettarsi su loro stessi. Quando è troppo alto, le ombre appaiono disallineate rispetto alla loro origine. Regolare il valore in base alle proprie esigenze.
Transmittance Bias: When this parameter is too low, self-shadowing occurs on materials that have transmittance enabled. When too high, shadows will not affect materials that have transmittance enabled consistently. Tweak to what works best for you.
Reverse Cull Face: Some scenes work better when shadow mapping is rendered with face-culling inverted.
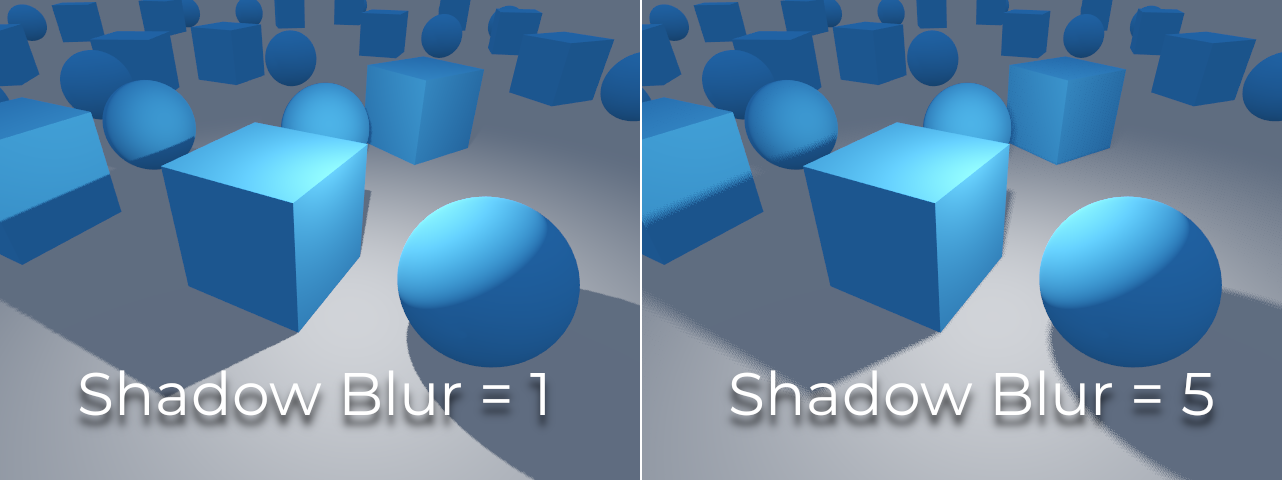
Blur: Multiplies the shadow blur radius for this light. This works with both traditional shadow mapping and contact-hardening shadows (lights with Angular Distance or Size greater than
0.0). Higher values result in softer shadows, which will also appear to be more temporally stable for moving objects. The downside of increasing shadow blur is that it will make the grainy pattern used for filtering more noticeable. See also Modalità di filtro delle ombre.Caster Mask: Shadows are only cast by objects in these layers. Note that this mask does not affect which objects shadows are cast onto.
Aggiustare il bias delle ombre
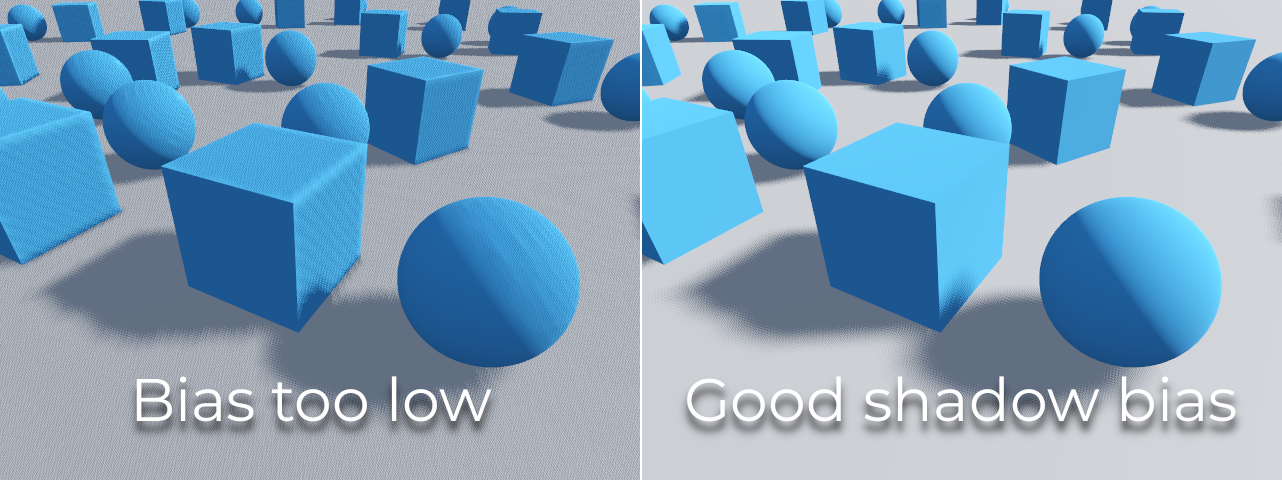
Di seguito è riportata un'immagine che mostra cosa succede regolando il bias. I valori predefiniti funzionano nella maggior parte dei casi, ma in generale, dipendono dalle dimensioni e dalla complessità della geometria.
If the Shadow Bias or Shadow Normal Bias is set too low for a given light, the shadow will be "smeared" onto the objects. This will cause the light's intended appearance to darken, and is called shadow acne:
On the other hand, if the Shadow Bias or Shadow Normal Bias is set too high for a given light, the shadow may appear to be disconnected from the object. This is called peter-panning:
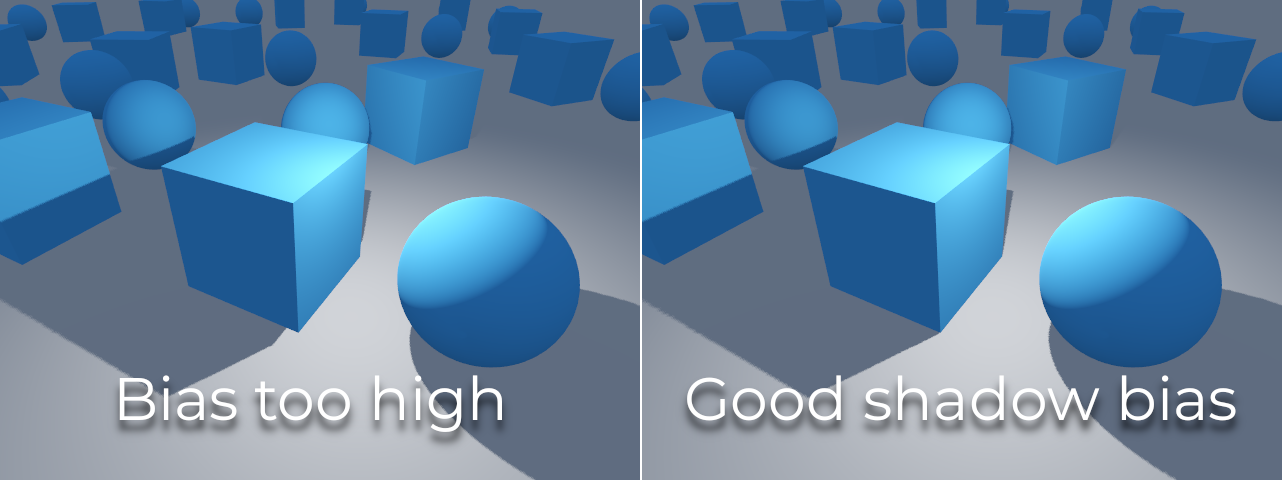
In general, increasing Shadow Normal Bias is preferred over increasing Shadow Bias. Increasing Shadow Normal Bias does not cause as much peter-panning as increasing Shadow Bias, but it can still resolve most shadow acne issues efficiently. The downside of increasing Shadow Normal Bias is that it can make shadows appear thinner for certain objects.
Qualsiasi sorta di problema di bias si può correggere aumentando la risoluzione della mappa delle ombre, a scapito delle prestazioni.
Nota
Tweaking shadow mapping settings is an art – there are no "one size fits all" settings. To achieve the best visuals, you may need to use different shadow bias values on a per-light basis.
Note on Appearance Changes: When enabling shadows on a light, be aware that the light's appearance might change compared to when it's rendered without shadows in the compatibility renderer. Due to limitations with older mobile devices, shadows are implemented using a multi-pass rendering approach so lights with shadows are rendered in sRGB space instead of linear space. This change in rendering space can sometimes drastically alter the light's appearance. To achieve a similar appearance to an unshadowed light, you may need to adjust the light's energy setting.
Luce direzionale
Questo è il tipo di luce più comune e rappresenta una sorgente luminosa molto distante (come il sole). È anche la luce meno costosa da calcolare e si dovrebbe utilizzare ogni volta che è possibile (sebbene non sia la mappa delle ombre meno costosa da calcolare, ma ne parleremo più avanti).
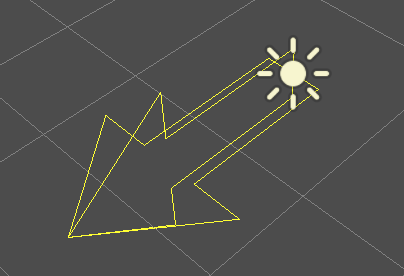
I modelli di illuminazione direzionale simulano un numero infinito di raggi luminosi paralleli che illuminano l'intera scena. Il nodo di luce direzionale è rappresentato da una grande freccia che indica la direzione dei raggi luminosi. Tuttavia, la posizione del nodo non influisce proprio sull'illuminazione e può essere ovunque.
Ogni superficie la cui parte frontale è colpita dai raggi luminosi è illuminata, mentre le altre rimangono al buio. A differenza di quasi tutti gli altri tipi di luce, le luci direzionali non hanno parametri specifici.
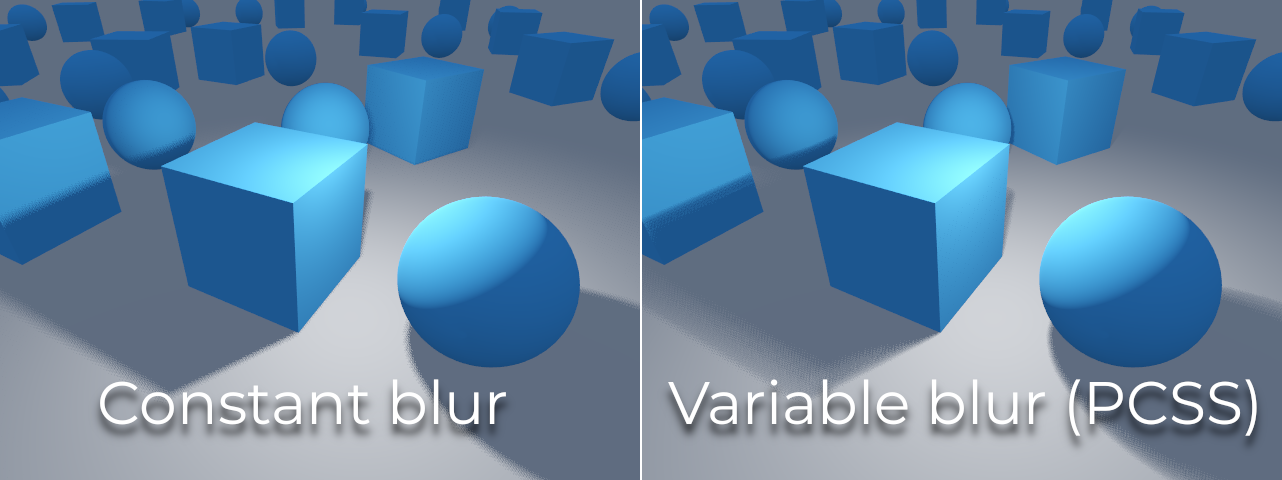
La luce direzionale offre anche una proprietà Angular Distance, che determina l'ampiezza angolare della luce in gradi. Aumentando questo valore oltre 0.0, le ombre risulteranno più sfumate a distanze maggiori dalla loro sorgente , influenzando anche l'aspetto del sole nei materiali procedurali del cielo (procedural sky). Questa è detta contact-hardening shadow (nota anche come PCSS).
Per riferimento, la distanza angolare del Sole visto dalla Terra è di circa 0.5. Questo tipo di ombra è costoso, quindi dare un'occhiata le raccomandazioni in Raccomandazioni per PCSS se si imposta questo valore oltre 0.0 sulle luci con ombre abilitate.
Mappatura delle ombre direzionali
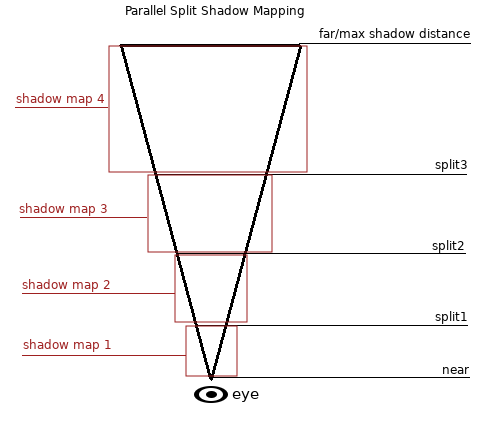
Per calcolare le mappe delle ombre, la scena è renderizzata (solo la profondità) da un punto di vista ortogonale che copre l'intera scena (o fino alla distanza massima). C'è, tuttavia, un problema con questo approccio, perché gli oggetti più vicini alla telecamera ricevono ombre a bassa risoluzione che possono apparire squadrate.
Per risolverlo, si utilizza una tecnica chiamata Parallel Split Shadow Maps (PSSM). Questa tecnica divide il frustum di visualizzazione in 2 o 4 aree. Ogni area ottiene la propria mappa delle ombre. Ciò consente alle piccole aree vicine all'osservatore di avere la stessa risoluzione delle ombre di un'area enorme e lontana. Quando le ombre sono abilitate per DirectionalLight3D, la modalità predefinita è PSSM con 4 divisioni. Negli scenari in cui un oggetto è abbastanza grande da apparire in tutte e quattro le divisioni, ci sarà un aumento delle chiamate di disegno. Nello specifico, tale oggetto verrà renderizzato cinque volte in totale: una volta per ciascuna delle quattro divisioni delle ombre e una volta per il rendering finale della scena. Questo può influire sulle prestazioni; è importante comprendere questo comportamento per ottimizzare la scena e gestire le aspettative di prestazioni.
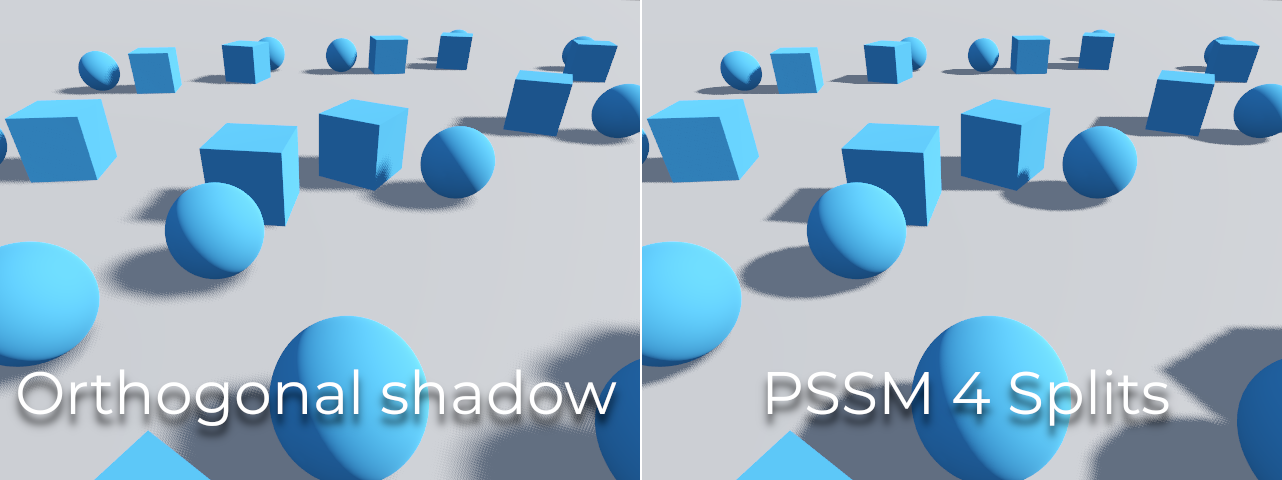
Con questo, le ombre diventano più dettagliate:
Per controllare PSSM, sono esposti vari parametri:
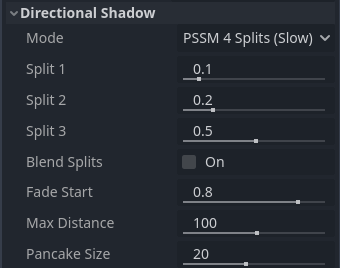
Ogni distanza di divisione è relativa alla distanza lontana (far) della telecamera (o alla Max Distance dell'ombra se maggiore di 0.0). 0.0 corrisponde alla posizione dell'occhio e 1.0 è il punto in cui l'ombra termina a distanza. Le divisioni si trovano tra questi due valori. I valori predefiniti generalmente funzionano bene, ma è comune regolare leggermente la prima divisione per dare più dettagli agli oggetti vicini (come un personaggio in un gioco in terza persona).
Assicurarsi sempre di impostare la Max Distance delle ombre in base alle esigenze della scena. Una distanza massima più bassa produrrà ombre dall'aspetto migliore e prestazioni migliori, poiché meno oggetti dovranno essere inclusi nel rendering delle ombre. È anche possibile regolare Fade Start per controllare l'intensità della dissolvenza delle ombre in lontananza. Per le scene in cui la Max Distance copre completamente la scena in qualsiasi posizione della telecamera, è possibile aumentare Fade Start a 1.0 per evitare che l'ombra si dissolva in lontananza. Non si dovrebbe fare in scene in cui la Max Distance non copre completamente la scena, poiché l'ombra apparirà tagliata bruscamente in lontananza.
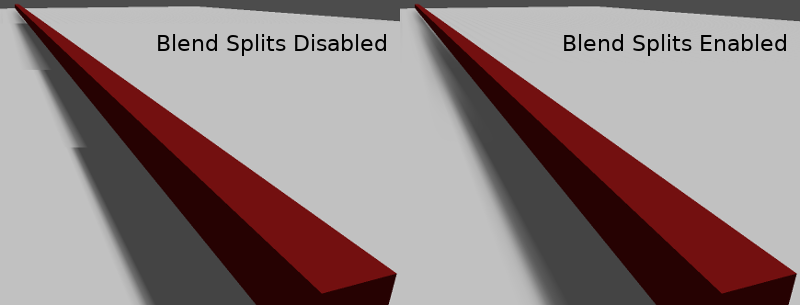
A volte, la transizione tra una divisione e la prossima può sembrare sbrutta. Per correggerlo, è possibile attivare Blend Splits, che sacrifica dettagli e prestazioni in cambio di transizioni più fluide:
Il parametro Shadow > Normal Bias può servire per correggere casi particolari di auto-ombreggiatura quando gli oggetti sono perpendicolari alla luce. L'unica pecca è che rende l'ombra leggermente più sottile. È consigliabile aumentare Shadow > Normal Bias prima di aumentare Shadow > Bias nella maggior parte delle situazioni.
Infine, Pancake Size è una proprietà che si può regolare per correggere eventuali ombre mancanti quando si utilizzano oggetti grandi con mesh non suddivise. Cambiare questo valore solo se si notano ombre mancanti non causati da problemi di bias delle ombre.
Luce omnidirezionale
Omni light è una sorgente puntiforme che emette luce sfericamente in tutte le direzioni entro una determinata portata.
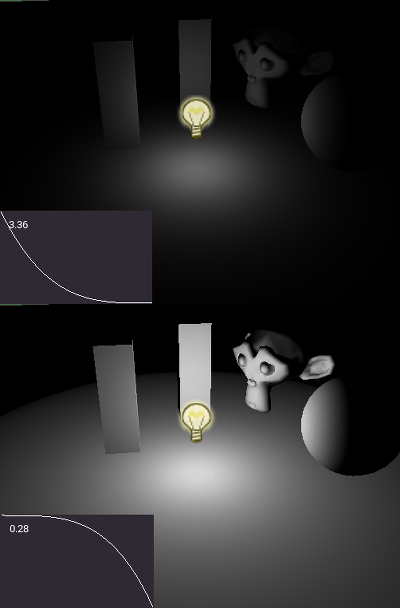
Nella vita reale, l'attenuazione della luce è una funzione inversa, il che significa che le luci omnidirezionali non hanno una portata. Questo è un problema perché implica che calcolare numerose luci omnidirezionali diventerebbe impegnativo.
Per risolvere ciò, viene introdotto un parametro Range insieme a una funzione di attenuazione.
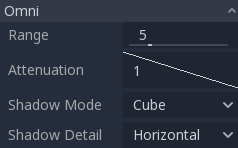
Questi due parametri consentono di aggiustare visivamente il funzionamento per ottenere risultati esteticamente gradevoli.
Un parametro Size è anche disponibile in OmniLight3D. Aumentando questo valore, la luce si attenuerà più lentamente e le ombre appariranno più sfocate quando la sorgente è lontana. Può servire per simulare le luci d'area, fino a un certo punto. L'ombra è detta contact-hardening shadow (anche nota come PCSS). Questo tipo di ombra è costoso, quindi si consiglia di consultare le raccomandazioni in Raccomandazioni per PCSS se si imposta questo valore su un valore più grande di 0.0 per le luci con le ombre abilitate.
Mappatura di ombre omnidirezionali
La mappatura delle ombre dalle luci omnidirezionali è relativamente semplice. Il problema principale da considerare è l'algoritmo utilizzato per renderizzarle.
Le ombre omnidirezionali si possono renderizzare con mappatura Dual Paraboloid o Cube. La mappatura Dual Paraboloid è veloce, ma può causare deformazioni, mentre la Cube è più precisa, ma più lenta. La mappatura predefinita è Cube, ma si consiglia di passare a Dual Paraboloid per le luci per cui non fa molta differenza visiva.
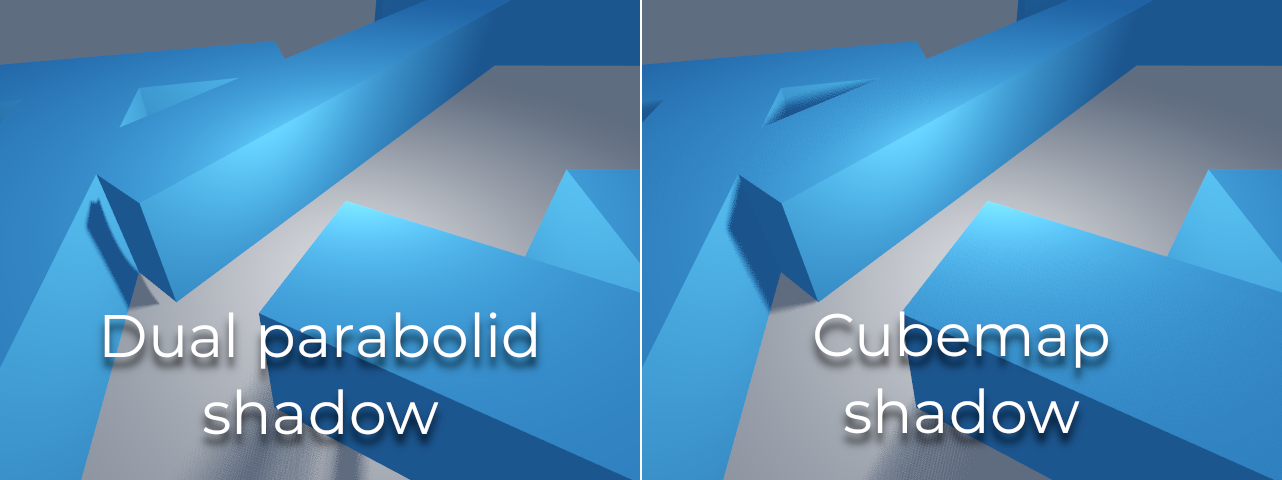
Se gli oggetti da renderizzare sono perlopiù irregolari e suddivisi, Dual Paraboloid solitamente basta. In ogni caso, poiché queste ombre sono memorizzate in un atlante di ombre (maggiori dettagli alla fine), potrebbe non fare alcuna differenza sulle prestazioni per la maggior parte delle scene.
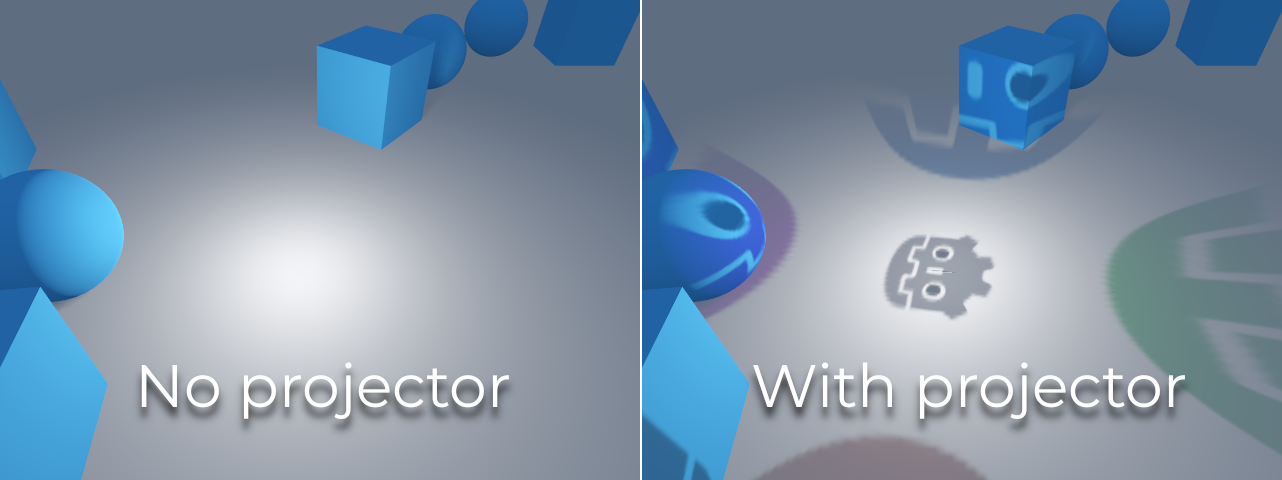
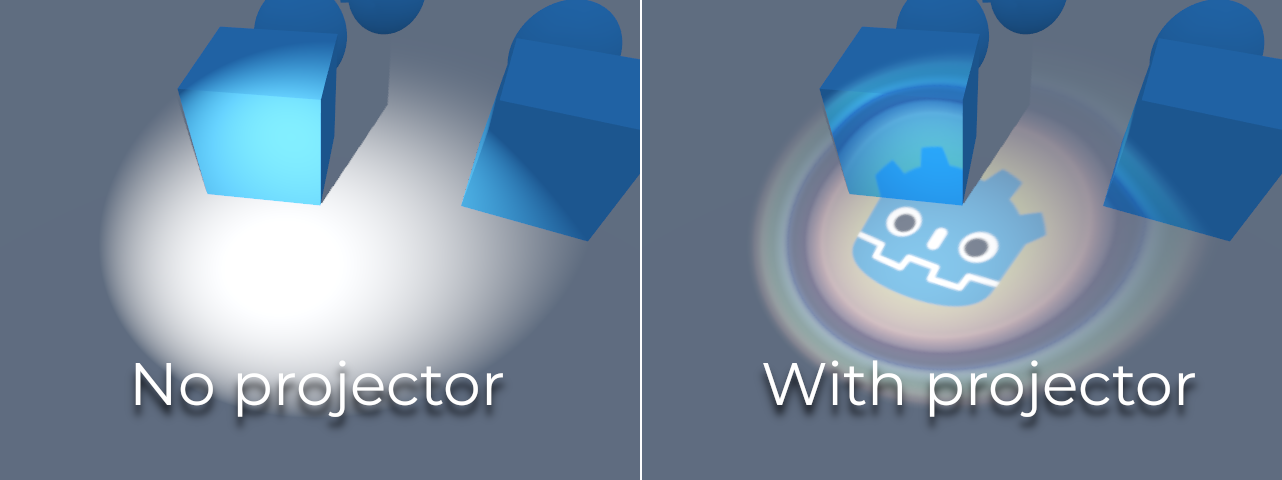
Le luci omnidirezionali con ombre abilitate possono utilizzare i proiettori. La texture di proiettore moltiplica il colore della luce per il colore in un determinato punto nella texture. Di conseguenza, le luci appariranno generalmente più scure una volta assegnata una texture di proiettore; è possibile aumentare Energy per compensare.
Le texture di proiettore per le luci omnidirezionali richiedono una mappatura speciale panoramica a 360°, simile alle texture di PanoramaSkyMaterial.
Con la texture di proiettore mostrata di seguito, si ottiene il seguente risultato:
Suggerimento
Se hai acquisito proiettori omnidirezionali sotto forma di immagini cubemap, puoi utilizzare questo strumento di conversione sul web per convertirle in un'unica immagine panoramica.
Spot light
Spot lights are similar to omni lights, except they emit light only into a cone (or "cutoff"). They are useful to simulate flashlights, car lights, reflectors, spots, etc. This type of light is also attenuated towards the opposite direction it points to.
Spot lights share the same Range, Attenuation and Size as OmniLight3D, and add two extra parameters:
Angle: l'angolo di apertura della luce.
Angle Attenuation: l'attenuazione del cono, che contribuisce a sfumare i bordi del cono.
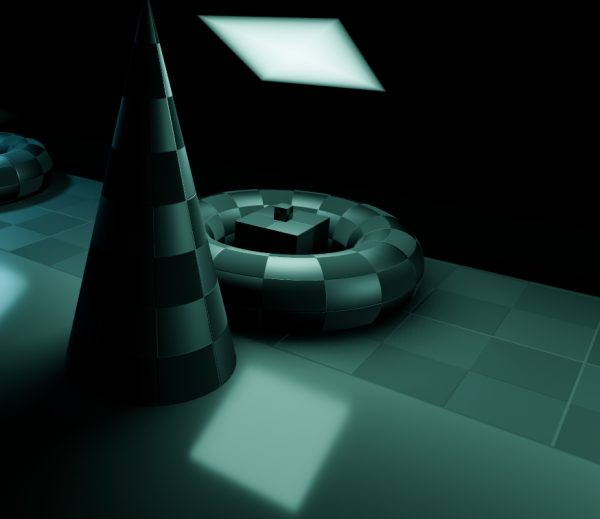
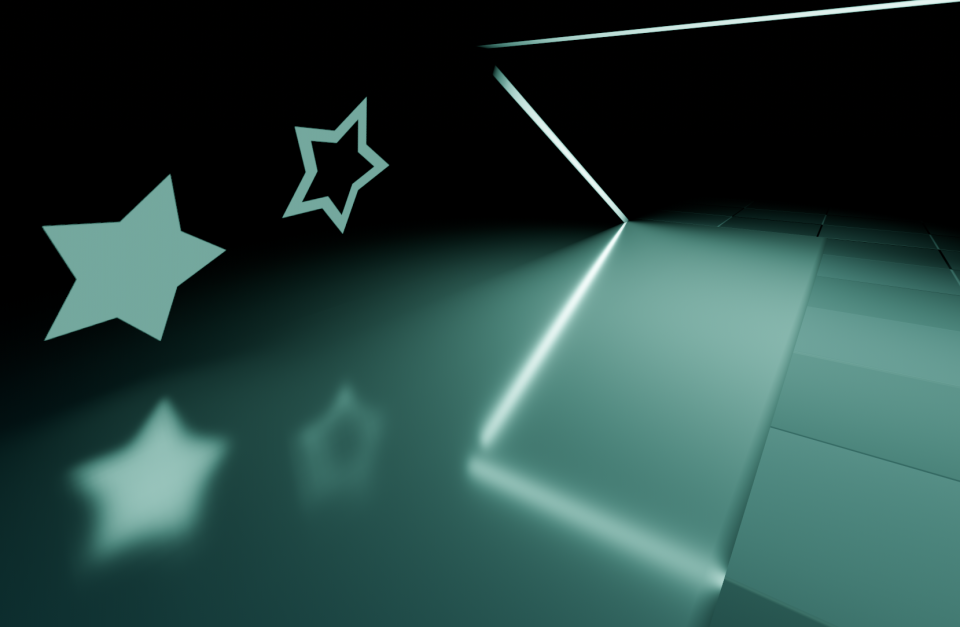
Spot shadow mapping
Spots feature the same parameters as omni lights for shadow mapping. Rendering spot shadow maps is significantly faster compared to omni lights, as only one shadow texture needs to be rendered (instead of rendering 6 faces, or 2 in dual paraboloid mode).
Le luci focali con ombre abilitate possono utilizzare i proiettori. La texture di proiettore moltiplica il colore della luce per il colore in un determinato punto nella texture. Di conseguenza, le luci appariranno generalmente più scure una volta assegnata una texture di proiettore; è possibile aumentare Energy per compensare.
Unlike omni light projectors, a spot light projector texture doesn't need to follow a special format to look correct. It will be mapped in a way similar to a decal.
Con la texture di proiettore mostrata di seguito, si ottiene il seguente risultato:
Nota
Spot lights with wide angles will have lower-quality shadows than spot lights with narrow angles, as the shadow map is spread over a larger surface. At angles wider than 89 degrees, spot light shadows will stop working entirely. If you need shadows for wider lights, use an omni light instead.
Luce d'area
A volte, si desidera che l'illuminazione provenga da un'ampia area anziché da un singolo punto. Le luci d'area sono utili per simulare un'illuminazione tenue e diffusa, come la luce proveniente da una finestra o da un cartellone pubblicitario illuminato.
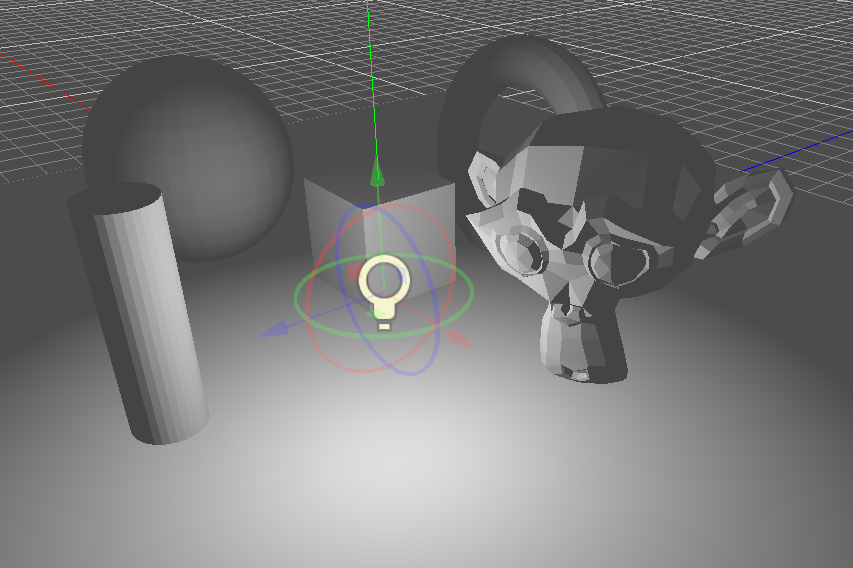
Godot fornisce il nodo AreaLight3D per questo scopo, che emette luce da un'area rettangolare. Il nodo emette solo luce e non ha altre rappresentazioni visive nella scena. Gli screenshot seguenti utilizzano un nodo Sprite3D come figlio della luce d'area a scopo di visualizzazione.
Avvertimento
Questo tipo di luce è il più esigente da renderizzare in tempo reale. Si dovrebbe utilizzare con moderazione, soprattutto quando le ombre sono abilitate. Si consiglia solo per le sequenze cinematiche o quando si punta a dispositivi di fascia alta.
In Forward+, non appena una luce d'area è visibile nel frustum di visualizzazione, comporta un costo aggiuntivo sulle prestazioni per tutti gli oggetti renderizzati nella scena, anche quelli non raggiunti da una luce d'area. Questo compromesso consente di renderizzare un numero maggiore di luci d'area (illuminazione clusterizzata).
In Mobile e Compatibilità, solo gli oggetti raggiunti da una luce d'area comportano un costo aggiuntivo sulle prestazioni.
Le luci d'area possono anche proiettare ombre, con penombra variabile simulata tramite PCSS come valore predefinito. La dimensione di questa penombra si può controllare con la proprietà Size del Light3D. Questo effetto può essere piuttosto esigente, quindi può essere disattivato impostando Size su 0.0.
Nota
Le ombre proiettate da una luce d'area potrebbero apparire errate se l'oggetto che le proietta non ha abbastanza suddivisioni ed è molto vicino alla luce d'area. Questa è la stessa limitazione della modalità d'ombra Dual Paraboloid su una luce omnidirezionale.
Nota
Poiché le luci d'area sono difficili da simulare in un renderer rasterizzato in tempo reale, presentano certe limitazioni.
Per piccole sorgenti luminose, è probabile che si ottengano risultati migliori usando luci puntiformi. Le ombre generate dalle luci d'area sono approssimazioni grossolane, poiché sono calcolate come se fossero luci puntiformi, e potrebbero apparire distorte ai bordi. Per ottenere un risultato migliore, assicurarsi che le mesh nella portata della luce siano suddivise abbastanza.
Le luci d'area soffrono di perdite di luce sul retro degli oggetti geometrici posti proprio di fronte a loro con angolazioni radenti, quindi bisogna fare attenzione a dove posizionarle.
Infine, non tutte le funzionalità dei materiali sono completamente supportate; le luci d'area sono praticamente limitate alla diffusione lambertiana e alla specularità GGX, mentre i materiali anisotropi appariranno come se fossero isotropi. Nemmeno l'ombreggiatura per vertice è implementata per le luci d'area.
Le luci d'area emettono luce in un'area rettangolare definita dalla proprietà Area > Size (da non confondere con la proprietà generica Size di Light3D). Per ottenere un risultato fisicamente accurato, è necessario ridimensionare quest'area così da corrispondere alle dimensioni della sorgente luminosa reale che si sta cercando di simulare. Ad esempio, se si sta simulando un tubo al neon di 1 metro di lunghezza e 10 centimetri di larghezza, impostare la dimensione dell'area su (1, 0.1) e regolare l'energia adeguatamente.
Come predefinito, l'energia della luce è normalizzata: maggiore è l'area, più debole è la luce. Ciò consente di cambiare le dimensioni dell'area senza dover regolare l'energia per compensare, il che è utile per le animazioni. È possibile disabilitare questo comportamento deselezionando Area > Normalize Energy se si desidera che l'energia sia indipendente dalle dimensioni dell'area.
L'area rettangolare può essere opzionalmente texturizzata. Questo può servire efficacemente per cambiare la forma della luce in qualsiasi forma 2D, o per tingerla con colori diversi. Il canale alfa della texture è trattato come nero (nessuna luce lo attraversa). La texture della luce d'area sarà visibile nei riflessi in base alla rugosità della superficie. Questo comportamento è diverso da quello dei proiettori omnidirezionali/spot, in quanto non proietta la texture direttamente su tutta la luce diffusa.
Quando si utilizzano texture trasparenti o nere verso i bordi, potrebbe essere opportuno lasciare uno spazio di qualche pixel per garantire che la texture appaia sfumata gradualmente.
Nota
Modificare la texture di una luce d'area in fase di esecuzione può essere costoso, soprattutto se la texture è grande.
Per ridurre l'impatto sulle prestazioni del cambio di texture in fase di esecuzione, assicurarsi che ogni dimensione di una texture di area sia un multiplo di 128 pixel, o una potenza di due. Questo elimina la necessità di un passaggio di ridimensionamento, il che rallenterebbe i cambi di texture. Le texture non devono necessariamente essere quadrate per essere ottimali. Esempi di dimensioni ottimali per le texture includono 32×64, 128×128 e 256×384.
Le luci d'area con texture non sono supportate nel renderer Compatibilità.
Atlante delle ombre
Unlike Directional lights, which have their own shadow texture, omni and spot lights are assigned to slots of a shadow atlas. This atlas can be configured in the advanced Project Settings (Rendering > Lights And Shadows > Positional Shadow).
The resolution applies to the whole shadow atlas. This atlas is divided into four quadrants:
Each quadrant can be subdivided to allocate any number of shadow maps; the following is the default subdivision:
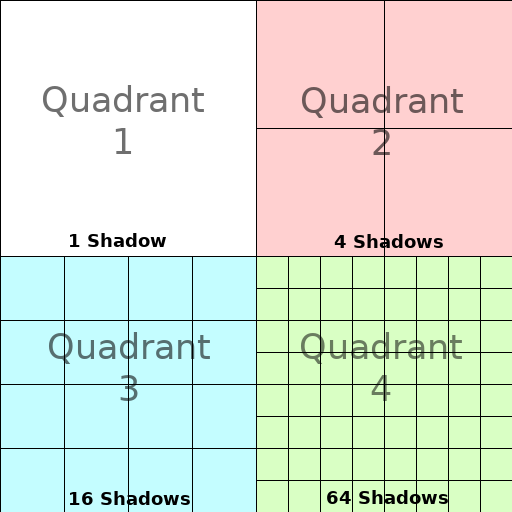
The shadow atlas allocates space as follows:
The biggest shadow map size (when no subdivision is used) represents a light the size of the screen (or bigger).
Subdivisions (smaller maps) represent shadows for lights that are further away from view and proportionally smaller.
Every frame, the following procedure is performed for all lights:
Check if the light is on a slot of the right size. If not, re-render it and move it to a larger/smaller slot.
Check if any object affecting the shadow map has changed. If it did, re-render the light.
If neither of the above has happened, nothing is done, and the shadow is left untouched.
Se gli slot in un quadrante sono pieni, le luci vengono rimandate in slot più piccoli, a seconda delle dimensioni e della distanza. Se tutti gli slot in tutti i quadranti sono pieni, alcune luci non saranno in grado di renderizzare ombre anche se le loro ombre sono abilitate.
La strategia predefinita di allocazione delle ombre consente di renderizzare un massimo di 88 luci con ombre abilitate nel frustum della telecamera (4 + 4 + 16 + 64):
Il primo e più dettagliato quadrante può memorizzare 4 ombre.
Il secondo quadrante può contenere altre 4 ombre.
Il terzo quadrante può memorizzare 16 ombre, con meno dettagli.
Il quarto e meno dettagliato quadrante può memorizzare 64 ombre, con ancora meno dettagli.
Utilizzare un numero maggiore di ombre per quadrante consente di supportare una quantità maggiore di luci totali con ombre abilitate, migliorando al contempo le prestazioni (poiché le ombre saranno renderizzate a una risoluzione più bassa per ciascuna luce). Tuttavia, aumentare il numero di ombre per ogni quadrante porta a ridurre la qualità delle ombre.
In alcuni casi, potrebbe essere opportuno utilizzare una strategia di allocazione diversa. Ad esempio, in un gioco con visuale dall'alto in cui tutte le luci hanno più o meno le stesse dimensioni, si potrebbe voler impostare tutti i quadranti con la stessa suddivisione in modo che tutte le luci abbiano ombre con un simile livello di qualità.
Equilibrare le prestazioni e la qualità
Il rendering delle ombre è un aspetto cruciale per le prestazioni del rendering 3D. È importante fare le scelte giuste per evitare di creare colli di bottiglia.
Le impostazioni di qualità delle ombre direzionali si possono cambiare in fase di esecuzione richiamando gli appositi metodi del RenderingServer.
Le impostazioni di qualità delle ombre posizionali (omni/spot) si possono cambiare in fase di esecuzione sulla Viewport radice.
Dimensioni della mappa delle ombre
Un'alta risoluzione delle ombre risulta in ombre più nitide, ma a un impatto significativo sulle prestazioni. Va inoltre notato che ombre più nitide non sono sempre più realistiche. Nella maggior parte dei casi, è consigliabile mantenere il valore predefinito di 4096 o ridurlo a 2048 per le GPU di fascia bassa.
Se le ombre posizionali diventano troppo sfocate dopo aver ridotto le dimensioni della mappa delle ombre, è possibile compensare regolando i quadranti dell'atlante delle ombre in modo che contengano meno ombre. Ciò consentirà a ciascuna ombra di essere renderizzata a una risoluzione più alta.
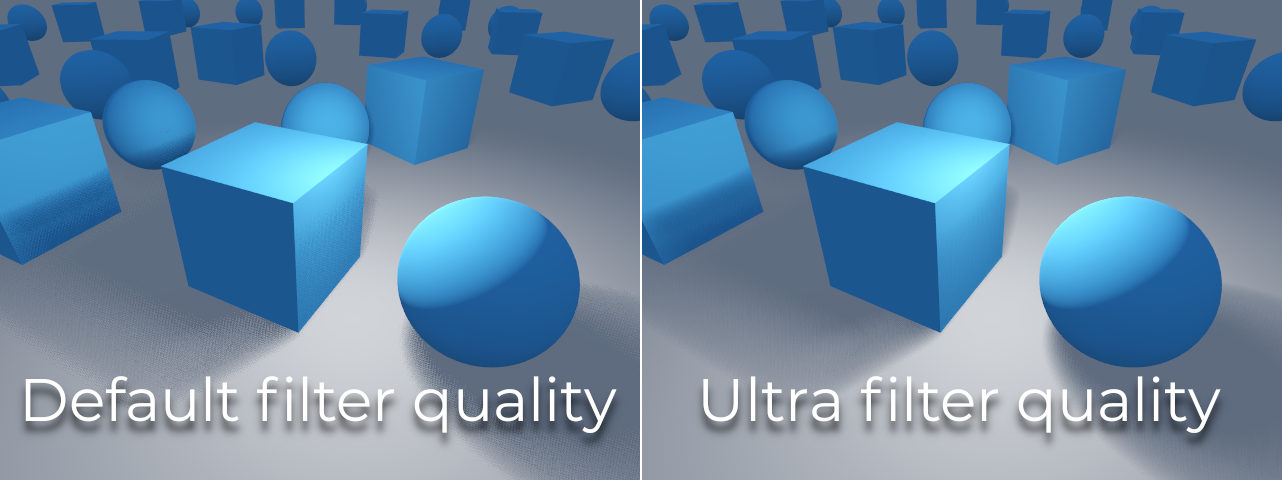
Modalità di filtro delle ombre
Qui è possibile scegliere diverse impostazioni di qualità per la mappa delle ombre. Il valore predefinito Soft Low è un buon compromesso tra prestazioni e qualità per le scene con texture dettagliate, poiché il livello di dettaglio delle texture aiuta a rendere meno evidente l'effetto dithering.
Tuttavia, nei progetti con texture meno dettagliate, il motivo di dithering nelle ombre si potrebbe notare di più. Per nascondere questo motivo, è possibile abilitare Antialiasing temporale (TAA), AMD FidelityFX Super Resolution 2.2 (FSR2), Antialiasing approssimativo rapido (FXAA) oppure aumentare la qualità del filtro delle ombre a Soft Medium o superiore.
L'impostazione Soft Very Low ridurrà automaticamente la sfocatura delle ombre per rendere meno visibili gli artefatti dovuti al basso numero di campioni. Inversamente, le impostazioni Soft High e Soft Ultra aumenteranno automaticamente la sfocatura delle ombre per sfruttare al meglio il maggior numero di campioni.
16 bit contro 32 bit
Come predefinito, Godot utilizza texture di profondità a 16 bit per renderizzare le mappe delle ombre. Questo è consigliato nella maggior parte dei casi, in quanto offre prestazioni migliori senza una differenza di qualità percepibile.
Se l'opzione 16 bit è disabilitata, saranno utilizzate texture di profondità a 32 bit. Ciò può ridurre gli artefatti in scene complesse e con luci intense e ombre abilitate. Tuttavia, la differenza è spesso a malapena percettibile, eppure può avere un impatto drastico sulle prestazioni.
Dissolvenza a distanza di luci/ombre
OmniLight3D e SpotLight3D offrono diverse funzionalità per nascondere le luci distanti. Questo può migliorare significativamente le prestazioni in scene grandi con decine o più luci.
Enabled: controlla se la dissolvenza a distanza (una forma di LOD) è abilitata. La luce svanirà gradualmente per Begin + Length, dopodiché sarà scartata e non inviata proprio allo shader. Utilizzare questa opzione per ridurre il numero di luci attive in una scena e quindi migliorare le prestazioni.
Begin: la distanza dalla telecamera alla quale la luce inizia a svanire (in unità 3D).
Shadow: la distanza dalla telecamera alla quale l'ombra inizia a svanire (in unità 3D). Si può utilizzare per far svanire le ombre più presto rispetto alla luce, migliorando ulteriormente le prestazioni. Disponibile solo se le ombre sono abilitate per la luce.
Length: la distanza su cui la luce e l'ombra svaniscono (in unità 3D). La luce diventa gradualmente più trasparente su questa distanza, fino a diventare completamente invisibile. Valori più elevati rendono la dissolvenza più graduale, più adatta quando la telecamera si muove velocemente.
Raccomandazioni per PCSS
Percentage-closer soft shadows (PCSS) provide a more realistic shadow mapping appearance, with the penumbra size varying depending on the distance between the caster and the surface receiving the shadow. This comes at a high performance cost, especially for directional lights.
Per evitare problemi di prestazioni, si consiglia di:
Utilizzate solo un po' di luci con ombre PCSS abilitate. L'effetto è generalmente più visibile sulle luci grandi e luminose. Le sorgenti luminose secondarie che sono più deboli di solito non usufruiscono molto dall'uso di ombre PCSS.
Fornire un'impostazione che consenta agli utenti di disabilitare le ombre PCSS. Per le luci direzionali, ciò si può fare impostando la proprietà
light_angular_distancedei DirectionalLight3D su0.0in uno script. Per le luci posizionali, si può fare impostando la proprietàlight_sizedegli OmniLight3D o SpotLight3D su0.0in uno script.
Modalità di filtro dei proiettori
Anche il modo in cui sono renderizzati i proiettori ha un impatto sulle prestazioni. L'impostazione avanzata del progetto Rendering > Texture > Proiettori di luce > Filtro consente di controllare come filtrare le texture dei proiettori. Con Nearest/Linear non utilizzano mipmap, il che li rende più veloci da renderizzare. Tuttavia, i proiettori appariranno sgranati se visti da lontano. Con Nearest/Linear Mipmaps appariranno più uniformi da lontano, ma i proiettori appariranno sfocati se visti da angolazioni oblique. Ciò si può risolvere usando Nearest/Linear Mipmaps Anisotropic, che è la modalità di qualità più alta, ma anche la più costosa sulle prestazioni.
Se il proprio progetto ha uno stile pixel art, si consiglia di impostare il filtro su uno dei valori Nearest in modo che i proiettori utilizzino il filtro vicino più ravvicinato. Altrimenti, mantenere Lineare.