Attention: Here be dragons
This is the latest
(unstable) version of this documentation, which may document features
not available in or compatible with released stable versions of Godot.
Checking the stable version of the documentation...
Formati 3D disponibili
Quando si lavora con risorse 3D, Godot offre un importatore flessibile e configurabile.
Godot works with scenes. This means that the entire scene being worked on in your favorite 3D modeling software will be transferred as close as possible.
Godot supports the following 3D scene file formats:
glTF 2.0 (recommended). Godot has support for both text (
.gltf) and binary (.glb) formats..blend(Blender). This works by calling Blender to export to glTF in a transparent manner (requires Blender to be installed).DAE (COLLADA), an older format that is supported.
OBJ (Wavefront) format + their MTL material files. This is also supported, but pretty limited given the format's limitations (no support for pivots, skeletons, animations, UV2, PBR materials, ...).
FBX, supportato tramite la libreria ufbx. La procedura precedente di importazione utilizzava l'integrazione di FBX2glTF. Ciò richiede l'installazione di un programma esterno che si colleghi all'SDK proprietario di FBX, pertanto consigliamo di utilizzare il metodo ufbx predefinito oppure altri formati elencati sopra (se adatti al proprio flusso di lavoro).
Copy the scene file together with the textures and mesh data (if separate) to the project repository, then Godot will do a full import when focusing the editor window.
Esportare file glTF 2.0 da Blender (consigliato)
Esistono 3 modi per esportare i file glTF da Blender:
Come file binario glTF (
.glb).Come file glTF testuale con dati binari e texture separati (file
.gltf+ file.bin+ texture).
I file binari glTF (.glb) sono l'opzione più compatta. Includono la mesh e le texture impostate in Blender. Una volta importate in Godot, le texture diventano parte del file del materiale dell'oggetto.
Ci sono due motivi per utilizzare glTF con le texture separate. Il primo è quello di avere la descrizione della scena in un formato testuale e i dati binari in un file binario separato. Può essere utile per il controllo versioni se vuoi rivedere le modifiche in un formato testuale. Il secondo è quando hai bisogno che i file delle texture siano separati dal file del materiale. Se queste cose non importano, i file binari glTF vanno benissimo.
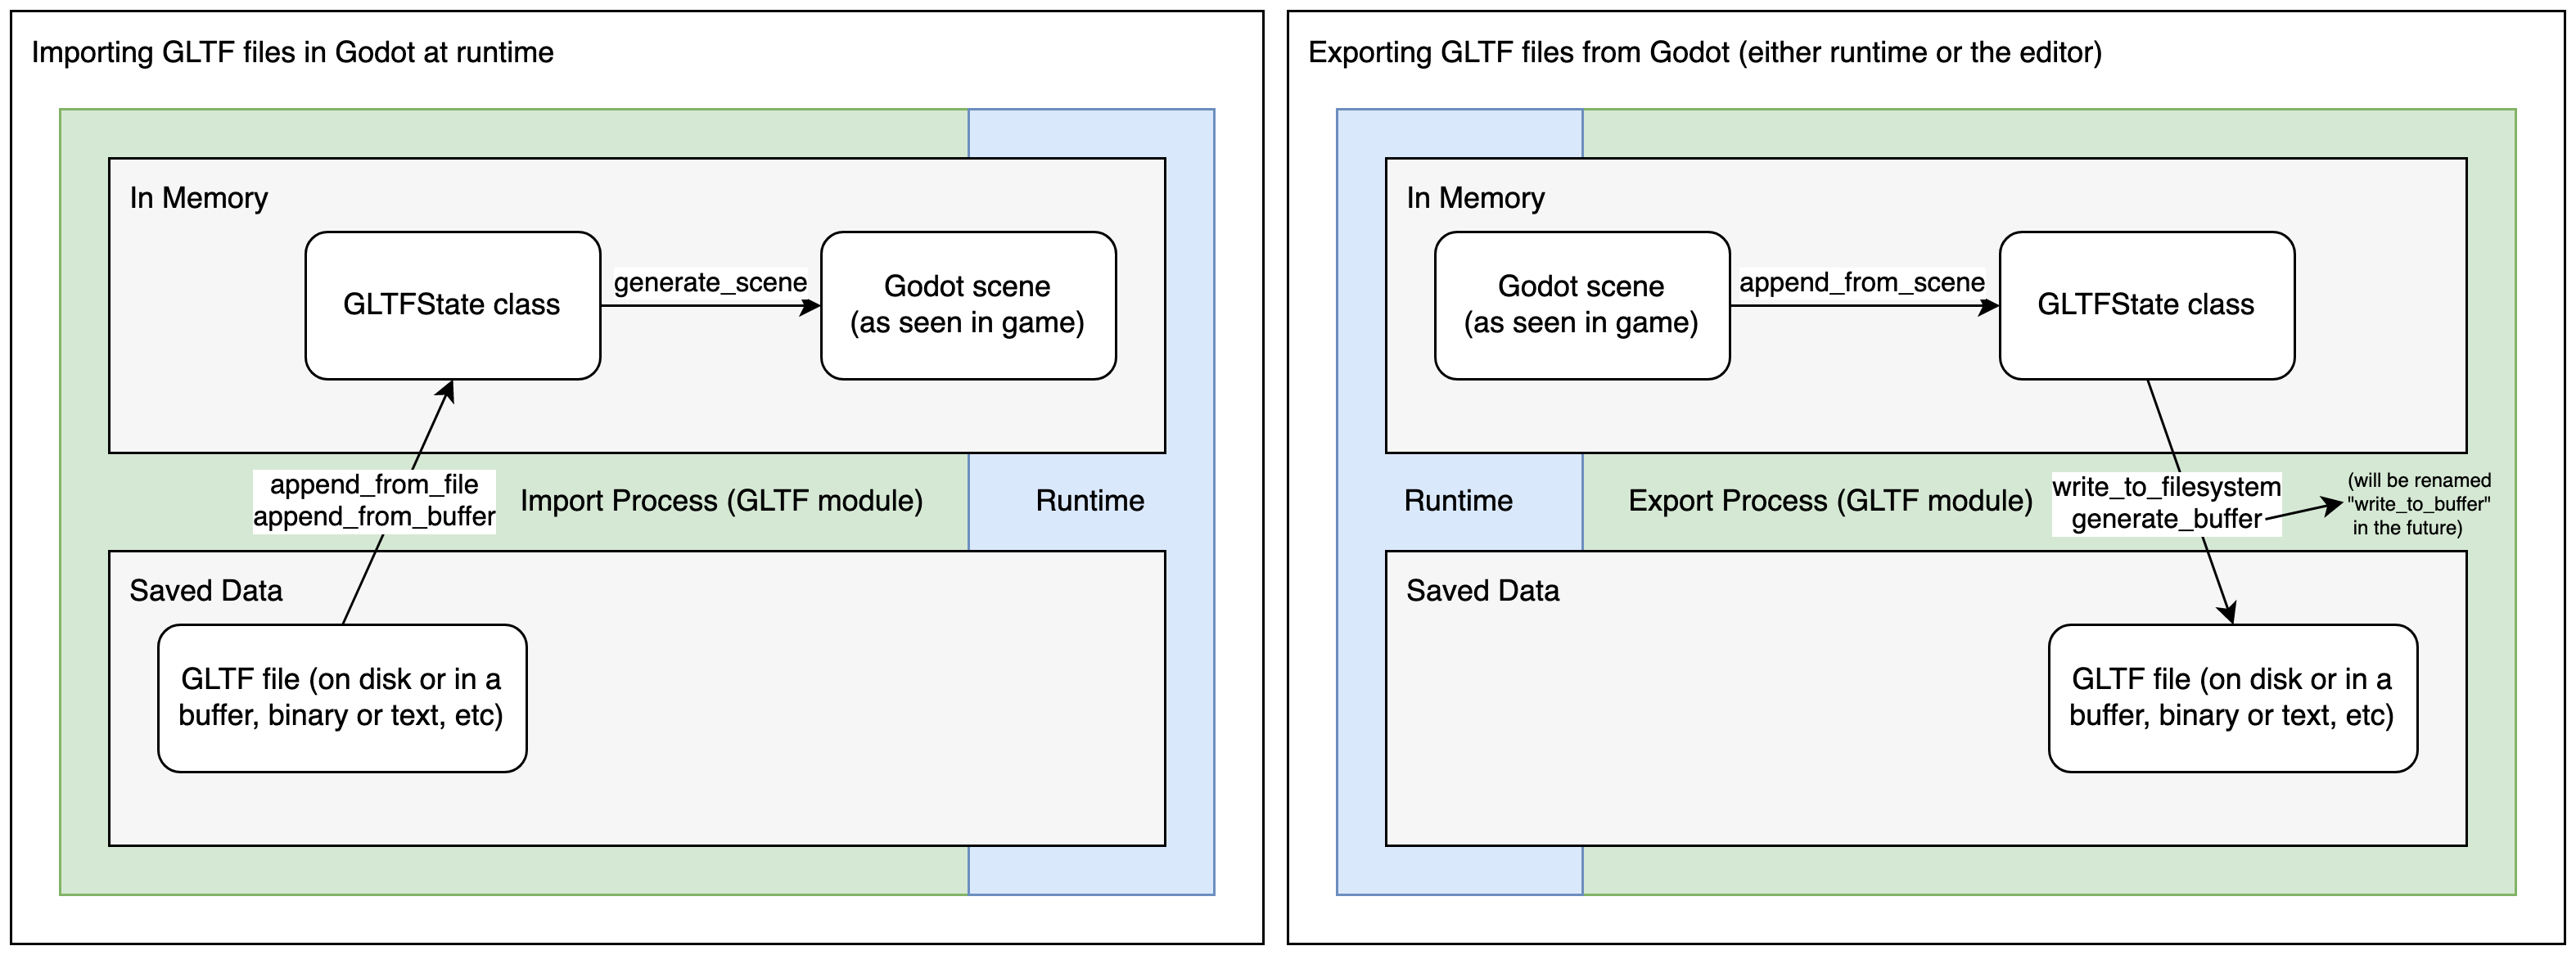
Il processo di importazione glTF carica innanzitutto i dati del file glTF in una classe GLTFState in memoria. Questi dati servono poi per generare una scena Godot. Quando si importano file in fase di esecuzione, questa scena si può aggiungere direttamente all'albero. Il processo di esportazione è l'inverso: una scena di Godot viene convertita in una classe GLTFState, poi viene generato il file glTF derivato da quest'ultima.
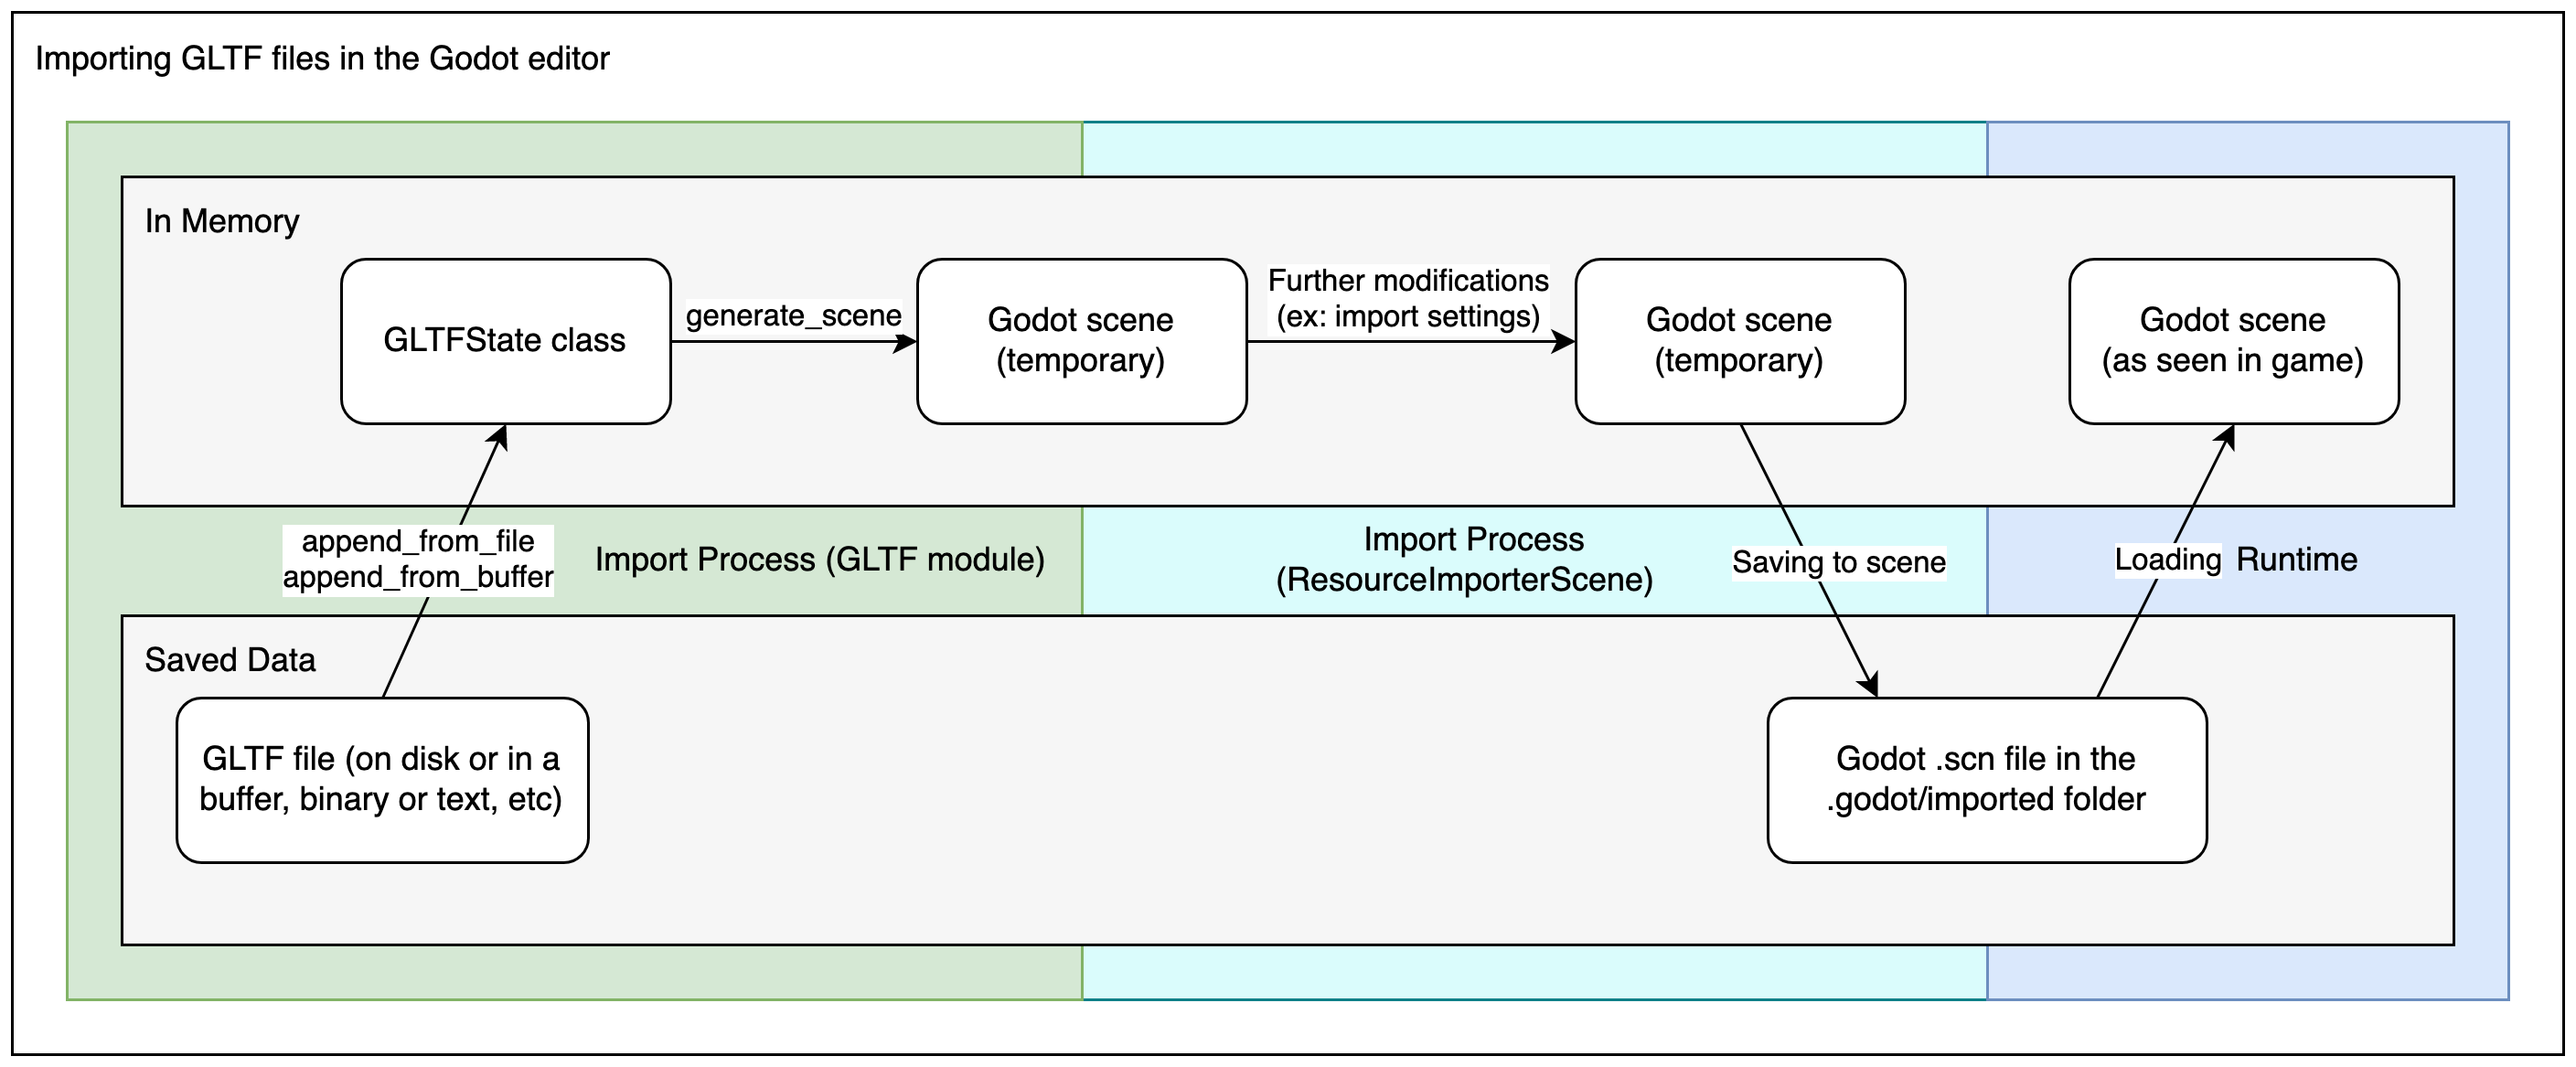
Quando si importano file glTF nell'editor, sono necessari altri due passaggi. Dopo aver generato la scena di Godot, la classe ResourceImporterScene viene utilizzata per applicare impostazioni di importazione in più, incluse quelle definite tramite il pannello Importazione e la finestra Impostazioni di importazione avanzate. Il risultato viene poi salvato come file di scena di Godot, che è quello che si userà durante l'esecuzione o l'esportazione del gioco.
Avvertimento
Se il modello contiene blend shape (note anche come "shape keys" e "morph target"), l'impostazione di esportazione glTF Dati > Armatura > Esporta solo ossa di deformazione deve essere configurata su Enabled.
Esportare comunque ossa non deformabili porterà a un'ombreggiatura errata.
Nota
Le versioni di Blender precedenti alla 3.2 non esportano le texture emissive insieme al file glTF. Se il tuo modello ne utilizza una e stai usando una versione precedente di Blender, dovrai importarla separatamente.
Normalmente, Blender disabilita il culling delle facce posteriori sui materiali ed esporta i materiali pur di corrispondere al modo in cui si renderizzano in Blender. Ciò significa che i materiali in Godot avranno la modalità di culling impostata su Disabilitata. Ciò può ridurre le prestazioni, poiché le facce posteriori saranno renderizzate anche quando sono nascoste da altre facce. Per risolvere ciò, abilita Backface Culling nella scheda Materiali di Blender, quindi esporta nuovamente la scena in glTF.
Importare i file .blend direttamente all'interno di Godot
Nota
Questa funzionalità richiede Blender 3.0 o versioni successive. Per i migliori risultati, consigliamo di utilizzare Blender 3.5 o versioni successive, in quanto include numerose correzioni per l'esportatore glTF.
Si consiglia fortemente di utilizzare una versione ufficiale di Blender scaricata da blender.org, anziché un pacchetto di distribuzione Linux o Flatpak. Questo evita qualsiasi problema legato al packaging, come versioni diverse delle librerie che possono causare incompatibilità o restrizioni di sandboxing.
L'editor può importare direttamente i file .blend richiamando in modo trasparente la funzionalità di esportazione glTF di Blender.
Ciò permette di iterare più velocemente sulle scene 3D, poiché è possibile salvare la scena in Blender, ritornare su Godot con Alt+Tab e visualizzare immediatamente le modifiche. Quando si lavora con un sistema di controllo versioni, risulta anche più efficiente, in quanto non è più necessario inserire una copia del file glTF esportato nel sistema di controllo versione.
Per utilizzare l'importazione di file .blend, bisogna installare Blender prima di aprire l'editor di Godot (se si apre un progetto che contiene già file .blend). Se mantieni Blender installato nella posizione predefinita, Godot dovrebbe essere in grado di rilevarne automaticamente il percorso. Se no, configura il percorso dell'eseguibile di Blender nelle Impostazioni dell'editor (Filesystem > Importazione > Blender > Percorso di Blender).
Se mantieni i file .blend nella cartella del tuo progetto ma non vuoi che siano importati da Godot, disabilita Filesystem > Importazione > Blender > Abilitato nelle impostazioni avanzate del progetto.
Il processo di importazione .blend converte prima in glTF, così da utilizzare comunque il codice di importazione glTF in Godot. Pertanto, il processo di importazione .blend è identico al processo di importazione glTF, ma con un passaggio in più all'inizio.

Nota
Quando si lavora in un team, è importante tenere presente che utilizzare i file .blend nel progetto richiede che tutti i membri del team abbiano Blender installato. Sebbene Blender sia scaricabile gratuitamente, questo potrebbe creare difficoltà durante lo sviluppo del progetto. L'importazione di file .blend non è inoltre disponibile negli editor per Android e web, poiché queste piattaforme non possono richiamare programmi esterni.
Se ciò dovesse essere problematico, si consiglia di utilizzare scene glTF esportate da Blender.
Esportare i file DAE da Blender
Blender ha il supporto integrato per COLLADA, ma non funziona correttamente per quello che hanno bisogno i motori di gioco e non si dovrebbe utilizzare così com'è. Tuttavia, le scene esportate con il supporto integrato per Collada potrebbero comunque funzionare per scene semplici senza animazioni.
Per scene complesse o scene che contengono animazioni, si consiglia vivamente di utilizzare glTF.
Importare i file OBJ in Godot
OBJ è uno dei formati 3D più semplici in assoluto, quindi Godot dovrebbe essere in grado di importare la maggior parte dei file OBJ senza problemi. Tuttavia, OBJ è anche un formato molto limitato: non supporta lo skinning, le animazioni, gli UV2 o i materiali PBR.
Esistono due modi per utilizzare le mesh OBJ in Godot:
Caricali direttamente in un nodo MeshInstance3D o in qualsiasi altra proprietà che si aspetti una mesh (come GPUParticles3D). Questa è la modalità predefinita.
Cambia la modalità di importazione in OBJ as Scene nel pannello Importazione e riavvia l'editor. Questo permette di utilizzare le stesse opzioni di importazione delle scene glTF o Collada, come ad esempio la mappatura degli UV2 durante l'importazione (per Using Lightmap global illumination).
Nota
Blender 3.4 e versioni successive possono esportare i colori dei vertici RGB in file OBJ (è un'estensione non standard del formato OBJ). Godot è in grado di importare questi colori dei vertici, ma non saranno visualizzati sul materiale a meno che non sia abilitato Vertex Color > Use As Albedo sul materiale .
I colori dei vertici dalle mesh OBJ mantengono il loro spazio colore originale una volta importati (sRGB/lineare), ma la loro luminosità viene limitata a 1.0 (non possono essere sovra-luminosi).
Importare i file FBX in Godot
Come predefinito, qualsiasi file FBX aggiunto a un progetto Godot in Godot 4.3 o versioni successive utilizzerà il metodo di importazione ufbx. Qualsiasi file aggiunto a un progetto in una versione precedente, come la 4.2, continuerà a essere importato tramite il metodo FBX2glTF a meno che non accedi alle impostazioni di importazione del file e cambi l'importatore in ufbx.
Se mantieni i file .fbx nella cartella del tuo progetto ma non vuoi che siano importati da Godot, disabilita Filesystem > Importazione > FBX > Abilitato nelle impostazioni avanzate del progetto.
Se vuoi configurare il flusso di lavoro FBX2glTF, cosa generalmente sconsigliata a meno che non si abbia un motivo specifico per utilizzarlo, bisogna scaricare l'eseguibile FBX2glTF, poi specificare il percorso di questo eseguibile nelle impostazioni dell'editor in Filesystem > Importa > FBX > FBX2glTFPath
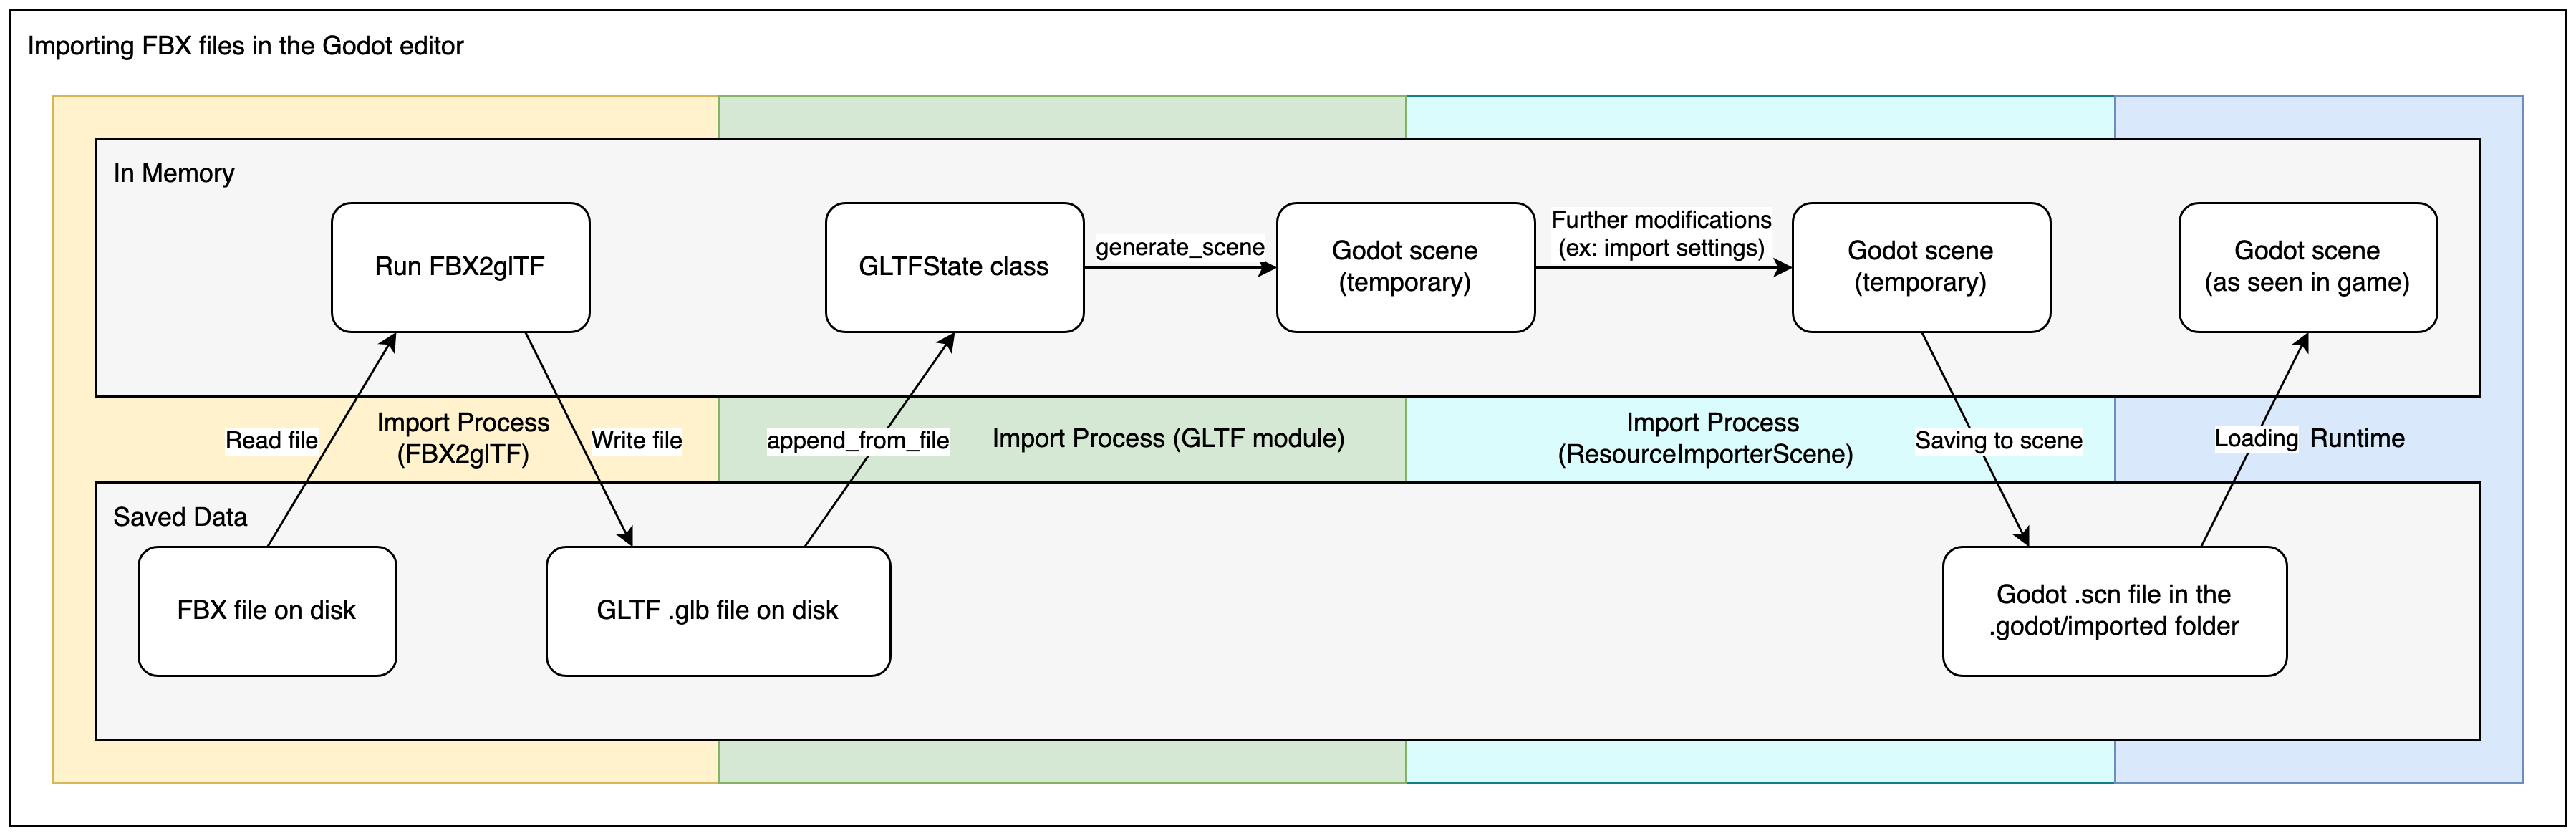
Il processo di importazione FBX2glTF converte prima in glTF, così da utilizzare comunque il codice di importazione glTF in Godot. Pertanto, il processo di importazione FBX2glTF è identico al processo di importazione glTF, ma con un passaggio in più all'inizio.
Vedi anche
La procedura completa di installazione per l'utilizzo di FBX2glTF in Godot è descritta nella pagina di importazione FBX del sito web di Godot.