Attention: Here be dragons
This is the latest
(unstable) version of this documentation, which may document features
not available in or compatible with released stable versions of Godot.
Checking the stable version of the documentation...
Deploying to Android
Configura
Most standalone headsets run on Android and OpenXR support is making its way to these platforms.
Before following the OpenXR-specific instructions here, you'll need to first setup your system to export to Android in general, including:
Installing OpenJDK 17
Installare Android Studio
Configuring the location of the Android SDK in Godot
See Esportazione per Android for the full details, and return here when you've finished these steps.
Avvertimento
Sebbene il motore di rendering mobile Vulkan abbia numerose ottimizzazioni specifiche per i dispositivi mobili, stiamo ancora lavorando per risolvere i dettagli. Per il momento, è altamente consigliabile utilizzare il motore di rendering Compatibilità (OpenGL) per i dispositivi XR basati su Android.
Gradle Android build
Nota
Official support for the Android platform wasn't added to the OpenXR specification initially resulting in various vendors creating custom loaders to make OpenXR available on their headsets. While the long term expectation is that all vendors will adopt the official OpenXR loader, for now these loaders need to be added to your project.
In order to include the vendor-specific OpenXR loader into your project, you will need to setup a gradle Android build.
Select Install Android Build Template... from the Project menu:
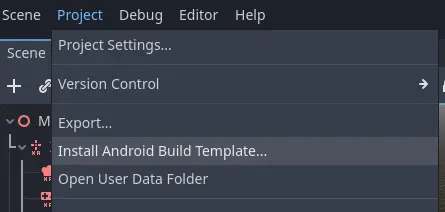
This will create a folder called android inside of your project that contains all the runtime files needed on Android. You can now customize this installation. Godot won't show this in the editor but you can find it with a file browser.
Puoi leggere ulteriori informazioni sulle build gradle qui: Build Gradle per Android.
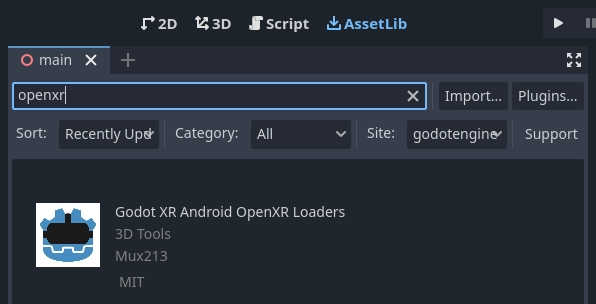
Installazione del plugin dei fornitori
L'estensione dei fornitori si può scaricare dall'Asset Store, cercando "OpenXR vendors".
You will find the installed files inside the addons folder. Alternatively you can manually install the vendors plugin by downloading it from the release page here. You will need to copy the assets/addons/godotopenxrvendors folder from the zip file into your projects addons folder.
You can find the main repository of the vendors plugin here.
Nota
From Godot 4.6 onwards, the vendor plugin is now an optional but recommended plugin. Godot can export directly to most Android-compatible devices. This can be useful for demonstration and tutorial projects where a single APK can be deployed to multiple devices. The vendor plugin unlocks vendor specific implementations and settings, and may be required to release on app stores.
Creare i modelli di esportazione
Sarà necessario impostare una preimpostazione di esportazione separata per ogni dispositivo, poiché ogni dispositivo richiederà l'inclusione del proprio caricatore.
Open Project and select Export... Click on Add.. and select Android. Next change the name of the export preset for the device you're setting this up for, say Meta Quest. And enable Use Gradle Build. Next change the XR Mode to OpenXR. If you want to use one-click deploy (described below), ensure that Runnable is enabled.
If you've installed the vendor plugin you will also find entries for the different headsets under XR Features. Select the entry for your headset, if you see one. Otherwise, enable the Khronos plugin.
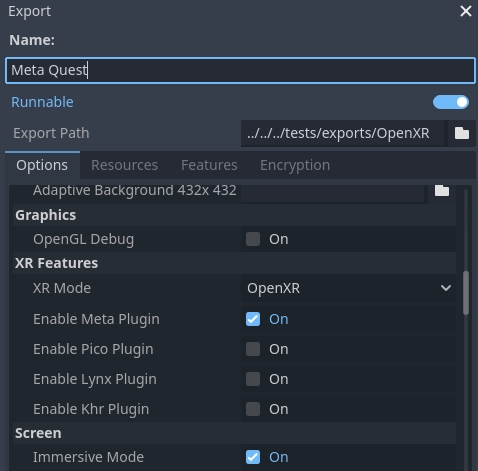
Scroll to the bottom of the list and you'll find additional XR feature sections, currently only Meta XR Features, Pico XR Features, Magicleap XR Features and Khronos XR Features for HTC are available. You will need to select the appropriate settings if you wish to use these features.
Eseguire sul tuo dispositivo dall'editor Godot
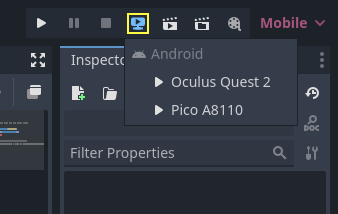
If you've setup your export settings as described above, and your headset is connected to your computer and correctly recognized, you can launch it directly from the Godot editor using Distribuzione con un clic:
Per alcuni dispositivi e su alcune piattaforme, potrebbe essere necessario eseguire passaggi in più affinché il dispositivo sia riconosciuto correttamente; pertanto, si consiglia di consultare la documentazione per sviluppatori del produttore del visore.
Ad esempio, con il Meta Quest 2, è necessario abilitare la modalità sviluppatore sul visore e, se si utilizza Windows, sarà necessario installare driver ADB specifici. Consulta la documentazione ufficiale per sviluppatori di Meta Quest per maggiori dettagli.
Se riscontri problemi con la distribuzione con un clic, consulta la sezione Risoluzione dei problemi.