Attention: Here be dragons
This is the latest
(unstable) version of this documentation, which may document features
not available in or compatible with released stable versions of Godot.
Checking the stable version of the documentation...
Singleton (Autoload)
Introduzione
Il sistema di scene di Godot, pur essendo potente e flessibile, ha un inconvenienza: non esiste un metodo per memorizzare informazioni (ad esempio, il punteggio o l'inventario di un giocatore) necessarie a più di una scena.
Ci sono diverse soluzioni per ovviare a questo problema, ma anche queste hanno le proprie limitazioni:
Potresti usare una scena "master" che carica e scarica altre scene come sue figlie. Tuttavia, ciò significa che non sarà più possibile eseguire tali scene singolarmente e aspettarsi che funzionino correttamente.
Si potrebbero memorizzare informazioni su disco in
user://e poi caricarle dalle scene che ne hanno bisogno, ma salvare e caricare frequentemente i dati è macchinoso e può risultare lento.
Il pattern Singleton è uno strumento utile per risolvere il caso d'uso comune in cui è necessario memorizzare informazioni persistenti tra scene. Nel nostro caso, è possibile riusare la stessa scena o classe per più singleton, purché abbiano nomi diversi.
Attraverso questo concetto, è possibile creare oggetti che:
Sono sempre caricati, a prescindere dalla scena attualmente in esecuzione.
Può memorizzare variabili globali come le informazioni del giocatore.
È in grado di gestire il cambio e le transizioni tra le scene.
Agisce come un singleton, poiché GDScript, di proposito, non supporta le variabili globali.
Autoloading nodes and scripts can give us these characteristics.
Nota
Godot won't make an Autoload a "true" singleton as per the singleton design pattern. It may still be instanced more than once by the user if desired.
Suggerimento
If you're creating an autoload as part of an editor plugin, consider registering it automatically in the Project Settings when the plugin is enabled.
Autoload
You can create an Autoload to load a scene or a script that inherits from Node.
Nota
When autoloading a script, a Node will be created and the script will be attached to it. This node will be added to the root viewport before any other scenes are loaded.
To autoload a scene or script, start from the menu and navigate to Project > Project Settings > Globals > Autoload.
Here you can add any number of scenes or scripts. Each entry in the list
requires a name, which is assigned as the node's name property. The order of
the entries as they are added to the global scene tree can be manipulated using
the up/down arrow keys. Like regular scenes, the engine will read these nodes
in top-to-bottom order.
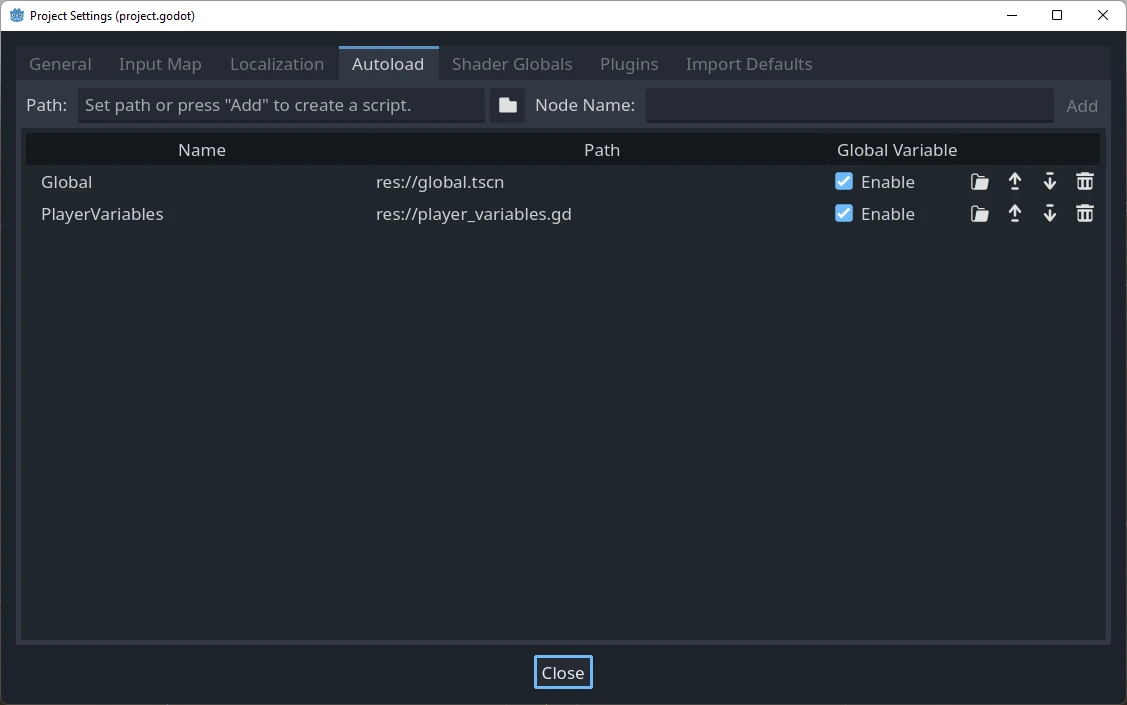
If the Enable column is checked (which is the default), then the singleton can be accessed directly in GDScript:
PlayerVariables.health -= 10
La colonna Enable non ha alcun effetto nel codice C#. Tuttavia, se il singleton è uno script C#, è possibile ottenere un effetto simile includendo una proprietà statica chiamata Instance e assegnandole un valore in _Ready():
public partial class PlayerVariables : Node
{
    public static PlayerVariables Instance { get; private set; }

    public int Health { get; set; }

    public override void _Ready()
    {
        Instance = this;
    }
}
Ciò consente di accedere al singleton dal codice C# senza usare GetNode() e senza effettuare un cast di tipo:
PlayerVariables.Instance.Health -= 10;
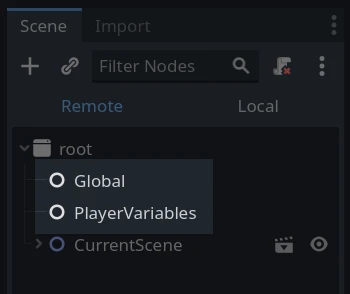
Note that autoload objects (scripts and/or scenes) are accessed just like any other node in the scene tree. In fact, if you look at the running scene tree, you'll see the autoloaded nodes appear:
Avvertimento
Gli autoload non si devono rimuovere tramite free() o queue_free() in fase di esecuzione, altrimenti il motore si bloccherà.
Custom scene switcher
This tutorial will demonstrate building a scene switcher using autoloads. For basic scene switching, you can use the SceneTree.change_scene_to_file() method (see Utilizzo dello SceneTree for details). However, if you need more complex behavior when changing scenes, this method provides more functionality.
To begin, download the template from here: singleton_autoload_starter.zip and open it in Godot.
Potrebbe comparire una finestra che avvisa che il progetto è stato aperto l'ultima volta con una versione precedente di Godot; non preoccuparti, è normale. Clicca su Ok per aprire il progetto.
Il progetto contiene due scene: scene_1.tscn e scene_2.tscn. Ogni scena contiene un'etichetta che mostra il nome della scena e un pulsante con il suo segnale pressed() connesso. Quando si esegue il progetto, questo si avvia in scene_1.tscn. Tuttavia, premendo il pulsante non succede nulla.
Creare lo script
Apri la finestra Script e crea un nuovo script chiamato global.gd. Assicurati che erediti da Node:
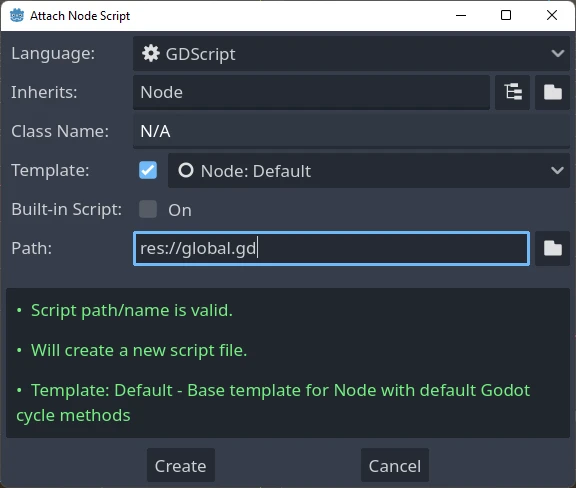
Il prossimo passo consiste nell'aggiungere questo script all'elenco degli autoload. Partendo dal menu, apri Progetto > Impostazioni del progetto > Globali > Autoload e seleziona lo script cliccando sul pulsante Sfoglia o digitandone il percorso: res://global.gd. Premi Aggiungi per aggiungerlo all'elenco degli autoload e rinominalo "Global", il che è necessario affinché gli script possano accedervi tramite il nome "Global":

Ora, ogni volta che eseguiamo una scena nel progetto, questo script sarà sempre caricato.
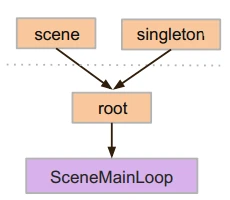
Returning to the script, it needs to fetch the current scene in the
_ready() function. Both the current scene (the one with the button) and
global.gd are children of root, but autoloaded nodes are always first. This
means that the last child of root is always the loaded scene.
extends Node

var current_scene = null

func _ready():
    var root = get_tree().root
    # Using a negative index counts from the end, so this gets the last child node of `root`.
    current_scene = root.get_child(-1)
using Godot;

public partial class Global : Node
{
    public Node CurrentScene { get; set; }

    public override void _Ready()
    {
        Viewport root = GetTree().Root;
        // Using a negative index counts from the end, so this gets the last child node of `root`.
        CurrentScene = root.GetChild(-1);
    }
}
Ora ci serve una funzione per cambiare la scena. Questa funzione deve liberare la scena attuale e sostituirla con quella richiesta.
func goto_scene(path):
    # This function will usually be called from a signal callback,
    # or some other function in the current scene.
    # Deleting the current scene at this point is
    # a bad idea, because it may still be executing code.
    # This will result in a crash or unexpected behavior.

    # The solution is to defer the load to a later time, when
    # we can be sure that no code from the current scene is running:

    _deferred_goto_scene.call_deferred(path)


func _deferred_goto_scene(path):
    # It is now safe to remove the current scene.
    current_scene.free()

    # Load the new scene.
    var s = ResourceLoader.load(path)

    # Instance the new scene.
    current_scene = s.instantiate()

    # Add it to the active scene, as child of root.
    get_tree().root.add_child(current_scene)

    # Optionally, to make it compatible with the SceneTree.change_scene_to_file() API.
    get_tree().current_scene = current_scene
public void GotoScene(string path)
{
    // This function will usually be called from a signal callback,
    // or some other function from the current scene.
    // Deleting the current scene at this point is
    // a bad idea, because it may still be executing code.
    // This will result in a crash or unexpected behavior.

    // The solution is to defer the load to a later time, when
    // we can be sure that no code from the current scene is running:

    CallDeferred(MethodName.DeferredGotoScene, path);
}

public void DeferredGotoScene(string path)
{
    // It is now safe to remove the current scene.
    CurrentScene.Free();

    // Load a new scene.
    var nextScene = GD.Load<PackedScene>(path);

    // Instance the new scene.
    CurrentScene = nextScene.Instantiate();

    // Add it to the active scene, as child of root.
    GetTree().Root.AddChild(CurrentScene);

    // Optionally, to make it compatible with the SceneTree.change_scene_to_file() API.
    GetTree().CurrentScene = CurrentScene;
}
Usando Object.call_deferred(), la seconda funzione verrà eseguita solo dopo che tutto il codice della scena attuale sarà stato completato. Pertanto, la scena attuale non verrà rimossa finché è ancora in uso (ovvero, finché il suo codice è ancora in esecuzione).
Finally, we need to fill the empty callback functions in the two scenes:
# Add to 'scene_1.gd'.

func _on_button_pressed():
    Global.goto_scene("res://scene_2.tscn")
// Add to 'Scene1.cs'.

private void OnButtonPressed()
{
    var global = GetNode<Global>("/root/Global");
    global.GotoScene("res://Scene2.tscn");
}
e
# Add to 'scene_2.gd'.

func _on_button_pressed():
    Global.goto_scene("res://scene_1.tscn")
// Add to 'Scene2.cs'.

private void OnButtonPressed()
{
    var global = GetNode<Global>("/root/Global");
    global.GotoScene("res://Scene1.tscn");
}
Run the project and test that you can switch between scenes by pressing the button.
Nota
When scenes are small, the transition is instantaneous. However, if your scenes are more complex, they may take a noticeable amount of time to appear. To learn how to handle this, see the next tutorial: Caricamento nello sfondo.
Alternatively, if the loading time is relatively short (less than 3 seconds or so), you can display a "loading plaque" by showing some kind of 2D element just before changing the scene. You can then hide it just after the scene is changed. This can be used to indicate to the player that a scene is being loaded.