Attention: Here be dragons
This is the latest
(unstable) version of this documentation, which may document features
not available in or compatible with released stable versions of Godot.
Checking the stable version of the documentation...
Creazione della scena del giocatore
Con le impostazioni del progetto a posto, possiamo cominciare a lavorare sul personaggio controllato dal giocatore.
La prima scena definirà l'oggetto Player. Uno dei vantaggi di creare una scena separata per il giocatore è che possiamo testarla separatamente, anche prima di aver creato altre parti del gioco.
Struttura del nodo
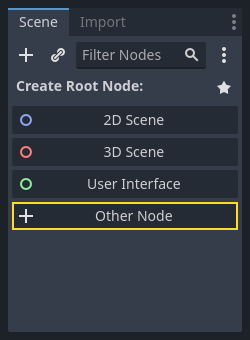
Per iniziare, dobbiamo scegliere un nodo radice per l'oggetto giocatore. Come regola generale, il nodo radice di una scena dovrebbe riflettere la funzionalità desiderata dell'oggetto - ciò che l'oggetto è. Nell'angolo in alto a sinistra, nella scheda "Scena", clicca sul pulsante "Altro nodo" e aggiungi un nodo Area2D alla scena.
Nota
Godot fornisce anche il nodo CharacterBody2D, progettato specificamente per personaggi 2D, che include il supporto integrato per alcuni dei processi spiegati in questo tutorial. In molti progetti reali, CharacterBody2D sarebbe una scelta migliore per giocatori e nemici. Tuttavia, questo tutorial si concentra sui concetti fondamentali che si applicano a una gamma più ampia di nodi e casi d'uso.
Quando aggiungi il nodo Area2D, Godot visualizzerà la seguente icona di avvertimento accanto ad esso nell'albero di scene:

Questo avvertimento ci informa che il nodo Area2D richiede una forma per rilevare collisioni o sovrapposizioni. Possiamo ignorare temporaneamente l'avvertimento perché prima configureremo le immagini del giocatore (utilizzando uno sprite animato). Una volta che le immagini saranno pronte, aggiungeremo una forma di collisione come nodo figlio. Questo ci permetterà di dimensionare e posizionare accuratamente la forma in base all'aspetto dello sprite.
Con il nodo Area2D possiamo rilevare gli oggetti che si sovrappongono o scontrano con il giocatore. Rinomina il nodo in Player facendo doppio click sopra di esso. Ora che abbiamo impostato la scena principale, possiamo aggiungere ulteriori nodi al giocatore per aggiungere altre funzionalità.
Prima di aggiungere figli al nodo Player, vogliamo assicurarci di non muoverli o ridimensionarli accidentalmente cliccandoci sopra. Seleziona il nodo e clicca sull'icona a destra del lucchetto; il suo suggerimento dice "Raggruppa il nodo selezionato con i suoi figli. Ciò fa sì che il genitore venga selezionato quando si clicca su qualsiasi nodo figlio nella vista 2D e 3D."

Salva la scena come player.tscn. Clicca su Scena -> Salva, oppure premi Ctrl + S su Windows/Linux o Cmd + S su macOS.
Nota
Per questo progetto, seguiremo le convenzioni di denominazione di Godot.
GDScript: Le classi (nodi) usano PascalCase, le variabili e le funzioni snake_case e le costanti usano ALL_CAPS (Vedi Guida di stile di GDScript).
C#: Le classi, le variabili di esportazione e i metodi usano PascalCase, i campi privati usano _camelCase, le variabili locali e i parametri usano camelCase (Consultare Guida di stile C#). Bisogna fare attenzione a scrivere il nome dei metodi correttamente quando si connettono i segnali.
Animazione Sprite
Clicca su il nodo Player e aggiungi (Ctrl + A su Windows/Linux o Cmd + A su macOS) un AnimatedSprite2D come nodo figlio. Il nodo AnimatedSprite2D si occuperà dell'aspetto e delle animazioni del nostro giocatore. Nota che accanto al nodo c'è un simbolo di avviso. Un AnimatedSprite2D richiede una risorsa SpriteFrames, la quale è una lista di animazioni che può visualizzare. Assicurati che AnimatedSprite2D è selezionato e poi cerca la proprietà Sprite Frames sotto la sezione Animazione nell'Ispettore e clicca "[vuoto]" -> "Nuovo SpriteFrames":
Cliccare sullo SpriteFrames appena creato per aprire il pannello "SpriteFrames":
A sinistra c'è un elenco di animazioni. Cliccare su quella predefinita (default) e rinominala walk. Quindi cliccare sul pulsante Aggiungi animazione per creare una seconda animazione chiamata up.
Trova le immagini del giocatore nel pannello del file system: si trovano nella cartella art che hai decompresso in precedenza. Trascina le due immagini per ogni animazione nella sezione Fotogrammi di animazione del pannello per l'animazione corrispondente:
playerGrey_walk1eplayerGrey_walk2per l'animazionewalkplayerGrey_up1eplayerGrey_up2per l'animazioneup
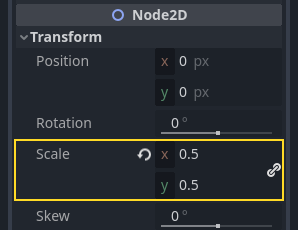
Le immagini del giocatore sono un po' troppo grandi per la finestra di gioco, quindi dobbiamo rimpicciolirle. Clicca sul nodo AnimatedSprite e imposta la proprietà Scala a (0.5, 0.5). La puoi trovare nell'Ispettore nella sezione Node2D.
Infine, aggiungi un CollisionShape2D come figlio di Player. Questo determinerà la "hitbox" del giocatore, in altre parole i limiti dell'area di collisione. Per questo personaggio, un nodo CapsuleShape2D è la scelta migliore, quindi vicino a "Shape" nell'Ispettore, clicca "[empty]"" -> "New CapsuleShape2D". Usando le due maniglie di dimensione, ridimensiona la forma in modo da coprire la sprite:

Quando hai finito, la tua scena Player dovrebbe essere simile a questa:
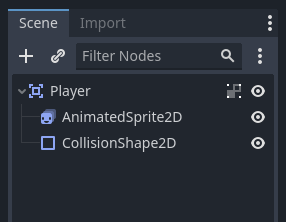
Una volta fatto ciò, L'avvertimento sul nodo Area2D scomparirà, poiché ora gli è stata assegnata una forma e può interagire con altri oggetti.
Assicurati di salvare di nuovo la scena dopo queste modifiche.
Nella prossima parte, aggiungeremo uno script al nodo del giocatore per muoverlo e animarlo. Poi, configureremo il rilevamento delle collisioni per sapere quando il giocatore è stato colpito da qualcosa.