Attention: Here be dragons
This is the latest
(unstable) version of this documentation, which may document features
not available in or compatible with released stable versions of Godot.
Checking the stable version of the documentation...
Creare il nemico
Ora è il momento di creare i nemici che il nostro giocatore dovrà schivare. Il loro comportamento non sarà molto complesso: i mob saranno generati in modo casuale ai bordi dello schermo, sceglieranno una direzione casuale e si muoveranno in linea retta.
Creeremo una scena Mob, che possiamo poi istanziare per creare un qualsiasi numero di mob indipendenti nel gioco.
Impostazione dei nodi
Clicca "Scena -> Nuova scena" dal menu superiore e aggiungi i seguenti nodi:
RigidBody2D (chiamato
Mob)
Non dimenticare di impostare i figli affinché non si possano selezionare, come hai fatto per la scena Player. Per farlo, seleziona il nodo genitore (RigidBody2D) nel pannello dell'albero di scene, poi clicca sul pulsante nella parte superiore dell'editor 2D (o premi Ctrl + G o `:kbd:`Cmd + G su macOS).
Seleziona il nodo Mob e imposta la sua proprietà Gravity Scale nella sezione RigidBody2D dell'ispettore a 0. Ciò impedirà al mob di cadere verso il basso.
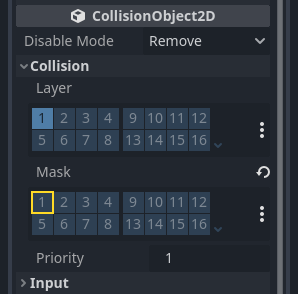
Inoltre, nell'ispettore del nodo Mob, nella sezione CollisionObject2D, espandi il gruppo Collision e deseleziona 1 all'interno della proprietà Mask. Ciò eviterà che i mob entrino in collisione tra loro.
Imposta l'AnimatedSprite2D come hai fatto per il giocatore. Questa volta abbiamo 3 animazioni: fly, swim e walk. Ci sono due immagini per ogni animazione nella cartella art.
La proprietà Animation Speed deve essere impostata per ogni singola animazione. Impostala su 3 per tutte e tre le animazioni.
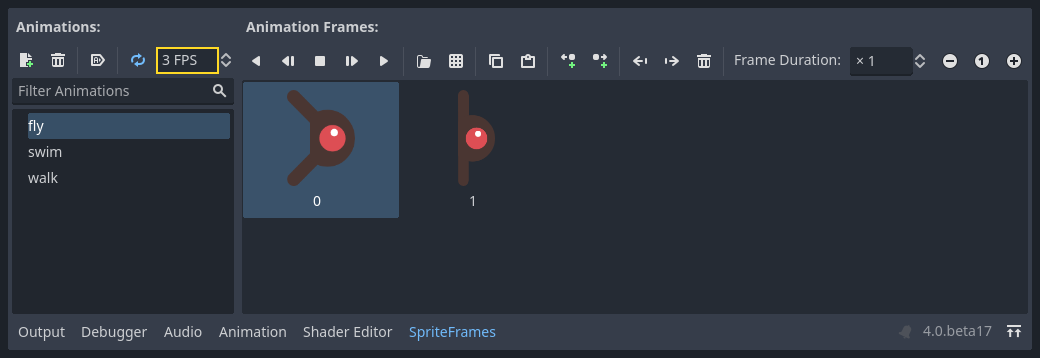
È possibile utilizzare i pulsanti "Riproduci animazione" a destra del campo di input Animation Speed per visualizzare in anteprima le animazioni.
Selezioneremo una di queste animazioni casualmente in modo che i nemici abbiano una certa varietà.
Come per le immagini del giocatore, anche quelle del nemico dovranno essere rimpicciolite. Imposta la proprietà Scale dell' AnimatedSprite2D a (0.75, 0.75).
Come nella scena Player, aggiungi un CapsuleShape2D per la collisione. Per allineare la forma con l'immagine, dovrai impostare la proprietà Rotation su 90 (sotto "Transform" nell'Ispettore).
Salva la scena.
Script del nemico
Allega uno script a Mob in questo modo:
extends RigidBody2D
using Godot;

public partial class Mob : RigidBody2D
{
    // Don't forget to rebuild the project.
}
Ora guardiamo il resto della script. In _ready() riproduciamo l'animazione e scegliamo casualmente uno dei tre tipi di animazione:
func _ready():
    var mob_types = Array($AnimatedSprite2D.sprite_frames.get_animation_names())
    $AnimatedSprite2D.animation = mob_types.pick_random()
    $AnimatedSprite2D.play()
public override void _Ready()
{
    var animatedSprite2D = GetNode<AnimatedSprite2D>("AnimatedSprite2D");
    string[] mobTypes = animatedSprite2D.SpriteFrames.GetAnimationNames();
    animatedSprite2D.Play(mobTypes[GD.Randi() % mobTypes.Length]);
}
Per prima cosa, otteniamo l'elenco dei nomi delle animazioni dalla proprietà frames di AnimatedSprite2D. Questo restituisce un Array contenente tutti e tre i nomi delle animazioni: ["walk", "swim", "fly"].
Nel codice in GDScript, utilizziamo il metodo Array.pick_random per selezionare casualmente uno di questi nomi di animazione. Nel codice in C#, invece, scegliamo un numero casuale tra 0 e 2 per selezionare uno di questi nomi dalla lista (gli indici degli array iniziano da 0). L'espressione GD.Randi() % n seleziona un numero intero casuale tra 0 e n-1.
Infine, chiamiamo play() per avviare la riproduzione dell'animazione scelta.
L'ultimo parte consiste in fare in modo che i nemici si eliminino da soli quando escono dallo schermo. Collega il segnale screen_exited() del nodo VisibleOnScreenNotifier2D` al ``Mob e aggiungi questo codice:
func _on_visible_on_screen_notifier_2d_screen_exited():
    queue_free()
// We also specified this function name in PascalCase in the editor's connection window.
private void OnVisibleOnScreenNotifier2DScreenExited()
{
    QueueFree();
}
queue_free() è una funzione che essenzialmente "libera", o elimina, il nodo alla fine del frame.
Questo completa la scena Mob.
Con il giocatore e i nemici pronti, nella parte successiva li porteremo insieme in una nuova scena. Faremo apparire i nemici casualmente sulla tavola di gioco e li faremo avanzare, trasformando il nostro progetto in un gioco giocabile.