Attention: Here be dragons
This is the latest
(unstable) version of this documentation, which may document features
not available in or compatible with released stable versions of Godot.
Checking the stable version of the documentation...
Disegno personalizzato in 2D
Introduzione
Godot include nodi per disegnare sprite, poligoni, particelle, testo e molti altri bisogni comuni nello sviluppo di giochi. Tuttavia, se hai bisogno di qualcosa di specifico non coperto dai nodi standard, puoi fare in modo che qualsiasi nodo 2D (ad esempio, basato su Control o Node2D) disegni sullo schermo utilizzando comandi personalizzati.
Il disegno personalizzato in un nodo 2D è davvero utile. Ecco alcuni casi d'uso:
Disegnare forme o logiche che i nodi esistenti non possono fare, come un'immagine con scie o un poligono animato speciale.
Disegnare un gran numero di oggetti semplici, come una griglia o una scacchiera per un gioco 2D. Il disegno personalizzato evita di utilizzare un gran numero di nodi, riducendo potenzialmente il consumo di memoria e migliorando le prestazioni.
Creare un controllo personalizzato per la propria interfaccia utente. Sono disponibili molti controlli, ma in caso di esigenze particolari, è probabile che sia necessario un controllo personalizzato.
Disegnare
Aggiungi uno script a qualsiasi nodo derivato da CanvasItem, come Control o Node2D. Poi sovrascrivi la funzione _draw().
extends Node2D

func _draw():
    pass  # Your draw commands here.
using Godot;

public partial class MyNode2D : Node2D
{
    public override void _Draw()
    {
        // Your draw commands here.
    }
}
I comandi di disegno sono descritti nel riferimento della classe CanvasItem. Ce ne sono molti e ne vedremo alcuni negli esempi seguenti.
Aggiornamento
La funzione _draw viene chiamata una sola volta, dopodiché i comandi di disegno vengono memorizzati nella cache, rendendo inutili ulteriori chiamate.
Se è necessario ridisegnare perché una variabile o qualcos'altro è cambiato, chiama CanvasItem.queue_redraw nello stesso nodo e verrà eseguita una nuova chiamata a _draw().
Ecco un esempio un po' più complesso, in cui abbiamo una variabile di texture che può essere modificata in qualsiasi momento e, utilizzando un setter, forziamo un ridisegno della texture quando viene modificata:
extends Node2D

@export var texture : Texture2D:
    set(value):
        texture = value
        queue_redraw()

func _draw():
    draw_texture(texture, Vector2())
using Godot;

public partial class MyNode2D : Node2D
{
    private Texture2D _texture;

    [Export]
    public Texture2D Texture
    {
        get
        {
            return _texture;
        }

        set
        {
            _texture = value;
            QueueRedraw();
        }
    }

    public override void _Draw()
    {
        DrawTexture(_texture, new Vector2());
    }
}
Per vederlo in azione, puoi impostare la texture così che sia icona di Godot nell'editor, trascinando e rilasciando il file icon.svg predefinito dalla scheda FileSystem alla proprietà Texture nella scheda Inspector. Quando modifichi il valore della proprietà Texture mentre lo script precedente è in esecuzione, anche la texture cambierà automaticamente.
In alcuni casi, potrebbe essere necessario ridisegnare ogni frame. Per farlo, chiama queue_redraw dal metodo _process, in questo modo:
extends Node2D

func _draw():
    pass  # Your draw commands here.

func _process(_delta):
    queue_redraw()
using Godot;

public partial class MyNode2D : Node2D
{
    public override void _Draw()
    {
        // Your draw commands here.
    }

    public override void _Process(double delta)
    {
        QueueRedraw();
    }
}
Coordinates and line width alignment
L'API di disegno utilizza il sistema di coordinate del CanvasItem, non necessariamente le coordinate in pixel. Significa che _draw() utilizza lo spazio di coordinate creato dopo aver applicato la trasformazione del CanvasItem. Inoltre, è possibile applicare una trasformazione personalizzata in più, usando draw_set_transform o draw_set_transform_matrix.
When using draw_line, you should
consider the width of the line. When using a width that is an odd size, the
position of the start and end points should be shifted by 0.5 to keep the
line centered, as shown below.
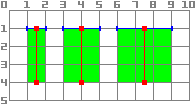
func _draw():
    draw_line(Vector2(1.5, 1.0), Vector2(1.5, 4.0), Color.GREEN, 1.0)
    draw_line(Vector2(4.0, 1.0), Vector2(4.0, 4.0), Color.GREEN, 2.0)
    draw_line(Vector2(7.5, 1.0), Vector2(7.5, 4.0), Color.GREEN, 3.0)
public override void _Draw()
{
    DrawLine(new Vector2(1.5f, 1.0f), new Vector2(1.5f, 4.0f), Colors.Green, 1.0f);
    DrawLine(new Vector2(4.0f, 1.0f), new Vector2(4.0f, 4.0f), Colors.Green, 2.0f);
    DrawLine(new Vector2(7.5f, 1.0f), new Vector2(7.5f, 4.0f), Colors.Green, 3.0f);
}
The same applies to the draw_rect
method with filled = false.

func _draw():
    draw_rect(Rect2(1.0, 1.0, 3.0, 3.0), Color.GREEN)
    draw_rect(Rect2(5.5, 1.5, 2.0, 2.0), Color.GREEN, false, 1.0)
    draw_rect(Rect2(9.0, 1.0, 5.0, 5.0), Color.GREEN)
    draw_rect(Rect2(16.0, 2.0, 3.0, 3.0), Color.GREEN, false, 2.0)
public override void _Draw()
{
    DrawRect(new Rect2(1.0f, 1.0f, 3.0f, 3.0f), Colors.Green);
    DrawRect(new Rect2(5.5f, 1.5f, 2.0f, 2.0f), Colors.Green, false, 1.0f);
    DrawRect(new Rect2(9.0f, 1.0f, 5.0f, 5.0f), Colors.Green);
    DrawRect(new Rect2(16.0f, 2.0f, 3.0f, 3.0f), Colors.Green, false, 2.0f);
}
Disegno con antialiasing
Godot offers method parameters in draw_line
to enable antialiasing, but not all custom drawing methods offer this antialiased
parameter.
For custom drawing methods that don't provide an antialiased parameter,
you can enable 2D MSAA instead, which affects rendering in the entire viewport.
This provides high-quality antialiasing, but a higher performance cost and only
on specific elements. See Antialiasing 2D for more information.
Here is a comparison of a line of minimal width (width=-1) drawn with
antialiased=false, antialiased=true, and antialiased=false with
2D MSAA 2x, 4x, and 8x enabled.

Strumenti
Drawing your own nodes might also be desired while running them in the editor. This can be used as a preview or visualization of some feature or behavior.
To do this, you can use the tool annotation on both GDScript and C#. See the example below and Eseguire codice nell'editor for more information.
Example 1: drawing a custom shape
We will now use the custom drawing functionality of the Godot Engine to draw something that Godot doesn't provide functions for. We will recreate the Godot logo but with code- only using drawing functions.
You will have to code a function to perform this and draw it yourself.
Nota
The following instructions use a fixed set of coordinates that could be too small for high resolution screens (larger than 1080p). If that is your case, and the drawing is too small consider increasing your window scale in the project setting Display > Window > Stretch > Scale to adjust the project to a higher resolution (a 2 or 4 scale tends to work well).
Disegnare una forma poligonale personalizzata
While there is a dedicated node to draw custom polygons ( Polygon2D), we will use in this case exclusively lower level drawing functions to combine them on the same node and be able to create more complex shapes later on.
First, we will define a set of points -or X and Y coordinates- that will form the base of our shape:
extends Node2D

var coords_head : Array = [
    [ 22.952, 83.271 ],  [ 28.385, 98.623 ],
    [ 53.168, 107.647 ], [ 72.998, 107.647 ],
    [ 99.546, 98.623 ],  [ 105.048, 83.271 ],
    [ 105.029, 55.237 ], [ 110.740, 47.082 ],
    [ 102.364, 36.104 ], [ 94.050, 40.940 ],
    [ 85.189, 34.445 ],  [ 85.963, 24.194 ],
    [ 73.507, 19.930 ],  [ 68.883, 28.936 ],
    [ 59.118, 28.936 ],  [ 54.494, 19.930 ],
    [ 42.039, 24.194 ],  [ 42.814, 34.445 ],
    [ 33.951, 40.940 ],  [ 25.637, 36.104 ],
    [ 17.262, 47.082 ],  [ 22.973, 55.237 ]
]
using Godot;

public partial class MyNode2D : Node2D
{
    private float[,] _coordsHead =
    {
        { 22.952f, 83.271f },  { 28.385f, 98.623f },
        { 53.168f, 107.647f }, { 72.998f, 107.647f },
        { 99.546f, 98.623f },  { 105.048f, 83.271f },
        { 105.029f, 55.237f }, { 110.740f, 47.082f },
        { 102.364f, 36.104f }, { 94.050f, 40.940f },
        { 85.189f, 34.445f },  { 85.963f, 24.194f },
        { 73.507f, 19.930f },  { 68.883f, 28.936f },
        { 59.118f, 28.936f },  { 54.494f, 19.930f },
        { 42.039f, 24.194f },  { 42.814f, 34.445f },
        { 33.951f, 40.940f },  { 25.637f, 36.104f },
        { 17.262f, 47.082f },  { 22.973f, 55.237f }
    };
}
This format, while compact, is not the one that Godot understands to draw a polygon. In a different scenario we could have to load these coordinates from a file or calculate the positions while the application is running, so some transformation may be needed.
To transform these coordinates into the right format, we will create a new
method float_array_to_Vector2Array(). Then we will override the _ready()
function, which Godot will call only once -at the start of the execution-
to load those coordinates into a variable:
var head : PackedVector2Array

func float_array_to_Vector2Array(coords : Array) -> PackedVector2Array:
    # Convert the array of floats into a PackedVector2Array.
    var array : PackedVector2Array = []
    for coord in coords:
        array.append(Vector2(coord[0], coord[1]))
    return array

func _ready():
    head = float_array_to_Vector2Array(coords_head);
private Vector2[] _head;

private Vector2[] FloatArrayToVector2Array(float[,] coords)
{
    // Convert the array of floats into an array of Vector2.
    int size = coords.GetUpperBound(0);
    Vector2[] array = new Vector2[size + 1];
    for (int i = 0; i <= size; i++)
    {
        array[i] = new Vector2(coords[i, 0], coords[i, 1]);
    }
    return array;
}

public override void _Ready()
{
    _head = FloatArrayToVector2Array(_coordsHead);
}
To finally draw our first shape, we will use the method draw_polygon and pass the points (as an array of Vector2 coordinates) and its color, like this:
func _draw():
    # We are going to paint with this color.
    var godot_blue : Color = Color("478cbf")
    # We pass the PackedVector2Array to draw the shape.
    draw_polygon(head, [ godot_blue ])
public override void _Draw()
{
    // We are going to paint with this color.
    Color godotBlue = new Color("478cbf");
    // We pass the array of Vector2 to draw the shape.
    DrawPolygon(_head, [godotBlue]);
}
Durante l'esecuzione, dovresti vedere qualcosa di simile a questo:
Note the lower part of the logo looks segmented- this is because a low amount of points were used to define that part. To simulate a smooth curve, we could add more points to our array, or maybe use a mathematical function to interpolate a curve and create a smooth shape from code (see example 2).
Polygons will always connect its last defined point to its first one in order to have a closed shape.
Disegno di linee connesse
Drawing a sequence of connected lines that don't close down to form a polygon is very similar to the previous method. We will use a connected set of lines to draw Godot's logo mouth.
First, we will define the list of coordinates that form the mouth shape, like this:
var coords_mouth = [
    [ 22.817, 81.100 ], [ 38.522, 82.740 ],
    [ 39.001, 90.887 ], [ 54.465, 92.204 ],
    [ 55.641, 84.260 ], [ 72.418, 84.177 ],
    [ 73.629, 92.158 ], [ 88.895, 90.923 ],
    [ 89.556, 82.673 ], [ 105.005, 81.100 ]
]
private float[,] _coordsMouth =
{
    { 22.817f, 81.100f }, { 38.522f, 82.740f },
    { 39.001f, 90.887f }, { 54.465f, 92.204f },
    { 55.641f, 84.260f }, { 72.418f, 84.177f },
    { 73.629f, 92.158f }, { 88.895f, 90.923f },
    { 89.556f, 82.673f }, { 105.005f, 81.100f }
};
We will load these coordinates into a variable and define an additional variable with the configurable line thickness:
var mouth : PackedVector2Array
var _mouth_width : float = 4.4

func _ready():
    head = float_array_to_Vector2Array(coords_head);
    mouth = float_array_to_Vector2Array(coords_mouth);
private Vector2[] _mouth;
private float _mouthWidth = 4.4f;

public override void _Ready()
{
    _head = FloatArrayToVector2Array(_coordsHead);
    _mouth = FloatArrayToVector2Array(_coordsMouth);
}
E infine useremo il metodo draw_polyline per disegnare la linea, in questo modo:
func _draw():
    # We will use white to draw the line.
    var white : Color = Color.WHITE
    var godot_blue : Color = Color("478cbf")

    draw_polygon(head, [ godot_blue ])

    # We draw the while line on top of the previous shape.
    draw_polyline(mouth, white, _mouth_width)
public override void _Draw()
{
    // We will use white to draw the line.
    Color white = Colors.White;
    Color godotBlue = new Color("478cbf");

    DrawPolygon(_head, [godotBlue]);

    // We draw the while line on top of the previous shape.
    DrawPolyline(_mouth, white, _mouthWidth);
}
Dovresti ottenere il seguente risultato:
Unlike draw_polygon(), polylines can only have a single unique color
for all its points (the second argument). This method has 2 additional
arguments: the width of the line (which is as small as possible by default)
and enabling or disabling the antialiasing (it is disabled by default).
L'ordine delle chiamate in _draw è importante: come per le posizioni dei nodi nella gerarchia dell'albero, le diverse forme verranno disegnate dall'alto verso il basso, con il risultato che le ultime forme nasconderanno quelle precedenti se si sovrappongono. In questo caso vogliamo che la bocca venga disegnata sopra la testa, quindi la mettiamo per ultima.
Nota come possiamo definire i colori in modi diversi, sia con un codice esadecimale sia con un nome di colore predefinito. Consulta la classe Color per altre costanti e modi di definire i colori.
Disegno di cerchi
Per creare gli occhi, aggiungeremo 4 chiamate in più per disegnare le forme degli occhi, in diverse dimensioni, colori e posizioni.
Per disegnare un cerchio, lo posizionamo in base al suo centro usando il metodo draw_circle. Il primo parametro è un Vector2 con le coordinate del suo centro, il secondo è il suo raggio e il terzo è il suo colore:
func _draw():
    var white : Color = Color.WHITE
    var godot_blue : Color = Color("478cbf")
    var grey : Color = Color("414042")

    draw_polygon(head, [ godot_blue ])
    draw_polyline(mouth, white, _mouth_width)

    # Four circles for the 2 eyes: 2 white, 2 grey.
    draw_circle(Vector2(42.479, 65.4825), 9.3905, white)
    draw_circle(Vector2(85.524, 65.4825), 9.3905, white)
    draw_circle(Vector2(43.423, 65.92), 6.246, grey)
    draw_circle(Vector2(84.626, 66.008), 6.246, grey)
public override void _Draw()
{
    Color white = Colors.White;
    Color godotBlue = new Color("478cbf");
    Color grey = new Color("414042");

    DrawPolygon(_head, [godotBlue]);
    DrawPolyline(_mouth, white, _mouthWidth);

    // Four circles for the 2 eyes: 2 white, 2 grey.
    DrawCircle(new Vector2(42.479f, 65.4825f), 9.3905f, white);
    DrawCircle(new Vector2(85.524f, 65.4825f), 9.3905f, white);
    DrawCircle(new Vector2(43.423f, 65.92f), 6.246f, grey);
    DrawCircle(new Vector2(84.626f, 66.008f), 6.246f, grey);
}
Durante l'esecuzione, dovresti avere qualcosa di simile a questo:
Per gli archi parziali e non riempiti (porzioni di una forma di cerchio tra certi angoli arbitrari), è possibile usare il metodo draw_arc.
Disegno di linee
Per disegnare la forma finale (il naso) useremo una linea per approssimarla.
draw_line serve per disegnare un singolo segmento fornendo le sue coordinate iniziali e finali come argomenti, in questo modo:
func _draw():
    var white : Color = Color.WHITE
    var godot_blue : Color = Color("478cbf")
    var grey : Color = Color("414042")

    draw_polygon(head, [ godot_blue ])
    draw_polyline(mouth, white, _mouth_width)
    draw_circle(Vector2(42.479, 65.4825), 9.3905, white)
    draw_circle(Vector2(85.524, 65.4825), 9.3905, white)
    draw_circle(Vector2(43.423, 65.92), 6.246, grey)
    draw_circle(Vector2(84.626, 66.008), 6.246, grey)

    # Draw a short but thick white vertical line for the nose.
    draw_line(Vector2(64.273, 60.564), Vector2(64.273, 74.349), white, 5.8)
public override void _Draw()
{
    Color white = Colors.White;
    Color godotBlue = new Color("478cbf");
    Color grey = new Color("414042");

    DrawPolygon(_head, [godotBlue]);
    DrawPolyline(_mouth, white, _mouthWidth);
    DrawCircle(new Vector2(42.479f, 65.4825f), 9.3905f, white);
    DrawCircle(new Vector2(85.524f, 65.4825f), 9.3905f, white);
    DrawCircle(new Vector2(43.423f, 65.92f), 6.246f, grey);
    DrawCircle(new Vector2(84.626f, 66.008f), 6.246f, grey);

    // Draw a short but thick white vertical line for the nose.
    DrawLine(new Vector2(64.273f, 60.564f), new Vector2(64.273f, 74.349f),
             white, 5.8f);
}
Ora dovreste essere in grado di vedere la seguente forma sullo schermo:
Tieni in mente che se hai bisogno di disegnare più linee non collegate allo stesso tempo, potresti ottenere prestazioni migliori disegnandole tutte in un'unica chiamata, usando il metodo draw_multiline.
Disegno di testo
Sebbene l'utilizzo del nodo Label sia il metodo più comune per aggiungere testo alla propria applicazione, la funzione di basso livello _draw include la possibilità di aggiungere testo al disegno personalizzato del nodo. La useremo per aggiungere il nome "GODOT" sotto la testa del robot.
Useremo il metodo draw_string per farlo, in questo modo:
var default_font : Font = ThemeDB.fallback_font;

func _draw():
    var white : Color = Color.WHITE
    var godot_blue : Color = Color("478cbf")
    var grey : Color = Color("414042")

    draw_polygon(head, [ godot_blue ])
    draw_polyline(mouth, white, _mouth_width)
    draw_circle(Vector2(42.479, 65.4825), 9.3905, white)
    draw_circle(Vector2(85.524, 65.4825), 9.3905, white)
    draw_circle(Vector2(43.423, 65.92), 6.246, grey)
    draw_circle(Vector2(84.626, 66.008), 6.246, grey)
    draw_line(Vector2(64.273, 60.564), Vector2(64.273, 74.349), white, 5.8)

    # Draw GODOT text below the logo with the default font, size 22.
    draw_string(default_font, Vector2(20, 130), "GODOT",
                HORIZONTAL_ALIGNMENT_CENTER, 90, 22)
private Font _defaultFont = ThemeDB.FallbackFont;

public override void _Draw()
{
    Color white = Colors.White;
    Color godotBlue = new Color("478cbf");
    Color grey = new Color("414042");

    DrawPolygon(_head, [godotBlue]);
    DrawPolyline(_mouth, white, _mouthWidth);
    DrawCircle(new Vector2(42.479f, 65.4825f), 9.3905f, white);
    DrawCircle(new Vector2(85.524f, 65.4825f), 9.3905f, white);
    DrawCircle(new Vector2(43.423f, 65.92f), 6.246f, grey);
    DrawCircle(new Vector2(84.626f, 66.008f), 6.246f, grey);
    DrawLine(new Vector2(64.273f, 60.564f), new Vector2(64.273f, 74.349f),
             white, 5.8f);

    // Draw GODOT text below the logo with the default font, size 22.
    DrawString(_defaultFont, new Vector2(20f, 130f), "GODOT",
               HorizontalAlignment.Center, 90, 22);
}
Qui prima carichiamo nella variabile defaultFont il font del tema predefinito configurato (è possibile impostarne uno personalizzato al suo posto) e poi passiamo i seguenti parametri: font, posizione, testo, allineamento orizzontale, larghezza e dimensione del font.
Dovresti vedere sul tuo schermo quanto segue:
Informazioni su ulteriori parametri e altri metodi relativi a testo e caratteri sono disponibili nel riferimento della classe CanvasItem.
Mostra il disegno durante la modifica
Sebbene il codice ora sia in grado di disegnare il logo su una finestra in esecuzione, questo non apparirà nella vista 2D dell'editor. In alcuni casi, potrebbe essere utile mostrare anche il proprio Node2D o controllo personalizzato nell'editor, per posizionarlo e ridimensionarlo appropriatamente, come fa la gran parte degli altri nodi.
Per mostrare il logo direttamente nell'editor (senza eseguirlo), è possibile utilizzare l'annotazione @tool per richiedere che il disegno personalizzato del nodo appaia anche durante la modifica, in questo modo:
@tool
extends Node2D
using Godot;

[Tool]
public partial class MyNode2D : Node2D
Dovrai salvare la scena, ricompilare il progetto (solo per C#) e ricaricare manualmente la scena attuale tramite l'opzione di menu Scena > Ricarica la scena salvata per aggiornare il nodo attuale nella vista 2D la prima volta che aggiungi o rimuovi l'annotazione @tool.
Animazione
Se volessimo modificare la forma personalizzata in fase di esecuzione, potremmo modificare i metodi chiamati o i suoi argomenti al momento dell'esecuzione, oppure applicare una trasformazione.
Ad esempio, se vogliamo che la forma personalizzata che abbiamo progettato ruoti, possiamo aggiungere la seguente variabile e il seguente codice ai metodi _ready e _process:
extends Node2D

@export var rotation_speed : float = 1  # In radians per second.

func _ready():
    rotation = 0
    ...

func _process(delta: float):
    rotation -= rotation_speed * delta
[Export]
public float RotationSpeed { get; set; } = 1.0f;  // In radians per second.

public override void _Ready()
{
    Rotation = 0;
    ...
}

public override void _Process(double delta)
{
    Rotation -= RotationSpeed * (float)delta;
}
Il problema con il codice sopra riportato è che, poiché abbiamo creato i punti approssimativamente su un rettangolo partendo dall'angolo superiore sinistro, la coordinata (0, 0) ed estendendoci verso destra e verso il basso, notiamo che la rotazione viene effettuata utilizzando l'angolo superiore sinistro come perno. Una modifica della trasformazione di posizione sul nodo non ci aiuterà qui, poiché la trasformazione di rotazione viene applicata per prima.
Sebbene potessimo riscrivere tutte le coordinate dei punti in modo che siano centrate attorno a (0, 0), comprese le coordinate negative, ciò richiederebbe molto lavoro.
Un possibile modo per aggirare questo problema è utilizzare il metodo di basso livello draw_set_transform per risolvere il problema, traslando tutti i punti nello spazio del CanvasItem stesso e poi riportandolo nella sua posizione originale con una regolare trasformazione di nodo, o nell'editor o nel codice, in questo modo:
func _ready():
    rotation = 0
    position = Vector2(60, 60)
    ...

func _draw():
    draw_set_transform(Vector2(-60, -60))
    ...
public override void _Ready()
{
    Rotation = 0;
    Position = new Vector2(60, 60);
    ...
}

public override void _Draw()
{
    DrawSetTransform(new Vector2(-60.0f, -60.0f));
    ...
}
Questo è il risultato, ruotando attorno a un perno ora in (60, 60):

Se ciò che vogliamo animare è una proprietà all'interno della chiamata _draw(), dobbiamo ricordarci di chiamare queue_redraw() per forzare un aggiornamento, altrimenti non verrebbe aggiornata sullo schermo.
Ad esempio, ecco come possiamo far aprire e chiudere la bocca del robot, cambiando lo spessore della linea della sua bocca in modo che segua una curva sinusoidale (sin):
var _mouth_width : float = 4.4
var _max_width : float = 7
var _time : float = 0

func _process(delta : float):
    _time += delta
    _mouth_width = abs(sin(_time) * _max_width)
    queue_redraw()

func _draw():
    ...
    draw_polyline(mouth, white, _mouth_width)
    ...
private float _mouthWidth = 4.4f;
private float _maxWidth = 7f;
private float _time = 0f;

public override void _Process(double delta)
{
    _time += (float)delta;
    _mouthWidth = Mathf.Abs(Mathf.Sin(_time) * _maxWidth);
    QueueRedraw();
}

public override void _Draw()
{
    ...
    DrawPolyline(_mouth, white, _mouthWidth);
    ...
}
All'esecuzione, dovrebbe avere più o meno questo aspetto:

Si prega di notare che _mouth_width è una proprietà definita dall'utente come qualsiasi altra ed è possibile animare essa, o qualsiasi altra proprietà utilizzata come argomento di disegno, attraverso metodi più standard e di alto livello come un nodo Tween o un nodo AnimationPlayer. L'unica differenza è che è necessaria una chiamata a queue_redraw() per applicare tali modifiche e mostrarle sullo schermo.
Esempio 2: disegnare una linea dinamica
L'esempio precedente è stato utile per imparare a disegnare e modificare i nodi con forme e animazioni personalizzate. Questo può offrire alcuni vantaggi, come l'uso di coordinate e vettori esatti per il disegno, anziché bitmap, il che significa che si adatteranno bene allo schermo quando sono trasformati. In alcuni casi, si potrebbero ottenere risultati simili componendo funzionalità di livello più alto con nodi come sprite o AnimatedSprite, caricando risorse SVG (che sono anch'esse immagini definite con vettori) e il nodo AnimationPlayer.
In altri casi ciò non sarà possibile perché non sapremo quale sarà la rappresentazione grafica risultante prima di eseguire il codice. Qui vedremo come disegnare una linea dinamica le cui coordinate non sono note in anticipo e sono influenzate dall'input dell'utente.
Disegnare una linea retta tra 2 punti
Supponiamo di voler tracciare una linea retta tra due punti: il primo sarà fisso nell'angolo in alto a sinistra (0, 0) e il secondo sarà definito dalla posizione del cursore sullo schermo.
Potremmo disegnare una linea dinamica tra questi due punti in questo modo:
extends Node2D

var point1 : Vector2 = Vector2(0, 0)
var width : int = 10
var color : Color = Color.GREEN

var _point2 : Vector2

func _process(_delta):
    var mouse_position = get_viewport().get_mouse_position()
    if mouse_position != _point2:
        _point2 = mouse_position
        queue_redraw()

func _draw():
    draw_line(point1, _point2, color, width)
using Godot;
using System;

public partial class MyNode2DLine : Node2D
{
    public Vector2 Point1 { get; set; } = new Vector2(0f, 0f);
    public int Width { get; set; } = 10;
    public Color Color { get; set; } = Colors.Green;

    private Vector2 _point2;

    public override void _Process(double delta)
    {
        Vector2 mousePosition = GetViewport().GetMousePosition();
        if (mousePosition != _point2)
        {
            _point2 = mousePosition;
            QueueRedraw();
        }
    }

    public override void _Draw()
    {
        DrawLine(Point1, _point2, Color, Width);
    }
}
In questo esempio otteniamo la posizione del mouse nella viewport predefinita ad ogni frame con il metodo get_mouse_position. Se la posizione è cambiata dall'ultima richiesta di disegno (una piccola ottimizzazione per evitare di ridisegnare ad ogni frame), pianificheremo un ridisegno. Il nostro metodo _draw() ha una sola riga: richiede il disegno di una linea verde, con uno spessore di 10 pixel, tra l'angolo in alto a sinistra e la posizione ottenuta.
La larghezza, il colore e la posizione del punto di partenza possono essere configurati con le proprietà corrispondenti.
Quando viene eseguito dovrebbe apparire così:

Disegnare un arco tra 2 punti
L'esempio precedente funziona, ma potremmo voler unire quei due punti con una forma o una funzione diversa da una linea retta.
Proviamo ora a creare un arco (una porzione di circonferenza) tra i due punti.
Esportando il punto di partenza della linea, i segmenti, lo spessore, il colore e l'antialiasing, potremo modificare queste proprietà molto facilmente direttamente dal pannello Ispettore nell'editor:
extends Node2D

@export var point1 : Vector2 = Vector2(0, 0)
@export_range(1, 1000) var segments : int = 100
@export var width : int = 10
@export var color : Color = Color.GREEN
@export var antialiasing : bool = false

var _point2 : Vector2
using Godot;
using System;

public partial class MyNode2DLine : Node2D
{
    [Export]
    public Vector2 Point1 { get; set; } = new Vector2(0f, 0f);
    [Export]
    public float Length { get; set; } = 350f;
    [Export(PropertyHint.Range, "1,1000,")]
    public int Segments { get; set; } = 100;
    [Export]
    public int Width { get; set; } = 10;
    [Export]
    public Color Color { get; set; } = Colors.Green;
    [Export]
    public bool AntiAliasing { get; set; } = false;

    private Vector2 _point2;
}

Per disegnare l'arco, possiamo usare il metodo draw_arc. Esistono molti archi che passano per 2 punti, quindi per questo esempio sceglieremo il semicerchio che ha il centro nel punto medio tra i 2 punti iniziali.
Il calcolo di questo arco sarà più complesso rispetto al caso della linea:
func _draw():
    # Average points to get center.
    var center : Vector2 = Vector2((_point2.x + point1.x) / 2,
                                   (_point2.y + point1.y) / 2)
    # Calculate the rest of the arc parameters.
    var radius : float = point1.distance_to(_point2) / 2
    var start_angle : float = (_point2 - point1).angle()
    var end_angle : float = (point1 - _point2).angle()
    if end_angle < 0:  # end_angle is likely negative, normalize it.
        end_angle += TAU

    # Finally, draw the arc.
    draw_arc(center, radius, start_angle, end_angle, segments, color,
             width, antialiasing)
public override void _Draw()
{
    // Average points to get center.
    Vector2 center = new Vector2((_point2.X + Point1.X) / 2.0f,
                                    (_point2.Y + Point1.Y) / 2.0f);
    // Calculate the rest of the arc parameters.
    float radius = Point1.DistanceTo(_point2) / 2.0f;
    float startAngle = (_point2 - Point1).Angle();
    float endAngle = (Point1 - _point2).Angle();
    if (endAngle < 0.0f)  // endAngle is likely negative, normalize it.
    {
        endAngle += Mathf.Tau;
    }

    // Finally, draw the arc.
    DrawArc(center, radius, startAngle, endAngle, Segments, Color,
            Width, AntiAliasing);
}
Il centro del semicerchio sarà il punto medio tra i due punti. Il raggio sarà la metà della distanza tra i due punti. Gli angoli iniziale e finale saranno gli angoli del vettore che va dal punto 1 al punto 2 e viceversa. Si noti che abbiamo dovuto normalizzare end_angle in valori positivi perché se end_angle è minore di start_angle, l'arco verrà disegnato in senso antiorario, cosa che non desideriamo in questo caso (l'arco risulterebbe capovolto).
Il risultato dovrebbe essere qualcosa del genere, con l'arco che scende e passa tra i punti:

Sentiti liberi di sperimentare con i parametri nell'ispettore per ottenere risultati diversi: cambia il colore, lo spessore, l'antialiasing e aumenta il numero di segmenti per migliorare la levigatezza della curva, a scapito delle prestazioni.