Attention: Here be dragons
This is the latest
(unstable) version of this documentation, which may document features
not available in or compatible with released stable versions of Godot.
Checking the stable version of the documentation...
Installare estensioni
Godot offre un sistema di estensioni per l'editor con numerose estensioni sviluppate dalla comunità. le estensioni possono estendere le funzionalità dell'editor con nuovi nodi, pannelli aggiuntivi, funzionalità di comodità e altro ancora.
Trovare estensioni
Il modo migliore per trovare estensioni di Godot è attraverso la Libreria dei contenuti. Sebbene sia consultabile online, è più comodo utilizzarla direttamente dall'editor. Per farlo, cliccare sulla scheda AssetLib nella parte superiore dell'editor:

È possibile trovare asset anche su siti web di hosting di codice come GitHub.
Nota
Alcuni repository si descrivono come "plugin", ma potrebbero non essere effettivamente estensioni dell'editor. Questo vale in particolare per gli script destinati all'uso in un progetto in esecuzione. Non è necessario abilitare tali estensioni per utilizzarli. Scaricare ed estrarre i file nella cartella del progetto.
Un modo per distinguere le estensioni dell'editor da quelle non dell'editor è cercare un file plugin.cfg nel repository che ospita l'estensione. Se il repository contiene un file plugin.cfg in una cartella situata nella cartella addons/, allora è di un'estensione dell'editor.
Installazione di un'estensione
Per installare l'estensione, scaricarla come archivio ZIP. Nella Libreria dei contenuti, si può fare tramite il pulsante Download, sia dall'editor sia dall'interfaccia web.
Su GitHub, se un'estensione ha dei tag (versioni) dichiarati, andare alla scheda Releases per scaricare una versione stabile. Ciò assicura di ottenere una versione dichiarata stabile dal suo autore.
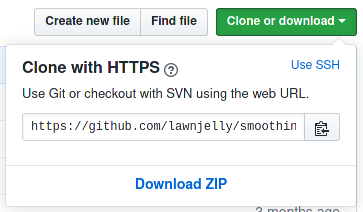
Su GitHub, se l'estensione non ha alcun tag dichiarato, premere il pulsante Scarica ZIP per scaricare uno ZIP dell'ultima revisione:
Estrarre l'archivio ZIP e spostare la cartella addons/ in esso contenuta nella cartella del progetto. Se il progetto contiene già una cartella addons/, spostare la cartella addons/ dell'estensione nella cartella del progetto per unire il contenuto della nuova cartella a quello esistente. Il gestore dei file potrebbe chiedere se si desidera scrivere nella cartella; rispondere Sì. Nessun file verrà sovrascritto nel processo.
Abilitare un'estensione
Per abilitare l'estensione appena installata, aprire Progetto > Impostazioni del progetto nella parte superiore dell'editor, quindi andare alla scheda Estensioni. Se l'estensione è stata impacchettata correttamente, si dovrebbe vedere nell'elenco delle estensioni. Cliccare sulla casella di spunta Abilita per abilitare l'estensione.
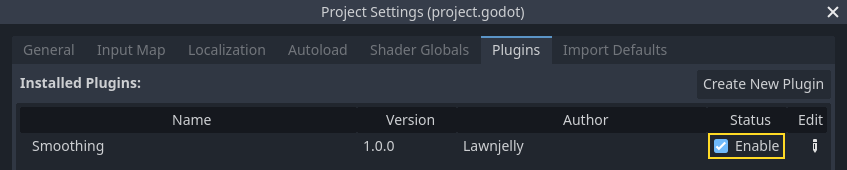
È possibile utilizzare l'estensione subito dopo averla abilitata; non è necessario riavviare l'editor. Allo stesso modo, è possibile disabilitare un'estensione senza dover riavviare l'editor.