Attention: Here be dragons
This is the latest
(unstable) version of this documentation, which may document features
not available in or compatible with released stable versions of Godot.
Checking the stable version of the documentation...
Animazione dei personaggi
In questa lezione finale, useremo gli strumenti di animazione integrati in Godot per far fluttuare e svolazzare i nostri personaggi. Imparerai a progettare animazioni nell'editor e a utilizzare codice per dare vita al tuo gioco.
Cominceremo con un'introduzione all'utilizzo dell'editor di animazione.
Utilizzo dell'editor di animazione
Il motore è dotato di strumenti per creare animazioni nell'editor. È poi possibile utilizzare il codice per riprodurle e controllarle in fase di esecuzione.
Apri la scena del giocatore, selezionare il nodo Player e aggiungere un nodo AnimationPlayer.
Il pannello Animazione è visualizzato nel pannello inferiore.
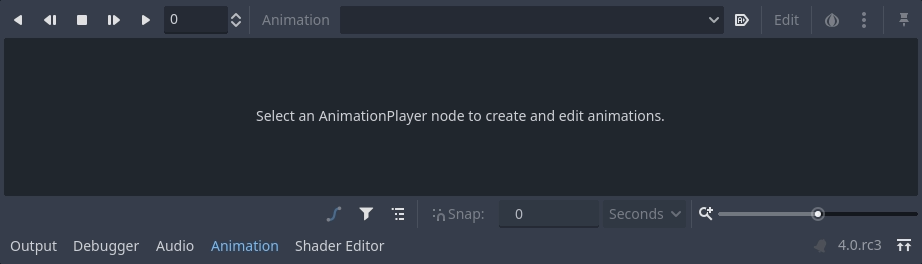
Contiene una barra degli strumenti e il menu a discesa dell'animazione in alto, un editor di tracce al centro attualmente vuoto, nonché opzioni di filtro, scatto e zoom in basso.
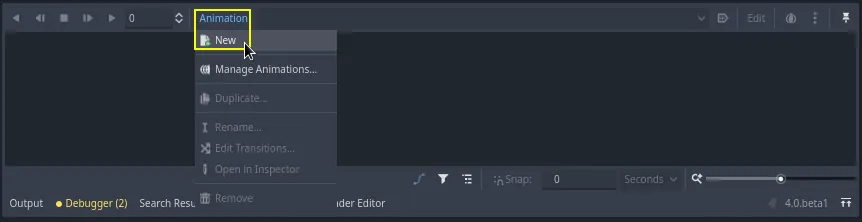
Creiamo un'animazione. Clicca su Animazione -> Nuova.
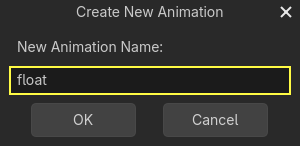
Denomina l'animazione "float".
Una volta creata l'animazione, sarà visualizzata la linea del tempo con dei numeri che rappresentano il tempo in secondi.

Vogliamo che l'animazione venga riprodotta automaticamente all'inizio del gioco. Inoltre, dovrebbe ripetersi in loop.
Per fare ciò, puoi cliccare sul pulsante di riproduzione automatica ( ) nella barra degli strumenti di animazione e sulle frecce di ripetizione, rispettivamente.

Puoi anche fissare l'editor di animazione cliccando sull'icona a forma di puntina in alto a destra. Ciò impedisce che si chiuda quando clicchi sulla finestra e deselezioni i nodi.
![]()
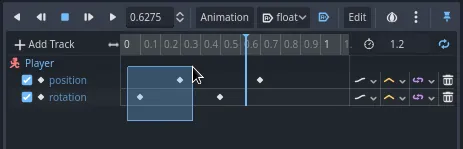
Imposta la durata dell'animazione su 1.2 secondi nell'angolo in alto a destra del pannello.
Dovresti vedere il nastro grigio allargarsi leggermente. Ti mostra l'inizio e la fine dell'animazione e la linea blu verticale è il cursore del tempo.

È possibile cliccare e trascinare lo slider in basso a destra per ingrandire o rimpicciolire la linea del tempo.

L'animazione fluttuante
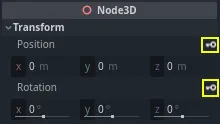
Con il nodo del AnimationPlayer, puoi animare gran parte delle proprietà su tutti i nodi che desideri. Nota l'icona a forma di chiave accanto alle proprietà nell'Ispettore. Puoi cliccare su una di esse per creare un fotogramma chiave, che è una coppia di valore e tempo per la proprietà corrispondente. Il fotogramma chiave è inserito nel punto in cui si trova il cursore del tempo nella linea del tempo.
Inseriamo le nostre prime chiavi. Qui animeremo sia la posizione sia la rotazione del nodo Character.
Seleziona Character e nell'Ispettore espandi la sezione Transform. Clicca sull'icona a forma di chiave accanto a Position e Rotation.
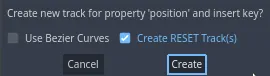
Per questo tutorial, crea semplicemente una traccia RESET, che è la scelta predefinita
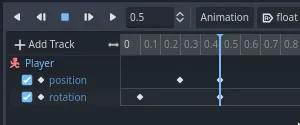
Due tracce sono visualizzate nell'editor, ciascuna delle quali è rappresentata da un'icona a forma di diamante.
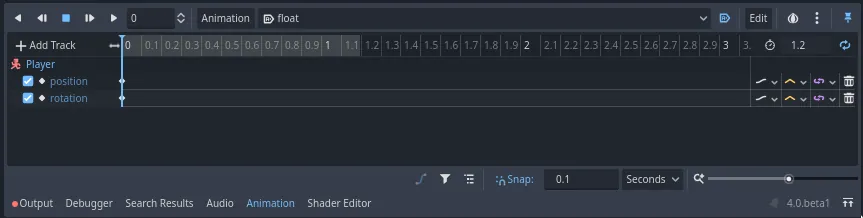
Puoi cliccare e trascinare i diamanti per spostarli nel tempo. Sposta la chiave della posizione a 0.3 secondi e la chiave della rotazione a 0.1 secondi.

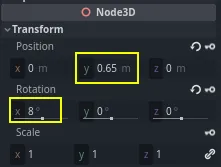
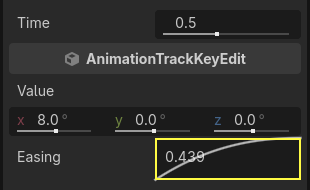
Sposta il cursore del tempo su 0.5 secondi cliccando e trascinando sulla timeline grigia, o immettendoli nel campo di input.

Nell'Ispettore, imposta l'asse Y di Position a 0.65 metri e l'asse X di Rotation a 8.
Se non vedi le proprietà nel pannello Ispettore, clicca prima nuovamente sul nodo Character nel pannello Scena.
Crea un fotogramma chiave per entrambe le proprietà
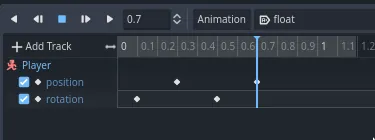
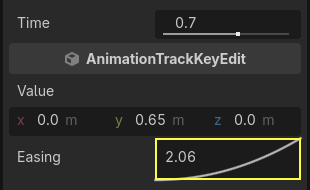
Ora, sposta il fotogramma chiave di posizione a 0.7 secondi trascinandolo sulla linea del tempo.
Nota
Una lezione sui principi dell'animazione va oltre lo scopo di questo tutorial. Nota solo che non dovresti distribuire uniformemente i tempi e gli spazi. Gli animatori giocano invece con i tempi e gli spazi, due principi fondamentali dell'animazione. È necessario compensare e contrastare i movimenti dei personaggi per farli sembrare vivi.
Sposta il cursore del tempo alla fine dell'animazione, a 1.2 secondi. Imposta la posizione Y a circa 0.35 e la rotazione X a -9 gradi. Una volta ancora, crea una chiave per entrambe le proprietà.

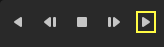
Puoi visualizzare in anteprima il risultato cliccando sul pulsante di riproduzione o premendo Maiusc + D. Clicca sul pulsante di arresto o premi S per interrompere la riproduzione.
Come puoi vedere, il motore interpola tra i fotogrammi chiave per produrre un'animazione continua. Al momento, però, il movimento sembra molto robotico. Questo perché l'interpolazione predefinita è lineare, causando transizioni costanti, a differenza di come si muovono gli esseri viventi nel mondo reale.
Possiamo controllare la transizione tra i fotogrammi chiave utilizzando le curve di easing.
Clicca e trascina attorno alle prime due chiavi nella linea del tempo per selezionarle.
Puoi modificare contemporaneamente le proprietà di entrambe le chiavi nell'Ispettore, dove è possibile vedere una proprietà Easing.
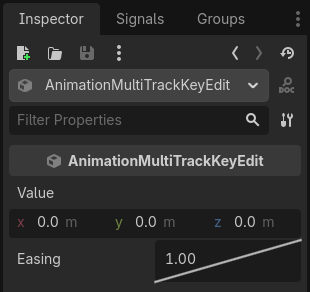
Clicca e trascina la curva, tirandola verso sinistra. Questo applicherà un ease-out, ovvero la transizione sarà inizialmente rapida e rallenterà man mano che il cursore del tempo raggiunge il fotogramma chiave successivo.

Riproduci l'animazione nuovamente per vedere la differenza. La prima metà dovrebbe già essere un po' più dinamica.
Applica un ease-out al secondo fotogramma chiave nella traccia di rotazione.
Fai l'opposto per il secondo fotogramma chiave di posizione, trascinandolo verso destra.
La tua animazione dovrebbe assomigliare a questa.
Nota
Le animazioni aggiornano le proprietà dei nodi animati a ogni fotogramma, sovrascrivendo i valori iniziali. Se animassimo direttamente il nodo Player, non potremmo spostarlo in codice. È qui che il nodo Pivot torna utile: anche se abbiamo animato il Character, possiamo comunque spostare e ruotare il Pivot e sovrapporre all'animazione le modifiche in uno script.
Se avvii il gioco, la creatura del giocatore ora fluttuerà!
Se la creatura è un po' troppo vicina al pavimento, puoi spostare Pivot verso l'alto per compensare.
Controllo dell'animazione in codice
Possiamo usare codice per controllare la riproduzione dell'animazione secondo l'input del giocatore. Cambiamo la velocità dell'animazione quando il personaggio è in movimento.
Apri lo script Player cliccando sull'icona dello script accanto ad esso.
![]()
In _physics_process(), dopo la riga in cui verifichiamo il vettore direction, aggiungiamo il seguente codice.
func _physics_process(delta):
    #...
    if direction != Vector3.ZERO:
        #...
        $AnimationPlayer.speed_scale = 4
    else:
        $AnimationPlayer.speed_scale = 1
public override void _PhysicsProcess(double delta)
{
    // ...
    if (direction != Vector3.Zero)
    {
        // ...
        GetNode<AnimationPlayer>("AnimationPlayer").SpeedScale = 4;
    }
    else
    {
        GetNode<AnimationPlayer>("AnimationPlayer").SpeedScale = 1;
    }
}
Questo codice fa in modo che quando il giocatore si muove, moltiplichiamo la velocità di riproduzione per 4. Quando si ferma, la riportiamo alla velocità normale.
Abbiamo accennato che Pivot potrebbe sovrapporre all'animazione le trasformazioni. Possiamo fare in modo che il personaggio si muova ad arco durante il salto, utilizzando la seguente riga di codice. Aggiungila alla fine di _physics_process().
func _physics_process(delta):
    #...
    $Pivot.rotation.x = PI / 6 * velocity.y / jump_impulse
public override void _PhysicsProcess(double delta)
{
    // ...
    var pivot = GetNode<Node3D>("Pivot");
    pivot.Rotation = new Vector3(Mathf.Pi / 6.0f * Velocity.Y / JumpImpulse, pivot.Rotation.Y, pivot.Rotation.Z);
}
Animazione dei mob
Ecco un altro bel trucco con le animazioni in Godot: finché si utilizza una struttura di nodi simile, è possibile copiarle in scene diverse.
Ad esempio, entrambe le scene Mob e Player hanno un nodo Pivot e un nodo Character, quindi possiamo riciclare le animazioni tra di esse.
Apri la scena Player, seleziona il nodo AnimationPlayer e clicca su Animazione > Gestisci animazioni.... Clicca sul pulsante Copia animazione negli appunti (due quadratini) accanto all'animazione float. Clicca su OK per chiudere la finestra.
Successivamente, apri mob.tscn, crea un nodo figlio AnimationPlayer e selezionalo. Clicca su Animazione > Gestisci animazioni, quindi su Aggiungi libreria. Dovrebbe apparire il messaggio "Verrà creata una libreria globale". Lascia vuoto il campo di testo e clicca su OK. Clicca sull'icona Incolla (gli appunti) e dovrebbe apparire nella finestra. Clicca su OK per chiudere la finestra.
Quindi, assicurati che il pulsante di riproduzione automatica () e le frecce di ripetizione (Ripetizione di animazione) siano attivati anche nell'editor di animazione nel pannello inferiore. Ecco fatto; tutti i mostri ora riprodurranno l'animazione "float".
Possiamo cambiare la velocità di riproduzione secondo la proprietà random_speed della creatura. Apriamo lo script del Mob e alla fine della funzione initialize() aggiungiamo la seguente riga.
func initialize(start_position, player_position):
    #...
    $AnimationPlayer.speed_scale = random_speed / min_speed
public void Initialize(Vector3 startPosition, Vector3 playerPosition)
{
    // ...
    GetNode<AnimationPlayer>("AnimationPlayer").SpeedScale = randomSpeed / MinSpeed;
}
E con questo, hai finito di programmare il tuo primo gioco completo in 3D.
Congratulazioni!
Nella prossima parte, riepilogheremo brevemente ciò che hai imparato e ti forniremo alcuni collegamenti per continuare a saperne di più. Per ora, ecco i file player.gd e mob.gd completi, così potrai confrontare il tuo codice con questi.
Ecco lo script di Player.
extends CharacterBody3D

signal hit

# How fast the player moves in meters per second.
@export var speed = 14
# The downward acceleration while in the air, in meters per second squared.
@export var fall_acceleration = 75
# Vertical impulse applied to the character upon jumping in meters per second.
@export var jump_impulse = 20
# Vertical impulse applied to the character upon bouncing over a mob
# in meters per second.
@export var bounce_impulse = 16

var target_velocity = Vector3.ZERO


func _physics_process(delta):
    # We create a local variable to store the input direction
    var direction = Vector3.ZERO

    # We check for each move input and update the direction accordingly
    if Input.is_action_pressed("move_right"):
        direction.x = direction.x + 1
    if Input.is_action_pressed("move_left"):
        direction.x = direction.x - 1
    if Input.is_action_pressed("move_back"):
        # Notice how we are working with the vector's x and z axes.
        # In 3D, the XZ plane is the ground plane.
        direction.z = direction.z + 1
    if Input.is_action_pressed("move_forward"):
        direction.z = direction.z - 1

    # Prevent diagonal movement being very fast
    if direction != Vector3.ZERO:
        direction = direction.normalized()
        # Setting the basis property will affect the rotation of the node.
        $Pivot.basis = Basis.looking_at(direction)
        $AnimationPlayer.speed_scale = 4
    else:
        $AnimationPlayer.speed_scale = 1

    # Ground Velocity
    target_velocity.x = direction.x * speed
    target_velocity.z = direction.z * speed

    # Vertical Velocity
    if not is_on_floor(): # If in the air, fall towards the floor
        target_velocity.y = target_velocity.y - (fall_acceleration * delta)

    # Jumping.
    if is_on_floor() and Input.is_action_just_pressed("jump"):
        target_velocity.y = jump_impulse

    # Iterate through all collisions that occurred this frame
    # in C this would be for(int i = 0; i < collisions.Count; i++)
    for index in range(get_slide_collision_count()):
        # We get one of the collisions with the player
        var collision = get_slide_collision(index)

        # If the collision is with ground
        if collision.get_collider() == null:
            continue

        # If the collider is with a mob
        if collision.get_collider().is_in_group("mob"):
            var mob = collision.get_collider()
            # we check that we are hitting it from above.
            if Vector3.UP.dot(collision.get_normal()) > 0.1:
                # If so, we squash it and bounce.
                mob.squash()
                target_velocity.y = bounce_impulse
                # Prevent further duplicate calls.
                break

    # Moving the Character
    velocity = target_velocity
    move_and_slide()

    $Pivot.rotation.x = PI / 6 * velocity.y / jump_impulse

# And this function at the bottom.
func die():
    hit.emit()
    queue_free()

func _on_mob_detector_body_entered(body):
    die()
using Godot;

public partial class Player : CharacterBody3D
{
    // Emitted when the player was hit by a mob.
    [Signal]
    public delegate void HitEventHandler();

    // How fast the player moves in meters per second.
    [Export]
    public int Speed { get; set; } = 14;
    // The downward acceleration when in the air, in meters per second squared.
    [Export]
    public int FallAcceleration { get; set; } = 75;
    // Vertical impulse applied to the character upon jumping in meters per second.
    [Export]
    public int JumpImpulse { get; set; } = 20;
    // Vertical impulse applied to the character upon bouncing over a mob in meters per second.
    [Export]
    public int BounceImpulse { get; set; } = 16;

    private Vector3 _targetVelocity = Vector3.Zero;

    public override void _PhysicsProcess(double delta)
    {
        // We create a local variable to store the input direction.
        var direction = Vector3.Zero;

        // We check for each move input and update the direction accordingly.
        if (Input.IsActionPressed("move_right"))
        {
            direction.X += 1.0f;
        }
        if (Input.IsActionPressed("move_left"))
        {
            direction.X -= 1.0f;
        }
        if (Input.IsActionPressed("move_back"))
        {
            // Notice how we are working with the vector's X and Z axes.
            // In 3D, the XZ plane is the ground plane.
            direction.Z += 1.0f;
        }
        if (Input.IsActionPressed("move_forward"))
        {
            direction.Z -= 1.0f;
        }

        // Prevent diagonal movement being very fast.
        if (direction != Vector3.Zero)
        {
            direction = direction.Normalized();
            // Setting the basis property will affect the rotation of the node.
            GetNode<Node3D>("Pivot").Basis = Basis.LookingAt(direction);
            GetNode<AnimationPlayer>("AnimationPlayer").SpeedScale = 4;
        }
        else
        {
            GetNode<AnimationPlayer>("AnimationPlayer").SpeedScale = 1;
        }

        // Ground velocity
        _targetVelocity.X = direction.X * Speed;
        _targetVelocity.Z = direction.Z * Speed;

        // Vertical velocity
        if (!IsOnFloor())
        {
            _targetVelocity.Y -= FallAcceleration * (float)delta;
        }

        // Jumping.
        if (IsOnFloor() && Input.IsActionJustPressed("jump"))
        {
            _targetVelocity.Y += JumpImpulse;
        }

        // Iterate through all collisions that occurred this frame.
        for (int index = 0; index < GetSlideCollisionCount(); index++)
        {
            // We get one of the collisions with the player.
            KinematicCollision3D collision = GetSlideCollision(index);

            // If the collision is with a mob.
            if (collision.GetCollider() is Mob mob)
            {
                // We check that we are hitting it from above.
                if (Vector3.Up.Dot(collision.GetNormal()) > 0.1f)
                {
                    // If so, we squash it and bounce.
                    mob.Squash();
                    _targetVelocity.Y = BounceImpulse;
                    // Prevent further duplicate calls.
                    break;
                }
            }
        }

        // Moving the character
        Velocity = _targetVelocity;
        MoveAndSlide();

        var pivot = GetNode<Node3D>("Pivot");
        pivot.Rotation = new Vector3(Mathf.Pi / 6.0f * Velocity.Y / JumpImpulse, pivot.Rotation.Y, pivot.Rotation.Z);
    }

    private void Die()
    {
        EmitSignal(SignalName.Hit);
        QueueFree();
    }

    private void OnMobDetectorBodyEntered(Node body)
    {
        Die();
    }
}
E lo script di Mob.
extends CharacterBody3D

# Minimum speed of the mob in meters per second.
@export var min_speed = 10
# Maximum speed of the mob in meters per second.
@export var max_speed = 18

# Emitted when the player jumped on the mob
signal squashed

func _physics_process(_delta):
    move_and_slide()

# This function will be called from the Main scene.
func initialize(start_position, player_position):
    # We position the mob by placing it at start_position
    # and rotate it towards player_position, so it looks at the player.
    look_at_from_position(start_position, player_position, Vector3.UP)
    # Rotate this mob randomly within range of -45 and +45 degrees,
    # so that it doesn't move directly towards the player.
    rotate_y(randf_range(-PI / 4, PI / 4))

    # We calculate a random speed (integer)
    var random_speed = randi_range(min_speed, max_speed)
    # We calculate a forward velocity that represents the speed.
    velocity = Vector3.FORWARD * random_speed
    # We then rotate the velocity vector based on the mob's Y rotation
    # in order to move in the direction the mob is looking.
    velocity = velocity.rotated(Vector3.UP, rotation.y)

    $AnimationPlayer.speed_scale = random_speed / min_speed

func _on_visible_on_screen_notifier_3d_screen_exited():
    queue_free()

func squash():
    squashed.emit()
    queue_free() # Destroy this node
using Godot;

public partial class Mob : CharacterBody3D
{
    // Emitted when the played jumped on the mob.
    [Signal]
    public delegate void SquashedEventHandler();

    // Minimum speed of the mob in meters per second
    [Export]
    public int MinSpeed { get; set; } = 10;
    // Maximum speed of the mob in meters per second
    [Export]
    public int MaxSpeed { get; set; } = 18;

    public override void _PhysicsProcess(double delta)
    {
        MoveAndSlide();
    }

    // This function will be called from the Main scene.
    public void Initialize(Vector3 startPosition, Vector3 playerPosition)
    {
        // We position the mob by placing it at startPosition
        // and rotate it towards playerPosition, so it looks at the player.
        LookAtFromPosition(startPosition, playerPosition, Vector3.Up);
        // Rotate this mob randomly within range of -45 and +45 degrees,
        // so that it doesn't move directly towards the player.
        RotateY((float)GD.RandRange(-Mathf.Pi / 4.0, Mathf.Pi / 4.0));

        // We calculate a random speed (integer).
        int randomSpeed = GD.RandRange(MinSpeed, MaxSpeed);
        // We calculate a forward velocity that represents the speed.
        Velocity = Vector3.Forward * randomSpeed;
        // We then rotate the velocity vector based on the mob's Y rotation
        // in order to move in the direction the mob is looking.
        Velocity = Velocity.Rotated(Vector3.Up, Rotation.Y);

        GetNode<AnimationPlayer>("AnimationPlayer").SpeedScale = randomSpeed / MinSpeed;
    }

    public void Squash()
    {
        EmitSignal(SignalName.Squashed);
        QueueFree(); // Destroy this node
    }

    private void OnVisibilityNotifierScreenExited()
    {
        QueueFree();
    }
}