Attention: Here be dragons
This is the latest
(unstable) version of this documentation, which may document features
not available in or compatible with released stable versions of Godot.
Checking the stable version of the documentation...
Heads up display (HUD)
L'ultimo pezzo di cui il nostro gioco ha bisogno è un'interfaccia utente (UI) che visualizzi informazioni come il punteggio, un messaggio "game over" e un pulsante per riavviare.
Creare una nuova scena, clicca sul pulsante "Altro nodo" e aggiungi un nodo CanvasLayer denominato HUD. "HUD" sta per "heads-up display", un schermata informativa che appare sovrapposta alla vista di gioco.
Il nodo CanvasLayer ci consente di disegnare i nostri elementi dell'interfaccia utente su un livello sopra il resto del gioco, in modo che le informazioni visualizzate non siano coperte da elementi di gioco come il giocatore o i mob.
L'HUD deve mostrare le seguenti informazioni:
Punteggio, modificato da ''ScoreTimer''.
Un messaggio, ad esempio "Game Over" o "Get Ready!"
Un pulsante "Start" per iniziare il gioco.
Il nodo di base per gli elementi dell'interfaccia utente è Control. Per creare l'interfaccia utente, useremo due tipi di nodi Control: Label e Button.
Crea i seguenti come figli del nodo HUD:
Label denominato
ScoreLabel.Label denominato
Message.Button denominato
StartButton.Timer denominato
MessageTimer.
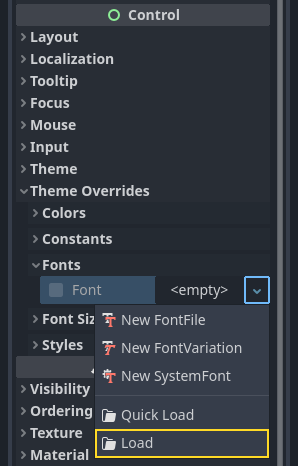
Fare clic su ScoreLabel e digitare un numero nel campo Testo nell'Ispettore. Il tipo di font predefinito per i nodi Control è piccolo e non scala bene. C'è un file di font incluso nelle risorse di gioco chiamato "Xolonium-Regular.ttf". Per utilizzare questo font, eseguire le operazioni seguenti:
Sotto "Sostituzioni del tema > Font", scegli "Carica" e seleziona il file "Xolonium-Regular.ttf".
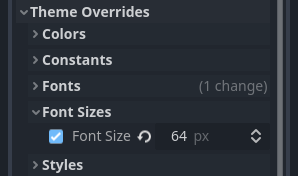
La dimensione del font è ancora troppo piccola, aumentala a 64 in "Sostituzioni del tema > Dimensioni del font". Dopo aver modificato ScoreLabel, ripeti le modifiche per i nodi Message e StartButton.
Nota
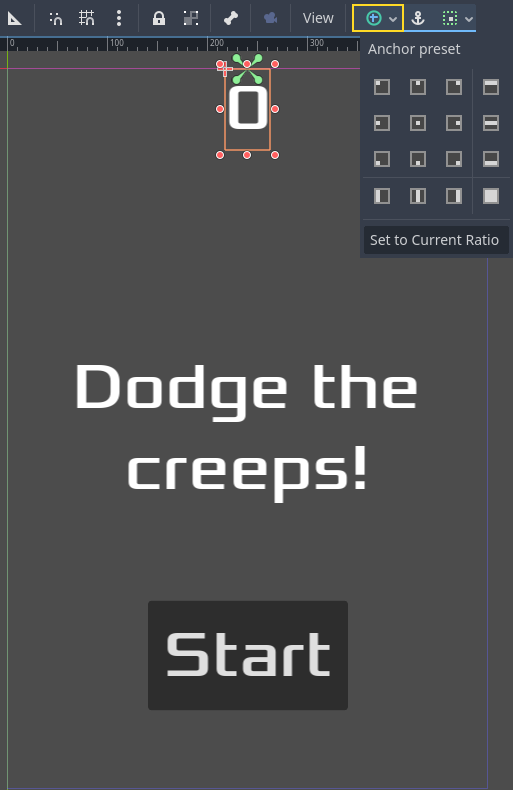
Ancoraggi: I nodi Control hanno una posizione e dimensioni, ma hanno anche ancoraggi. Gli ancoraggi definiscono l'origine, ovvero il punto di riferimento per gli spigoli del nodo.
Organizza i nodi come mostrato in seguito. Puoi trascinare i nodi per posizionarli manualmente o, per un posizionamento più preciso, utilizzare le "preimpostazioni di ancoraggio".
ScoreLabel
Aggiungi il testo
0.Imposta l'"Allineamento orizzontale" e l'"Allineamento verticale" su
Center.Scegli la "preimpostazione di ancoraggio"
Al centro in alto.
Messaggio
Aggiungi il testo
Dodge the Creeps!.Imposta l'"Allineamento orizzontale" e l'"Allineamento verticale" su
Center.Impostare l'"Autowrap Mode" su
Word, altrimenti l'etichetta rimarrà su una riga.In "Control - Layout/Trasform" imposta "Size X" su
480per utilizzare l'intera larghezza dello schermo.Scegli la "preimpostazione di ancoraggio"
Al centro.
Collegamento di HUD a Main
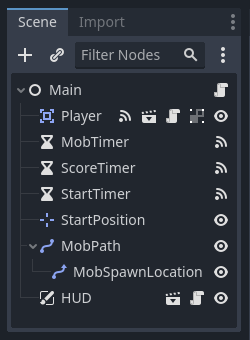
Ora che abbiamo finito di creare la scena HUD, tornare a Main. Istanza la scena HUD in Main come hai fatto per la scena Player. L'albero della scena completo dovrebbe essere simile a questo, quindi assicurati di non aver tralasciato nulla:
Ora dobbiamo collegare la funzionalità HUD al nostro script Main. Ciò richiede alcune aggiunte alla scena Main:
Nella scheda Segnali, collega il segnale start_game dell'HUD alla funzione new_game() del nodo Main, cliccando sul pulsante "Scegli" nella finestra "Connetti un segnale" e selezionando il metodo new_game(), oppure digitando "new_game" in "Metodo ricevitore" nella stessa finestra. Verifica che l'icona verde di connessione appaia ora accanto a func new_game() nello script.
In new_game(), aggiorna la visualizzazione del punteggio e mostra il messaggio "Get Ready":
$HUD.update_score(score)
$HUD.show_message("Get Ready")
var hud = GetNode<HUD>("HUD");
hud.UpdateScore(_score);
hud.ShowMessage("Get Ready!");
In game_over() dobbiamo chiamare la corrispondente funzione HUD:
$HUD.show_game_over()
GetNode<HUD>("HUD").ShowGameOver();
Infine, aggiungi questo a _on_score_timer_timeout() per mantenere la schermata sincronizzata con il punteggio che cambia:
$HUD.update_score(score)
GetNode<HUD>("HUD").UpdateScore(_score);
Avvertimento
Ricordati di rimuovere la chiamata a new_game() da _ready() se non lo hai già fatto, altrimenti il tuo gioco partirà automaticamente.
Ora sei pronto per giocare! Clicca sul pulsante "Esegui il progetto".
Rimuovere i vecchi "creeps"
Se giochi fino al "Game Over" e inizi subito una nuova partita, i creeps del gioco precedente potrebbero essere ancora sullo schermo. Sarebbe meglio se scomparissero tutti all'inizio di una nuova partita. Abbiamo solo bisogno di un modo per dire a tutti i mob di sparire. Possiamo farlo con la funzione "gruppo".
Nella scena Mob, seleziona il nodo radice e clicca sulla scheda Groups accanto alla scheda Signals e il pulsante "+" per aprire la finestra di dialogo "Crea un nuovo gruppo".
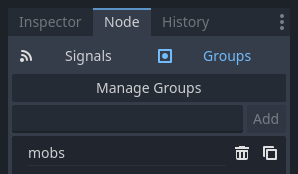
Assegna al gruppo il nome mobs e clicca su "ok" per aggiungere un nuovo gruppo di scena.

Ora tutti i mob saranno nel gruppo "mobs".

Possiamo quindi aggiungere la seguente riga alla funzione new_game() in Main:
get_tree().call_group("mobs", "queue_free")
// Note that for calling Godot-provided methods with strings,
// we have to use the original Godot snake_case name.
GetTree().CallGroup("mobs", Node.MethodName.QueueFree);
La funzione call_group() chiama la funzione cosi denominata su ogni nodo di un gruppo - cosi facendo diciamo a ogni mob di cancellarsi.
A questo punto il gioco è quasi completato. Nella prossima e ultima parte, lo rifiniremo un po' aggiungendo uno sfondo, musica in ripetizione e alcune scorciatoie da tastiera.