Attention: Here be dragons
This is the latest
(unstable) version of this documentation, which may document features
not available in or compatible with released stable versions of Godot.
Checking the stable version of the documentation...
Programmare il giocatore
In questa lezione aggiungeremo il movimento del giocatore, l'animazione e configureremo quel che serve per rilevare le collisioni.
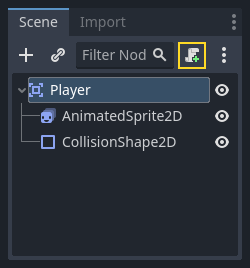
Per fare ciò, abbiamo bisogno di aggiungere alcune funzionalità che si possono avere con un nodo integrato, quindi aggiungeremo uno script. Clicca sul nodo Player e poi sul pulsante "Allega script":
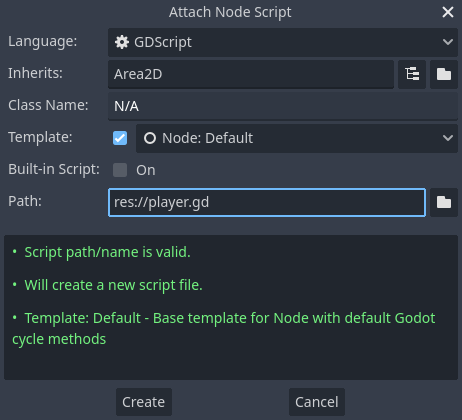
Nella finestra di impostazioni dello script, puoi lasciare le impostazioni di default. Clicca "Crea":
Nota
Se stai creando uno script C# o in altri linguaggi, scegli il linguaggio dal menu a tendina linguaggio prima di cliccare crea.
Nota
Se è la prima volta che ti imbatti in GDScript, leggi Linguaggi di scripting prima di continuare.
Inizia dichiarando le variabili membro che questo oggetto avrà bisogno:
extends Area2D

@export var speed = 400 # How fast the player will move (pixels/sec).
var screen_size # Size of the game window.
using Godot;

public partial class Player : Area2D
{
    [Export]
    public int Speed { get; set; } = 400; // How fast the player will move (pixels/sec).

    public Vector2 ScreenSize; // Size of the game window.
}
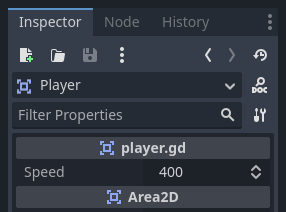
Utilizzando la parola chiave export sulla prima variabile speed ci permette di impostare il suo valore dall'Ispettore. Ciò può essere utile per valori che vorresti poter modificare proprio come le proprietà integrate di un nodo. Clicca sul nodo Player e noterai che la proprietà è ora apparsa nell'Ispettore in una nuova sezione con il nome dello script. Ricorda, se cambi il valore qui, sovrascriverà il valore predefinito specificato nello script (lo script non sarà modificato).
Avvertimento
Se stai usando C#, devi (ri)compilare i file di assemblaggio del progetto ogni volta che vuoi vedere le nuove variabili esportate o i segnali. Questa compilazione si può attivare cliccando sul pulsante Build, in alto a destra dell'editor.

Lo script player.gd dovrebbe già contenere le funzioni _ready() e _process(). Se non hai selezionato il modello predefinito mostrato in precedenza, crea queste funzioni mentre segui la lezione.
La funzione _ready() viene chiamata quando un nodo entra nello scene tree, è un momento ideale per andare a ricavare le dimensioni della finestra di gioco:
func _ready():
    screen_size = get_viewport_rect().size
public override void _Ready()
{
    ScreenSize = GetViewportRect().Size;
}
Ora possiamo usare la funzione _process() per definire cosa farà il player. La funzione _process() viene chiamata a ogni frame, quindi la useremo per aggiornare gli elementi del nostro gioco che ci aspettiamo che cambino spesso. Per il player dobbiamo fare il seguente:
Controlla per input.
Muoversi nella direzione data.
Esegui l'animazione appropriata.
Prima di tutto, dobbiamo verificare gli input - il giocatore sta premendo un pulsante? Per questo gioco abbiamo 4 direzioni di input da verificare. Le azioni di Input sono definite nelle Impostazioni del progetto sotto "Mappa di input". Qui puoi definire degli eventi personalizzati e assegnargli diversi pulsanti, eventi del mouse, o altri tipi di input. Per questa demo mapperemo i tasti delle frecce direzionali alle quattro direzioni.
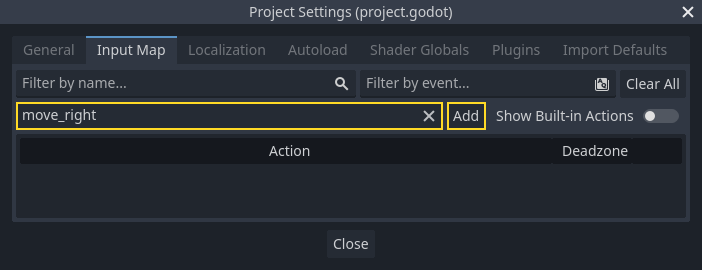
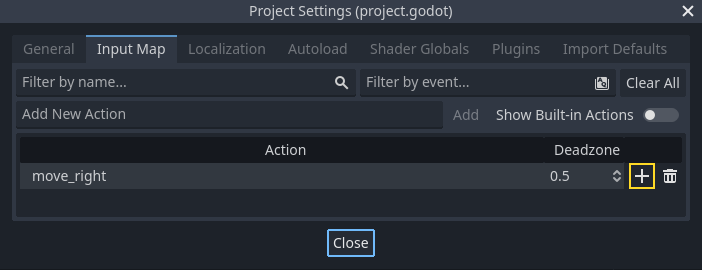
Clicca su Progetto -> Impostazioni del progetto per aprire la finestra delle impostazioni del progetto e cliccare sulla scheda Mappa di input in alto. Digita "move_right" nella barra in alto e clicca sul pulsante "Aggiungi" per aggiungere l'azione move_right.
Dobbiamo assegnare un tasto a questa azione. Clicca sull'icona "+" a destra per aprire la finestra di gestione degli eventi.
Il campo "In attesa di input..." dovrebbe essere selezionato automaticamente. Premi il tasto della freccia "destra" sulla tastiera e il menu dovrebbe apparire così.
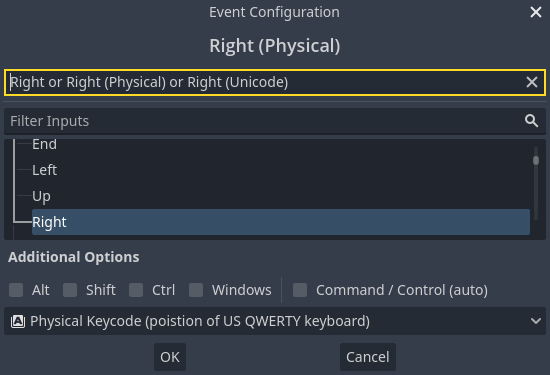
Seleziona il pulsante "ok". Il tasto della freccia "destra" è ora associato all'azione move_right.
Ripeti questi passaggi per aggiungere altre tre mappature:
move_leftmappato sul tasto freccia sinistra.move_upmappato sul tasto freccia su.E
move_downmappato sul tasto freccia giù.
La scheda della mappa di input dovrebbe apparire così:
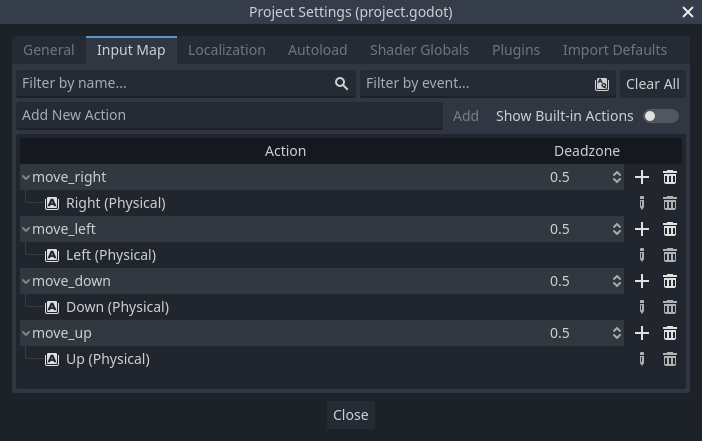
Clicca sul pulsante "Chiudi" per chiudere le impostazioni del progetto.
Nota
Abbiamo assegnato un solo tasto a ogni azione di input, ma è possibile assegnare più tasti, pulsanti del joystick o pulsanti del mouse alla stessa azione di input.
Puoi rilevare quando un pulsante è premuto usando Input.is_action_pressed(), che ritorna true se è premuto o false se non lo è.
func _process(delta):
    var velocity = Vector2.ZERO # The player's movement vector.
    if Input.is_action_pressed("move_right"):
        velocity.x += 1
    if Input.is_action_pressed("move_left"):
        velocity.x -= 1
    if Input.is_action_pressed("move_down"):
        velocity.y += 1
    if Input.is_action_pressed("move_up"):
        velocity.y -= 1

    if velocity.length() > 0:
        velocity = velocity.normalized() * speed
        $AnimatedSprite2D.play()
    else:
        $AnimatedSprite2D.stop()
public override void _Process(double delta)
{
    var velocity = Vector2.Zero; // The player's movement vector.

    if (Input.IsActionPressed("move_right"))
    {
        velocity.X += 1;
    }

    if (Input.IsActionPressed("move_left"))
    {
        velocity.X -= 1;
    }

    if (Input.IsActionPressed("move_down"))
    {
        velocity.Y += 1;
    }

    if (Input.IsActionPressed("move_up"))
    {
        velocity.Y -= 1;
    }

    var animatedSprite2D = GetNode<AnimatedSprite2D>("AnimatedSprite2D");

    if (velocity.Length() > 0)
    {
        velocity = velocity.Normalized() * Speed;
        animatedSprite2D.Play();
    }
    else
    {
        animatedSprite2D.Stop();
    }
}
Iniziamo impostando la velocity a (0, 0) - di default il giocatore non dovrebbe muoversi. Poi controlliamo ogni input e aggiungiamo/sottraiamo da velocity per ottenere una direzione globale. Per esempio, se tieni premuto destra e giù allo stesso tempo, il vettore velocity che otterremo sarà (1, 1). In questo caso, dato che stiamo sommando un movimento orizzontale e uno verticale, il giocatore si muoverà più velocemente in diagonale rispetto al solo movimento orizzontale.
Possiamo prevenire ciò normalizzando la velocità, che significa impostare la sua lunghezza a 1, dopodiché possiamo moltiplicare il vettore per la velocità desiderata. In questo modo possiamo evitare i movimenti diagonali a velocità maggiore.
Suggerimento
Se non hai mai usato la matematica vettoriale prima d'ora, oppure hai bisogno di una rinfrescata, puoi vedere una spiegazione sull'uso dei vettori in Godot a Matematica vettoriale. È buona cosa da sapere, ma non sarà necessario per il resto di questo tutorial.
Possiamo anche verificare se il giocatore si sta muovendo, così possiamo chiamare play() o stop() sul nodo AnimatedSprite2D.
Suggerimento
$ è l'abbreviazione di get_node(). Quindi nel codice precedente, $AnimatedSprite.play() è identico a get_node("AnimatedSprite").play().
In GDScript, $ ritorna il nodo al percorso relativo del nodo attuale, oppure ritorna null se il nodo non viene trovato. Siccome AnimatedSprite2D è un figlio del nodo attuale, possiamo usare $AnimatedSprite.
Ora che abbiamo una direzione di movimento, possiamo aggiornare la posizione del player. Possiamo inoltre usare clamp() per prevenire che il player esca dallo schermo. Fare il clamping di un valore significa restringerlo a un certo intervallo. Aggiungi il seguente codice sul fondo della funzione _process() (assicurati che non sia indentato sotto else):
position += velocity * delta
position = position.clamp(Vector2.ZERO, screen_size)
Position += velocity * (float)delta;
Position = new Vector2(
    x: Mathf.Clamp(Position.X, 0, ScreenSize.X),
    y: Mathf.Clamp(Position.Y, 0, ScreenSize.Y)
);
Suggerimento
Il parametro delta della funzione _process() si riferisce alla lunghezza del frame - il tempo di esecuzione del frame precedente. Usare questo valore garantisce che il movimento sia proporzionale al frame precedente, in caso di variazione del frame rate.
Clicca su "Esegui scena attuale" (F6, Cmd + R su macOS) e conferma di poter muovere il giocatore sullo schermo in tutte le direzioni.
Avvertimento
Se ottieni un errore nel pannello "Debugger" che dice
Tentativo di chiamare la funzione 'play' nella base 'istanza nulla' su un'istanza nulla
questo probabilmente significa che hai scritto male il nome del nodo AnimatedSprite2D. I nomi dei nodi distinguono tra maiuscole e minuscole; $NodeName deve corrispondere al nome che vedi nell'albero di scene.
Scegliere le animazioni
Ora che il giocatore si può muovere, abbiamo bisogno di cambiare l'animazione riprodotta dall'AnimatedSprite2D secondo la sua direzione. Abbiamo l'animazione "walk", che mostra il giocatore camminare verso destra. Questa animazione deve essere capovolta orizzontalmente tramite la proprietà flip_h per il movimento verso sinistra. Abbiamo anche un animazione "up", la quale deve essere capovolta verticalmente tramite flip_v per il movimento verso il basso. Aggiungiamo questo codice alla fine della funzione _process():
if velocity.x != 0:
    $AnimatedSprite2D.animation = "walk"
    $AnimatedSprite2D.flip_v = false
    # See the note below about the following boolean assignment.
    $AnimatedSprite2D.flip_h = velocity.x < 0
elif velocity.y != 0:
    $AnimatedSprite2D.animation = "up"
    $AnimatedSprite2D.flip_v = velocity.y > 0
if (velocity.X != 0)
{
    animatedSprite2D.Animation = "walk";
    animatedSprite2D.FlipV = false;
    // See the note below about the following boolean assignment.
    animatedSprite2D.FlipH = velocity.X < 0;
}
else if (velocity.Y != 0)
{
    animatedSprite2D.Animation = "up";
    animatedSprite2D.FlipV = velocity.Y > 0;
}
Nota
Le assegnazioni booleane nel codice qui sopra sono comuni abbreviazioni per i programmatori. Siccome stiamo facendo una comparazione (booleano) a anche assegnando un valore booleano, possiamo fare entrambi allo stesso momento. Considera questo codice contro l'assegnamento booleano in un'unica riga mostrato sopra:
if velocity.x < 0:
    $AnimatedSprite2D.flip_h = true
else:
    $AnimatedSprite2D.flip_h = false
if (velocity.X < 0)
{
    animatedSprite2D.FlipH = true;
}
else
{
    animatedSprite2D.FlipH = false;
}
Riproduci la scena e verifica che le animazioni siano corrette in ciascuna delle direzioni.
Suggerimento
Un errore comune è quello di scrivere male i nomi delle animazioni. I nomi delle animazioni nel pannello SpriteFrames devono corrispondere a quello che hai digitato nel codice. Se hai chiamato l'animazione "Walk", devi usare una "W" maiuscola anche nel codice.
Quando sei sicuro che il movimento stia funzionando correttamente, aggiungi questa linea a _ready(), così che il player sarà nascosto quando il gioco ha inizio:
hide()
Hide();
Preparare per le collisioni
Vogliamo che il Player rilevi quando viene colpito da un nemico, ma non abbiamo ancora creato nemici! Non c'è problema, perché useremo la funzionalità segnali di Godot per fare in modo che funzioni.
Aggiungi quanto segue all'inizio dello script. Se usi GDScript, aggiungilo dopo extends Area2D. Se usi C#, aggiungilo dopo public partial class Player : Area2D:
signal hit
// Don't forget to rebuild the project so the editor knows about the new signal.

[Signal]
public delegate void HitEventHandler();
Questo definisce un segnale personalizzato chiamato "hit" che il nostro giocatore emetterà (invierà) quando entra a contatto con un nemico. Useremo il nodo Area2D per rilevare la collisione. Seleziona il nodo Player e clicca sulla scheda Signals, vicino alla scheda Ispettore, per vedere l'elenco dei segnali che il giocatore può emettere:
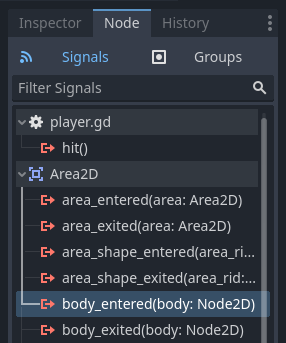
Nota come anche il nostro segnale "hit" personalizzato si trova lì! Poiché i nemici saranno nodi RigidBody2D, abbiamo bisogno del segnale body_entered(body: Node). Questo segnale viene emesso quando un corpo entra a contatto con il giocatore. Clicca "Connetti.." e apparirà la finestra "Connetti un segnale".
Godot creerà una funzione con quel nome esatto direttamente nello script. Non è necessario modificare le impostazioni predefinite per ora.
Avvertimento
Se utilizzi un editor di testo esterno (ad esempio, Visual Studio Code), un bug attualmente impedisce a Godot di farlo. Verrai reindirizzato all'editor esterno, ma la nuova funzione non sarà disponibile.
In questo caso, dovrai scrivere tu stesso la funzione nel file di script di Player.

Nota l'icona verde che indica che un segnale è connesso a questa funzione; ciò non significa che la funzione esista, ma solo che il segnale tenterà di connettersi a una funzione con quel nome, quindi controlla attentamente che la grafia della funzione corrisponda esattamente!
Successivamente, aggiungi questo codice alla funzione:
func _on_body_entered(_body):
    hide() # Player disappears after being hit.
    hit.emit()
    # Must be deferred as we can't change physics properties on a physics callback.
    $CollisionShape2D.set_deferred("disabled", true)
// We also specified this function name in PascalCase in the editor's connection window.
private void OnBodyEntered(Node2D body)
{
    Hide(); // Player disappears after being hit.
    EmitSignal(SignalName.Hit);
    // Must be deferred as we can't change physics properties on a physics callback.
    GetNode<CollisionShape2D>("CollisionShape2D").SetDeferred(CollisionShape2D.PropertyName.Disabled, true);
}
Ogni volta che un nemico colpirà il giocatore, il segnale verrà emesso. Bisogna disabilitare la collisione del giocatore per non innescare il segnale hit più di una volta.
Nota
Disabilitare la forma di collisione dell'area può causare un errore se si usa mentre il motore sta elaborando le collisioni. Usando set_deferred() si indica a Godot di aspettare per disabilitare la forma di collisione, fino a quando non è sicuro farlo.
L'ultimo pezzo è aggiungere una funzione che chiamiamo per resettare il player quando inizia una nuova partita.
func start(pos):
    position = pos
    show()
    $CollisionShape2D.disabled = false
public void Start(Vector2 position)
{
    Position = position;
    Show();
    GetNode<CollisionShape2D>("CollisionShape2D").Disabled = false;
}
Con il giocatore funzionante, nella prossima lezione lavoreremo sul nemico.