Attention: Here be dragons
This is the latest
(unstable) version of this documentation, which may document features
not available in or compatible with released stable versions of Godot.
Checking the stable version of the documentation...
Creazione di istanze
Nota
Questo tutorial riguarda l'istanziazione delle scene nell'editor. Per imparare come istanziare scene da codice, consultare Nodi e istanze di scene.
L'approccio di Godot all'istanziazione descritto di seguito non deve essere confuso con l'istanziazione hardware, che si può utilizzare per renderizzare rapidamente di grandi quantità di oggetti simili. Si veda invece Ottimizzazione tramite MultiMesh.
Nella parte precedente abbiamo visto che una scena è un insieme di nodi organizzati in una struttura ad albero, con un singolo nodo come radice. È possibile suddividere il progetto in un numero qualsiasi di scene. Questa funzione aiuta a suddividere e organizzare i diversi componenti del gioco.
Puoi creare tutte le scene che vuoi e salvarle come file con l'estensione .tscn, che sta per "scena di testo". Il file Label.tscn della lezione precedente ne è un esempio. Questi file sono chiamati "Packed Scenes" (scene impacchettate) perché contengono informazioni sul contenuto della scena.
Ecco un esempio di una palla. È composta da un nodo RigidBody2D come radice, chiamato "Ball", che consente alla palla di cadere e rimbalzare sui muri, un nodo Sprite2D e un nodo CollisionShape2D.

Una volta salvata una scena, questa funziona come un modello: si può riprodurre in altre scene tutte le volte che si vuole. La replica di un oggetto da un modello come questo si chiama istanziazione.

Come abbiamo detto nella parte precedente, le scene istanziate si comportano come un nodo: l'editor nasconde il loro contenuto per impostazione predefinita. Quando si istanzia la Palla, si vede solo il nodo Palla. Si noti anche come ogni duplicato abbia un nome unico.
Ogni istanza della scena Ball inizia con la stessa struttura e le stesse proprietà di ball.tscn. Tuttavia, è possibile modificare ciascuna istanza in modo indipendente, ad esempio cambiando il modo in cui rimbalza, il peso o qualsiasi proprietà esposta dalla scena di origine.
In pratica
Usiamo l'istanziazione in pratica per vedere come funziona in Godot. Ti invitiamo a scaricare il progetto di esempio della palla che abbiamo preparato per te: instancing_starter.zip.
Estrai l'archivio sul tuo computer. Per importarlo, hai bisogno del Gestore dei progetti. Per accedere al Gestore dei progetti, apri Godot oppure, se hai già aperto Godot, clicca su (Ctrl + Shift + Q, Ctrl + Option + Cmd + Q su macOS)
Nel Gestore dei progetti, clicca sul pulsante per importare il progetto.

Nel pop-up che appare, naviga nella cartella estratta. Fai doppio-clic sul file project.godot per aprirlo.

Infine, clicca sul pulsante .

Una finestra potrebbe informarti che il progetto è stato aperto l'ultima volta da una versione precedente di Godot. Non è un problema. Clicca su per aprire il progetto.
Il progetto contiene due scene impacchettate: main.tscn, contenente le pareti contro cui la palla si scontra, e ball.tscn. La scena principale dovrebbe aprirsi automaticamente. Se vedi una scena 3D vuota invece della scena principale, clicca sul pulsante 2D nella parte superiore dello schermo.


Aggiungiamo una palla come figlio del nodo Main. Nel pannello Scena, seleziona il nodo Main. Quindi, clicca sull'icona di collegamento nella parte superiore del pannello Scena. Questo pulsante consente di aggiungere un'istanza di una scena come figlio del nodo attualmente selezionato.

Fare doppio clic sulla scena della palla per istanziarla.

La palla apparirà nell'angolo in alto a sinistra della viewport.

Fare clic su di esso e trascinarlo verso il centro della vista.

Avvia il gioco premendo F5`(:kbd:`Cmd + B su macOS). Dovresti vederla cadere.
Ora, vogliamo creare altre istanze del nodo Ball. Con la palla ancora selezionata, premi Ctrl + D (Cmd + D su macOS) per richiamare il comando duplica. Clicca e trascina per spostare la nuova palla in una posizione diversa.

Puoi ripetere questo procedimento finché non ne hai diversi nella scena.

Eseguire nuovamente il gioco. Ora dovreste vedere ogni palla cadere indipendentemente l'una dall'altra. Questo è ciò che fanno le istanze. Ognuna è una riproduzione indipendente di una scena template (modello).
Modificare scene e istanze
C'è ancora altro sulle istanze. Con questa funzione è possibile:
Modificare le proprietà di una sfera senza influenzare le altre attraverso l'Inspector.
Modificare le proprietà predefinite di ogni Ball aprendo la scena
Ball.tscne modificando il nodo Ball. Al salvataggio, tutte le istanze di Ball nel progetto avranno i loro valori aggiornati.
Nota
La modifica di una proprietà su un'istanza sovrascrive sempre i valori della scena impacchettata corrispondente.
Proviamo così. Fai doppio clic su ball.tscn nel pannello FileSystem per aprirlo.

Nel pannello Scena a sinistra, seleziona il nodo Ball. Poi, nell'Inspector a destra, clicca sulla proprietà PhysicsMaterial per espanderla.
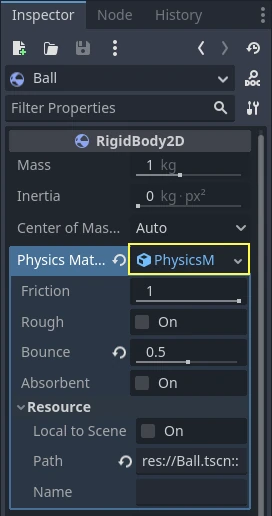
Imposta la proprietà Rimbalzo a 0.5 cliccando sul campo numerico, digitando 0.5 e premendo Enter.

Avvia il gioco premendo F5 (Cmd + B su macOS) e nota come tutte le palle ora rimbalzino molto di più. Poiché la scena Ball è un modello per tutte le istanze, modificandola e salvandola, tutte le istanze si aggiornano di conseguenza.
Regoliamo ora una singola istanza. Tornare alla scena principale facendo clic sulla scheda corrispondente sopra la finestra di visualizzazione.

Seleziona uno dei nodi Ball istanziati e, nell'Inspector, imposta il valore Gravity Scale su 10.

Accanto alla proprietà modificata viene visualizzato il pulsante grigio "revert" (ripristina).
Questa icona indica che si sta sovrascrivendo un valore dalla scena impacchettata originale. Anche se modifichi la proprietà nella scena originale, il valore sovrascritto verrà conservato nell'istanza. Cliccando sull'icona di ripristino, la proprietà verrà ripristinata al valore nella scena salvata.
Riprendete il gioco e notate che questa palla ora cade molto più velocemente delle altre.
Nota
Potresti notare che non è possibile modificare i valori del PhysicsMaterial della palla. Questo perché PhysicsMaterial è una risorsa e deve essere resa unica prima che sia possibile modificarla in una scena collegata alla scena originale. Per rendere una risorsa unica per un'istanza, fai clic destro sulla proprietà Physics Material nell'Inspector e clicca su nel menu contestuale.
Le risorse sono un altro elemento essenziale dei giochi di Godot, che tratteremo in una lezione successiva.
Istanze di scena come linguaggio di design
Le istanze e le scene in Godot offrono un linguaggio di progettazione eccellente, che distingue il motore da altri esistenti. Abbiamo progettato Godot intorno a questo concetto fin dall'inizio.
Quando si realizzano giochi con Godot, consigliamo di evitare i normali Design pattern, come MVC (Model-View-Controller) o Entity-Relationship. Potresti cominciare, invece, immaginando gli elementi che i giocatori vedranno nel gioco e strutturando il codice intorno ad essi.
Per esempio, potresti scomporre uno sparatutto in questo modo:
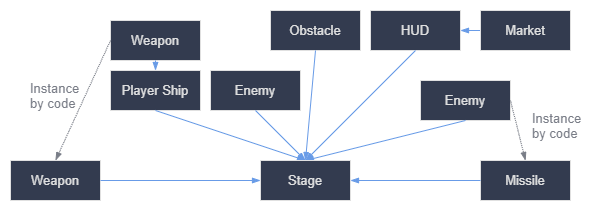
È possibile creare un diagramma come questo per quasi tutti i tipi di gioco. Ogni rettangolo rappresenta un'entità che è visibile nel gioco dalla prospettiva del giocatore. Le frecce puntano verso l'istanziatore di ogni scena.
Una volta creato un diagramma, ti consigliamo di creare una scena per ogni elemento elencato nel diagramma per sviluppare il tuo gioco. Userai, tramite codice o direttamente nell'editor, per costruire il tuo albero di scene.
I programmatori tendono a dedicare molto tempo a progettare un'architettura e integrare i componenti al suo interno. La progettazione basata su scene sostituisce questo approccio e rende lo sviluppo molto più veloce e intuitivo, permettendoti di concentrarti sulla logica del gioco stesso. Poiché la maggior parte dei componenti di gioco corrispondono direttamente a una scena, basarsi sull'istanziazione di scene richiederà poco codice architetturale in più.
Osserviamo un altro esempio di un diagramma di scena per un gioco open-world pieno di risorse ed elementi intrecciati:
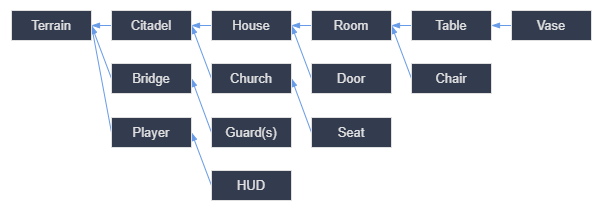
Immaginiamo di iniziare creando la stanza. Potremmo creare un paio di scene di stanze diverse, con una disposizione unica dei mobili al loro interno. In seguito, potremmo creare una scena di una casa che utilizza istanze multiple per gli interni. Creeremo una cittadella con molte istanze di case e un grande terreno su cui posizionare la cittadella. Ognuno di questi elementi sarebbe una scena che istanzia una o più sotto-scene.
Poi, potremmo creare scene rappresentanti guardie e aggiungere anch'essi alla cittadella. Saranno indirettamente aggiunti al complessivo mondo di gioco.
With Godot, it's easy to iterate on your game like this, as all you need to do is create and instantiate more scenes. We designed the editor to be accessible to programmers, designers, and artists alike. A typical team development process can involve 2D or 3D artists, level designers, game designers, and animators, all working with the Godot editor.
Riepilogo
L'istanziazione, il processo di produzione di un oggetto da un blueprint, ha molti utilizzi. Con le scene, consente di:
La possibilità di dividere il gioco in componenti riutilizzabili.
Uno strumento per strutturare e incapsulare sistemi complessi.
Un linguaggio pensato per concepire la struttura del vostro progetto di gioco in modo naturale.