Attention: Here be dragons
This is the latest
(unstable) version of this documentation, which may document features
not available in or compatible with released stable versions of Godot.
Checking the stable version of the documentation...
Luci e ombre 2D
Introduzione
Inizialmente, le scene 2D in Godot non sono ombreggiate, senza luci e ombre visibili. Sebbene sia veloce da renderizzare, le scene non ombreggiate possono risultare scialbe. Godot offre l'abilità di utilizzare illuminazione e ombre 2D in tempo reale, che possono migliorare molto il senso di profondità del progetto.
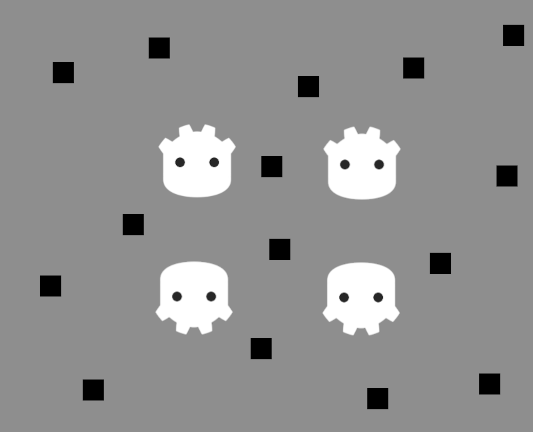
Nessuna luce o ombra 2D, la scena non è ombreggiata
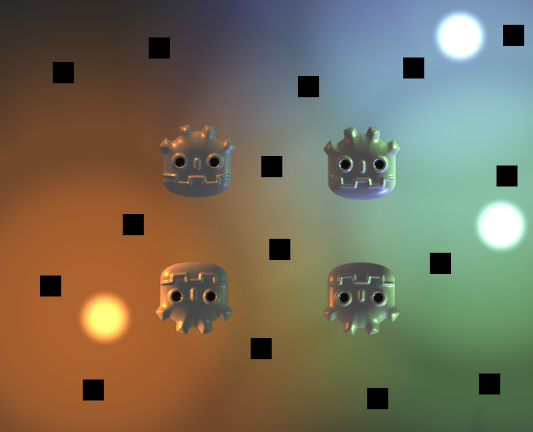
Luci 2D abilitate (senza ombre)

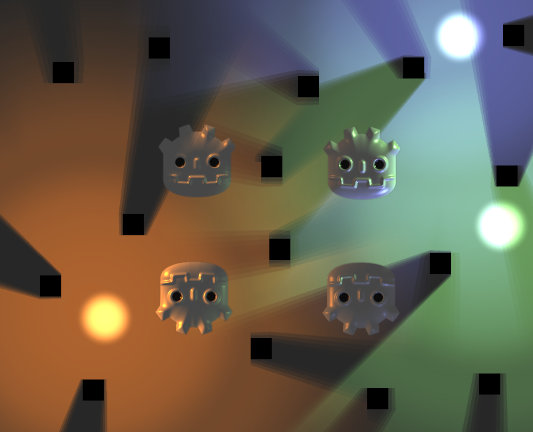
Luci e ombre 2D abilitate
Nodi
Ci sono vari nodi coinvolti In una configurazione completa di illuminazione 2D:
CanvasModulate (per oscurare il resto della scena)
PointLight2D (per luci omnidirezionali o spot)
DirectionalLight2D (per la luce solare o lunare)
LightOccluder2D (per proiettare ombre)
Altri nodi 2D che ricevono illuminazione, come Sprite2D o TileMapLayer.
CanvasModulate è usato per scurire la scena specificando un colore che fungerà da colore "ambientale" base. Questo è il colore di illuminazione finale nelle aree che nessuna luce 2D riesce a raggiungere. Senza un nodo CanvasModulate, la scena finale apparirebbe troppo luminosa, poiché le luci 2D schiarirebbero soltanto l'aspetto non ombreggiato esistente (che appare completamente illuminato).
Gli Sprite2D sono usati per visualizzare le texture delle sfere luminose, dello sfondo e delle sorgenti di ombra.
Gli PointLight2D sono usati per illuminare la scena. Il modo in cui una luce funziona solitamente consiste nell'aggiungere la texture selezionata al resto della scena per simulare l'illuminazione.
I nodi LightOccluder2D servono per indicare allo shader quali parti della scena proiettano ombre. È possibile posizionare questi occlusori come nodi indipendenti o far parte di un nodo TileMapLayer.
Le ombre appaiono solo sulle aree coperte dal PointLight2D e la loro direzione è basata sul centro del Light.
Nota
Il colore di sfondo non riceve alcuna illuminazione. Se si desidera che la luce sia proiettata sullo sfondo, bisogna aggiungere una rappresentazione visiva per lo sfondo, come ad esempio uno Sprite2D.
Le proprietà Region dello Sprite2D possono essere utili per creare rapidamente una texture ripetuta di sfondo, ma bisogna ricordare di impostare anche Texture > Repeat su Enabled nelle proprietà dello Sprite2D.
Luci puntiforme
Le luci puntiformi (chiamate anche luci posizionali) sono l'elemento più comune nell'illuminazione 2D. Si possono utilizzare per rappresentare la luce di torce, fuoco, proiettili, ecc.
PointLight2D offre le seguenti proprietà da regolare nell'ispettore:
Texture: la texture da utilizzare come sorgente luminosa. Le dimensioni della texture determinano le dimensioni della luce. La texture può avere un canale alfa, utile per la modalità di fusione Mix di Light2D, ma non è necessaria per le modalità di fusione Add (predefinita) o Subtract.
Offset: l'offset per la texture della luce. A differenza di quando si sposta il nodo della luce, cambiare l'offset non fa spostare le ombre.
Texture Scale: il moltiplicatore per le dimensioni della luce. Valori più alti faranno estendere di più la luce. Le luci più grandi hanno un impatto maggiore sulle prestazioni poiché influenzano più pixel sullo schermo, quindi tienilo in mente prima di aumentare le dimensioni di una luce.
Height: The light's virtual height with regards to normal mapping. By default, the light is very close to surfaces receiving lights. This will make lighting hardly visible if normal mapping is used, so consider increasing this value. Adjusting the light's height only makes a visible difference on surfaces that use normal mapping.
If you don't have a pre-made texture to use in a light, you can use this "neutral" point light texture (right-click > Save Image As…):
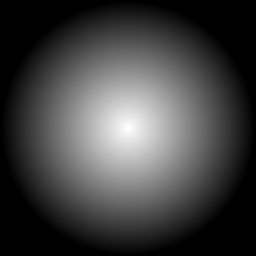
Texture di luce puntiforme neutra
Se hai bisogno di un'attenuazione diversa, puoi creare proceduralmente una texture assegnando un Nuovo GradientTexture2D alla proprietà Texture della luce. Dopo aver creato la risorsa, espandi la sezione Fill e imposta la modalità di riempimento su Radial. Dovrai poi regolare il gradiente stesso in modo che parta da bianco opaco e diventi bianco trasparente, e spostare il suo punto di partenza al centro.
Luce direzionale
L'illuminazione direzionale è usata per rappresentare la luce solare o lunare. I raggi luminosi sono proiettati paralleli tra loro, come se il sole o la luna si trovassero infinitamente lontani dalla superficie che riceve la luce.
DirectionalLight2D offre le seguenti proprietà:
Height: The light's virtual height with regards to normal mapping (
0.0= parallel to surfaces,1.0= perpendicular to surfaces). By default, the light is fully parallel with the surfaces receiving lights. This will make lighting hardly visible if normal mapping is used, so consider increasing this value. Adjusting the light's height only makes a visual difference on surfaces that use normal mapping. Height does not affect shadows' appearance.Max Distance: The maximum distance from the camera center objects can be before their shadows are culled (in pixels). Decreasing this value can prevent objects located outside the camera from casting shadows (while also improving performance). Camera2D zoom is not taken into account by Max Distance, which means that at higher zoom values, shadows will appear to fade out sooner when zooming onto a given point.
Nota
Le ombre direzionali appariranno sempre infinitamente lunghe, a prescindere dal valore della proprietà Height. Questa è una limitazione del metodo di rendering delle ombre utilizzato per le luci 2D in Godot.
Per ottenere ombre direzionali che non sono infinitamente lunghe, bisognerebbe disabilitare le ombre in DirectionalLight2D e utilizzare invece uno shader personalizzato che legga dal campo di distanza con segno 2D. Questo campo di distanza viene generato automaticamente dai nodi LightOccluder2D presenti nella scena.
Proprietà comuni di luci
Entrambi PointLight2D e DirectionalLight2D offrono proprietà comuni, che fanno parte della classe base Light2D:
Enabled: consente di cambiare la visibilità della luce. A differenza di nascondere il nodo luce, disabilitare questa proprietà non nasconderà i nodi figli della luce.
Editor Only: se abilitata, la luce è visibile solo all'interno dell'editor. Sarà automaticamente disabilitata nel progetto in esecuzione.
Color: il colore della luce.
Energy: moltiplicatore dell'intensità della luce. Valori più elevati risulteranno in una luce più brillante.
Blend Mode: la formula di fusione utilizzata per i calcoli della luce. Il valore predefinito Add (aggiungi) è adatta alla maggior parte dei casi d'uso. Subtract (sottrai) si può usare per le luci negative, che non sono fisicamente accurate ma possono servire per effetti speciali. La modalità di fusione Mix miscela il valore dei pixel corrispondenti alla texture della luce con i valori dei pixel sottostanti tramite un'interpolazione lineare.
Range > Z Min: l'indice Z più basso influenzato dalla luce.
Range > Z Max: l'indice Z più alto influenzato dalla luce.
Range > Layer Min: il livello visivo più basso influenzato dalla luce.
Range > Layer Max: il livello visivo più alto influenzato dalla luce.
Range > Item Cull Mask: controlla quali nodi ricevono luce da questo nodo, a seconda degli strati visivi abilitati in Occluder Light Mask degli altri nodi. Si può utilizzare per impedire che determinati oggetti ricevano luce.
Configurare ombre
Dopo aver abilitato la proprietà Shadow > Enabled su un nodo PointLight2D o DirectionalLight2D, inizialmente non si noterà alcuna differenza visiva. Questo perché nessun nodo nella scena ha ancora occlusori, che servono come base per la proiezione delle ombre.
Affinché le ombre appaiano nella scena, è necessario aggiungere nodi LightOccluder2D. Questi nodi devono inoltre avere poligoni di occlusione progettati per adattarsi al contorno dello sprite.
Oltre alla loro risorsa poligono (che deve essere impostata per avere un effetto visivo), i nodi LightOccluder2D hanno 2 proprietà:
SDF Collision: se abilitata, l'occlusore farà parte di un campo di distanza con segno generato in tempo reale che si può sfruttare negli shader personalizzati. Quando non si utilizzano shader personalizzati che leggono da questo SDF, abilitare questa opzione non fa alcuna differenza visiva e prestazionale, pertanto è normalmente abilitata per comodità.
Occluder Light Mask: Questa maschera serve insieme alla proprietà Shadow > Item Cull Mask di PointLight2D e DirectionalLight2D per controllare quali oggetti proiettano ombre per ciascuna luce. Si può utilizzare per impedire a specifici oggetti di proiettare ombre.
Ci sono due modi per creare occlusori di luce:
Generare automaticamente un occlusore di luce
Gli occlusori si possono creare automaticamente dai nodi Sprite2D selezionando il nodo, cliccando sul menu Sprite2D in alto all'editor 2D e poi scegliendo Crea LightOccluder2D fratello.
In the dialog that appears, an outline will surround your sprite's edges. If the outline matches the sprite's edges closely, you can click OK. If the outline is too far away from the sprite's edges (or is "eating" into the sprite's edges), adjust Grow (pixels) and Shrink (pixels), then click Update Preview. Repeat this operation until you get satisfactory results.
Disegnare manualmente un occlusore di luce
Crea un nodo LightOccluder2D, poi seleziona il nodo e clicca sul pulsante "+" in cima all'editor 2D. Quando ti viene chiesto di creare una risorsa poligono, rispondi Sì. Puoi quindi iniziare a disegnare un poligono occlusore cliccando per creare nuovi punti. Puoi rimuovere i punti esistenti facendo clic destro su di essi, e creare nuovi punti dalla linea esistente cliccando sulla linea e trascinandola.
Le seguenti proprietà si possono regolare sulle luci 2D con ombre abilitate:
Color: il colore delle aree ombreggiate. Normalmente, le aree ombreggiate sono completamente nere, ma si può cambiare per scopi artistici. Il canale alfa del colore controlla l'intensità della tinta applicata dal colore specificato.
Filter: The filter mode to use for shadows. The default None is the fastest to render, and is well suited for games with a pixel art aesthetic (due to its "blocky" visuals). If you want a soft shadow, use PCF5 instead. PCF13 is even softer, but is the most demanding to render. PCF13 should only be used for a few lights at once due to its high rendering cost.
Filter Smooth: Controls how much softening is applied to shadows when Filter is set to PCF5 or PCF13. Higher values result in a softer shadow, but may cause banding artifacts to be visible (especially with PCF5).
Item Cull Mask: controlla quali nodi LightOccluder2D proiettano ombre, a seconda delle loro rispettive proprietà Occluder Light Mask.
Nota
Risoluzione di illuminazione e ombre nei giochi in pixel art
Il motore calcola l'illuminazione e le ombre 2D alla risoluzione in pixel della Viewport, non alla risoluzione in texel della texture sorgente. L'aspetto delle luci e ombre dipende dalla risoluzione della finestra o Viewport, non dalla risoluzione delle singole texture degli sprite.
If you create a pixel-art game and want pixelated or blocky lighting and shadows that match your art style, Nearest texture filtering will not achieve this effect. Nearest filtering affects only how the engine samples textures — it does not change how the engine renders lighting and shadows.
Per ottenere illuminazione e ombre pixelate, utilizza uno shader personalizzato per modificare LIGHT_VERTEX e SHADOW_VERTEX in modo da allineare il campionamento delle luci a una griglia di pixel. Il seguente shader allinea l'illuminazione a una griglia tramite la funzione floor():
shader_type canvas_item;

uniform float pixel_size = 4.0;

void fragment() {
    // Snap lighting and shadows to pixel grid.
    LIGHT_VERTEX.xy = floor(LIGHT_VERTEX.xy / pixel_size) * pixel_size;
    SHADOW_VERTEX = floor(SHADOW_VERTEX / pixel_size) * pixel_size;

    // Normal rendering.
    COLOR = texture(TEXTURE, UV);
}
Questo funziona dividendo la posizione per pixel_size per convertirla nello spazio della griglia, usando floor() per arrotondare per difetto al punto della griglia più vicino, e infine moltiplicando nuovamente per convertire nello spazio dello schermo. Il risultato costringe il motore a campionare l'illuminazione da posizioni discrete della griglia, creando così l'effetto pixelato.
For more information on canvas item shaders, see CanvasItem shaders.

Ombre nitide

Soft shadows (PCF13, Filter Smooth 1.5)
Soft shadows with streaking artifacts due to Filter Smooth being too high (PCF5, Filter Smooth 4)
Mappe normali e speculari
Normal maps and specular maps can greatly enhance the sense of depth of your 2D lighting. Similar to how these work in 3D rendering, normal maps can help make lighting look less flat by varying its intensity depending on the direction of the surface receiving light (on a per-pixel basis). Specular maps further help improve visuals by making some of the light reflect back to the viewer.
Both PointLight2D and DirectionalLight2D support normal mapping and specular mapping. Normal and specular maps can be assigned to any 2D element, including nodes that inherit from Node2D or Control.
Una mappa di normali rappresenta la direzione verso cui punta ciascun pixel. Queste informazioni vengono poi utilizzate dal motore grafico per applicare correttamente l'illuminazione alle superfici 2D in modo fisicamente plausibile. Le mappe di normali si creano in genere da mappe di altezza dipinte a mano, ma si possono anche generare automaticamente da altre texture.
Una mappa speculare definisce quanta luce ogni pixel dovrebbe riflettere (e in quale colore, se la mappa speculare contiene colori). Valori più luminosi risulteranno in un riflesso più luminoso in quel determinato punto della texture. Le mappe speculari si creano in genere manualmente, utilizzando la texture diffusa come base.
Suggerimento
Se non hai mappe di normali o speculari per i tuoi sprite, puoi generarle attraverso lo strumento gratuito e open source Laigter.
Per configurare mappe di normali e/o mappe speculari su un nodo 2D, crea una nuova risorsa CanvasTexture per la proprietà che disegna la texture del nodo. Ad esempio, su uno Sprite2D:
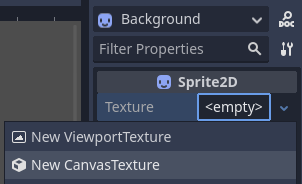
Creazione di una risorsa CanvasTexture per un nodo Sprite2D
Espandi la risorsa appena creata. Troverai diverse proprietà che dovrai regolare:
Diffuse > Texture: la texture del colore base. In questa proprietà, carica la texture che stai utilizzando per lo sprite stesso.
Normal Map > Texture: la texture della mappa di normali. In questa proprietà, carica una texture di mappa di normali che hai generato da una mappa di altezza (vedi il suggerimento di prima).
Specular > Texture: la texture della mappa speculare, che controlla l'intensità speculare di ciascun pixel sulla texture diffusa. La mappa speculare è solitamente in scala di grigi, ma può anche contenere colori per moltiplicare di conseguenza il colore dei riflessi. In questa proprietà, carica una texture della mappa speculare che hai creato (vedi il suggerimento di prima).
Specular > Color: il moltiplicatore del colore per i riflessi speculari.
Specular > Shininess: l'esponente speculare da utilizzare per i riflessi. Valori più bassi aumenteranno la luminosità dei riflessi e li renderanno più diffusi, mentre valori più alti li renderanno più localizzati. Valori alti sono più adatti per superfici dall'aspetto bagnato.
Texture > Filter: si può impostare per sovrascrivere la modalità di filtraggio della texture, a prescindere dal valore della proprietà del nodo (o dall'impostazione del progetto Rendering > Textures > Canvas Textures > Default Texture Filter).
Texture > Repeat: si può impostare per sovrascrivere la modalità di ripetizione della texture, a prescindere dal valore della proprietà del nodo (o dall'impostazione del progetto Rendering > Textures > Canvas Textures > Default Texture Repeat).
Dopo aver abilitato il normal mapping, potresti notare che le tue luci appaiono più deboli. Per risolvere questo problema, aumenta la proprietà Height dei nodi PointLight2D e DirectionalLight2D. Potresti anche voler aumentare leggermente la proprietà Energy delle luci per avvicinarti all'intensità luminosa che avevi prima di abilitare il normal mapping.
Utilizzare sprite additivi come alternativa più veloce alle luci 2D
Se riscontri problemi di prestazioni quando utilizzi luci 2D, potrebbe valere la pena sostituirne alcune con nodi Sprite2D che utilizzano la fusione additiva. Questo è particolarmente adatto per effetti dinamici di breve durata, come proiettili o esplosioni.
Gli sprite additivi sono molto più veloci da renderizzare, poiché non hanno bisogno di passare per una pipeline di rendering separata. Inoltre, è possibile utilizzare questo approccio con AnimatedSprite2D (o Sprite2D + AnimationPlayer), il che consente di creare "luci" 2D animate.
Tuttavia, gli sprite additivi hanno alcuni svantaggi rispetto alle luci 2D:
La formula di fusione non è accurata rispetto all'illuminazione 2D "reale". Questo di solito non è un problema nelle aree illuminate abbastanza, ma impedisce agli sprite additivi di illuminare correttamente le aree completamente buie.
Gli sprite additivi non possono proiettare ombre, poiché non sono fonti di luce.
Gli sprite additivi ignorano le mappe di normali e di speculari utilizzate su altri sprite.
Per visualizzare uno sprite con fusione additiva, crea un nodo Sprite2D e assegnagli una texture. Nell'ispettore, scorri verso il basso fino alla sezione CanvasItem > Material, espandila e clicca sul menu a tendina accanto alla proprietà Material. Scegli Nuovo CanvasItemMaterial, clicca sul materiale appena creato per modificarlo, poi imposta Blend Mode su Add.