Attention: Here be dragons
This is the latest
(unstable) version of this documentation, which may document features
not available in or compatible with released stable versions of Godot.
Checking the stable version of the documentation...
La scena principale del gioco
Adesso è il momento di riunire tutto ciò che abbiamo fatto in una scena di gioco giocabile.
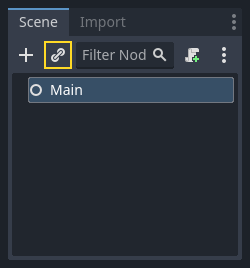
Crea una nuova scena e aggiungi un Node chiamato Main. (Il motivo per cui usiamo Node invece di Node2D è che questo nodo sarà un contenitore per gestire la logica di gioco. Non richiede di per sé la funzionalità 2D.)
Clicca sul pulsante Istanza (rappresentato dall'icona di una catena) e selezionare il file player.tscn salvato.
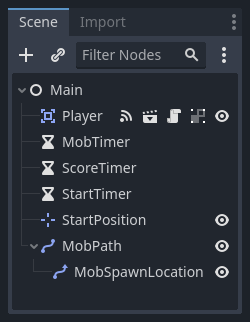
Ora, aggiungi i seguenti nodi come figli di Main, e rinominali come mostrato:
Timer (chiamato
MobTimer) - per controllare la frequenza con cui i mob si generanoTimer (chiamato
ScoreTimer) - per incrementare il punteggio ogni secondoTimer (chiamato
StartTimer) - per dare un ritardo prima di iniziareMarker2D (denominato
StartPosition) - per indicare la posizione di partenza del giocatore
Imposta la proprietà Wait Time di ciascuno dei nodi Timer come segue (i valori sono in secondi):
MobTimer:0.5ScoreTimer:1StartTimer:2
Inoltre, imposta la proprietà One Shot di StartTimer su "On" e imposta la Position del nodo StartPosition su (240, 450).
Generazione dei Mostri
Il nodo Main genererà nuovi mob, e vogliamo che appaiano in una posizione casuale sul bordo dello schermo. Clicca sul nodo Main nel pannello Scena, poi aggiungi un nodo Path2D con il nome MobPath. Quando selezioni Path2D, vedrai alcuni nuovi pulsanti nella parte superiore dell'editor:

Seleziona quello centrale ("Add Point") e disegna il percorso cliccando per aggiungere i punti agli angoli mostrati. Per fare in modo che i punti si aggancino alla griglia, assicurati che "Usa la griglia magnetica" e "Usa lo scatto intelligente" siano entrambi selezionati. Queste opzioni si trovano a sinistra del pulsante "Blocca", apparendo come un magnete accanto ad alcuni punti e linee intersecanti, rispettivamente.

Importante
Disegna il percorso in ordine orario, o i tuoi nemici verranno generati verso l'esterno invece che verso l'interno!
Dopo aver posizionato il punto 4 nell'immagine, fare clic sul pulsante "Chiudi curva" e la curva sarà completa.
Ora che il percorso è definito, aggiungere un nodo PathFollow2D come figlio di MobPath e dagli il nome MobSpawnLocation. Questo nodo ruoterà automaticamente e seguirà il percorso mentre si muove, quindi possiamo usarlo per selezionare una posizione e una direzione casuali lungo il percorso.
La tua scena dovrebbe assomigliare a questa:
Script principale
Aggiungi uno script a `` Main``. In alto allo script, utilizziamo @export var mob_scene: PackedScene per permetterci di scegliere la scena Mob che vogliamo istanziare.
extends Node

@export var mob_scene: PackedScene
var score
using Godot;

public partial class Main : Node
{
    // Don't forget to rebuild the project so the editor knows about the new export variable.

    [Export]
    public PackedScene MobScene { get; set; }

    private int _score;
}
Clicca sul nodo Main e vedrai la proprietà Mob Scene nell'Ispettore sotto "Main.gd".
Puoi assegnare il valore di questa proprietà in due modi:
Trascina
mob.tscndal pannello "FileSystem" e rilascialo nella proprietà Mob Scene.Clicca la freccia in giù accanto a "[empty]" e scegli "Carica". Seleziona
mob.tscn.
Successivamente, nel pannello Scene, seleziona l'istanza della scena Player sotto il nodo Main e accedi al pannello Segnali sulla barra laterale.
Dovresti vedere una lista dei segnali per il nodo Player. Trova e clicca due volte sul segnale hit dalla lista (o fai clic destro e seleziona "Connetti..."). In questo modo si aprirà la finestra di dialogo per connettere il segnale. Vogliamo creare una nuova funzione chiamata game_over, che gestirà ciò che deve accadere quando un gioco finisce. Digita "game_over nel campo "Metodo ricevitore" in fondo alla finestra di dialogo e clicca su "Connetti". Il tuo obiettivo è che il segnale hit venga emesso da Player e gestito nello script Main. Aggiungi il seguente codice alla nuova funzione, così come una funzione new_game che preparerà tutto per una nuova partita:
func game_over():
    $ScoreTimer.stop()
    $MobTimer.stop()

func new_game():
    score = 0
    $Player.start($StartPosition.position)
    $StartTimer.start()
public void GameOver()
{
    GetNode<Timer>("MobTimer").Stop();
    GetNode<Timer>("ScoreTimer").Stop();
}

public void NewGame()
{
    _score = 0;

    var player = GetNode<Player>("Player");
    var startPosition = GetNode<Marker2D>("StartPosition");
    player.Start(startPosition.Position);

    GetNode<Timer>("StartTimer").Start();
}
Ora collegheremo il segnale timeout() di ogni nodo Timer (StartTimer, ScoreTimer e MobTimer) allo script principale. Per ognuno dei tre timer, seleziona il timer nel pannello Scena, apri la scheda Segnali nel pannello Nodo, poi fai doppio clic sul segnale timeout() nell'elenco. Questo aprirà una nuova finestra per collegare il segnale. Le impostazioni predefinite in questa finestra dovrebbero andar bene, quindi seleziona Connetti per creare una nuova connessione di segnale.
Quando tutti e tre i timer saranno configurati, dovresti essere in grado di vedere che ogni timer ha una connessione al suo rispettivo segnale timeout(), mostrata in verde, nella sua rispettiva scheda Segnali:
(Per MobTimer):
_on_mob_timer_timeout()(Per ScoreTimer):
_on_score_timer_timeout()(Per StartTimer):
_on_start_timer_timeout()
Ora definiamo come opera ciascuno di questi timer aggiungendo il codice seguente. Nota che StartTimer avvierà gli altri due timer e che ScoreTimer incrementerà il punteggio di 1.
func _on_score_timer_timeout():
    score += 1

func _on_start_timer_timeout():
    $MobTimer.start()
    $ScoreTimer.start()
// We also specified this function name in PascalCase in the editor's connection window.
private void OnScoreTimerTimeout()
{
    _score++;
}

// We also specified this function name in PascalCase in the editor's connection window.
private void OnStartTimerTimeout()
{
    GetNode<Timer>("MobTimer").Start();
    GetNode<Timer>("ScoreTimer").Start();
}
In _on_MobTimer_timeout(), creeremo un'istanza di mob, sceglieremo una posizione di partenza casuale lungo il Path2D, e metteremo in movimento il mob. Il nodo PathFollow2D ruoterà automaticamente mentre segue il percorso, quindi lo useremo per selezionare la direzione e la posizione del mob. Quando generiamo un mob, sceglieremo un valore casuale tra 150.0 e 250.0 per la velocità con cui ogni mob si muoverà (sarebbe noioso se si muovessero tutti alla stessa velocità).
Nota che una nuova istanza deve essere aggiunta alla scena usando add_child().
func _on_mob_timer_timeout():
    # Create a new instance of the Mob scene.
    var mob = mob_scene.instantiate()

    # Choose a random location on Path2D.
    var mob_spawn_location = $MobPath/MobSpawnLocation
    mob_spawn_location.progress_ratio = randf()

    # Set the mob's position to the random location.
    mob.position = mob_spawn_location.position

    # Set the mob's direction perpendicular to the path direction.
    var direction = mob_spawn_location.rotation + PI / 2

    # Add some randomness to the direction.
    direction += randf_range(-PI / 4, PI / 4)
    mob.rotation = direction

    # Choose the velocity for the mob.
    var velocity = Vector2(randf_range(150.0, 250.0), 0.0)
    mob.linear_velocity = velocity.rotated(direction)

    # Spawn the mob by adding it to the Main scene.
    add_child(mob)
// We also specified this function name in PascalCase in the editor's connection window.
private void OnMobTimerTimeout()
{
    // Create a new instance of the Mob scene.
    Mob mob = MobScene.Instantiate<Mob>();

    // Choose a random location on Path2D.
    var mobSpawnLocation = GetNode<PathFollow2D>("MobPath/MobSpawnLocation");
    mobSpawnLocation.ProgressRatio = GD.Randf();

    // Set the mob's direction perpendicular to the path direction.
    float direction = mobSpawnLocation.Rotation + Mathf.Pi / 2;

    // Set the mob's position to a random location.
    mob.Position = mobSpawnLocation.Position;

    // Add some randomness to the direction.
    direction += (float)GD.RandRange(-Mathf.Pi / 4, Mathf.Pi / 4);
    mob.Rotation = direction;

    // Choose the velocity.
    var velocity = new Vector2((float)GD.RandRange(150.0, 250.0), 0);
    mob.LinearVelocity = velocity.Rotated(direction);

    // Spawn the mob by adding it to the Main scene.
    AddChild(mob);
}
Importante
Perché PI? Nelle funzioni che richiedono angoli, GDScript utilizza i radianti, non i gradi. Pi rappresenta un mezzo giro in radianti, circa 3,1415 (esiste anche TAU che è uguale a 2 * PI). Se sei più familiare con i gradi, avrai bisogno di usare le funzioni deg_to_rad() e rad_to_deg() per convertire tra i due.
Testare la scena
Andiamo a provare la scena per assicurarci che tutto funzioni. Aggiungi questa chiamata a new_game a _ready():
func _ready():
    new_game()
public override void _Ready()
{
    NewGame();
}
Assegniamo anche Main come nostra "Scena principale" - quella che viene eseguita automaticamente all'avvio del gioco. Premi il pulsante "Play" e seleziona Main.tscn quando richiesto.
Suggerimento
Se hai già impostato un'altra scena come "Scena principale", puoi cliccare con il pulsante destro su main.tscn nel pannello FileSystem e selezionare "Rendi scena principale".
Dovresti essere in grado di muovere il giocatore, vedere i nemici che vengono generati e vedere il giocatore scomparire quando viene colpito da uno di essi.
Quando sei sicuro che tutto funzioni, rimuovi la chiamata a new_game() da _ready() e sostituiscila con pass.
Cosa manca al nostro gioco? Un'interfaccia utente. Nella prossima lezione aggiungeremo una schermata del titolo e visualizzeremo il punteggio del giocatore.