Attention: Here be dragons
This is the latest
(unstable) version of this documentation, which may document features
not available in or compatible with released stable versions of Godot.
Checking the stable version of the documentation...
Distribuzione con un clic
Che cos'è la distribuzione con un clic?
La distribuzione con un clic è una funzionalità disponibile una volta configurata correttamente una piattaforma e connesso un dispositivo supportato al computer. Poiché le cose possono andare storte in tanti livelli (la piattaforma, l'SDK o il dispositivo potrebbero essere configurati o installati male, ecc.), è opportuno far sapere all'utente che esiste.
Dopo aver aggiunto una preimpostazione di esportazione Android segnata come Eseguibile, Godot è in grado di rilevare quando un dispositivo USB è collegato al computer e di offrire all'utente la possibilità di esportare, installare ed eseguire automaticamente il progetto (in modalità debug) sul dispositivo. Questa funzionalità è chiamata distribuzione con un clic.
Nota
La distribuzione con un clic è disponibile solo dopo aver aggiunto un modello di esportazione contrassegnato come Eseguibile nella finestra Esporta. È possibile contrassegnare più preimpostazioni di esportazione come eseguibili, ma solo una preimpostazione per ogni piattaforma può essere contrassegnata come eseguibile. Se si contrassegna una seconda preimpostazione come eseguibile in una determinata piattaforma, la prima preimpostazione non sarà più contrassegnata come eseguibile.
Piattaforme supportate
Android: esporta il progetto con il debug abilitato e lo esegue sul dispositivo connesso.
Assicurarsi di seguire i passaggi descritti in Esportazione per Android. Altrimenti, il pulsante di distribuzione con un clic non apparirà.
Se c'è più di un dispositivo collegato, Godot chiederà su quale dispositivo esportare il progetto.
iOS: esporta il progetto con il debug abilitato e lo esegue sul dispositivo connesso.
Assicurarsi di seguire i passaggi descritti in Esportazione per iOS. Altrimenti, il pulsante di distribuzione con un clic non apparirà.
Per ogni nuovo identificatore di pacchetto, esporta il progetto, aprilo in Xcode ed compila almeno una volta per creare un nuovo profilo di provisioning oppure crea un profilo di provisioning nella dashboard dell'account Apple Developer.
Se c'è più di un dispositivo collegato, Godot chiederà su quale dispositivo esportare il progetto.
Piattaforme desktop: esporta il progetto con il debug abilitato e lo esegue sul computer remoto tramite SSH.
Web: avvia un server web locale ed esegue il progetto esportato aprendo il browser web predefinito. Normalmente, è accessibile solo su
localhost. Consultare Risoluzione dei problemi per rendere il progetto esportato accessibile sui dispositivi remoti.
Utilizzo della distribuzione con un clic
- Android:
Abilitare la modalità sviluppatore sul dispositivo mobile, poi abilitare il debug USB nelle impostazioni del dispositivo.
Dopo aver abilitato il debug USB, collegare il dispositivo al PC tramite un cavo USB.
- È anche possibile effettuare la distribuzione con un solo clic tramite ADB wireless anziché con un cavo USB. Per fare ciò, è necessario:
Abilitare il debug wireless sul dispositivo:
Connettersi alla stessa rete Wi-Fi sul dispositivo mobile e sul PC.
Click
Sul PC, digitare il comando
adb pair <indirizzo ip>:<porta>e fornire il codice di accoppiamento quando richiesto. Seadbnon viene riconosciuto, potrebbe essere necessario aggiungere la cartella platform-tools dell'SDK Android al proprioPATHoppure eseguire questo comando da lì.È possibile verificare che il dispositivo ADB sia stato connesso correttamente digitando
adb devicesnel terminale.
- iOS:
Install Xcode, accept Xcode license and login with your Apple Developer account.
If you are using Xcode 14 or earlier, install ios-deploy and set path to ios-deploy in the Editor Settings (see Export ⇾ iOS ⇾ iOS Deploy).
- For running on device:
Associare il dispositivo mobile a un Mac.
Abilitare la modalità sviluppatore sul dispositivo.
Il dispositivo può essere collegato tramite USB o rete locale.
Assicurarsi che il dispositivo sia sulla stessa rete locale e che sia selezionata l'interfaccia di rete corretta nelle impostazioni dell'editor (vedere Rete ⇾ Debug ⇾ Host remoto). Per impostazione predefinita, l'editor è in ascolto solo per le connessioni su localhost.
Lo schermo del dispositivo dovrebbe essere sbloccato.
- Piattaforme desktop:
Abilitare Distribuzione SSH in remoto e configurare le impostazioni di connessione nelle impostazioni di esportazione del progetto.
Assicurarsi che sia presente una preimpostazione di esportazione segnata come Eseguibile per la piattaforma di destinazione (Android, iOS o Web).
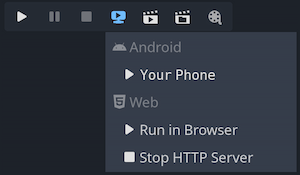
Se tutto è configurato correttamente e senza errori, nell'angolo in alto a destra dell'editor appariranno le icone specifiche della piattaforma.
Cliccare sul pulsante per esportare sulla piattaforma desiderata con un clic.
Risoluzione dei problemi
Android
If you can't see the device in the list of devices when running the
adb devices command in a terminal, it will not be visible by Godot either.
To resolve this:
Check if USB debugging is enabled and authorized on the device. Try unlocking your device and accepting the authorization prompt if you see any. If you can't see this prompt, running
adb deviceson your PC should make the authorization prompt appear on the device.Try revoking the debugging authorization in the device's developer settings, then follow the steps again.
Try using USB debugging instead of wireless debugging or vice versa. Sometimes, one of those can work better than the other.
Su Linux, potrebbero mancare le regole udev necessarie affinché il dispositivo sia riconosciuto.
Web
Normalmente, il server web avviato dall'editor è accessibile solo da localhost. Ciò significa che il server web non può essere raggiunto da altri dispositivi sulla rete locale o su Internet (se è configurato il port forwarding sul router). Questo viene fatto per motivi di sicurezza, poiché potresti non voler consentire ad altri dispositivi di accedere al progetto esportato durante la fase di test. Il collegamento a localhost impedisce inoltre il popup del firewall quando si utilizza la distribuzione con un clic per la piattaforma web.
Per rendere il server web locale accessibile tramite la rete locale, è necessario modificare l'impostazione dell'editor Esporta > Web > Host HTTP in 0.0.0.0. È inoltre necessario abilitare Esporta > Web > Usa TLS poiché SharedArrayBuffer richiede una connessione sicura per funzionare, a meno che non ci si connetta a localhost. Tuttavia, poiché altri client si connetteranno a un dispositivo remoto, l'uso di TLS è assolutamente necessario in questo caso.
Per rendere il server web locale accessibile tramite Internet, è necessario inoltrare la porta Esporta > Web > Porta HTTP specificata nelle impostazioni dell'editor (predefinita su 8060) in TCP sul router. Solitamente si fa accedendo all'interfaccia web del router e aggiungendo una regola NAT per la porta in questione. Per le connessioni IPv6, è invece necessario consentire la porta nel firewall IPv6 del router. Come per i dispositivi di rete locale, è inoltre necessario abilitare Esporta > Web > Usa TLS.
Nota
Quando Usa TLS è abilitato, il browser web visualizzerà un avviso poiché Godot utilizzerà un certificato autofirmato temporaneo. È possibile ignorarlo e bypassare l'avviso cliccando su Avanzate e quindi su Procedi a (indirizzo).
Se si dispone di un certificato SSL/TLS considerato attendibile dai browser, è possibile specificare i percorsi dei file della chiave e del certificato in Esporta > Web > Chiave TLS e Esporta > Web > Certificato TLS. Questa opzione funziona solo se il progetto è accessibile tramite un nome di dominio incluso nel certificato TLS.
Avvertimento
Quando si utilizza la distribuzione con un clic su progetti diversi, è possibile che venga visualizzato un progetto precedentemente modificato. Ciò è dovuto al fatto che la cache del service worker non viene svuotata automaticamente. Consultare Risoluzione dei problemi per istruzioni su come annullare la registrazione del service worker, operazione che svuoterà la cache e risolverà il problema.