Attention: Here be dragons
This is the latest
(unstable) version of this documentation, which may document features
not available in or compatible with released stable versions of Godot.
Checking the stable version of the documentation...
Анимация персонажей
В этом заключительном уроке мы используем встроенные в Godot инструменты анимации, чтобы заставить наших персонажей плавать и махать руками. Вы научитесь создавать анимацию в редакторе и использовать код так, чтобы ваша игра стала живой.
Мы начнем с введения в использование редактора анимации.
Использование редактора анимаций
Движок поставляется с инструментами для создания анимаций в редакторе. Затем вы можете использовать код для воспроизведения и управления ими во время выполнения.
Откройте сцену игрока, выберите узел Player и добавьте узел AnimationPlayer.
На нижней панели появится вкладка Анимация.
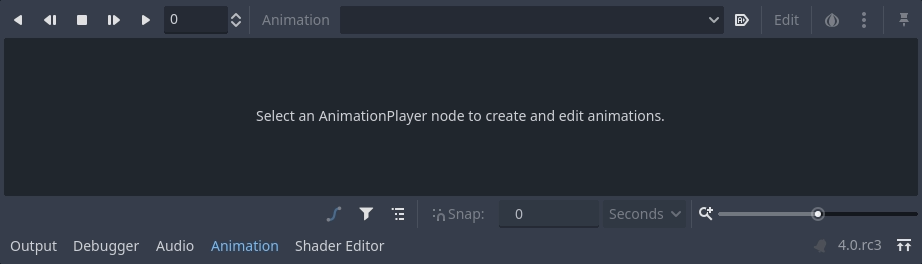
В ней есть панель инструментов и раскрывающееся меню анимации в верхней части, редактор дорожек в середине, который в настоящее время пуст, и опции фильтрации, привязки и масштабирования в нижней части.
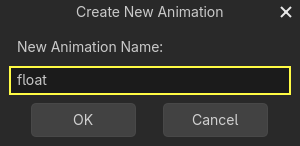
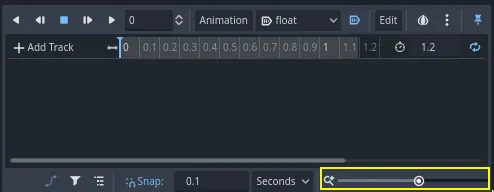
Давайте создадим анимацию. Щёлкните на Анимация -> Новый.
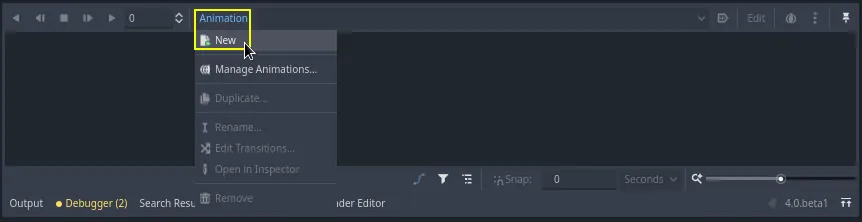
Назовите анимацию "float".
После создания анимации появляется временная шкала с цифрами, обозначающими время в секундах.

Мы хотим, чтобы анимация начинала воспроизводиться автоматически в начале игры. Кроме того, она должна быть зациклена.
Для этого можно нажать кнопку автовоспроизведения ( ) на панели инструментов анимации и зацикленные стрелки соответственно.

Вы также можете закрепить редактор анимации, нажав на значок булавки в правом верхнем углу. Это предотвратит его сворачивание при нажатии на область просмотра и отмене выделения.
![]()
Установите длительность анимации 1.2 секунды в правом верхнем углу панели.
Вы должны увидеть, как серая лента немного расширится. Она показывает начало и конец вашей анимации, а вертикальная синяя линия - это ваш временной курсор.

Вы можете щелкнуть и перетащить ползунок в правом нижнем углу, чтобы увеличить или уменьшить масштаб временной шкалы.
Анимация плавания
С помощью узла анимации игрока вы можете анимировать большинство свойств на стольких узлах, сколько вам нужно. Обратите внимание на значок ключа рядом со свойствами в инспекторе. Вы можете щёлкнуть любой из них, чтобы создать ключевой кадр - пару времени и значения для соответствующего свойства. Ключевой кадр будет вставлен туда, где находится курсор времени на временной шкале.
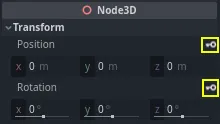
Давайте вставим наши первые ключи. Здесь мы будем анимировать как перемещение, так и поворот узла Character.
Выберите Character и нажмите на иконку ключа рядом с Transform в инспекторе. Сделайте то же самое для Position и Rotation.
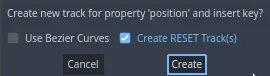
В этом руководстве мы просто создадим дорожку (дорожки) RESET, которая будет выбрана по умолчанию
В редакторе появятся две дорожки с ромбовидной иконкой, обозначающей каждый ключевой кадр.
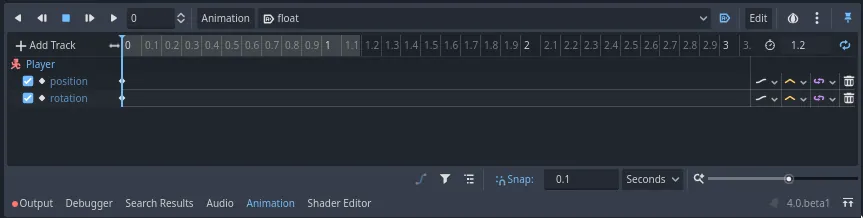
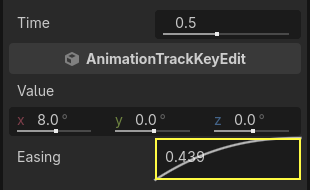
Вы можете щёлкнуть и перетащить ромбы, чтобы переместить их во времени. Переместите ключ перемещения на 0.3 секунды, а ключ вращения на 0.1 секунду.

Переместите курсор времени на 0.5 секунды, щелкнув и перетащив его на серую шкалу времени или введя его в поле ввода.

В инспекторе, установите значение Y у Position на 0.65 метров и значение X у Rotation на 8.
Если вы не видите свойства в панели Инспектор, сначала снова нажмите на узел Character во вкладке Сцена.
Создайте ключевой кадр для обоих свойств
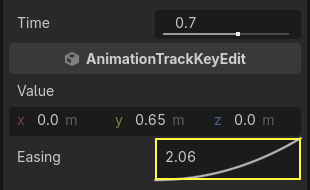
Теперь сдвиньте позицию ключевого кадра на 0.7 секунд, перетащив его на временной шкале.

Примечание
Лекция о принципах анимации выходит за рамки данного руководства. Просто отметим, что вы врят ли захотите равномерно распределять время и пространство. Вместо этого аниматоры играют с таймингом и интервалом - двумя основными принципами анимации. Вы хотите смещать и контрастировать движения персонажа, чтобы сделать их живыми.
Переместите курсор времени в конец анимации, на 1.2 секунд. Установите перемещение по Y примерно на 0.35 и поворот по X на -9 градусов. Снова создайте ключ для обоих свойств.

Вы можете просмотреть результат, нажав на кнопку воспроизведения или нажав Shift + D. Нажмите кнопку "Stop" или нажмите S, чтобы остановить воспроизведение.

Вы можете видеть, что движок интерполируется между вашими ключевыми кадрами для создания непрерывной анимации. Однако на данный момент движение кажется очень роботизированным. Это происходит потому, что интерполяция по умолчанию линейная, что приводит к постоянным переходам, в отличие от того, как живые существа двигаются в реальном мире.
Мы можем управлять переходом между ключевыми кадрами с помощью кривых смягчения.
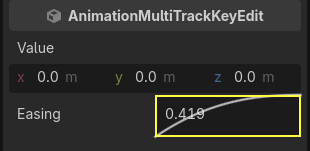
Щёлкните и перетащите вокруг первых двух ключей на временной шкале, чтобы выделить их.
Вы можете редактировать свойства обоих ключей одновременно в инспекторе, где вы можете увидеть свойство Easing.
Щёлкните и перетащите кривую, потянув её влево. Это заставит её ослабнуть, то есть сначала переход будет быстрым, а затем замедлится, когда курсор времени достигнет следующего ключевого кадра.
Воспроизведите анимацию ещё раз, чтобы увидеть разницу. Первая половина уже должна казаться немного более подпрыгивающей.
Примените ослабление ко второму ключевому кадру на дорожке вращения.
Проделайте обратные действия для второго ключевого кадра перемещения, перетащив его вправо.
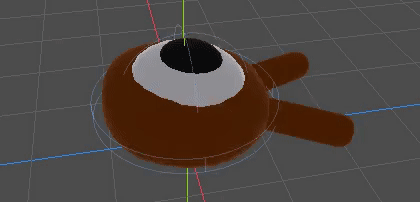
Ваша анимация должна выглядеть примерно так.
Примечание
Анимации обновляют свойства анимируемых узлов каждый кадр, переопределяя начальные значения. Если бы мы напрямую анимировали узел Player, это не позволило бы нам перемещать его в коде. Именно здесь пригодится узел Pivot: даже если мы анимировали Character, мы все равно можем перемещать и вращать Pivot и накладывать изменения поверх анимации в скриптах.
Если вы играете в игру, то существо игрока теперь будет плавать!
Если существо находится слишком близко к полу, вы можете переместить Pivot вверх, чтобы сместить его.
Управление анимацией в коде
Мы можем использовать код для управления воспроизведением анимации на основе ввода данных игроком. Давайте изменим скорость анимации, при движении игрока.
Откройте скрипт Player, нажав на иконку скрипта рядом с ним.
![]()
В _physics_process(), после строки, где мы проверяем вектор direction, добавьте следующий код.
func _physics_process(delta):
    #...
    if direction != Vector3.ZERO:
        #...
        $AnimationPlayer.speed_scale = 4
    else:
        $AnimationPlayer.speed_scale = 1
public override void _PhysicsProcess(double delta)
{
    // ...
    if (direction != Vector3.Zero)
    {
        // ...
        GetNode<AnimationPlayer>("AnimationPlayer").SpeedScale = 4;
    }
    else
    {
        GetNode<AnimationPlayer>("AnimationPlayer").SpeedScale = 1;
    }
}
Этот код делает так, что когда игрок движется, мы умножаем скорость воспроизведения на 4. Когда они останавливаются, мы восстанавливаем нормальное значение.
Мы упоминали, что Pivot может накладывать трансформации поверх анимации. Мы можем сделать прыжок по дуге с помощью следующей строки кода. Добавьте её в конец _physics_process().
func _physics_process(delta):
    #...
    $Pivot.rotation.x = PI / 6 * velocity.y / jump_impulse
public override void _PhysicsProcess(double delta)
{
    // ...
    var pivot = GetNode<Node3D>("Pivot");
    pivot.Rotation = new Vector3(Mathf.Pi / 6.0f * Velocity.Y / JumpImpulse, pivot.Rotation.Y, pivot.Rotation.Z);
}
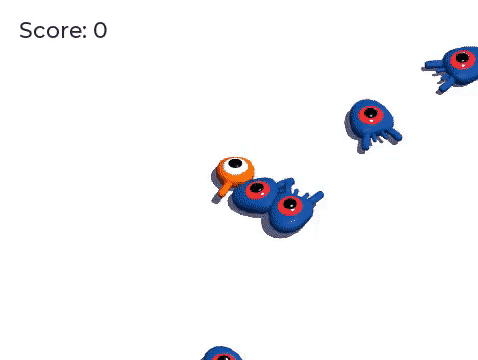
Анимация мобов
Вот ещё один приятный приём с анимациями в Godot: пока вы используете похожую структуру узлов, вы можете копировать их в разные сцены.
Например, обе сцены Mob и Player имеют узел Pivot и узел Character, поэтому мы можем повторно использовать анимацию между ними.
Откройте сцену Player, выберите узел AnimationPlayer и затем нажмите на Анимация > Управление анимациями.... Нажмите на кнопку Копировать анимацию в буфер обмена (два маленьких квадрата) рядом с анимацией float. Нажмите OK, чтобы закрыть окно.
Откройте сцену mob.tscn, создайте дочерний узел AnimationPlayer и выберите его. Нажмите Animation > Manage Animations..., затем New Library. Вы увидите сообщение "Глобальная библиотека будет создана". Оставьте текстовое поле пустым и нажмите ОК. Кликните иконку Вставить (из буфера) и он появится в окне. Нажмите ОК, чтобы закрыть окно.
Далее, убедитесь, что кнопка автовоспроизведения () и зацикливающихся стрелок (Зацикливание анимации) включены в редакторе анимаций в нижней панели. Вот и все; теперь все монстры будут проигрывать анимацию плавания.
Мы можем изменить скорость воспроизведения в зависимости от random_speed существа. Откройте скрипт Mob и в конце функции initialize() добавьте следующую строку.
func initialize(start_position, player_position):
    #...
    $AnimationPlayer.speed_scale = random_speed / min_speed
public void Initialize(Vector3 startPosition, Vector3 playerPosition)
{
    // ...
    GetNode<AnimationPlayer>("AnimationPlayer").SpeedScale = randomSpeed / MinSpeed;
}
И на этом вы закончили написание кода для своей первой полноценной 3D-игры.
Поздравляем!
В следующей части мы быстро подведём итоги того, что вы узнали, и дадим вам несколько ссылок для дальнейшего изучения. Но пока что здесь представлены полные версии player.gd и mob.gd, чтобы вы могли сверить с ними свой код.
Вот скрипт Player.
extends CharacterBody3D

signal hit

# How fast the player moves in meters per second.
@export var speed = 14
# The downward acceleration while in the air, in meters per second squared.
@export var fall_acceleration = 75
# Vertical impulse applied to the character upon jumping in meters per second.
@export var jump_impulse = 20
# Vertical impulse applied to the character upon bouncing over a mob
# in meters per second.
@export var bounce_impulse = 16

var target_velocity = Vector3.ZERO


func _physics_process(delta):
    # We create a local variable to store the input direction
    var direction = Vector3.ZERO

    # We check for each move input and update the direction accordingly
    if Input.is_action_pressed("move_right"):
        direction.x = direction.x + 1
    if Input.is_action_pressed("move_left"):
        direction.x = direction.x - 1
    if Input.is_action_pressed("move_back"):
        # Notice how we are working with the vector's x and z axes.
        # In 3D, the XZ plane is the ground plane.
        direction.z = direction.z + 1
    if Input.is_action_pressed("move_forward"):
        direction.z = direction.z - 1

    # Prevent diagonal movement being very fast
    if direction != Vector3.ZERO:
        direction = direction.normalized()
        # Setting the basis property will affect the rotation of the node.
        $Pivot.basis = Basis.looking_at(direction)
        $AnimationPlayer.speed_scale = 4
    else:
        $AnimationPlayer.speed_scale = 1

    # Ground Velocity
    target_velocity.x = direction.x * speed
    target_velocity.z = direction.z * speed

    # Vertical Velocity
    if not is_on_floor(): # If in the air, fall towards the floor
        target_velocity.y = target_velocity.y - (fall_acceleration * delta)

    # Jumping.
    if is_on_floor() and Input.is_action_just_pressed("jump"):
        target_velocity.y = jump_impulse

    # Iterate through all collisions that occurred this frame
    # in C this would be for(int i = 0; i < collisions.Count; i++)
    for index in range(get_slide_collision_count()):
        # We get one of the collisions with the player
        var collision = get_slide_collision(index)

        # If the collision is with ground
        if collision.get_collider() == null:
            continue

        # If the collider is with a mob
        if collision.get_collider().is_in_group("mob"):
            var mob = collision.get_collider()
            # we check that we are hitting it from above.
            if Vector3.UP.dot(collision.get_normal()) > 0.1:
                # If so, we squash it and bounce.
                mob.squash()
                target_velocity.y = bounce_impulse
                # Prevent further duplicate calls.
                break

    # Moving the Character
    velocity = target_velocity
    move_and_slide()

    $Pivot.rotation.x = PI / 6 * velocity.y / jump_impulse

# And this function at the bottom.
func die():
    hit.emit()
    queue_free()

func _on_mob_detector_body_entered(body):
    die()
using Godot;

public partial class Player : CharacterBody3D
{
    // Emitted when the player was hit by a mob.
    [Signal]
    public delegate void HitEventHandler();

    // How fast the player moves in meters per second.
    [Export]
    public int Speed { get; set; } = 14;
    // The downward acceleration when in the air, in meters per second squared.
    [Export]
    public int FallAcceleration { get; set; } = 75;
    // Vertical impulse applied to the character upon jumping in meters per second.
    [Export]
    public int JumpImpulse { get; set; } = 20;
    // Vertical impulse applied to the character upon bouncing over a mob in meters per second.
    [Export]
    public int BounceImpulse { get; set; } = 16;

    private Vector3 _targetVelocity = Vector3.Zero;

    public override void _PhysicsProcess(double delta)
    {
        // We create a local variable to store the input direction.
        var direction = Vector3.Zero;

        // We check for each move input and update the direction accordingly.
        if (Input.IsActionPressed("move_right"))
        {
            direction.X += 1.0f;
        }
        if (Input.IsActionPressed("move_left"))
        {
            direction.X -= 1.0f;
        }
        if (Input.IsActionPressed("move_back"))
        {
            // Notice how we are working with the vector's X and Z axes.
            // In 3D, the XZ plane is the ground plane.
            direction.Z += 1.0f;
        }
        if (Input.IsActionPressed("move_forward"))
        {
            direction.Z -= 1.0f;
        }

        // Prevent diagonal movement being very fast.
        if (direction != Vector3.Zero)
        {
            direction = direction.Normalized();
            // Setting the basis property will affect the rotation of the node.
            GetNode<Node3D>("Pivot").Basis = Basis.LookingAt(direction);
            GetNode<AnimationPlayer>("AnimationPlayer").SpeedScale = 4;
        }
        else
        {
            GetNode<AnimationPlayer>("AnimationPlayer").SpeedScale = 1;
        }

        // Ground velocity
        _targetVelocity.X = direction.X * Speed;
        _targetVelocity.Z = direction.Z * Speed;

        // Vertical velocity
        if (!IsOnFloor())
        {
            _targetVelocity.Y -= FallAcceleration * (float)delta;
        }

        // Jumping.
        if (IsOnFloor() && Input.IsActionJustPressed("jump"))
        {
            _targetVelocity.Y += JumpImpulse;
        }

        // Iterate through all collisions that occurred this frame.
        for (int index = 0; index < GetSlideCollisionCount(); index++)
        {
            // We get one of the collisions with the player.
            KinematicCollision3D collision = GetSlideCollision(index);

            // If the collision is with a mob.
            if (collision.GetCollider() is Mob mob)
            {
                // We check that we are hitting it from above.
                if (Vector3.Up.Dot(collision.GetNormal()) > 0.1f)
                {
                    // If so, we squash it and bounce.
                    mob.Squash();
                    _targetVelocity.Y = BounceImpulse;
                    // Prevent further duplicate calls.
                    break;
                }
            }
        }

        // Moving the character
        Velocity = _targetVelocity;
        MoveAndSlide();

        var pivot = GetNode<Node3D>("Pivot");
        pivot.Rotation = new Vector3(Mathf.Pi / 6.0f * Velocity.Y / JumpImpulse, pivot.Rotation.Y, pivot.Rotation.Z);
    }

    private void Die()
    {
        EmitSignal(SignalName.Hit);
        QueueFree();
    }

    private void OnMobDetectorBodyEntered(Node body)
    {
        Die();
    }
}
И скрипт Mob.
extends CharacterBody3D

# Minimum speed of the mob in meters per second.
@export var min_speed = 10
# Maximum speed of the mob in meters per second.
@export var max_speed = 18

# Emitted when the player jumped on the mob
signal squashed

func _physics_process(_delta):
    move_and_slide()

# This function will be called from the Main scene.
func initialize(start_position, player_position):
    # We position the mob by placing it at start_position
    # and rotate it towards player_position, so it looks at the player.
    look_at_from_position(start_position, player_position, Vector3.UP)
    # Rotate this mob randomly within range of -45 and +45 degrees,
    # so that it doesn't move directly towards the player.
    rotate_y(randf_range(-PI / 4, PI / 4))

    # We calculate a random speed (integer)
    var random_speed = randi_range(min_speed, max_speed)
    # We calculate a forward velocity that represents the speed.
    velocity = Vector3.FORWARD * random_speed
    # We then rotate the velocity vector based on the mob's Y rotation
    # in order to move in the direction the mob is looking.
    velocity = velocity.rotated(Vector3.UP, rotation.y)

    $AnimationPlayer.speed_scale = random_speed / min_speed

func _on_visible_on_screen_notifier_3d_screen_exited():
    queue_free()

func squash():
    squashed.emit()
    queue_free() # Destroy this node
using Godot;

public partial class Mob : CharacterBody3D
{
    // Emitted when the played jumped on the mob.
    [Signal]
    public delegate void SquashedEventHandler();

    // Minimum speed of the mob in meters per second
    [Export]
    public int MinSpeed { get; set; } = 10;
    // Maximum speed of the mob in meters per second
    [Export]
    public int MaxSpeed { get; set; } = 18;

    public override void _PhysicsProcess(double delta)
    {
        MoveAndSlide();
    }

    // This function will be called from the Main scene.
    public void Initialize(Vector3 startPosition, Vector3 playerPosition)
    {
        // We position the mob by placing it at startPosition
        // and rotate it towards playerPosition, so it looks at the player.
        LookAtFromPosition(startPosition, playerPosition, Vector3.Up);
        // Rotate this mob randomly within range of -45 and +45 degrees,
        // so that it doesn't move directly towards the player.
        RotateY((float)GD.RandRange(-Mathf.Pi / 4.0, Mathf.Pi / 4.0));

        // We calculate a random speed (integer).
        int randomSpeed = GD.RandRange(MinSpeed, MaxSpeed);
        // We calculate a forward velocity that represents the speed.
        Velocity = Vector3.Forward * randomSpeed;
        // We then rotate the velocity vector based on the mob's Y rotation
        // in order to move in the direction the mob is looking.
        Velocity = Velocity.Rotated(Vector3.Up, Rotation.Y);

        GetNode<AnimationPlayer>("AnimationPlayer").SpeedScale = randomSpeed / MinSpeed;
    }

    public void Squash()
    {
        EmitSignal(SignalName.Squashed);
        QueueFree(); // Destroy this node
    }

    private void OnVisibilityNotifierScreenExited()
    {
        QueueFree();
    }
}