Attention: Here be dragons
This is the latest
(unstable) version of this documentation, which may document features
not available in or compatible with released stable versions of Godot.
Checking the stable version of the documentation...
Запуск кода в редакторе
Что такое @tool?
@tool — это мощная строка кода, которая, будучи добавленной в начало скрипта, запускает его выполнение в редакторе. Вы также можете указать, какие части скрипта будут выполняться в редакторе, какие — в игре, а какие — и там, и там.
Вы можете использовать её для достижения многих вещей, но это наиболее полезно для дизайна уровней и визуальных представлений вещей которые сложно предсказать. Здесь показаны некоторые примеры использования:
Если у вас есть пушка, стреляющая ядрами, на которые влияет физика (гравитация), вы можете нарисовать траекторию полета ядра в редакторе, что значительно упростит дизайн уровней.
Если у вас есть прыжковые платформы с различными высотами прыжка, для каждой из них вы сможете нарисовать максимальную высоту на которую игрок может подпрыгнуть, что также делает дизайн уровней лёгким.
Если ваш игрок не использует спрайт, но рисует его из кода, вы можете сделать эту отрисовку выполняемой в редакторе так что вы увидите вашего игрока.
Опасно
Скрипты @tool запускаются внутри редактора и позволяют получить доступ к дереву сцены, редактируемой в данный момент. Это мощная функция, которая, однако, имеет свои недостатки, поскольку редактор не предусматривает защиты от возможного несанкционированного использования скриптов @tool. Будьте крайне осторожны при работе с деревом сцены, особенно с помощью Node.queue_free, так как это может привести к сбоям, если вы освободите узел во время выполнения редактором связанной с ним логики.
Как использовать @tool
Чтобы превратить скрипт в инструмент, добавьте аннотацию @tool в начало кода.
Чтобы проверить, находитесь ли вы в данный момент в редакторе, используйте: Engine.is_editor_hint().
Например, если вы хотите выполнить какой-то код только в редакторе, используйте:
if Engine.is_editor_hint():
    # Code to execute when in editor.
if (Engine.IsEditorHint())
{
    // Code to execute when in editor.
}
С другой стороны, если вы хотите выполнить код только в игре, просто отмените тот же оператор:
if not Engine.is_editor_hint():
    # Code to execute when in game.
if (!Engine.IsEditorHint())
{
    // Code to execute when in game.
}
Фрагменты кода, не соответствующие ни одному из двух вышеперечисленных условий, будут работать как в редакторе, так и в игре.
Вот как может выглядеть функция _process():
func _process(delta):
    if Engine.is_editor_hint():
        # Code to execute in editor.

    if not Engine.is_editor_hint():
        # Code to execute in game.

    # Code to execute both in editor and in game.
public override void _Process(double delta)
{
    if (Engine.IsEditorHint())
    {
        // Code to execute in editor.
    }

    if (!Engine.IsEditorHint())
    {
        // Code to execute in game.
    }

    // Code to execute both in editor and in game.
}
Важная информация
Общее правило заключается в том, что любой другой GDScript, который использует ваш скрипт инструмента, *также* должен быть инструментом. Редактор не может создавать экземпляры из файлов GDScript без @tool, что означает, что вы не можете вызывать методы или ссылаться на них переменные-члены иным образом. Однако, поскольку статические методы, константы и перечисления могут использоваться без создания экземпляра, их можно вызывать или ссылаться на них из скрипта @tool в других скриптах, не являющихся инструментами. Исключением являются static variables. Если вы попытаетесь прочитать значение статической переменной в скрипте, в котором нет @tool, он всегда вернет null, но при этом не выведет предупреждение или ошибку. Это ограничение не применяется к статическим методам, которые могут быть вызваны независимо от того, находится ли целевой скрипт в режиме инструмента.
Расширение скрипта @tool не делает расширяющий скрипт автоматически @tool. Отсутствие @tool в расширяющем скрипте отключит поведение инструмента из суперкласса. Поэтому расширяющий скрипт также должен содержать аннотацию @tool.
Изменения в редакторе являются постоянными, их невозможно отменить или повторить. Например, в следующем разделе, когда мы удалим скрипт, узел сохранит свое вращение. Будьте осторожны и не вносите нежелательных изменений. Рассмотрите возможность настройки version control, чтобы избежать потери работы в случае совершения ошибки.
Отладка
While the debugger and breakpoints cannot be used directly with tool scripts, it is possible to launch a new instance of the editor and debug from there. To do this, navigate to Debug > Customize Run Instances... and specify --editor in Main Run Args.
See Обзор инструментов отладки for more information.
Additionally, you can use print statements to display the contents of variables instead.
Попробуйте @tool
Добавьте узел Sprite2D в сцену и установите текстуру на иконку Godot. Присоедините и откройте скрипт, затем измените его следующим образом:
@tool
extends Sprite2D

func _process(delta):
    rotation += PI * delta
using Godot;

[Tool]
public partial class MySprite : Sprite2D
{
    public override void _Process(double delta)
    {
        Rotation += Mathf.Pi * (float)delta;
    }
}
Сохраните скрипт и вернитесь в редактор. Вы должны увидеть как ваш объект вращается. Если вы запустите игру, он также будет вращаться.
Предупреждение
Вам может потребоваться перезагрузить редактор. Это известная ошибка, найденная во всех версиях Godot 4: GH-66381.
Примечание
Если вы не увидели изменений, перезагрузите сцену (закройте и откройте снова).
Теперь давайте выберем когда и какой код запустится. Измените функцию _process() чтобы она выглядела вот так:
func _process(delta):
    if Engine.is_editor_hint():
        rotation += PI * delta
    else:
        rotation -= PI * delta
public override void _Process(double delta)
{
    if (Engine.IsEditorHint())
    {
        Rotation += Mathf.Pi * (float)delta;
    }
    else
    {
        Rotation -= Mathf.Pi * (float)delta;
    }
}
Сохраните скрипт. Теперь объект будет вращаться по часовой стрелке в редакторе, но если вы запустите игру он будет вращаться против часовой стрелки.
Редактирование переменных
Добавьте и экспортируйте переменную скорость в скрипт. Чтобы обновить скорость и сбросить угол поворота, добавьте сеттер set(new_speed), который выполняется при получении входных данных от инспектора. Измените _process(), чтобы включить скорость поворота.
@tool
extends Sprite2D


@export var speed = 1:
    # Update speed and reset the rotation.
    set(new_speed):
        speed = new_speed
        rotation = 0


func _process(delta):
    rotation += PI * delta * speed
using Godot;

[Tool]
public partial class MySprite : Sprite2D
{
    private float _speed = 1;

    [Export]
    public float Speed
    {
        get => _speed;
        set
        {
            // Update speed and reset the rotation.
            _speed = value;
            Rotation = 0;
        }
    }

    public override void _Process(double delta)
    {
        Rotation += Mathf.Pi * (float)delta * _speed;
    }
}
Примечание
Код из других узлов не запускается в редакторе. Ваш доступ к другим узлам ограничен. Вы можете получить доступ к дереву, узлам и их свойствам по умолчанию, но не можете получить доступ к пользовательским переменным. Для этого другие узлы также должны быть запущены в редакторе.
Getting notified when arrays or dictionaries change
You can use an Array or Dictionary as an @export variable. In a @tool
script, you can react to any changes to that collection by using a setter.
Normally, at runtime, such a setter is only called when you assign to the
variable, but when you modify an Array or Dictionary in the inspector, the
setter will also be called.
@tool
class_name MyTool
extends Node

@export var my_array = []:
    set(new_array):
        my_array = new_array
        print("My array just changed!")

@export var my_dictionary = {}:
    set(new_dictionary):
        my_dictionary = new_dictionary
        print("My dictionary just changed!")
using Godot;

[Tool]
public partial class MyTool : Node
{
    private Array _myArray = new();
    private Dictionary _myDictionary = new();

    [Export]
    public Array MyArray
    {
        get => _myArray;
        set
        {
            _myArray = value;
            GD.Print("My array just changed!");
        }
    }

    [Export]
    public Dictionary MyDictionary
    {
        get => _myDictionary;
        set
        {
            _myDictionary = value;
            GD.Print("My dictionary just changed!");
        }
    }
}
Получение уведомлений об изменении ресурсов
Иногда требуется, чтобы ваш инструмент использовал ресурс. Однако при изменении свойства этого ресурса в редакторе метод set() вашего инструмента не будет вызван.
@tool
class_name MyTool
extends Node

@export var resource: MyResource:
    set(new_resource):
        resource = new_resource
        _on_resource_set()

# This will only be called when you create, delete, or paste a resource.
# You will not get an update when tweaking properties of it.
func _on_resource_set():
    print("My resource was set!")
using Godot;

[Tool]
public partial class MyTool : Node
{
    private MyResource _resource;

    [Export]
    public MyResource Resource
    {
        get => _resource;
        set
        {
            _resource = value;
            OnResourceSet();
        }
    }

    // This will only be called when you create, delete, or paste a resource.
    // You will not get an update when tweaking properties of it.
    private void OnResourceSet()
    {
        GD.Print("My resource was set!");
    }
}
Чтобы обойти эту проблему, вам сначала придется сделать свой ресурс инструментом и заставить его выдавать сигнал changed каждый раз, когда устанавливается свойство:
# Make Your Resource a tool.
@tool
class_name MyResource
extends Resource

@export var property = 1:
    set(new_setting):
        property = new_setting
        # Emit a signal when the property is changed.
        changed.emit()
using Godot;

[Tool]
public partial class MyResource : Resource
{
    private float _property = 1;

    [Export]
    public float Property
    {
        get => _property;
        set
        {
            _property = value;
            // Emit a signal when the property is changed.
            EmitChanged();
        }
    }
}
Затем необходимо подключить сигнал при установке нового ресурса:
@tool
class_name MyTool
extends Node

@export var resource: MyResource:
    set(new_resource):
        resource = new_resource
        # Connect the changed signal as soon as a new resource is being added.
        if resource != null:
            resource.changed.connect(_on_resource_changed)

func _on_resource_changed():
    print("My resource just changed!")
using Godot;

[Tool]
public partial class MyTool : Node
{
    private MyResource _resource;

    [Export]
    public MyResource Resource
    {
        get => _resource;
        set
        {
            _resource = value;
            // Connect the changed signal as soon as a new resource is being added.
            if (_resource != null)
            {
                _resource.Changed += OnResourceChanged;
            }
        }
    }

    private void OnResourceChanged()
    {
        GD.Print("My resource just changed!");
    }
}
Наконец, не забудьте отключить сигнал, так как использование старого ресурса и его изменение в другом месте может привести к ненужным обновлениям.
@export var resource: MyResource:
    set(new_resource):
        # Disconnect the signal if the previous resource was not null.
        if resource != null:
            resource.changed.disconnect(_on_resource_changed)
        resource = new_resource
        if resource != null:
            resource.changed.connect(_on_resource_changed)
[Export]
public MyResource Resource
{
    get => _resource;
    set
    {
        // Disconnect the signal if the previous resource was not null.
        if (_resource != null)
        {
            _resource.Changed -= OnResourceChanged;
        }
        _resource = value;
        if (_resource != null)
        {
            _resource.Changed += OnResourceChanged;
        }
    }
}
Предупреждения о конфигурации узла
Godot использует систему предупреждений о конфигурации узлов, чтобы предупреждать пользователей о неправильно настроенных узлах. Если узел настроен неправильно, рядом с его именем в доке сцен появляется жёлтый предупреждающий знак. При наведении курсора или щелчке по значку появляется предупреждающее сообщение. Вы можете использовать эту функцию в своих скриптах, чтобы избежать ошибок при настройке сцен.
При использовании предупреждений конфигурации узла, когда изменяется любое значение, которое должно повлиять на предупреждение или удалить его, необходимо вызвать update_configuration_warnings . По умолчанию предупреждение обновляется только при закрытии и повторном открытии сцены.
# Use setters to update the configuration warning automatically.
@export var title = "":
    set(p_title):
        if p_title != title:
            title = p_title
            update_configuration_warnings()

@export var description = "":
    set(p_description):
        if p_description != description:
            description = p_description
            update_configuration_warnings()


func _get_configuration_warnings():
    var warnings = []

    if title == "":
        warnings.append("Please set `title` to a non-empty value.")

    if description.length() >= 100:
        warnings.append("`description` should be less than 100 characters long.")

    # Returning an empty array means "no warning".
    return warnings
Запуск одноразовых скриптов с помощью EditorScript
Иногда вам нужно запустить код всего один раз, чтобы автоматизировать определённую задачу, которая изначально недоступна в редакторе. Вот несколько примеров:
Используйте как площадку для написания сценариев GDScript или C# без необходимости запуска проекта. Вывод
print()отображается на панели вывода редактора.Измените масштаб всех световых узлов в текущей редактируемой сцене, так как вы заметили, что ваш уровень становится слишком темным или слишком ярким после размещения источников света там, где это необходимо.
Замените скопированные и вставленные узлы экземплярами сцены, чтобы упростить их последующее изменение.
В Godot это доступно через расширение EditorScript в скрипте. Это позволяет запускать отдельные скрипты в редакторе без необходимости создания плагина для редактора.
Чтобы создать EditorScript, щёлкните правой кнопкой мыши по папке или пустому месту в доке файловой системы и выберите New > Script.... В диалоговом окне создания скрипта щёлкните по значку дерева, чтобы выбрать объект, который будет расширяться (или введите EditorScript непосредственно в поле слева, но учтите, что регистр учитывается):
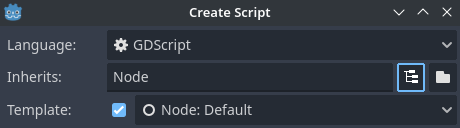
Создание скрипта редактора в диалоговом окне создания редактора скриптов
Это автоматически выберет шаблон скрипта, подходящий для EditorScripts, с уже вставленным методом _run():
@tool
extends EditorScript

# Called when the script is executed (using File -> Run in Script Editor).
func _run():
    pass
using Godot;

[Tool]
public partial class MyEditorScript : EditorScript
{
    // Called when the script is executed (right-click on Script -> Run in FileSystem dock).
    public override void _Run()
    {
        // ...
    }
}
This _run() method is executed when you use any of the 4 approaches that can be
used to run an EditorScript:
Use at the top of the script editor with the EditorScript being the current tab.
Press the keyboard shortcut Ctrl + Shift + X while the EditorScript is the current tab. This keyboard shortcut is only effective when focused on the script editor.
Right-click the script in the FileSystem dock and choose .
Add a
class_name <name>at the top of the script, bring up the command palette by pressing Ctrl + Shift + P, and enter the class name to run it. The entry will be named according to the class name, with automatic capitalization applied.
Scripts that extend EditorScript must be @tool scripts to function.
Примечание
EditorScripts can only be run from the Godot script editor. If you are using an external editor, use one of the last two approaches to run the script.
Примечание
C# EditorScripts cannot be run from the script editor as it only supports GDScript. Please refer to the above alternative approaches to run custom C# EditorScripts.
Keep in mind C# tool scripts will only appear in the command palette when denoted by the GlobalClass attribute.
Опасно
В EditorScripts нет функций отмены/повтора действий, поэтому обязательно сохраните сцену перед ее запуском, если скрипт предназначен для изменения каких-либо данных.
To access nodes in the currently edited scene, use the EditorInterface.get_edited_scene_root() method which returns the root Node of the currently edited scene. Here's an example that recursively gets all nodes in the currently edited scene and doubles the range of all OmniLight3D nodes:
@tool
# Thanks to the class name, we can run this script by bringing up
# the command palette and searching "Scale Omni Lights".
class_name ScaleOmniLights
extends EditorScript

func _run():
    for node in EditorInterface.get_edited_scene_root().find_children("", "OmniLight3D"):
        # Don't operate on instanced subscene children, as changes are lost
        # when reloading the scene.
        # See the "Instancing scenes" section below for a description of `owner`.
        var is_instanced_subscene_child = node != get_scene() and node.owner != get_scene()
        if not is_instanced_subscene_child:
            node.omni_range *= 2.0
            EditorInterface.mark_scene_as_unsaved()
using Godot;

[GlobalClass, Tool]
// Thanks to the GlobalClass attribute, we can run this script by bringing up
// the command palette and searching "Scale Omni Lights".
public partial class ScaleOmniLights : EditorScript
{
    public override void _Run()
    {
        var sceneNode = EditorInterface.Singleton.GetEditedSceneRoot();

        foreach (OmniLight3D node in sceneNode.FindChildren("", "OmniLight3D"))
        {
            // Don't operate on instanced subscene children, as changes are lost
            // when reloading the scene.
            // See the "Instancing scenes" section below for a description of `owner`.
            var isInstancedSubsceneChild = node != sceneNode && node.Owner != sceneNode;
            if (!isInstancedSubsceneChild)
            {
                node.OmniRange *= 2.0f;
                EditorInterface.Singleton.MarkSceneAsUnsaved();
            }
        }
    }
}
In the above example, we also call EditorScript.mark_scene_as_unsaved() after any modification that affects the scene's state. This allows the editor to display the scene as "unsaved" (i.e. with an asterisk next to the name). This way, you also get a confirmation when trying to close the scene with unsaved changes.
Совет
You can change the currently edited scene at the top of the editor even while the Script view is open. This will affect the return value of EditorInterface.get_edited_scene_root, so make sure you've selected the scene you intend to iterate upon before running the script.
Инстанцирование сцен
Вы можете создавать упакованные сцены обычным образом и добавлять их к сцене, открытой в данный момент в редакторе. По умолчанию узлы или сцены, добавленные с помощью Node.add_child(node), не видны в доке дерева сцены и не сохраняются на диск. Если вы хотите, чтобы узел или сцена были видны в доке дерева сцены и сохранялись на диск при сохранении сцены, вам нужно установить свойство дочернего узла owner на редактируемый корень сцены.
Если вы используете @tool:
func _ready():
    var node = Node3D.new()
    add_child(node) # Parent could be any node in the scene

    # The line below is required to make the node visible in the Scene tree dock
    # and persist changes made by the tool script to the saved scene file.
    node.owner = get_tree().edited_scene_root
public override void _Ready()
{
    var node = new Node3D();
    AddChild(node); // Parent could be any node in the scene

    // The line below is required to make the node visible in the Scene tree dock
    // and persist changes made by the tool script to the saved scene file.
    node.Owner = GetTree().EditedSceneRoot;
}
If you are using EditorScript:
func _run():
    # `parent` could be any node in the scene.
    var parent = get_scene().get_node("Parent")
    var node = Node3D.new()
    parent.add_child(node)

    # The line below is required to make the node visible in the Scene tree dock
    # and persist changes made by the tool script to the saved scene file.
    node.owner = get_scene()
public override void _Run()
{
    // `parent` could be any node in the scene.
    var parent = GetScene().GetNode("Parent");
    var node = new Node3D();
    parent.AddChild(node);

    // The line below is required to make the node visible in the Scene tree dock
    // and persist changes made by the tool script to the saved scene file.
    node.Owner = GetScene();
}
Примечание
Changes made by tool scripts and EditorScript (such as adding nodes or modifying properties)
do not automatically mark the scene as unsaved. To show the asterisk (*)
and prevent accidental data loss, call
EditorInterface.mark_scene_as_unsaved()
after modifications, or use EditorUndoRedoManager for undo support.
Предупреждение
Неправильное использование @tool может привести к множеству ошибок. Рекомендуется сначала написать код так, как вам нужно, и только затем добавлять аннотацию @tool в начало. Также обязательно разделяйте код, выполняемый в редакторе, от кода, выполняемого в игре. Это упростит обнаружение ошибок.