Attention: Here be dragons
This is the latest
(unstable) version of this documentation, which may document features
not available in or compatible with released stable versions of Godot.
Checking the stable version of the documentation...
Сборки Gradle для Android
Godot provides the option to build using the Gradle build system. Instead of using the already pre-built template that ships with Godot, an Android Java project gets installed into your project folder. Godot will then build it and use it as an export template every time you export the project.
Есть несколько причин, по которым вы можете захотеть это сделать:
Export an AAB file for Google Play.
Изменение проекта до его сборки.
Добавление внешнего SDK, которые собираются вместе с вашим проектом.
The native portion of the template (the .so library included in the APK)
remains precompiled. This means that unlike
compiling a custom Android export template,
you don't need to install a C++ toolchain or clone the Godot source code.
Configuring the Gradle build is a fairly straightforward process. But first, you need to follow the steps in exporting for android up to Setting it up in Godot. After doing that, follow the steps below.
Set up the Gradle build environment
Перейдите в меню "Project" и установите шаблон Gradle Build:
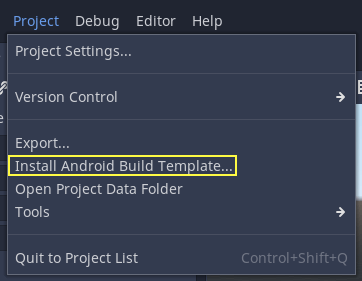
Убедитесь, что шаблоны экспорта загружены. Если нет, то это меню поможет вам их скачать.
Проект Android на базе Gradle будет создан в папке res://android/build. Редактировать эти файлы не требуется, если только вам действительно не нужно вносить изменения в проект.
Performing Gradle builds from the Android editor
Since Godot 4.6, it is possible to perform Gradle builds from the Android editor. This requires installing the Godot Android Build Environment (GABE) application on the same device the editor is running on.
Примечание
This application is not required when exporting from the Android editor with pre-built APK templates, or when exporting to other platforms.
This application lets you install everything required to build Android projects with Gradle. It is called by the editor to perform Gradle builds when exporting to Android.
To set up the build environment, open the app and follow these instructions:
Ensure you have an active Internet connection.
Open the tab from the bottom navigation bar.
Click .
After the installation completes, you can export projects using Gradle builds from the Godot editor.
Enabling the Gradle build and exporting
При настройке проекта Android в диалоговом окне Project > Export необходимо включить Gradle Build:
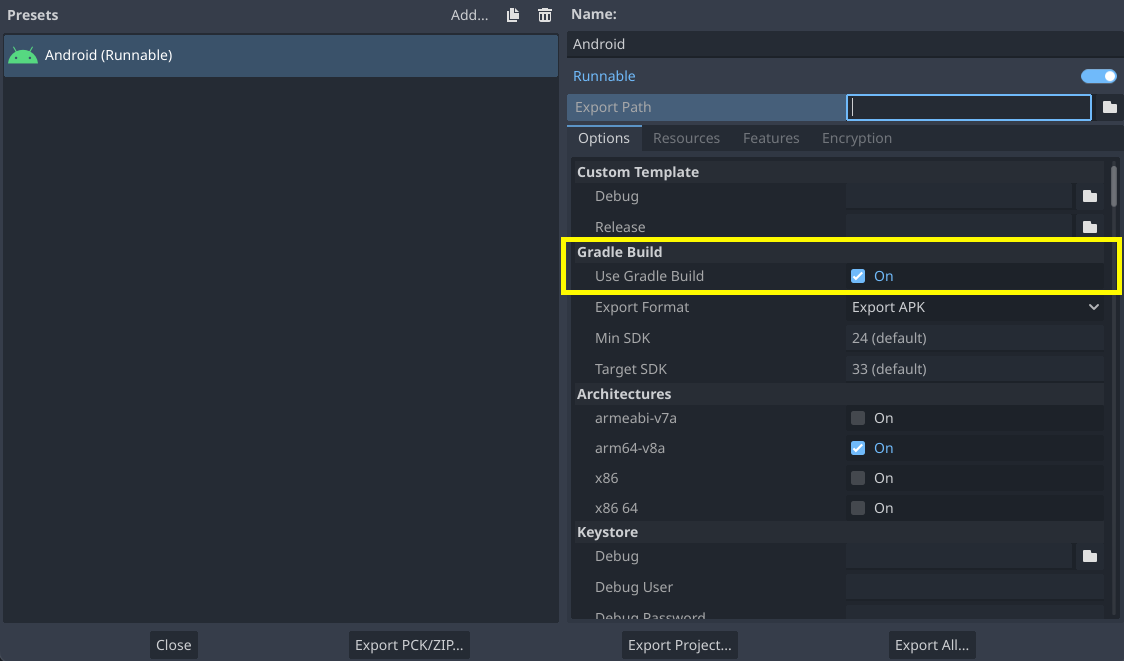
From now on, attempting to export the project or one-click deploy will call the Gradle build system to generate fresh templates. The templates built will be used automatically afterwards, so no further configuration is needed.
Примечание
When using the Gradle Android build system, assets that are placed within a folder whose name begins with an underscore will not be included in the generated APK. This does not apply to assets whose file name begins with an underscore.
Например, _example/image.png не будет включен в качестве актива, а _image.png будет.